How To Automate Your Curation With A $5 Pi Zero, A Micro SD Card and USB Cable

Here is a guide for those of you that want to do some automation and get in the game here on Steemit. It doesn't cost or take much resources to do so.
Requirements
- Pi Zero
- Micro SD card(4GB or higher)
- Micro USB cable(Same as android smartphone,tablet, or other various devices)
- PC/Laptop
- Micro Sd card reader
If you are going to get into using a Rasperberry Pi product, you most likely have a laptop or pc with an SD card reader in order to write the image to the micro SD card. So from here, all you need is a Pi Zero if you can get a hold of one in your area, you can check out:
http://www.whereismypizero.com to see list of authorized distributors that have it available in stock in your region. I know adafruit accepts bitcoin as a payment. That's how I got mine :) but it's out of stock at the moment.
Most of us have a micro USB cable laying around but if not, then you're going to have to ask your friend to borrow theirs and tell them you'll supposedly return the next time you see them :P Or just order one yourself.
Unfortunately, this will be explained from using Windows but can be done on other OS's. Let's get started.
Special Thanks
@ubg provided an awesome tutorial on a modified version of the "Winfrey" bot that @fyrstikken shared.https://steemit.com/raspberry/@ubg/how-to-set-up-a-curation-bot-on-raspberry-pi
I will be using the directions he used to show how to format and write to the micro SD card and SSH.
If you don't have all the requirements, you can also find links for where to buy what you need on his post
Download Official Raspbian PiXEL image
You can use both full or lite images but I just go with the full so you won't have to spend time downloading and installing more required packages.https://www.raspberrypi.org/downloads/raspbian/
Format Micro SD card
Make sure that the micro SD card is properly formatted. Download something like SDformatter and make sure format size adjustment is switched on.
Extract and write the image to the micro SD card.
Download and Install Etcher. You can follow the directions, it's really easy.
https://etcher.io/
After it's done writing to the card, do not remove it from the card reader yet, open it up in Windows to edit a couple files.
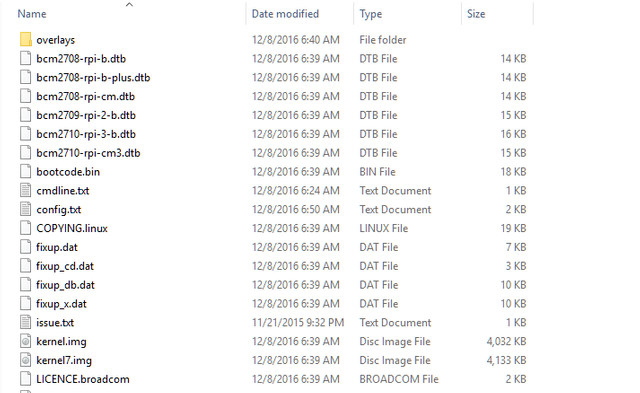
I just use notepad to do it fast, but if you prefer you can use something like notepad++ to see the line numbers.
Open the cmdline.txt file and and add:
modules-load=dwc2,g_ether after rootwait.

Then open config.txt and add:
dtoverlay=dwc2 at the end.

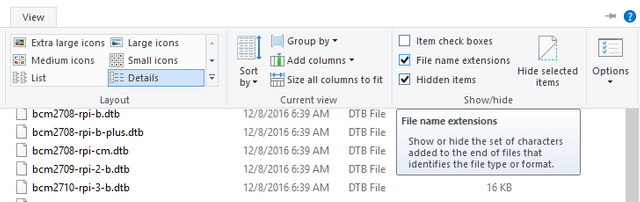
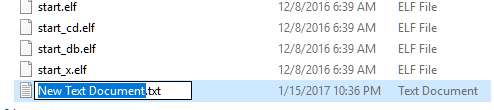
After making those edits to the 2 text files, you want to create a new file, text file is fine. You also want to make sure the file extension is visible first and just name the file ssh.

From here, you can remove the card from the card reader and insert it into the Pi Zero and connect the pi with the micro USB cable to the PC/laptop.
Notice: Be sure to plug the micro USB end on "USB" port on the pi, not the "PWR" port.
Setup Network Adapter On PC/Laptop To Share internet With Pi Zero
You'll want to open the Control Panel head to Network and Internet\Network Connections. Right click on your ethernet or wifi adapter that has the internet connection, click properties, and click the sharing tab.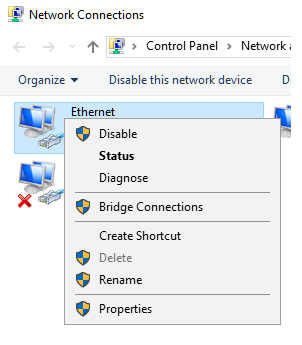
Then check the "Allow other computers to connect through this computer's internet connection" and under "Home networking connection:" select whatever new network adapter appears that is labeled USB Ethernet/RNDIS Gadget #2. My case, it was Ethernet 3. This is the Pi Zero.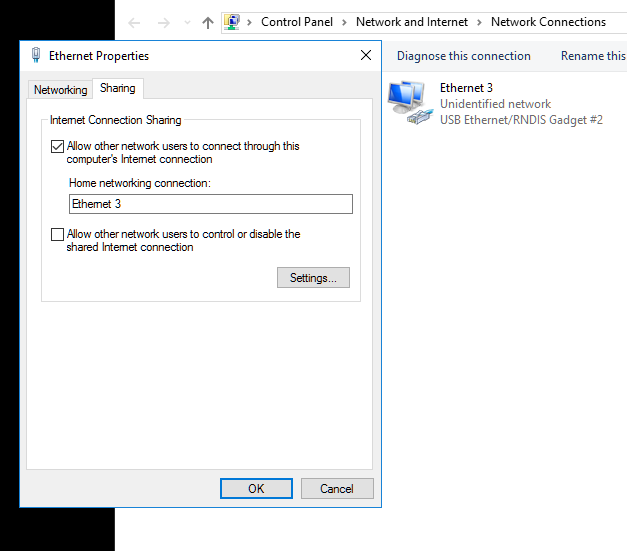
SSH Into Pi Zero
You can use bitvise SSH or Putty. I actually use putty but bitvise looks like it's better.https://www.bitvise.com/ssh-client-download
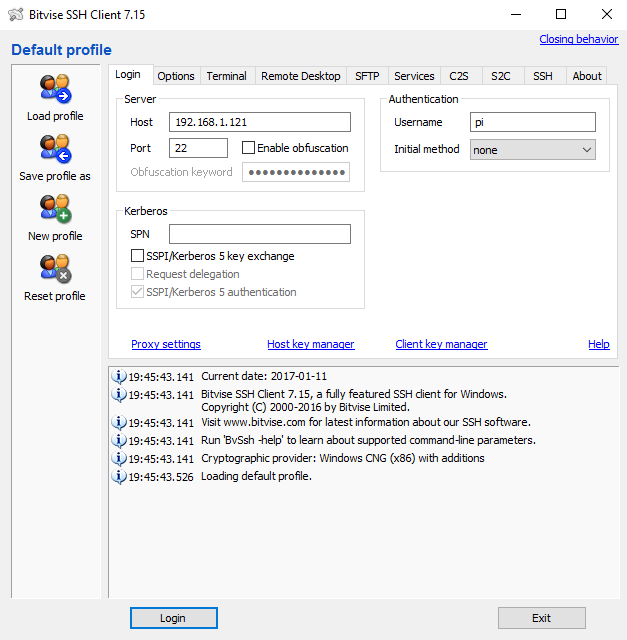
Host: raspberrypi.local
Username: pi
Password: raspberry
Port: 22(default)
Once logged in, Wait about 30 seconds for ethernet driver to get internet connection up on the Pi Zero. You can do a quick ping of your address but I just check if I can do an apt-get update. You may get some error's saying no connection. You may have to wait a little bit or re-do the share internet settings on your PC/Laptop.
Once you verified you have internet connection on the Pi Zero, you can head over to @ubg's post and continue to: Step 6. Install piston and all other prerequisites https://steemit.com/raspberry/@ubg/how-to-set-up-a-curation-bot-on-raspberry-pi
.
Feel free to follow and find me in Smart Media Group on Discord.
.gif)


 Facebook: @thesmartmediaproject
 Twitter: @the_smartmedia
 Instagram: @the_smartmedia
Very interesting and in-depth guide. Thanks. As someone who isn't very technically talented, I think this is great step by step process.
Thank you. Just keep in mind that this is a bit outdated as far as the bot software. There have been updates since this post was made.
I need this in my life.
Go for it buddy!
Been using streemian, so far so good.
Yes they are good. If their service is down(happens from time to time) or for those that want to keep their keys as secure as possible, you can setup a cheap bot yourself :)
Tell me more about this key situation, from what I know a third party locally run web app is done for the part. Thanks in advance!
Maybe @streemian can elaborate but I thought it only needed the active key to grant posting privileges to their bot. Is that not the case?
I will have to do some more research, it said the active key didn't leave the browser.
Yea well it's secure. Just some don't like the fact that they have to enter their keys on another website. You are responsible for your keys so having it only on your local machine makes it only YOU have your key and that information isn't floating around unless some hacks your machine. Plus this bot uses your posting-private-key, not your active-private-key like streemian.
@codydeeds Yes. I was simply stating the fact that you are entering your key away from you to a trusted 3rd party. They are trustworthy and secure so you're fine. Some are paranoid and only trust themselves with the key's as you should.
@codydeeds go a head, the community has gone through this many times already about streemian lol. You're fine I'm on there too. If something happens you can always change your keys.
Awesome tutorial!
You can't go cheaper without giving up your keys.
You sure can't.
Thanks @ubg, I was "inspired" by your post. I was serious when I said I was proud of you :)
kuule kuidas saab reitinkut tagasi
ära postita sitta nii, et sind flaggitakse. Kui su reputation läheb miinusesse siis teised su postitusi siin saidil ei näe.
That is a very great article.
Thank you.
Figure it will, but need to ask, this does also work on the regular raspberry pi as well with the WiFi, or Ethernet cable right?
Thinking this would be awesome tool to set up! Will @clayop voting bot also work our does it need some work to get done?
https://github.com/clayop/votum
I am revising votum to be more universal and to use @furion's steemdata, and public steemd node, and consequently one don't need to run his/her own node but is able to use powerful options (e.g. voting by reputation, mirroring other curators, etc.)
Awesome can't wait thank you. I'm very excited to test it out. Sound like some cool updates your working on. Thank you for the heads up.
This is simply to setup the pi zero to work with your PC/laptop with just a USB cable and have internet. So whatever bot you can compile on a regular pi you can do it on a pi zero for the most part without changing the script.
Sweet I will then look to set up my pi here in the next couple days. Thank you for the post, Seems easy enough, and should also be a fun side project.
@smysullivan, I may have misunderstood what you were asking. If you wanted to setup using the usb as a data+power port, that's not possible on a regular pi. This trick works because the pi zero has a micro usb data port, and a micro usb power port. The regular pi's only have a micro usb power port and regualr USB ports that is not tied to power on the pi
That is ok, your explanation was good for me, I love technology, just have not worked with the pi, so I had simply guessed it should work to automate from my pi, and you said enough that told me I would be able to, plan on trying this out soon.
Awesome!!!
I upvote, resteem anf follow you.
Thank you. Nice I just saw your post from yesterday. Spread Steemit in Deutschland! :P
You are welcome. Yes, I will do that.
Sounds really exciting. But I am lost from the beginning. Why do I need extra hardware? Can´t the computer simulate this? What kind of hardware is this? Sort of an Arduino? I will read the @ubg guide you mention right away. Thanks for this info, and for any comments on more basic info where I can get started.
Well, this is a bit outdated but instead of using the resources on your current hardware, this can be useful. Especially if you don't leave your Computer on 24/7, this little Pi Zero can be and uses very little resources.
Yes it is like an Arduino but is capable of running a special OS with a desktop environment designed for the Pi Zero.
Thank you very much. I´ll keep learning and moving forward.
This post has been ranked within the top 80 most undervalued posts in the first half of Jan 17. We estimate that this post is undervalued by $2.91 as compared to a scenario in which every voter had an equal say.
See the full rankings and details in The Daily Tribune: Jan 17 - Part I. You can also read about some of our methodology, data analysis and technical details in our initial post.
If you are the author and would prefer not to receive these comments, simply reply "Stop" to this comment.
good like you
So much to learn....