How to make Human(ized) 3D (printable) Models? (Tutorial + Example + Free software)

Making your own 3d models is easy!
Quickly get very usable results. results you can improve on over time.
The workflow described below has a low entry level, its mostly sliding, dragging and dropping and using the brush tools, When learning this modeling approache you will get a jumpstart into making your own models and quickly become better and better in a very fast and fun way!
Do you recognize one of the following:
You want to make 3d models but dont know where to start
You searched for a 3d model of your favorite character over and over and never can find the model?
You are curious how I made the humanized "Samurai Pizza Cat"
If one or more of the above questions is answered with yes! , you probably will be happy to follow this Quick start tutorial!
The steps in the tutorial will teach a workflow for quickly creating your first human(ized) 3d printable models
.
What can be learned from this tutorial?:
- Making printable human(ized) 3d models is not difficult to start with
- Making 3d models is fun!
- How to quickly make character ideas into 3d printable Human(ized) models
- Tips and tricks using free 3d software
- Tips and tricks for composing human(ized) models with already available parts
Start designing your (humanized) models today!
Tutorial
Design Steps:
Step 1. Choosing a character to use & do background research
For choosing a character you can think in a lot of directions from robots and other machines to fairytale like creatures or your favorite animal.
Some example Google searches to get you going and inspired:
Humanized Pikachu pictures
-Humanized Optimus prime pictures:
-Humanized Animal pictures
Gathering reference pictures:
Save the pictures of the character you wat to make in one easy to reach folder
Step 1. Use google image search and search for: High quality front, side, and back pictures to use for reference material.
Add keywords to your search to find other images and sources of your character such as:
"Model sheet" (VERY USEFUL!)
"Toy"
"Action figure"
"Game"
"Cartoon"
"Movie
"Front"
"Back"
And also "Fanart" can be great for getting more inspiration.
Save the pictures you found in one easy to reach folder created in the before step
Step 2. Making/customizing editing the human model
We need to have a human body as the base for our 3d model, in this tutorial we will use Makehuman, a simple tool for designing human body's.
-Download and Install (nightlybuild*)Makehuman (if you don't install the nightly builds there will be no other poses to select but the neutral pose!)
Start sliding the settings around and choose the options in each tab that fit the human(ized)character you want to make and fit your ideas. (female/male/thin/fat/muscles etc.)
Select a pose from the posing tab. keep in mind the specific features you want to add later, there need to be space for them and not to much of a overlapping of those added features. its most easy to to work with a neutral and symmetrical pose.
When you are done configuring your humanbody you will need to export your model as .DAE
Step 3. Finding reusable features and pieces & first simple model mixing
We need to find already available models that have the features/part that we can use for the model we want to design, for example (heads, armor, parts, swords, hekmets, gloves etc)
Sources you can use for gathering parts:

https://www.models-resource.com/ (extreem useful)
https://free3d.com/
https://www.thingiverse.com/
Save the models you found in the created folder from the first steps.
3.1 Install Meshmixer (Meshmixer is a great and powerfull tool to start mixing and editing)
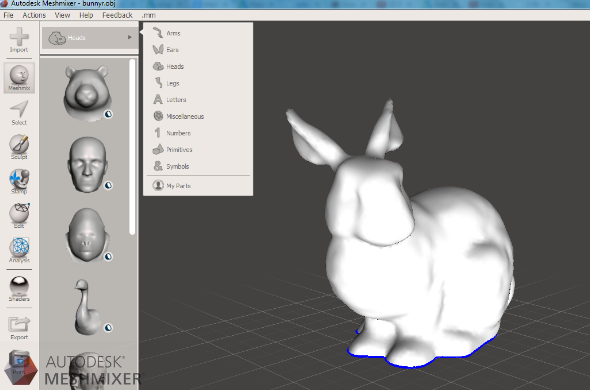
Load your Makehuman exported model into Meshmixer
Play around with the different tools and get some relevant Meshmixer experience, use the brush, selection, and transform tool.
Play around with the basic shapes available in Meshmixer and add them to your model and transform and reshape them.
For example add sphere into the same position as the elbows as armor or joints (same as the included pizza cat example)
Or add a base plate to your Makehuman model by dragging in a cylinder and transform it into a base plate for the figure to stand on.
Meshmixer tips:
Use ctrl for the opposite tool function (same as in windows for deselecting files).
Example: with the select tool this will select and deselect. This also works with the brushes to have the opposit functionality and is very useful!
Use the symmetry function.
If you choose a symmetrical human in Makehuman, you can edit your model in Meshmixer in symmetry.
Use the transform tool
The transform tool (shortkey: t) let you move, scale, rotate the whole model or selected parts.
After we have learned to play with the basic features of Meshmixer we can save and close the project file.
Open the parts from step 3 in a new meshmixer project those are the parts you want to cut and use into your before created meshmixer project. start selecting the parts you want with the selection tool.
selections can be done by using it as a brush and/ or by clicking multiple point to generate a selection (Very usefull!)
Save the remaining selection with a meaningfull name(shield/head/glove etc) into your working folder. (Keep in mind it is ok and even usefull if your selection have a bit of flesh around it, this can be easily removed)
Now open your MakeHuman Meshmixer project and drag your cutted saved features from the before step inside Meshmixer and use the Transform tool to scale them ("Crtl A" (select whole the part),( "t" Transform) and get them into place (on/in/on top of your human model.)
Once in place you can remove the flesh from al features using the brush tools. (This works very easy if you have everything imported as a seperate object)
To make those features solid: one option is to add primitive shapes (spheres, cubes) from the meshmixer shape librari and put them inside the features to make them filled and solid, then brush away the remains. this may seem as the most difficult step but the brush tool is smart and doing this is quite simple do, it do take some time.
When happy with the result you can select all parts and your human in the object browser (CTR + click) and select the option combine, after combining your ready to export your 3d model in .OBJ or .STL file.
Step 4 Making your 3d humanized character printable (and print it on your own printer or order it trough a online printing service such as https://www.3dhubs.com/ )
Check your model in your favorite 3d printer program (slicer) and see if all layers are going to be printed as a solid piece.
If not:
Go back to the last step of chapter 3 and fill up the added features that have holes or are not connected to the human.
Netfab also is a free tool that can repair the holes in your models and make them ready for 3d printing (Meshmixer has a make solid feature as well but I prefer Netfab) (Netfabb is a free tool from Autodesk https://www.autodesk.com/education/free-software/netfabb )
Keep in mind:
Not all of the above steps are mentioned precisely, and you may need to fix some small issues on your own.
Now print your 3d Model !!!
Enjoy it standing on your desk !!!
(When publishing your model online give credit, and make reference to the creator and add links to the models you used.)
Overview & Background:
Humans combined with your favorite cartoon/game/animal/fantasy characters are a lot of fun to make and have.
There are many 3d models available with great useable features such as: Clothing heads tails and props like armor/shoulderpads/chestplates/wings/gloves/ etc etc etc.
Why I designed this model is because I could not found any high resolution model of any of the Samurai Pizza Cats characters, after a while I found a "Speedy Cervichethe" model but it was made with a mobile app. still very well made for what is possible inside this mobile app so I decided to polish it and make it into the female character, after I finished making this model I also thought it would be fun to make her Humanized. and I have had used my own designed human models before, so I gave it a try. Now I want to share the workflow, so others can benefit from it as well.
Objectives:
Learn about 3d design
Learn about human and cartoon proportions
Learn about 3d modeling and printing
Learn even more about your favorite character
Have your own wonderfull design on your desk
Audiences:
Everyone but, you will need some free tools and patience to master them.
Subjects:
3d Modeling introduction, Character design, Humans, Character research, Creative work flow, .
Skills Learned:
Make 3d human models
Make humanized model
Mix your created 3d human models with your found character features such as eyes/faces/ and props like armor/shoulderpads/chestplates/wings/gloves/ etc etc etc
Meshmixer 3d modeling
Character Research
Activity:
Choosing a character to use & do background research
Finding useable features and pieces & first simple model mixing
Customizing editing the human and the features and pieces
4 Make it printable and start printing your first version, 3d humanized character
Duration: around:
4x 2.5 hour (?)
Preparation:
Knowledge: Some experience or intrest in/with 2d/3d software and 3d printing is required.
Material and other hardware: (optional)3D printer, PC, Free software
Free software needed: MakeHuman, Meshmixer, Netfabb
Software:
http://www.meshmixer.com/ (free)
http://www.makehuman.org/ (free)
https://www.autodesk.com/education/free-software/netfabb (free)
Parts and models:
The model parts i used to create the "Samurai Pizza cat"
http://www.123dapp.com/creature/Speedy-Cerviche/3839409 (made by Jose Quiroz 236)
http://www.models-resource.com/pc_computer/sonicgenerations/model/4253/ (Amy Rose from Sonic Generations )
At the end of the tutorial, you should have created a 3d humanized model. and have a 3d printable version of the model.
You can download the Example i made "humanized samurai pizza cat" in this zip file
Or download the file and see this article on Thingiverse: https://www.thingiverse.com/thing:1672403
meep
Great post...thanks for sharing @techtek