Create a Digital Hand-Drawn Animation in 7 Steps
This is the first of what will likely be many work-in-progress posts about my upcoming animated web-series. The show is going to be my platform to spew out my ideas about culture, politics and anarchy.
I hope you'll keep following me (or if you haven't done so yet, please do... @sethlinson) for news about this series and other art/animation/anarchy content that I may produce.
This post will serve 2 purposes:
- It will tease the web-series
- It will act as a tutorial for anyone interested in trying their hand at this type of animation
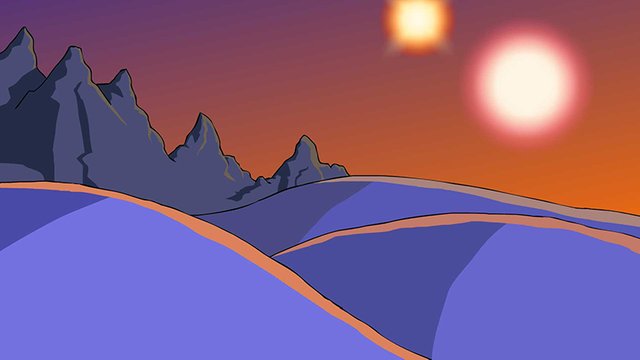
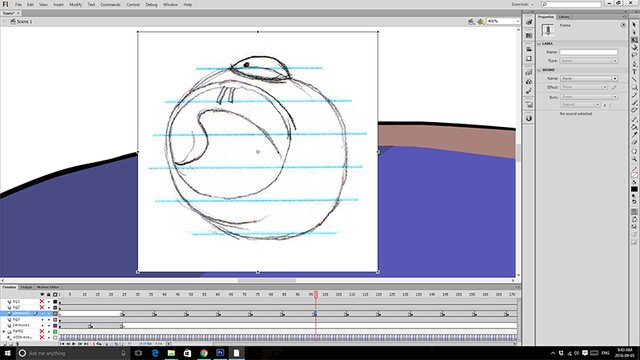
SURPRISE! You've already been teased a bit. The image at the top is the background of the second episode of the series called "Taxes." If you can't tell from the picture, the episode will take place on an alien planet.
Now, on with the tutorial/work-in-progress.
Where to Begin?
Step 1: Thumbnails
I'm going to assume you've already designed your scene and characters. I'm not going to go back and explain every little thing that goes into the making of a film, I'm just gonna talk about creating the animation itself.
You start out with thumbnail sketches like this:
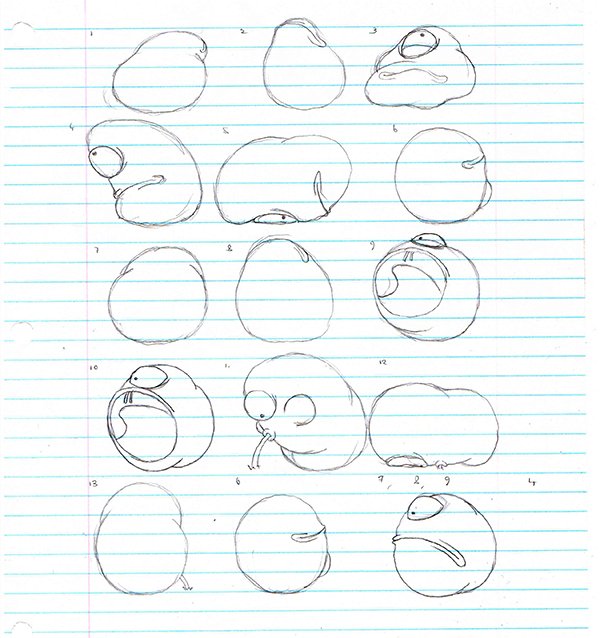
These drawings break down the important frames of a sequence of motion. I like to do my thumbnails on paper because I'm not nearly as confident in my tablet drawing skills. At this stage a lot of professional animators will make timing charts. I don't bother with that because... I never learned how. I work out the timing in Adobe Flash. But we'll get to that later.
This means the next step is obviously...
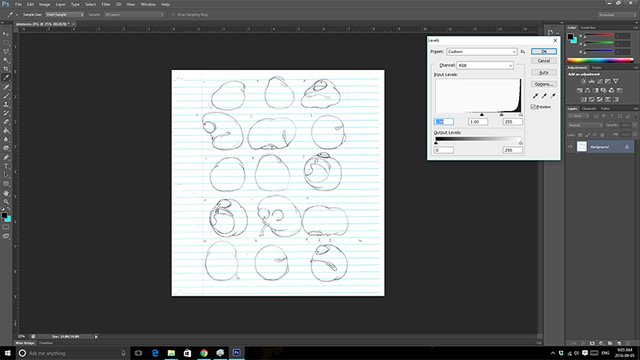
Step 2: Scan/Edit Your Sketches
Or photograph your sketches. Whatever works for you. Obviously this step doesn't apply if you drew your thumbnails on a tablet.
The editing is pretty simple. Since I drew my thumbnails in pencil, they were pretty light when scanned. So I adjusted the levels in Adobe Photoshop to make the lines stronger.
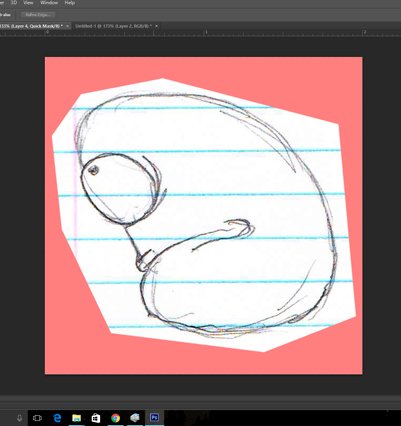
Step 3: Isolate Each Frame
Still in Photoshop, I use the Polygonal Lasso Tool to select each individual drawing. I don't use the Rectangular Marquee Tool because I didn't draw my thumbnails on a perfect grid, and I would rather not have clips of the adjacent thumbnails on the sides of my frames.
Once a drawing is selected, I paste it into a new document.
This is all boring busy work to me. Now the fun stuff...
Animating!
Step 4: Position each Thumbnail in the Scene
I do my animating in Flash even though it totally wasn't designed to handle straight-up hand-drawn animation. Maybe one day I'll upgrade to Harmony, but I'm poor. Flash serves my needs for now.
I try to get the size and position of each thumbnail exactly right at this step. The better it is now, the less work I'll have to do later making adjustments.
Step 5: Timing
This is the part where I play around with the spacing between frames to get the sequence times right. My Jimmons character is a blubbery mass and I don't want him moving too quickly.
Since I know I'm going to be animating on twos (12 frames per second, or every other frame) I make sure each thumbnail is positioned at an odd numbered frame. If I was animating on ones (24 frames per second, or every frame) I wouldn't need to worry about that.
Once I have the thumbnails positioned and timed, the sequence looks something like this:

Now that I'm watching it again I think it still may be a little too fast. That's okay. I still have time to adjust it.
Step 6: Drawing the Keyframes
The term keyframe usually refers to a frame of animation at the apex of a movement - where one motion ends and another being, like each step of a walk. When you make your thumbnails, they should at least cover all the keyframes. I like to do a little more than just that. Like I said, I'm not as confident in my digital drawing skills so I do as much on paper as possible.
Now is the time when you use your digital paintbrush to draw over your thumbnails. Use this as an opportunity to make any small changes you think you need to the shape and size of the character.
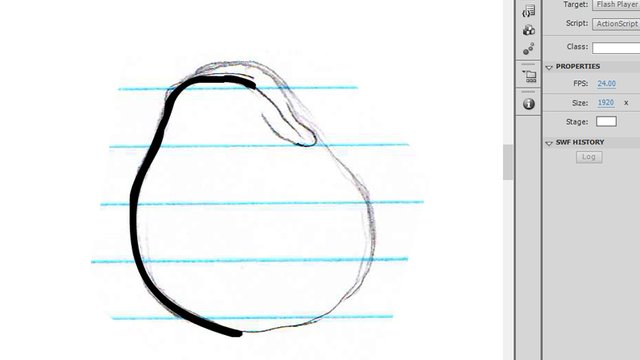
In Flash I like to keep the brush smoothing between 40 and 45.
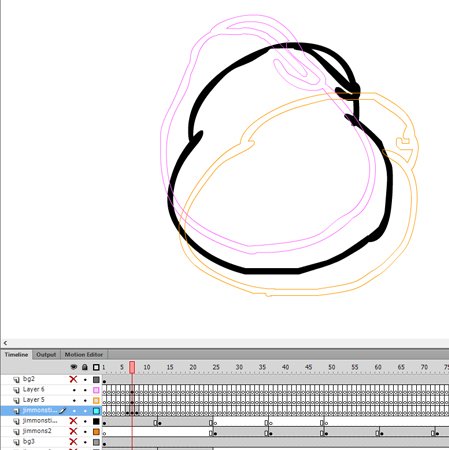
Step 7: Drawing the "Tweens"
For anyone unfamiliar with the lingo, tween is short for inbetween. These are the frames that go in between each thumbnail.
Most people would probably use the onion skin feature in flash so that they can see the previous and following frame when drawing a tween. I find Flash's onion skin too distracting, so I create two new layers - one for the "before" frame and one for "after." I set the frames to the colours that I've become used to: orange for before and pink for after. Then I draw my tween in a brand new frame.
And That's All Folks!
Seriously. That's it.
Of course there are optional steps like adding colour and refining the lines, but there are the basic steps required to create a digital hand-drawn animation.
It can be tedious work and it can take hours to create a single second of content. But the results are beautiful and like no other art form.
Sorry to disappoint you, but I'm not going to show you my finished sequence. You'll have to wait another month or two until I release the episode.
Also... (moment of truth) ...it's not done. Whoops.
Thanks for reading!
~Seth
P.S. If I've been unclear about any of these steps or if you're interested in learning more, you know where to comment!

I still have to get more confident in my plain drawing skills, but I'll bookmark and come back to this, haha!
Whenever I say this, my wife tells me I'm just being too modest, but this is the truth:
I don't consider my drawing skills very strong. I'm good at copying what I see but I don't have a strong enough sense of shape and form to confidently draw things on my own.
But I get by as an animator because I have a very good sense of motion and timing. The fact that my drawing skills need improvement is a big hindrance in my animation, but it doesn't stop me.
lol thanks.