How to Paint Trees and Foliage - Part 1 - Composition and Painting Design
Hello Steemers
I have just recently finished a studio painting which features a stand of poplar and sycamore trees with a backdrop of farmland and mountains. I got the inspiration to paint this scene after I went painting outdoors (known as plein air painting) the day after we'd had an unusual spell of cold weather that left snow on the mountains.
I was really happy with the art work I had created outdoors and so I thought I would do a bigger studio painting of the view I painted.
Below is the finished studio painting and in this blog I will show you the design process and how I planned the composition before I started on the painting. I will also explain some of the materials I am using.
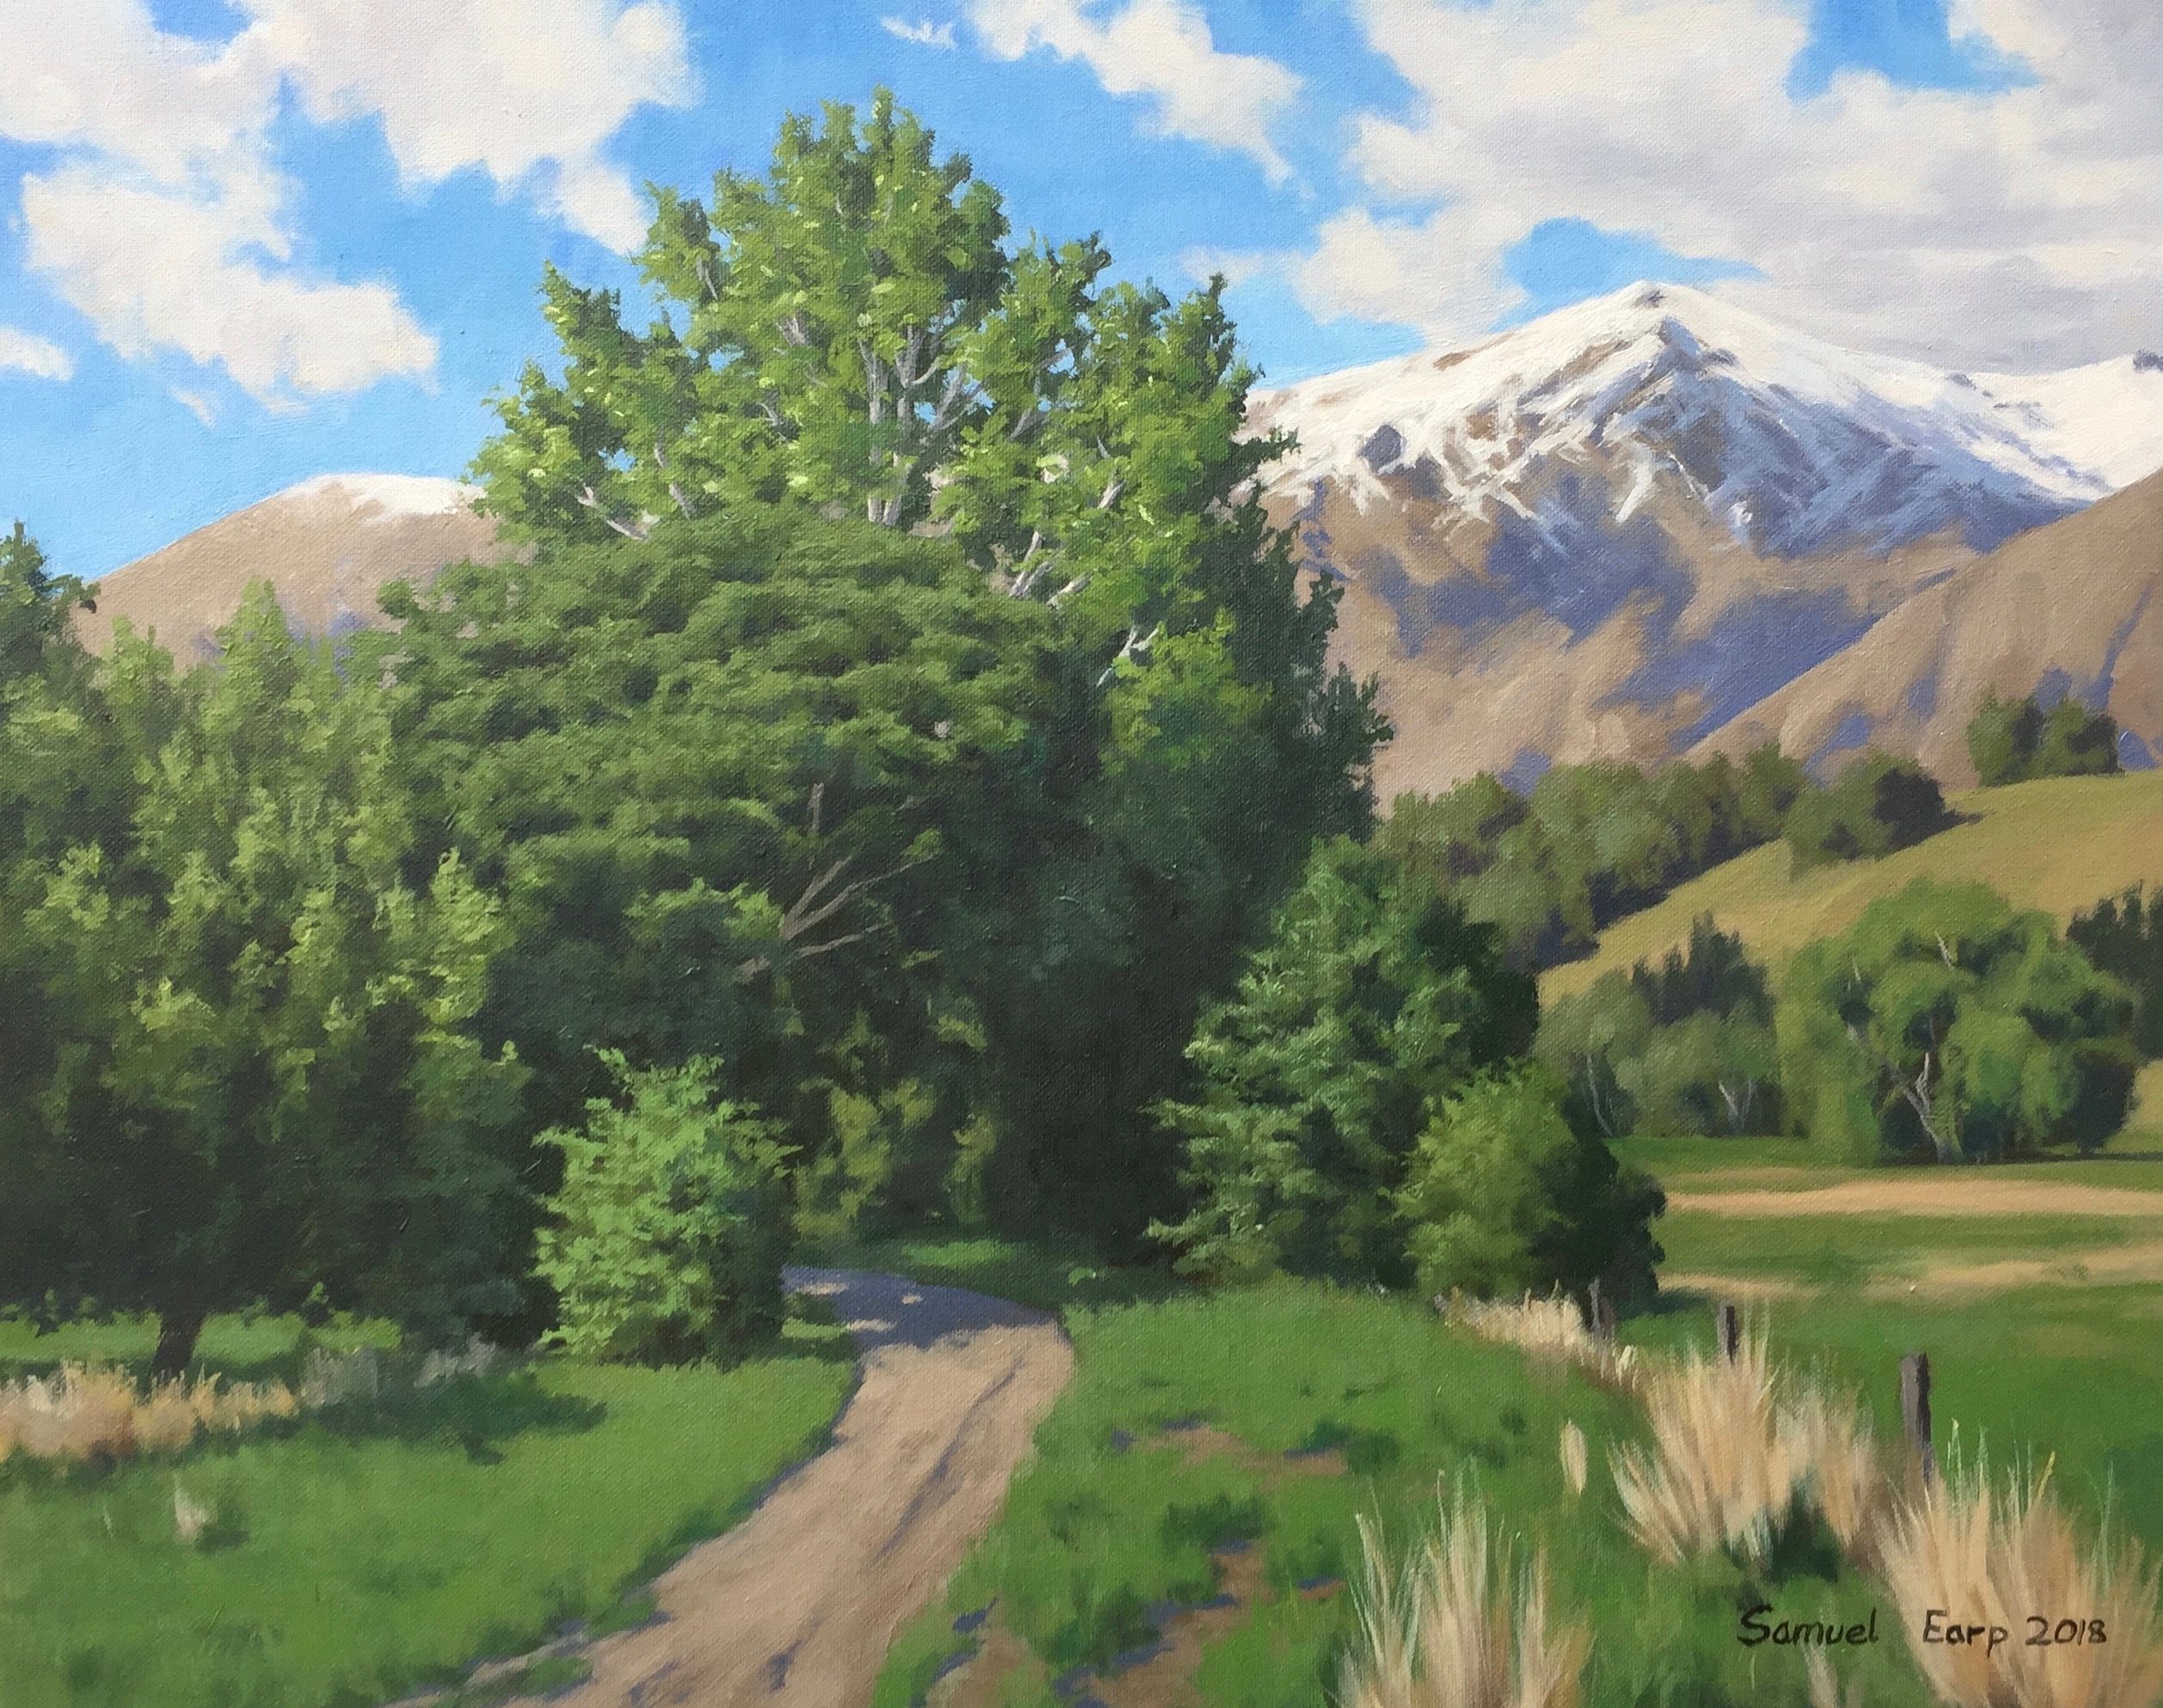
Poplar Trees and The Remarkables Mountains, New Zealand, 40cm x 50cm, oil on canvas.
Inspiration for This Painting
This painting was inspired by an area called Dalefield which is located in the Wakatipu Basin, just outside of Queenstown, New Zealand. I frequently come to this area to paint as there are so many subjects to capture on canvas including trees, fields, mountains and animals.
I came here to paint in February the day after we'd had a cold spell of weather that left snow on the mountains. Given that New Zealand is in the southern hemisphere the seasons are reversed and so February is a summer month. Anyway I thought it would make for an interesting painting with trees and fields juxtaposed against some snowy mountains.
This was the view I painted.

When I painted this scene outdoors I made the stand of trees the focal point and I kept the road in there to add some rhythm to the painting, I also removed the HV power lines from the scene as I felt these man made objects would have spoiled the painting.
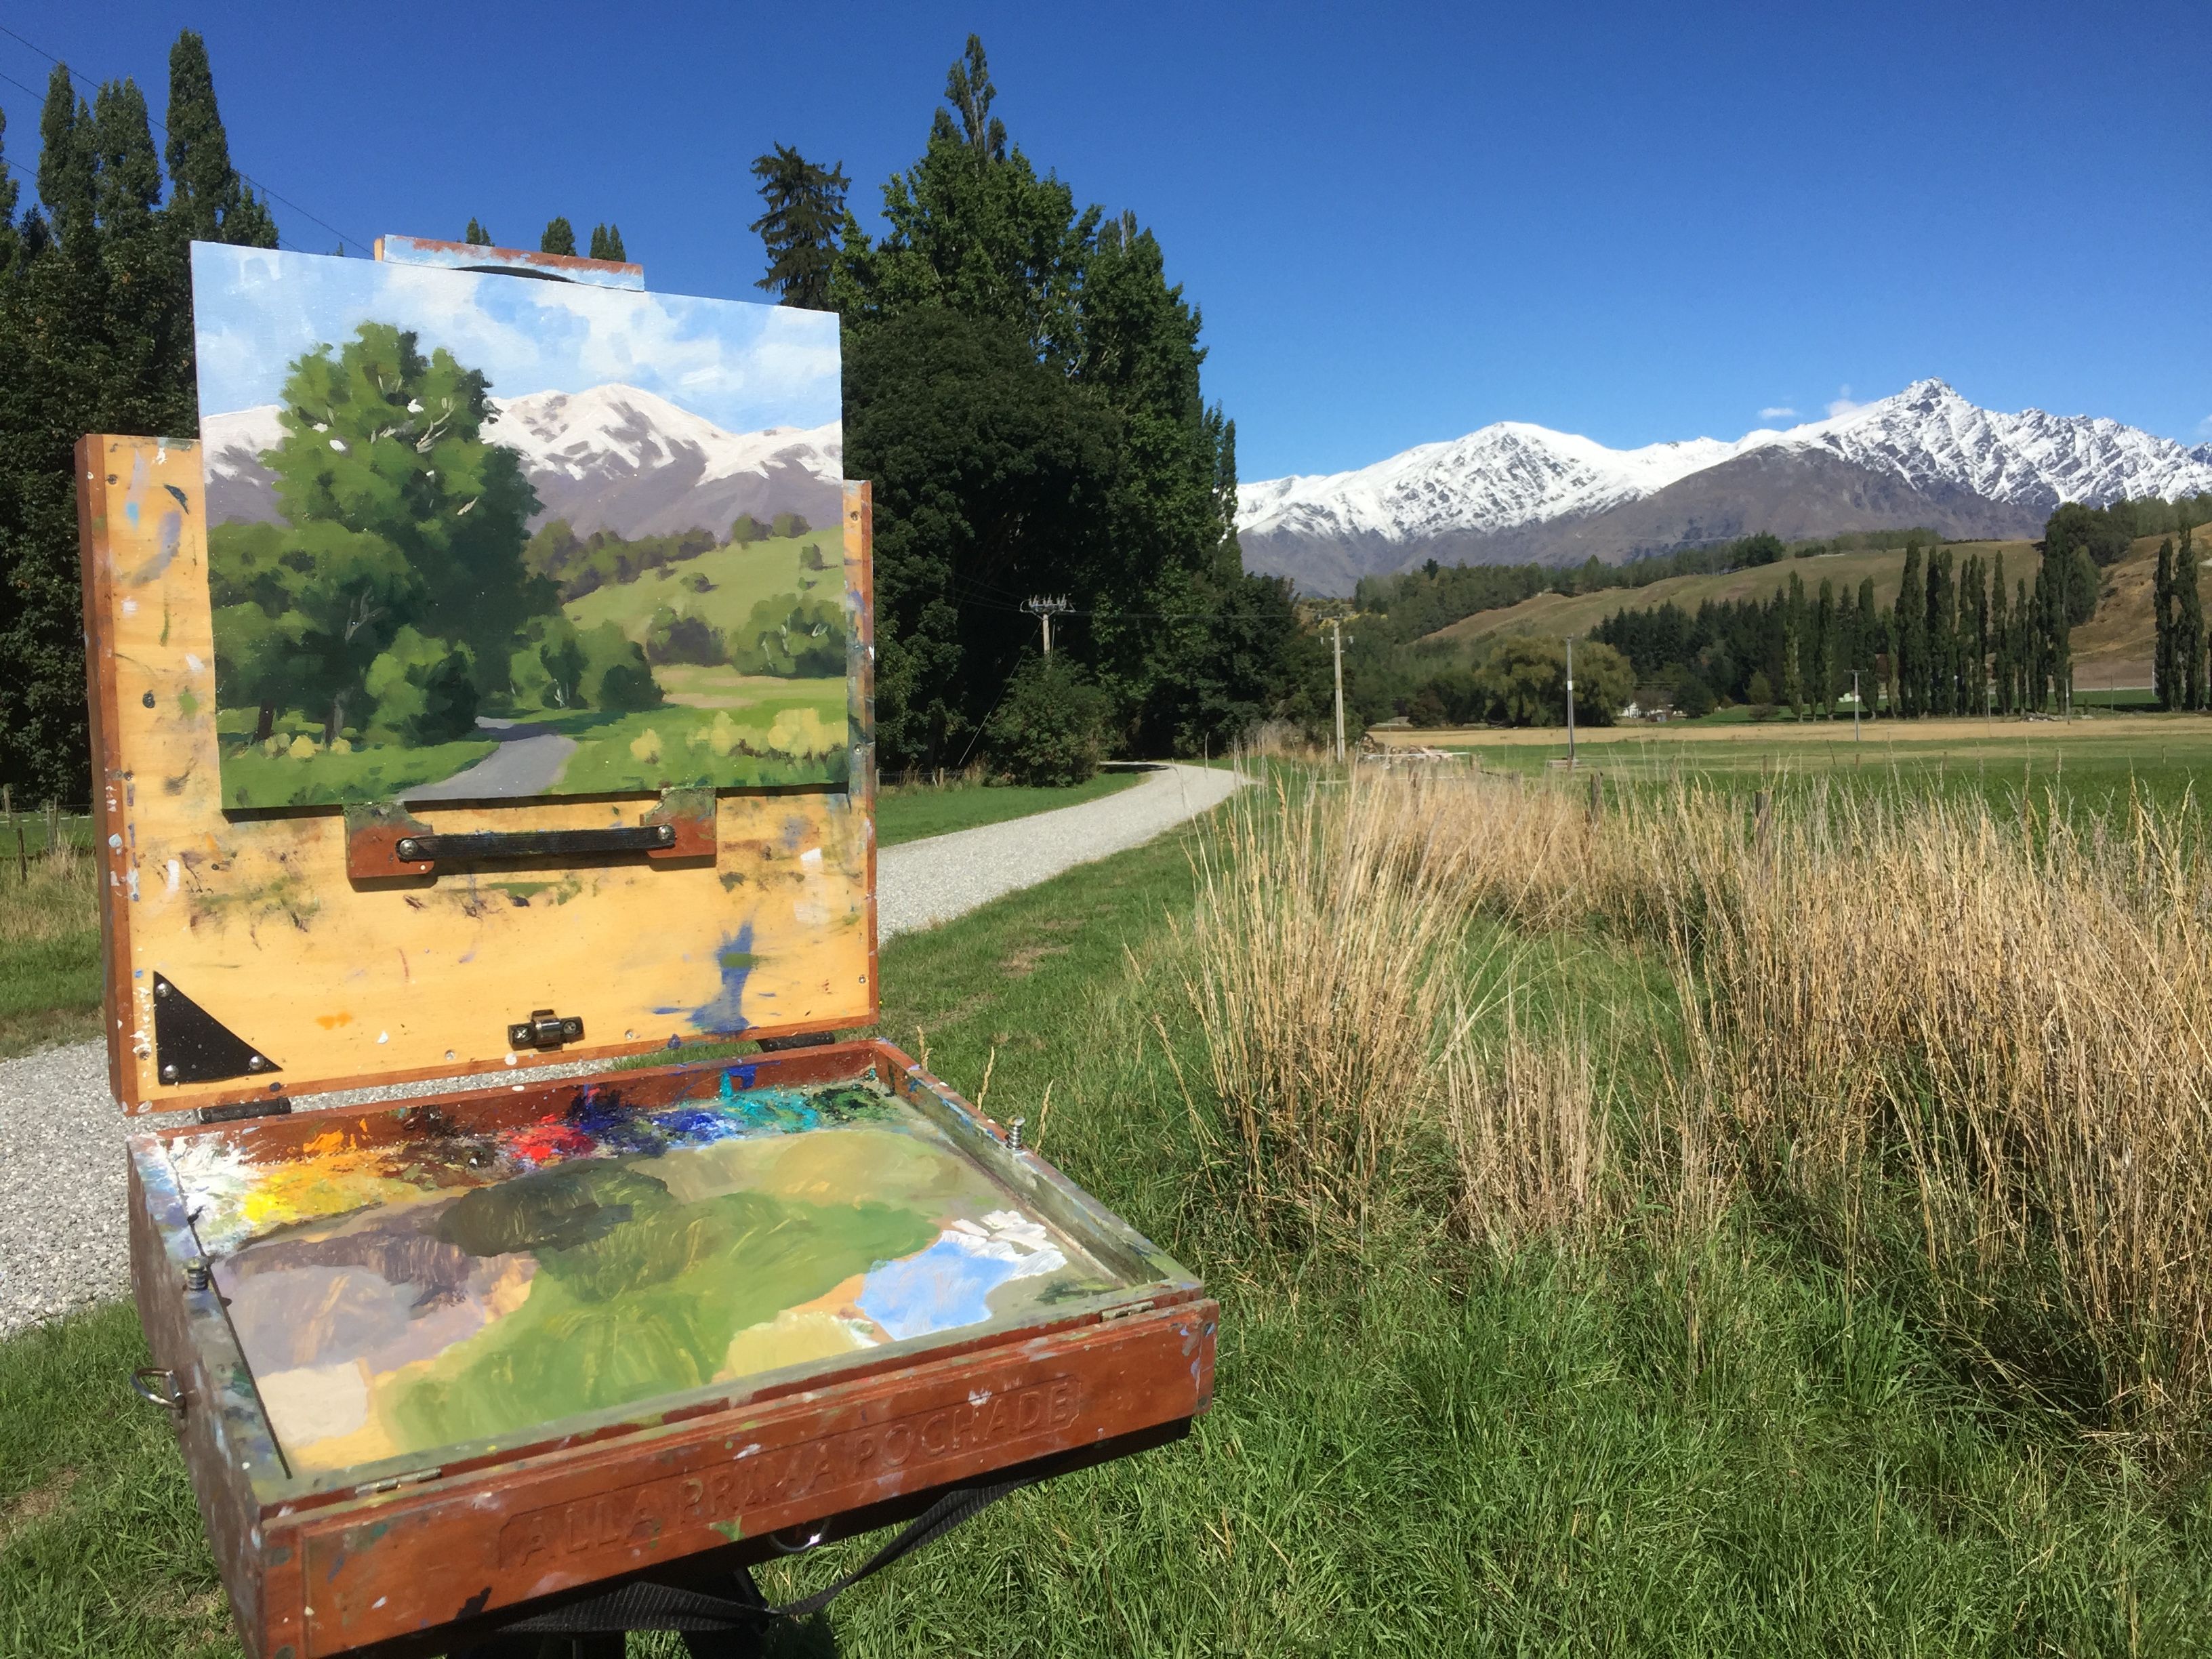
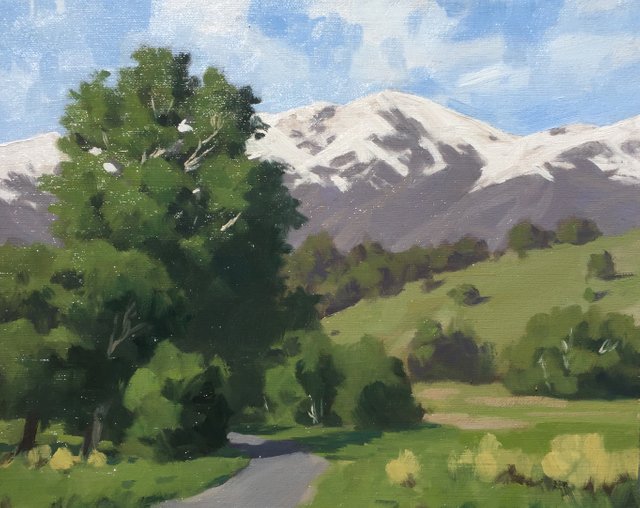
I was very happy with my plein air painting and that's when I decided I would create a larger studio painting of this view, also I could use my plein air painting as a colour study to refer to for the studio painting.
The Design Process and Sketching
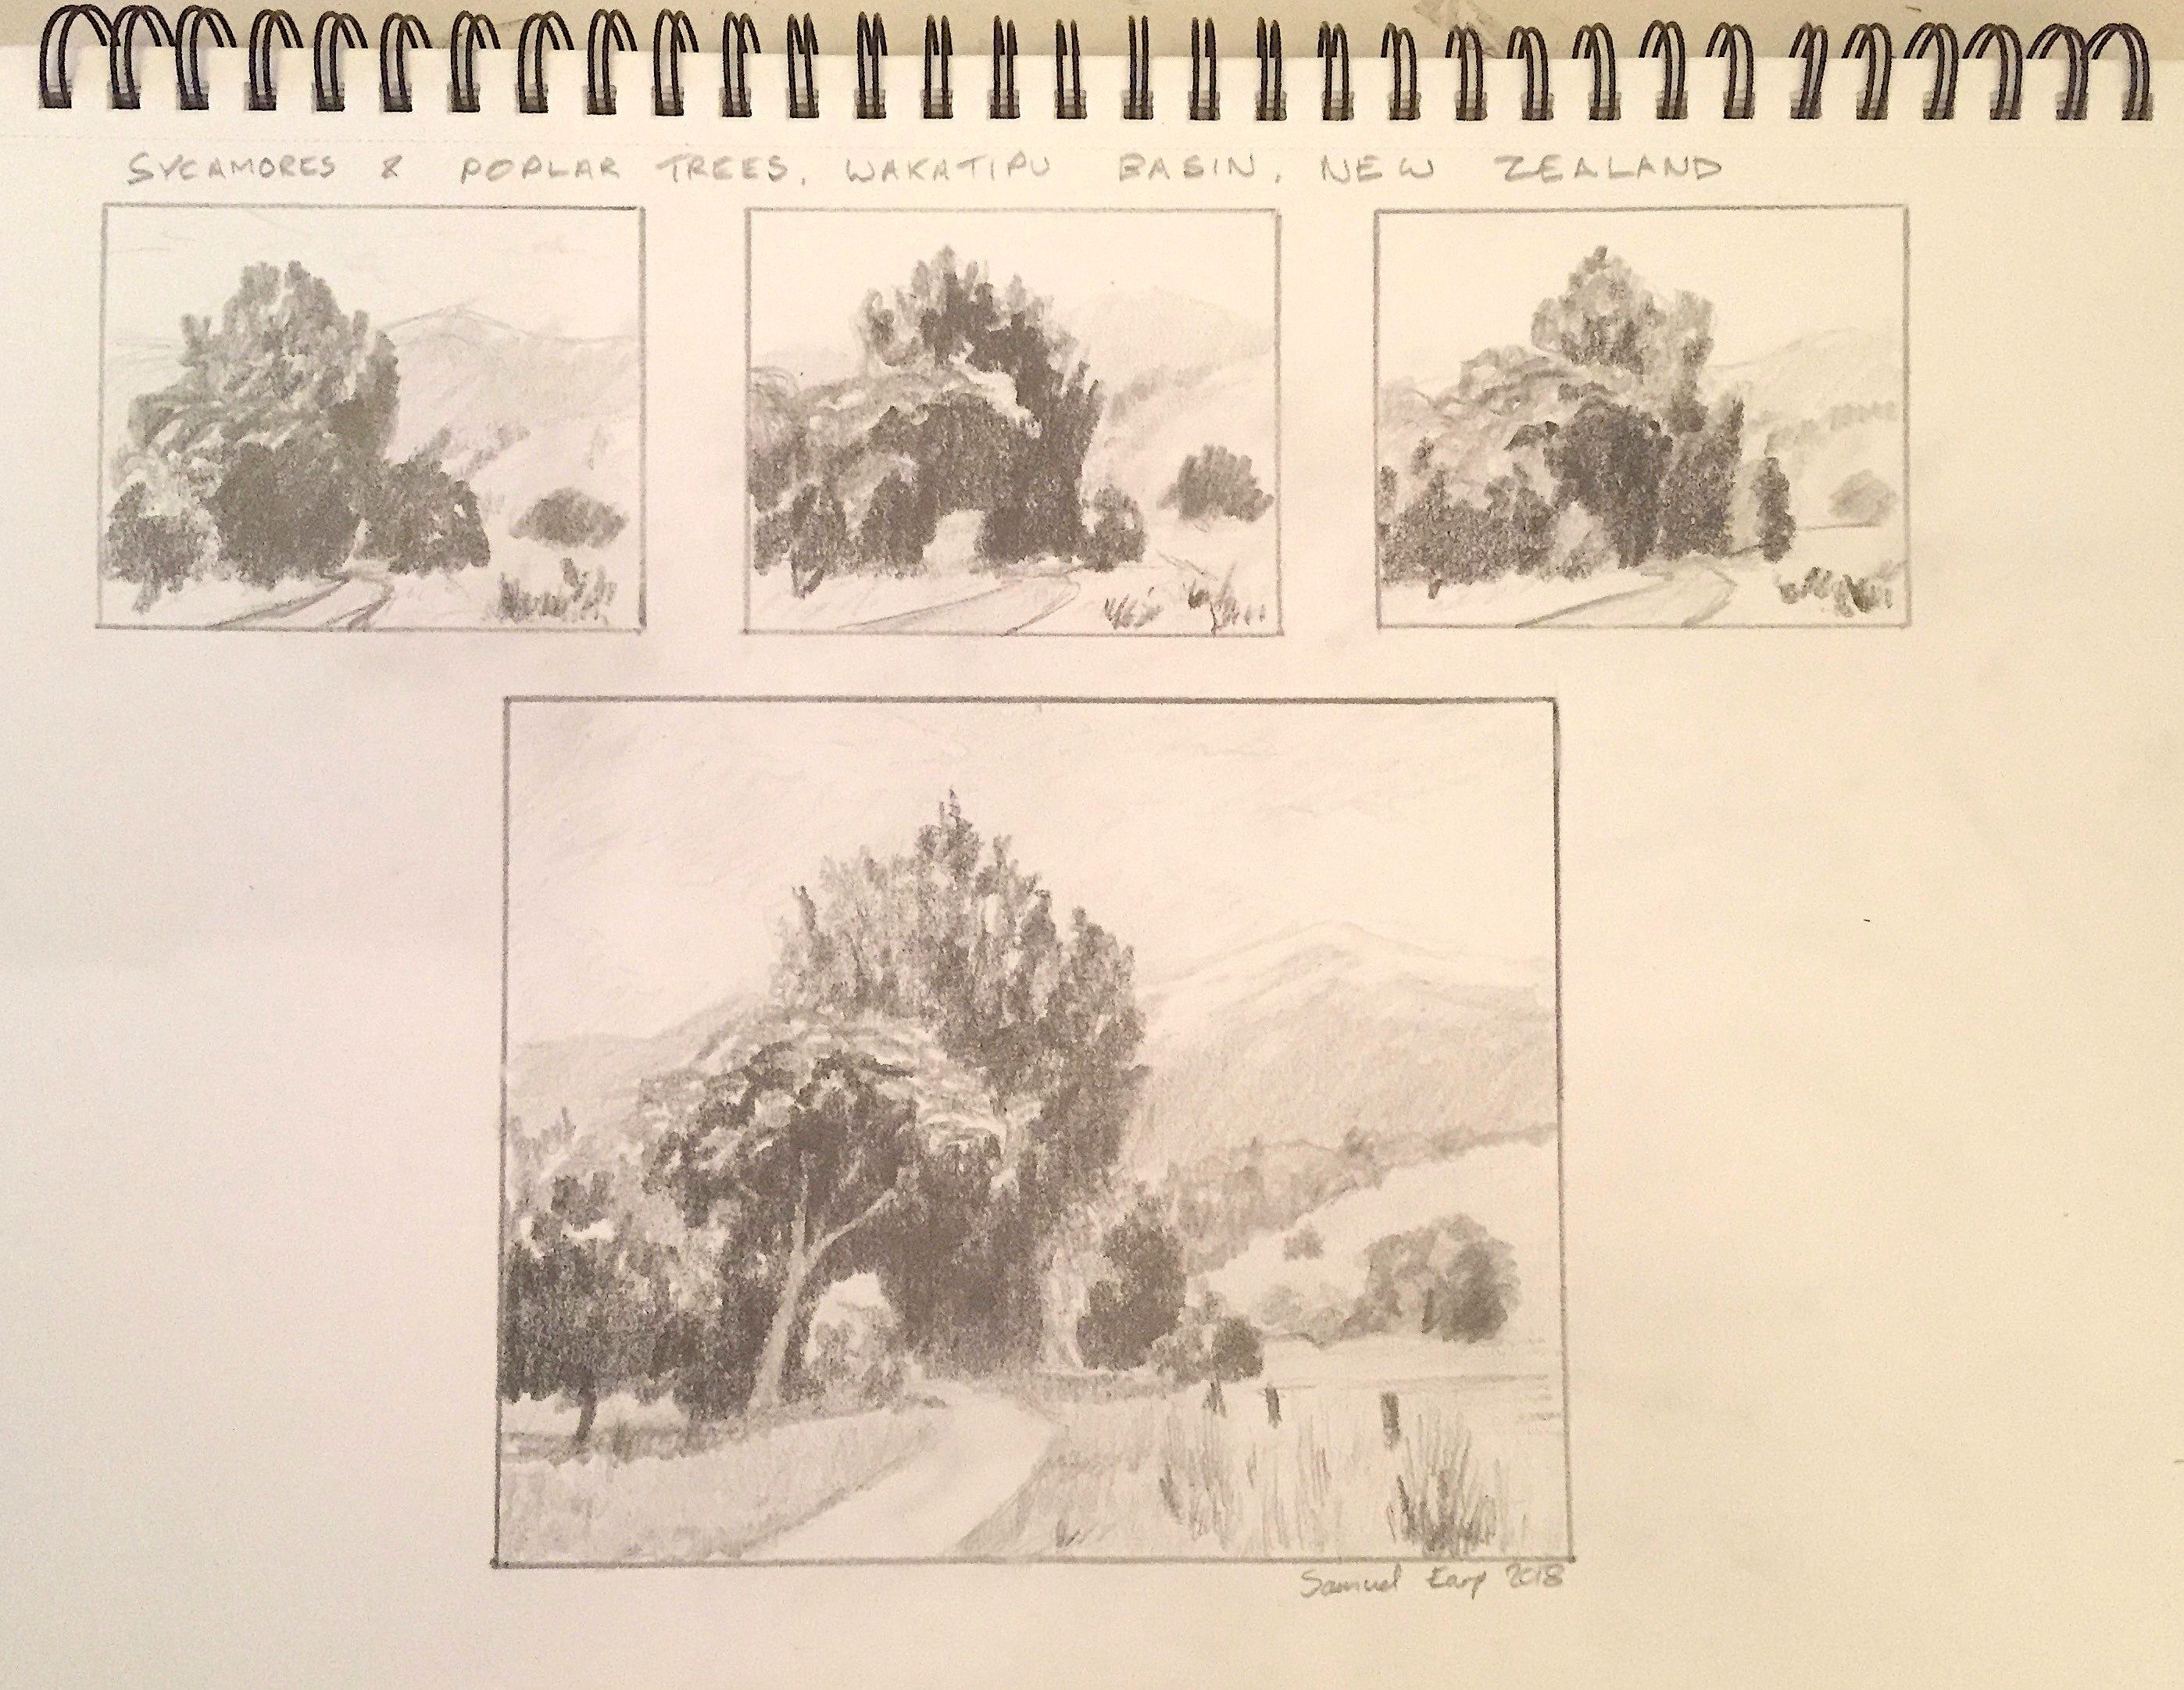
Now, whilst I was pretty happy with my plein air painting I felt I could improve the composition a little and so before I got into my studio painting I sat down with my sketch book and did some quick five minute thumbnail sketches. Then once I was sure of an idea for the composition I did a final sketch.
The sketch is purely for planning the composition and to give me an idea of the tonality of the scene, i.e. where my lights and darks will be when I come to paint this scene and I use a range of pencils from 4H to 4B.
Don't worry if your pencil sketches aren't perfect or amazing works of art, so long as they are good enough for you to transfer your composition onto the canvas thats all that matters.
Composition
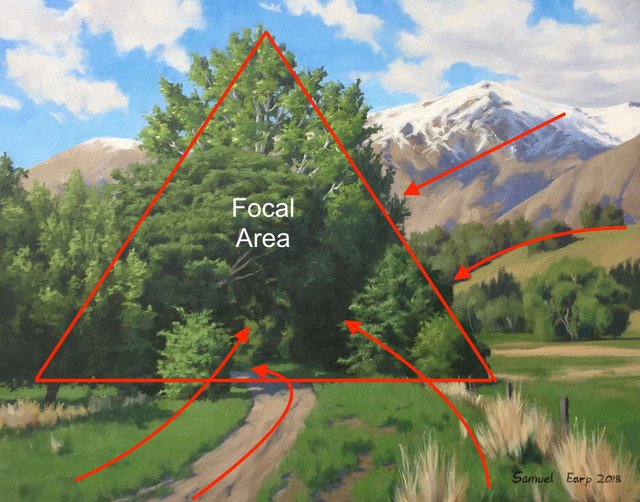
The aim of a the composition is to create unity and a feature that should be the main interest in the paintings, it should dominate all the other forms and masses in the painting. In this case I have made the stand of trees the area of interest in the painting.
This composition in this painting is known as a pyramid or triangle composition and it suggests permanence and stability because of its structure, perfect for trees. I have placed the stand of trees to the left of the centre, remember that you should never have your focal area in the middle of the painting as it's predictable and forms a displeasing static.
I have added supporting elements to create some flow in the compositions, subtle props thats leads the eye towards the focal area, the stand of trees. In this case the dirt track clearly leads the towards the trees as well as the dead grass clumps in the foreground. The hills and mountains in the distance slope downwards in a manner that subtly redirects the eye back towards the trees.
Colours
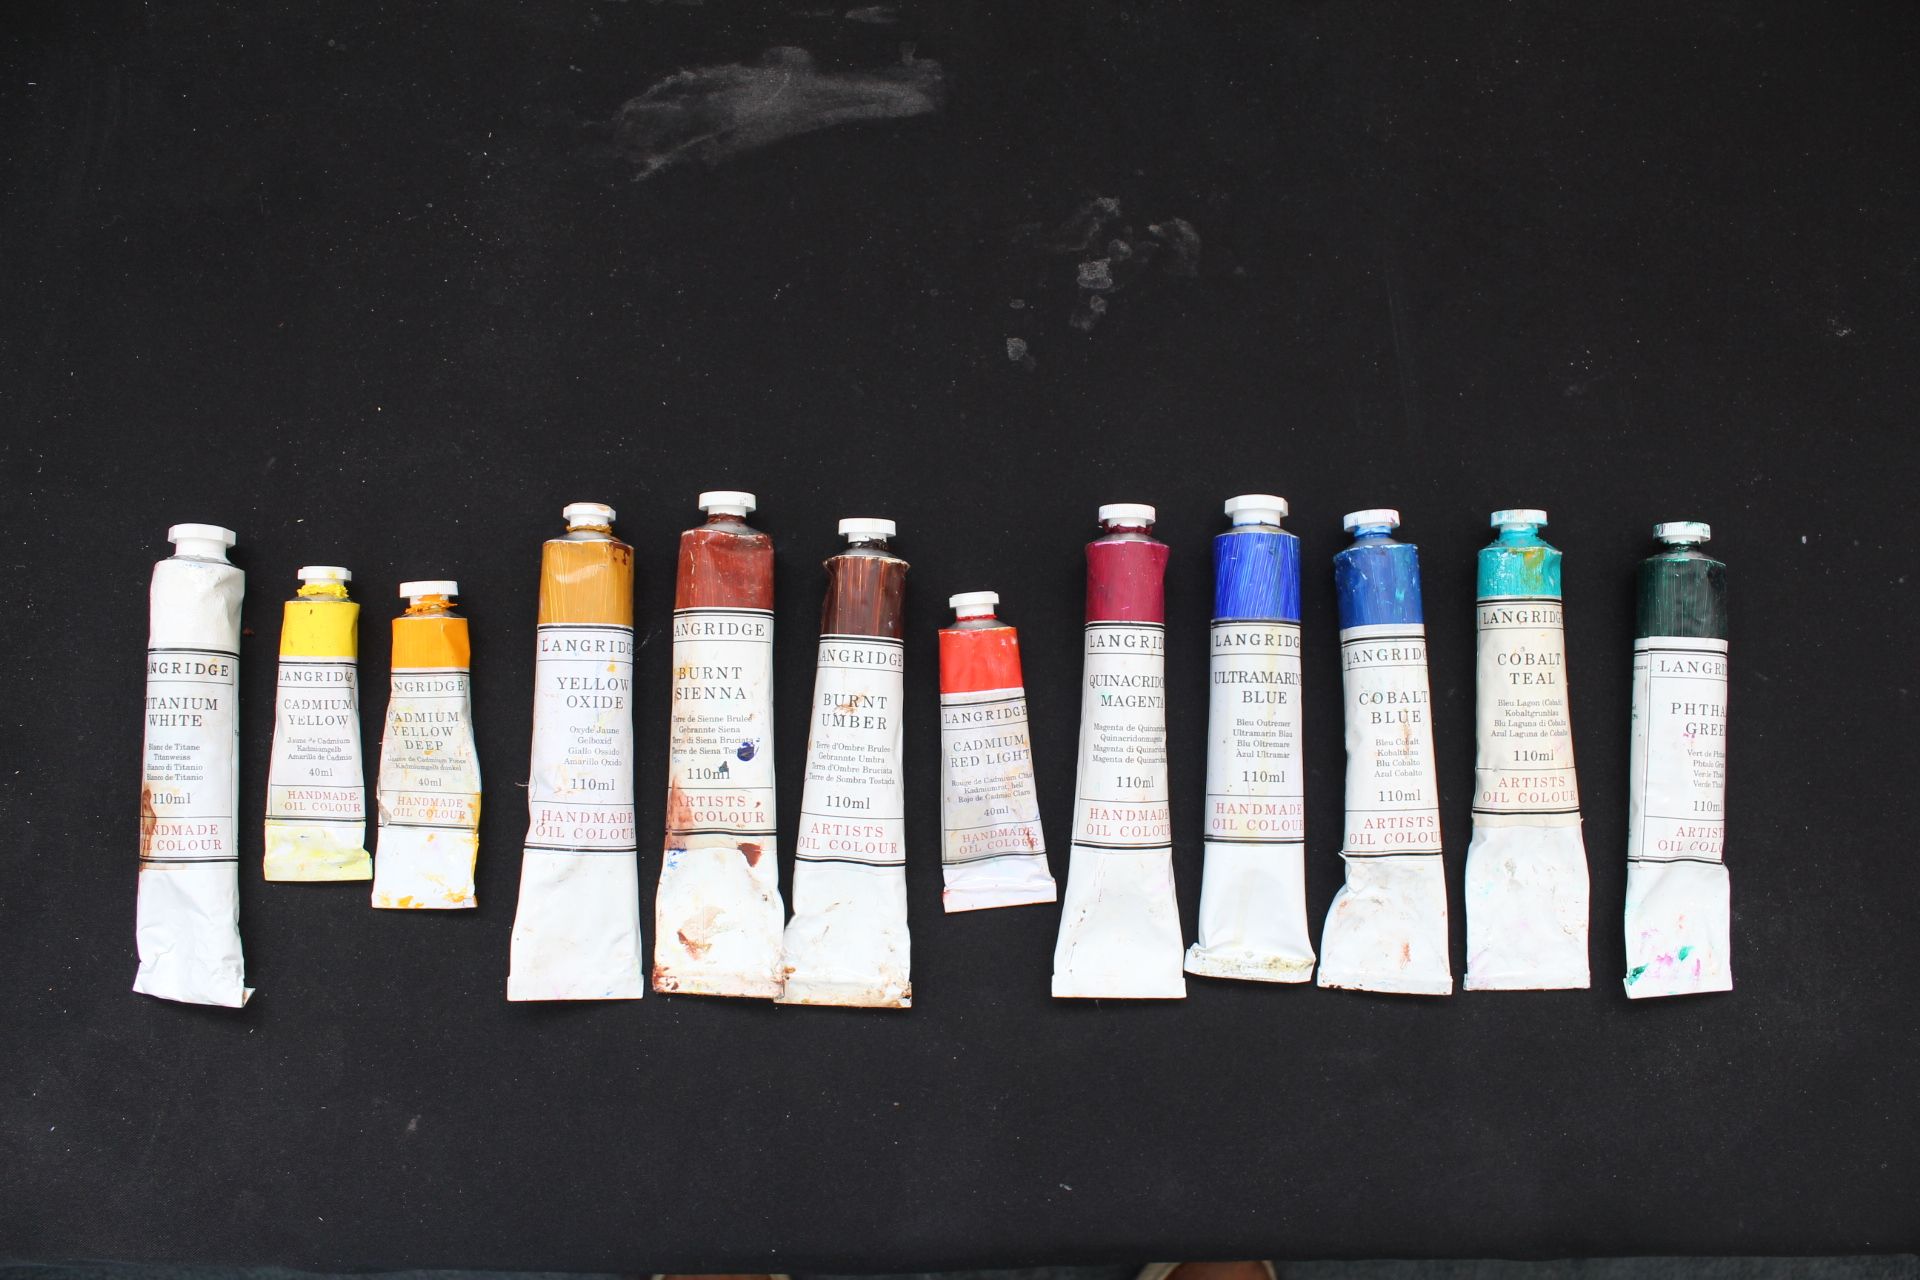
I painted this art work in oils but you can also use acrylics if you prefer. Here is a list of colours you will need for this painting:
- Titanium white
- Cadmium yellow
- Cadmium yellow deep
- Yellow oxide
- Burnt sienna
- Burnt umber
- Cadmium red light
- Quinacridone magenta
- Ultramarine blue
- Cobalt blue
- Cobalt teal
- Pthalo green
Brushes
You won't need a whole range of fancy brushes and I always thing it's best to keep it simple. Now, given that my painting style is that of a plein air painter, my studio paintings aren't massively detailed either and for good reason. I feel that excessive detail tends to ruin the composition as the eyes and brain are having to decode too much information. Often the suggestion of detail is more effective as the brain fills in the gaps, it also makes the paintings look more alive.
With more gestural brush strokes in mind I have opted for using mostly flat brushes, filberts and daggers.
Here is a list of the brushes I used in this painting:
- No.6 flat
- No.4 flat
- No.2 flat
- No.2 filbert
- No.1 round
- 1/2" dagger
- 3/8" dagger
- 1/4" dagger
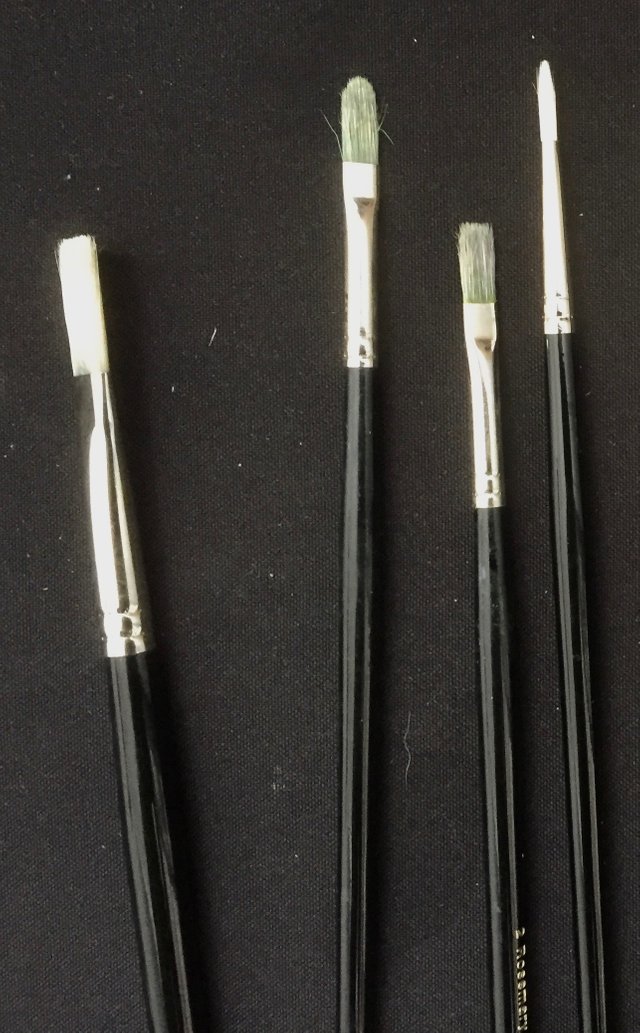
Flat, filbert and round brushes.
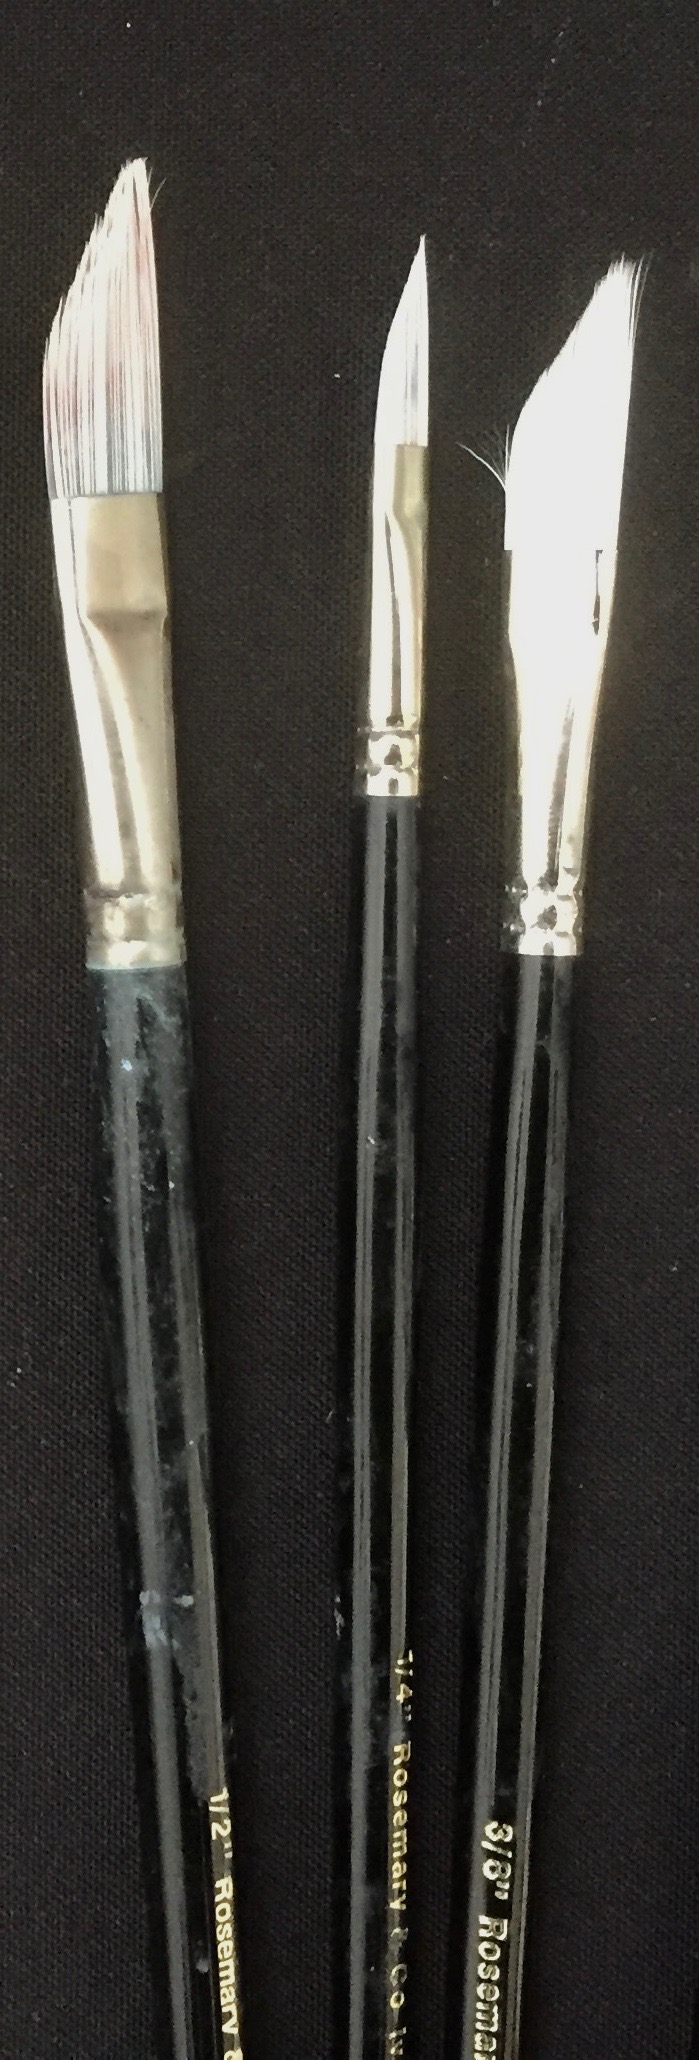
Dagger brushes.
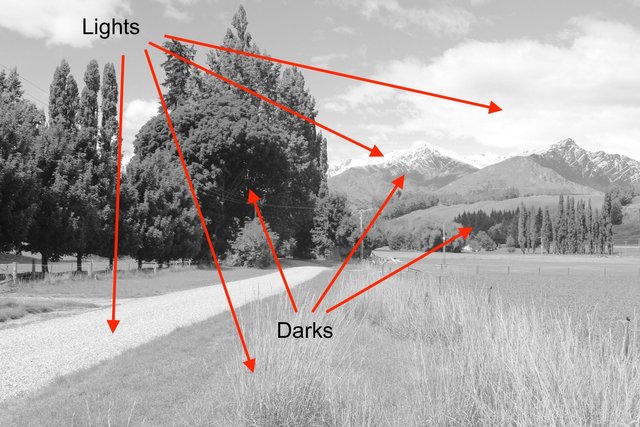
Tonal Values
Before starting the painting and even in the design process itself I establish where my light and dark values are and this will help to establish the overall tonality of the painting. The primary elements of the tonal scale is light, dark and half tones. Values refer to how light or how dark and object is.
In a landscape painting, objects in the distance such as the mountains will have a narrower tonal scale where darks are not quite dark and lights are not quite light. As we come forward in the painting the tonal scale increases so darks get darker and lights get lighter.
The concept of light and dark values is best illustrated when we switch our reference photos from colour to black and white. The shadows of the trees are the darkest values but as we look at the shadows in the distance such as the trees in the mid ground and the mountains in the distance, the shadows become lighter.
The lightest values in the photo is the track, grass, clouds and the snow on the mountains. Keeping in mind of where the lights and darks are in the photo will help with colour mixing as well as achieving a harmonious painting.
I hope you enjoyed the first part of this step by step painting tutorial, stay tuned for Part 2 where I will show you the first stage of creating the painting which is known as blocking-in. This is where I establish the basic shapes and colours and it serves as a base to work from for building up detail in the painting.
Check out my website for more painting demos and my art: samuelearp.com
Subscribe to my mailing list for news, new paintings and art tips and receive a FREE digital art print download of one of my seascape paintings suitable for printing an image of any size: https://www.samuelearp.com/subscribe/
Thank you sir for such a nice tutorials they are very helpful for me.
Regards @crafter
Thanks @crafter, I'll get the next part posted soon :)
Nice post
Thanks @aqilafatan :)
Very good your post! Thank you very much for sharing. I was a very good teacher!
Thanks @normazaro, your art is beautiful too :)