'Portrait of A European Woman' - Realistic Portrait Painting Series - ART + TUTORIAL

This Is My First Art Tutorial, Published Here First For Everyone On Steemit!
I don't know what it is about painting portraits, but I've found that I've been drawn to them for some reason, and I have really been enjoying working on them so far. There's something captivating about an expression on somebody's face, their own character which comes forwards as it is expressed through multiple micro-movements of all the tiny muscles which surrounded the eyes, nose and mouth. Whatever expression or emotion is revealed, we notice them as being something familiar (such as a smile or frown) but at the same time totally unique to the individual.
Above image; This is the close-up of my finished black and white digital portrait of a European woman.

Above image; Previously I posted my colour portrait of Christelle Langlet, this was the finished painting. You can view the full post here; Painting The Portrait Of Christelle Langlet.
The Psychological Aspect
The face of someone is what we are presented with in the world. In psychology, the emotions and expressions revealed on the face, usually in public is what is called the 'Persona'. It is also said that the word person also came from the word persona. Psychologist Carl Jung called this persona, The Mask, which is worn socially as a means of protection, and some kind of safety mechanism to not reveal all of the inner authentic feelings, freely to the entire world to see, judge upon and act against.
Carl Jung on describing what The Persona is; "a kind of mask, designed on the one hand to make a definite impression upon others, and on the other to conceal the true nature of the individual"
One of the fascinating things I have noticed about the face, is that even though this persona is worn by people every day, whether consciously or subconsciously, I can often see if this person is being honest and true to their outwards projection and expression or not. One thing which we can't change, is what is communicated through direct eye contact. We can know when a person is experiencing something else emotionally by looking at their eyes. And one of the biggest tellers of truth, is in body language. And there will be times when this persona drops, in a quiet moment away from a crowd, you can find an individual who has dropped their guard (big happy smile) who thinks they are alone for a moment, and then reveals the emotion/expression which tells the truth of how they are feeling or what they are thinking.
Maybe it is my interest in psychology, combined with my love for art which attracts me particularly to drawing and painting the face of the individual human being?
Back To The Artistic...
Detecting & Recognising Shadows
The shadows that cast on somebody's face, caused by the light source and dictated by the forms and features of the person can enable the human brain to recognise somebody in a crowd almost instantly. We can detect an individual and pick them out a mass of others in a busy area, even in very low lighting. This leads into an interesting area of how humans have evolved to spot potential threats in the environment, which I won't get into here.
Expressive Realism
I love looking at artists who paint realistically, but still manage to incorporate their own artistic flair into each piece. Whether it is the final few touches, blending and softening some of the edges (messing up and ruining previous strokes) which is something I really like to do, which creates a sense of contrast between hard/soft. Or painting in extra colourful strokes to give the painting more energy and life to it, this is what truly makes the artist I think, with his/her added dimension and creativity to the painting.
An Exercise of Painting 20 Portraits
Since I have been learning about painting realistic portraits, I have loved practicing painting them digitally. But very soon I intend on painting portraits in both oils and watercolours. I just want to reach my 10 b&w and 10 colour portraits first.
I set myself a target of painting 10 digital portraits in black and white before moving onto a second challenge of 10 colour portraits. It is really good practice to first work on improving on painting the values first, no matter what the medium or subject matter is, the same general rules of art apply.
Digital Painting of A European Woman
I will now show you the process of how I painted my European Woman, and hopefully demystify some of the digital painting aspects and 'way' towards the finished piece for those new to digital painting. But first you will need...
Tools;
Wacom Tablet Intuos 3 (You can buy these very cheap second-hand online, and they are just as good, if not better to use than the latest, much more expensive models.)
A computer/laptop capable of running Adobe software. This can be an old laptop, or brand new macbook. It doesn't really matter, so long as it has enough RAM and memory to be able to power and run the software you will use for painting.
Adobe Photoshop, Corel Painter, Sai, or any other software for digital painting. The software will be one of your greatest assets in being able to draw and paint digitally. Personally I use Photoshop and Corel Painter, but if you are short for cash, you could choose a free software such as Sai, which is supposed to work very well for digital painting.
Setting Up Your Digital Workspace (Photoshop)
To give you a demonstration of how I work, I will use software Adobe Photoshop as the example. Photoshop was created mainly as a digital photo editing software, but to this day it has remained one of the prominent tools used by industry professionals who work with conceptual and digital art/digital painting.
Opening Photoshop

This is the loading Icon/graphic that you will see by Photoshop as you wait for the software to open on your desktop. I have version Photoshop CS6.
Once Photoshop is open, you will either want to create a new file, or open an existing one. You can do this by clicking on file/open, file/new on the top drop down menu.
When you open Photoshop, the 'layers' panel should already be visible in the work area. If it is not, you just go to the top drop down menu, click on windows, then select layers. The layers panel will then open.

With your file open, you can begin to work on top of the base layer by clicking on 'new layer' in the layers panel menu. In Photoshop the layers system allows you to gradually build up stages of your work on top of each other, allowing the freedom to change each individual layer as you progress with the artwork. This has it's pros and cons when compared to traditional painting.
Setting Up & Experimenting With Digital Brushes
Once your file and layers panel are visible and ready to use, the next step is to make sure the brushes panel is open. This is where it gets fun!

You open up the brushes panel the same way you open the layers panel (if not already open) by going to the top drop down menu and selecting windows, and then brushes.

In the brushes panel, set your brush options to 'pen pressure' this will allow you to draw/paint softer and harder stroke depending on how much pressure you apply. You can of course experiment with these setting to find out what works out best for you.
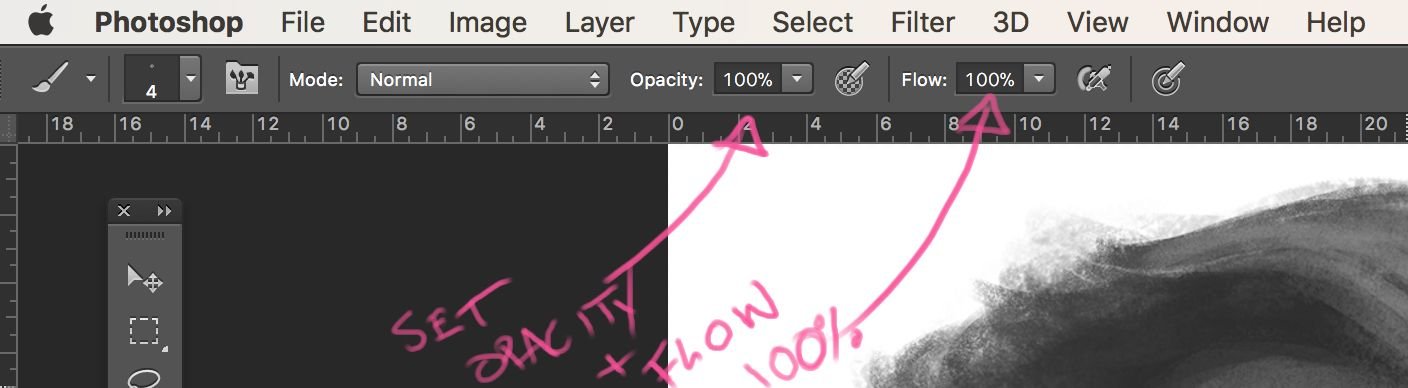
The next thing to do is make sure the opacity and flow of the brushes is set to 100%, as you already have the brushes set to pen pressure. But again you can experiment with these settings to suit you.
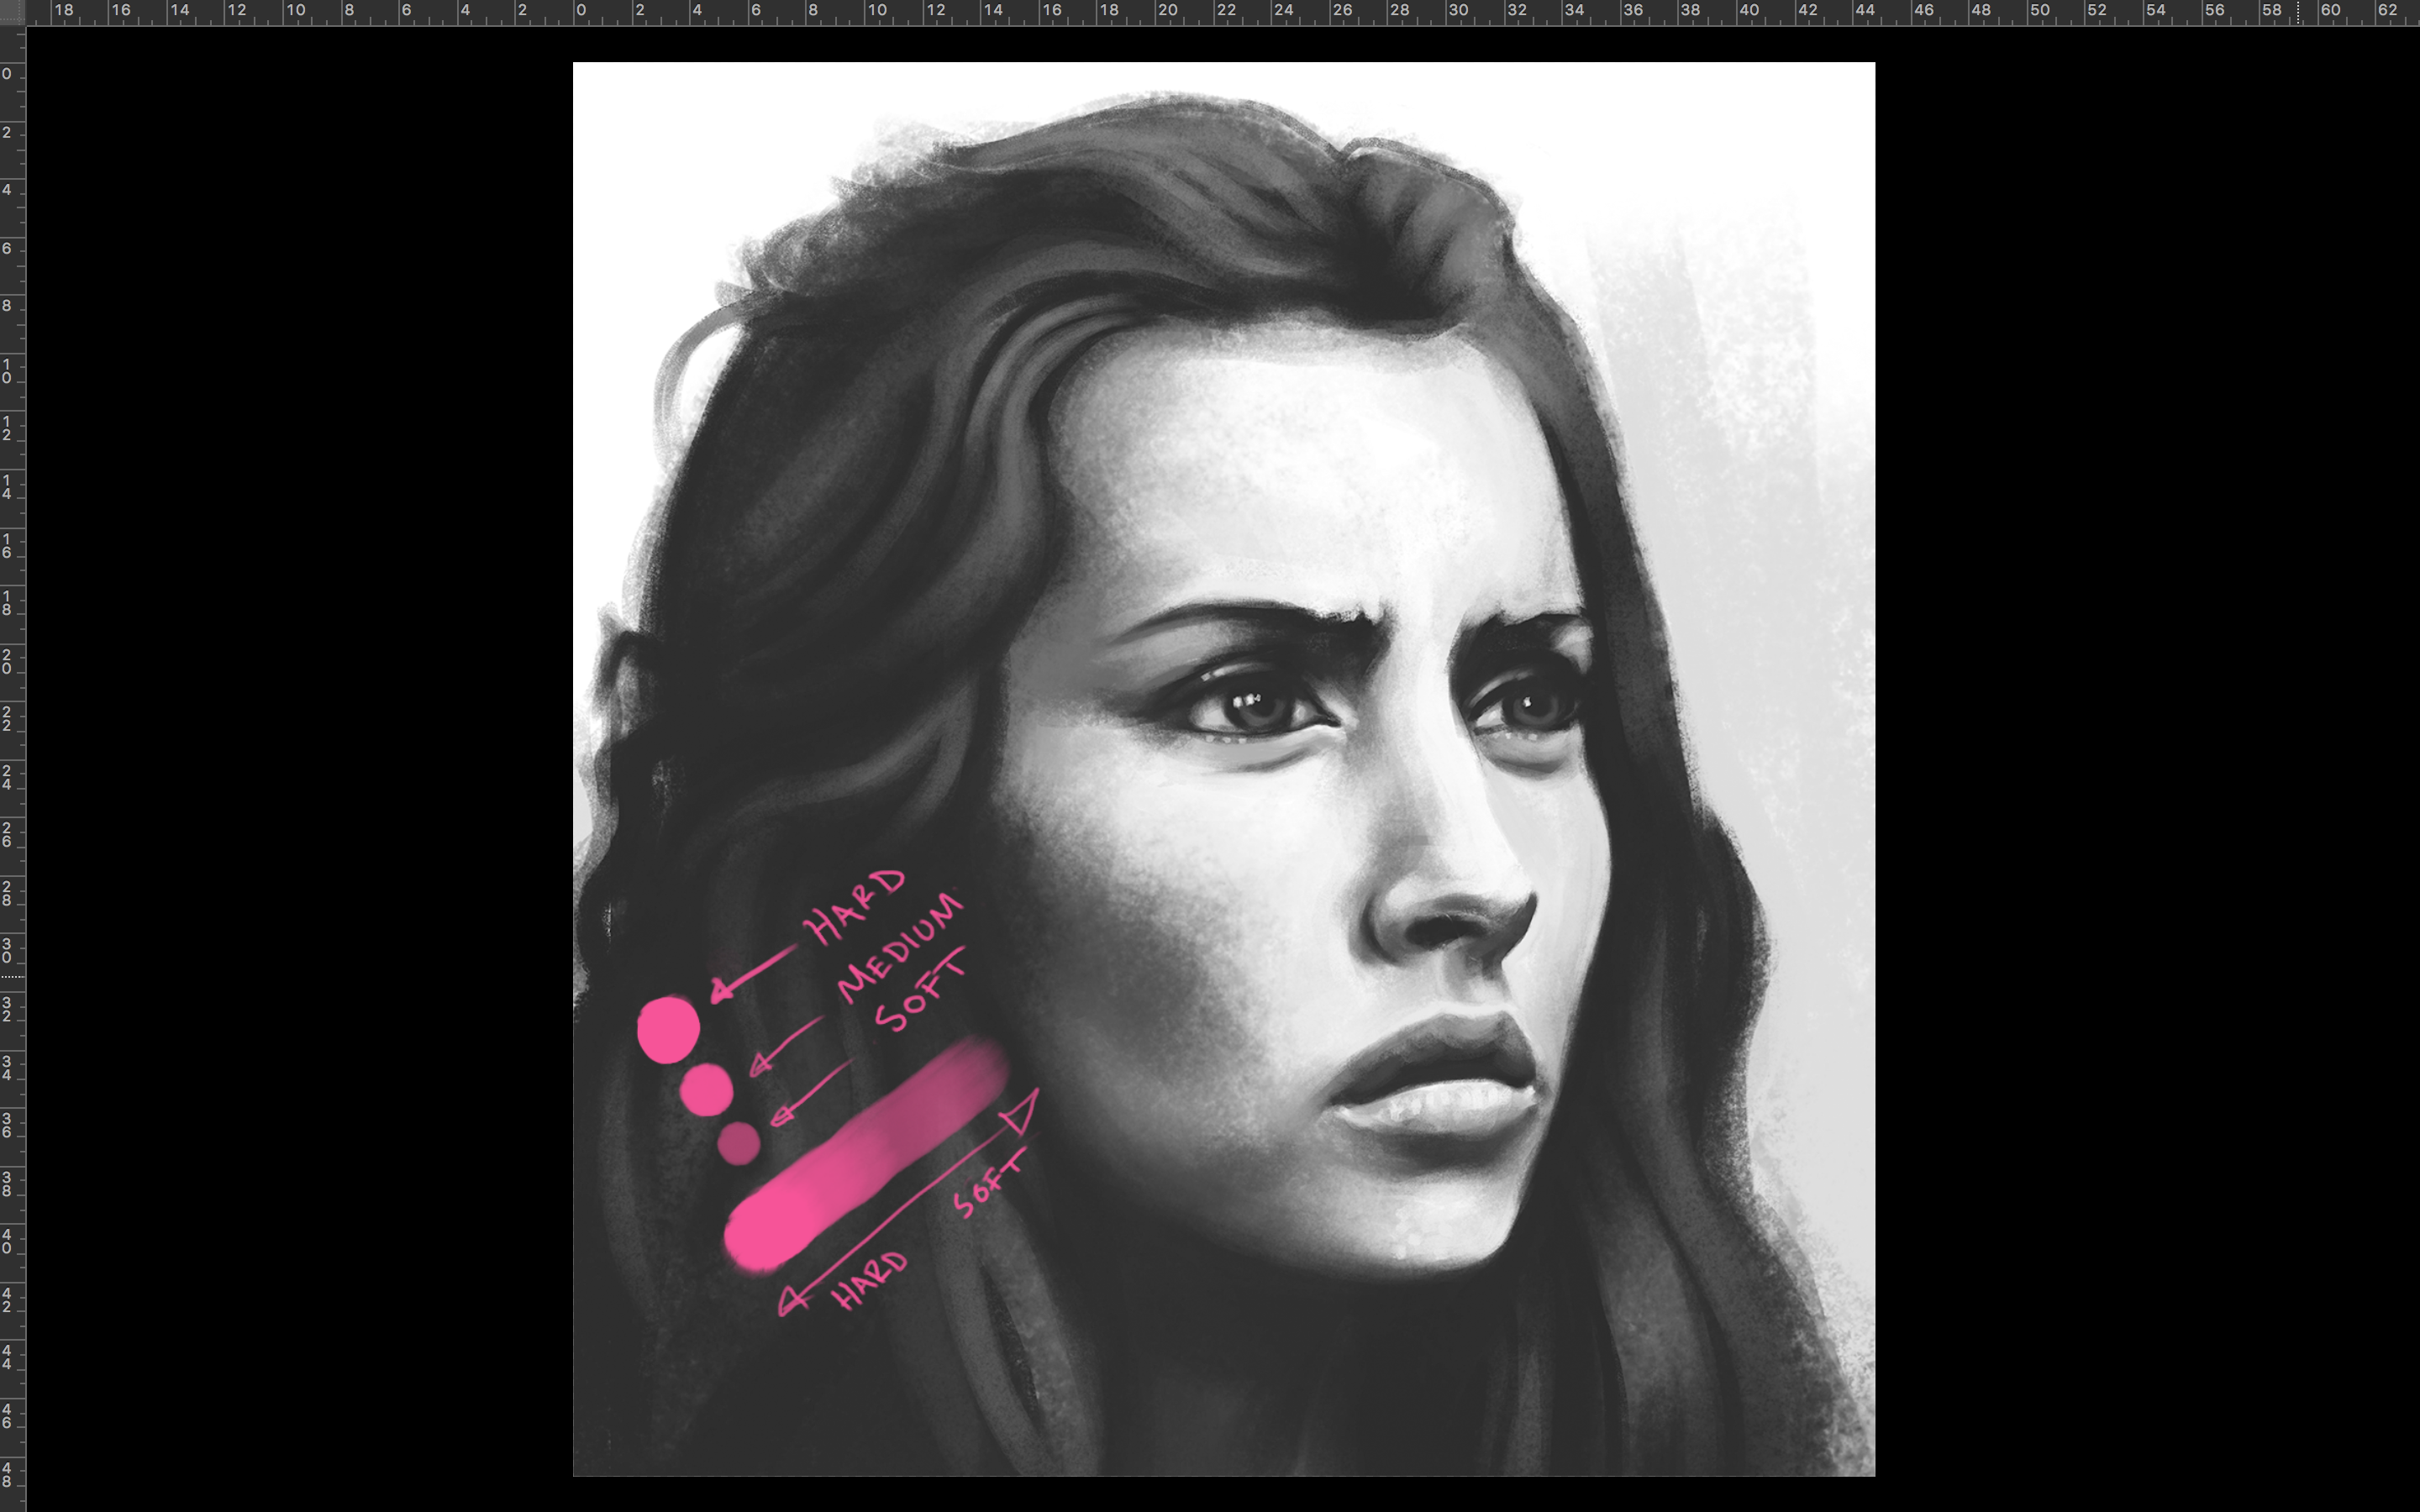
Now you begin experimenting with various brushes and the pen pressure settings on the digital canvas. In the above image I show how light, medium and hard pressure can look with a hard round brush. You can get many more variations and shades in-between.
So now you should be ready to draw/paint digitally! There is much more to learn of course, but you are now free to 'play' and experiment with brushes, their setting and the amount of pressure you can apply. I can create more in-depth tutorials in painting in Photoshop in the future, just let me know in the comments below.
Now for the steps to my digital painting!
The Steps To My Digital Painting Process

Starting Off
Usually when I'm drawing/painting faces, I lightly draw the lines of the faces, mapping out some of the basic contours and positions of the main facial features. But with this piece, I took one of my favourite chalk brushes, and 'slapped' down some large grey strokes to give me a little bit more 'mass' and value to work with early on.
This wasn't planned, I just decided to draw/paint loosely using my Wacom tablet. I think I did this as I find it easier to get some of the larger areas down quickly when painting digitally, as larger strokes don't feel anywhere near as intuitive as using a real brush or pencil, and moving it around at all angles in any direction.
I also started to map out some of the facial features here, reducing and enlarging the size of my brush by tapping two hot keys, as I begin the portrait process.

In the second step I just begin getting the largest areas down first, and the largest mass in this piece is the hair.

Next I start to work on getting some more of the main features in. I'm still focusing on the larger areas of shadow at this stage.

Next I extend the canvas, and begin adding more of the mass of hair, and trying to get the proportions correct in the facial features.

Further refining and softening/hardening the edges, and also making changes.corrections to the proportions. You will notice many times that the proportions might be slightly off, constant comparison, looking back and fourth between your work and the model/your reference will help you to see and identify what is wrong.

Making bolder marks in the shadow mass of the hair.

Refining the edges and features of the face again.

Making adjustments to the proportions of the eyes, nose and mouth.

Now the main shapes and shadow masses are in place, It's time to start building up more light value layers and overall detailing. I am still using a large brush for most of this process, but adjusting the size of the brush as I move across the painting.

Working on the values and masses of the hair, and further detailing. She's getting close to being finished!

##Detailing - The Fun Part
Adding highlights to the eyes. Usually I leave this stage right at the end, but I couldn't help myself in this piece, I wanted the highlights there just a little earlier.

Adding the final details and corrections to meet my time limit deadline.
I like to try and set myself a personal deadline for my work, this helps me to focus 100% and avoid all other distractions. But for much longer pieces, this can be very hard to get right. I usually underestimate how long something will take. So this is also an area of experimentation for me personally.

The Finished Portrait
Finally I add my signature to the painting, save a master copy, and take a break from my work. It is good practice to re-vist your 'final' work a few hours after you think it is complete, or the next day, as your fresh perspective will enable you to more easily spot any mistakes, and make a few final corrections before publishing or sending your work.
Below is the photo reference I used for the portrait;

This Is My First Tutorial!
Thank you all for reading my post. If you have any questions, please ask below in the comments, and let me know if you would like me to create more digital art or drawing tutorials in the future.
My website; www.robbieallenartist.com