Deconstructed Japanese Maple Tree Painting
Hi Steemit! <3 I'm gonna walk through the process of my biggest painting ever. This is not necessarily my favorite piece--usually my work is more personal and relevant to the themes I'm thinking about, and this was a commission, but it was one of my favorite to create. I'd never done something on so large a scale before and the logistics of getting it right the first time was a lot of fun. I was also crazy lucky to have a very talented artist named Chris working with me on it, and he was invaluable for doing a lot of the detail and reassuring me when I would panic from indecision.
Obviously if you don't have the wall space or the time for such a large project you may not want to do this piece specifically, but I thought I'd post the process so that you can pull ideas for designing something similarly "deconstructed", like a triptych. The possibilities for this style really are endless. Multiple canvases spaced apart but posed as a single fluid piece can be such a gorgeous concept, and if you haven't tried it, tryyyy iiiit
Manipulating negative space adds a whole new dimension to paintings.
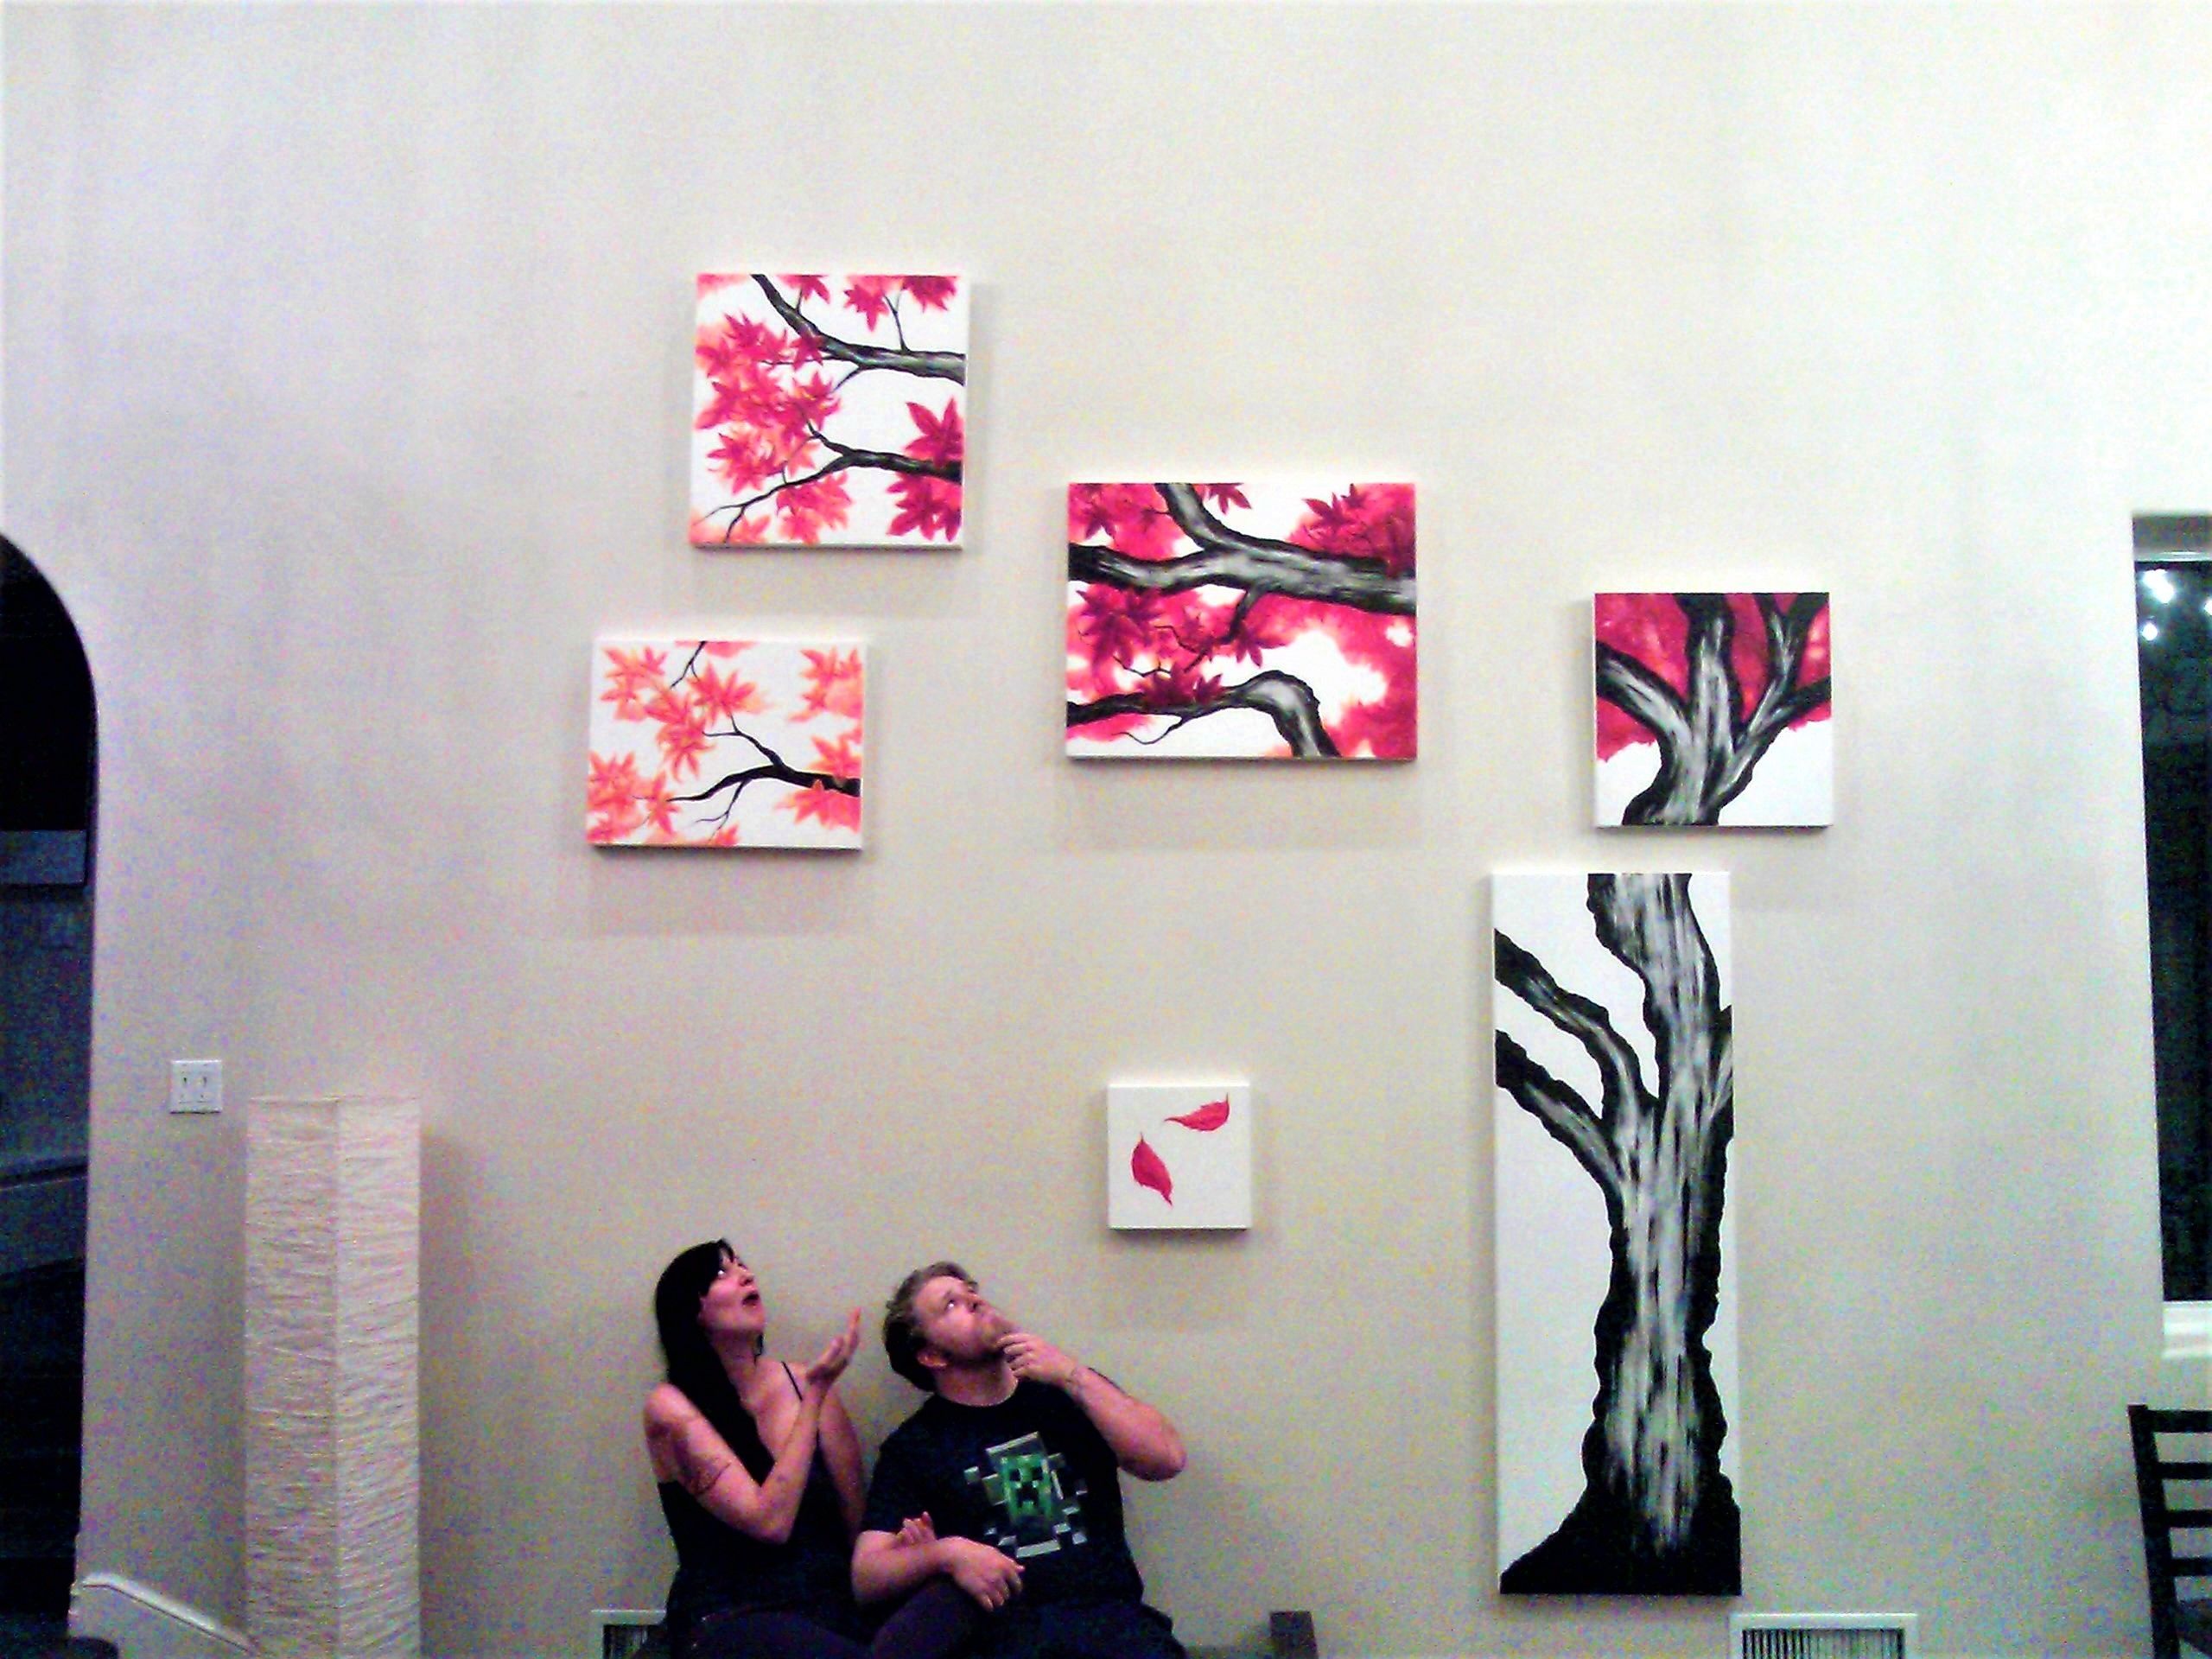
This is the finished piece, with bonus goofy-ass artists:
So, the basic concept was a tree built out over multiple canvases that don't touch. Here's how we did it:
Phase 1: I Love it when a Plan Comes Together
This was my first commissioned piece, and I was terrified. Rightly so--canvas is expensive, and when you're investing in 6 large canvases, you want to get it right the first time. I actually laid out the canvases on the floor in the shop to get a sense of exactly what I wanted to buy, and settled on this design:
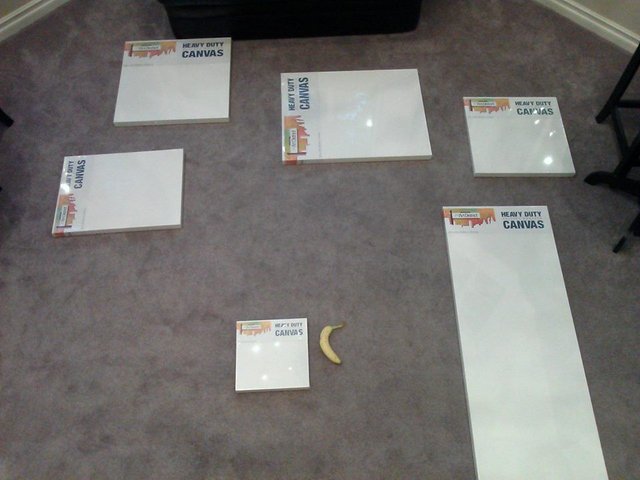
I got these on a Labor Day sale, but even so, I think I paid about $250 US. The banana is for scale, but to give you a better sense, the largest canvas on the right is 4x2 feet.
This took me about an hour in the store to figure out. Placement is everything with negative space, so know what you want before you buy. Sketch it out on paper, cut out rectangles and play with them as a model to see what looks good, measure your hanging space, whatever it takes--plan your canvas placement well in advance and you leave less room for mistakes.
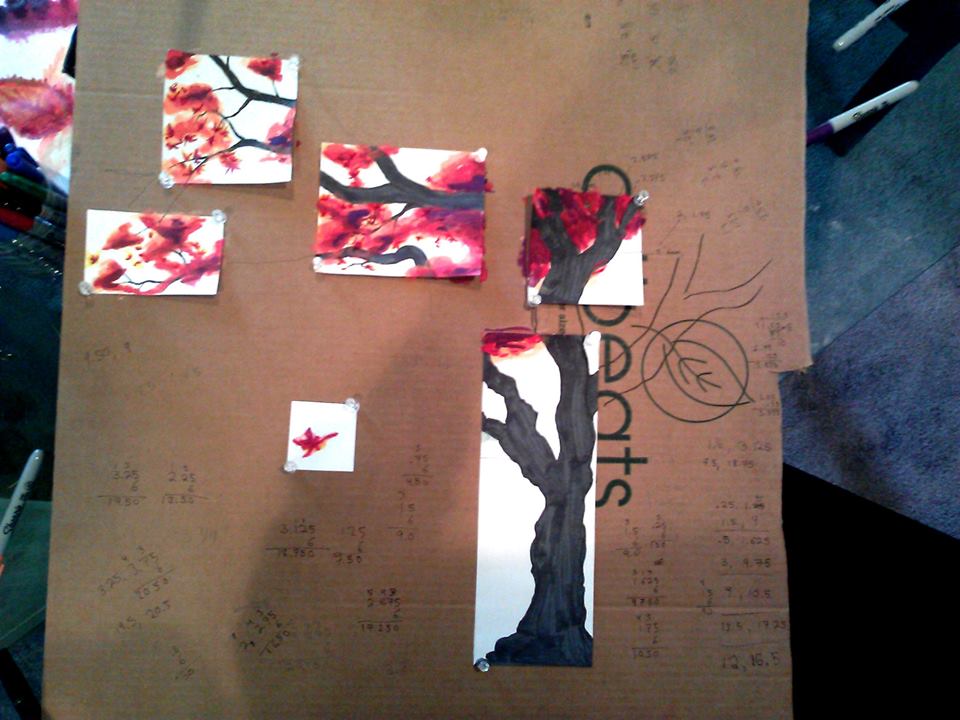
Next came the model:

I made three of these models, but only ended up using one. You might notice the chicken-scratch math all over the board...that was the groundwork for this:
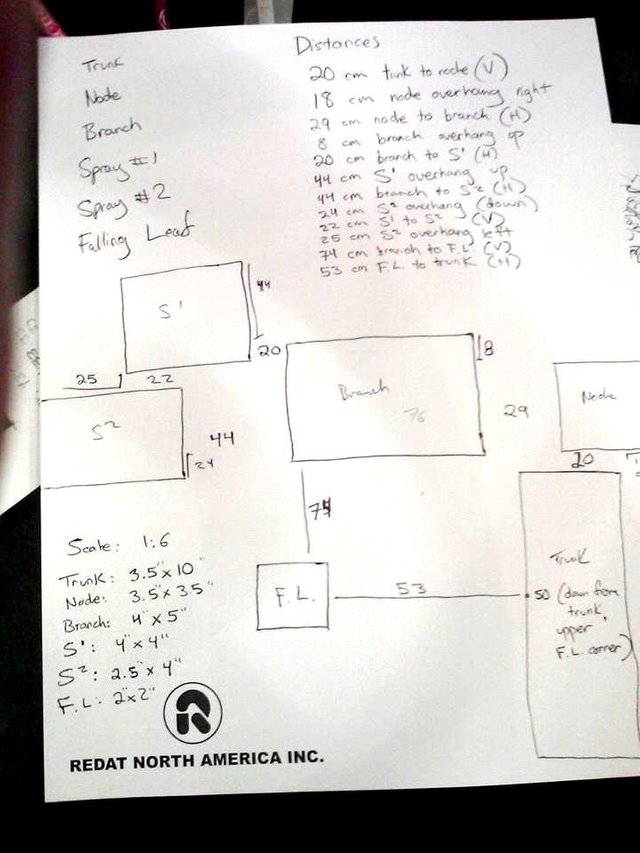
This madness was the record for canvas placement and the sizing scale for the model. I wanted the transitions between the canvas to be completely seamless, so I actually created the model at a 1:6 ratio, drew the tree, then measured the points where the branches would begin and end on the model and translated that back to full scale. I also measured the spaces between the canvases on the ground and their overlap in inches. This was important in case the painting ever got moved or rehung, so that the owner wouldn't have to eyeball it and line it up off-kilter.
This was oddly the most fun part of the project for me. For those of you who aren't particularly mathy and are confident in your artistry, you could sketch your design out across the canvases freehand. Just remember to measure the spaces between them and make a note so that your vision looks the same on the wall.
Phase 2: Art Don't Grow On Trees
The model was done, the canvases were placed. Next we did mock-ups of leaves for a few hours just to see what we liked best:
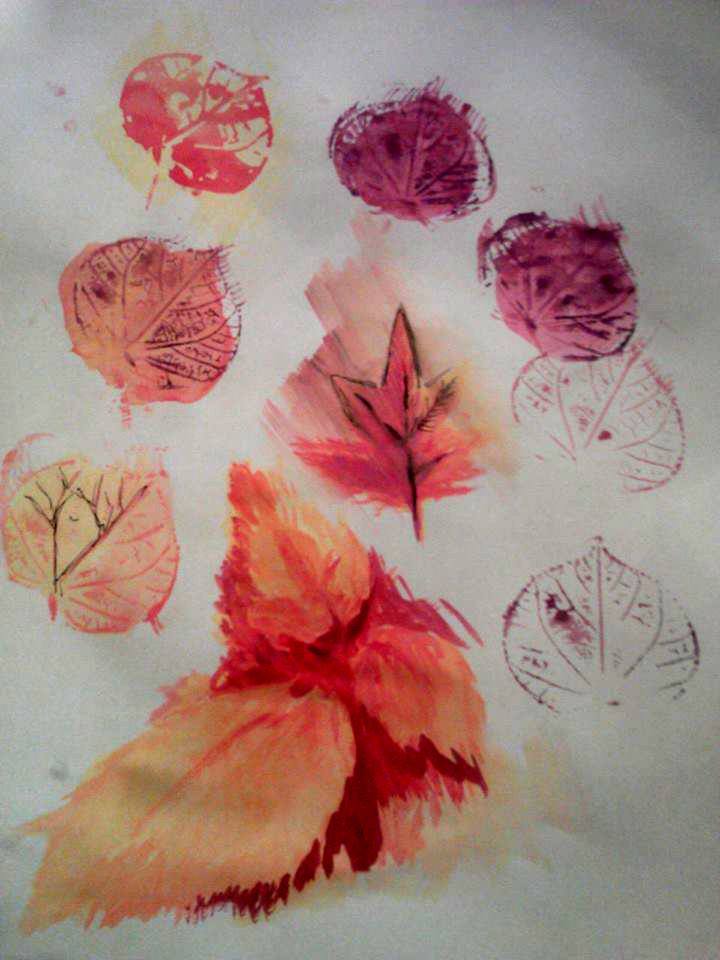
These were watercolor. The prints are real leaves dipped in paint and pressed to the page. I loved them, but we kept experimenting. These are acrylic, with the edges painted with foam sponge :

We ended up deciding on simple, bold Japanese maple leaves, since we liked it on the model:
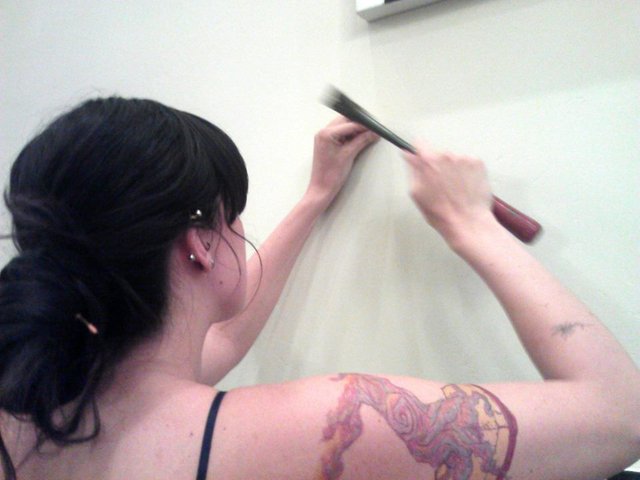
Next came the painting of the tree trunk and branches. Here's a close-up of the trunk:
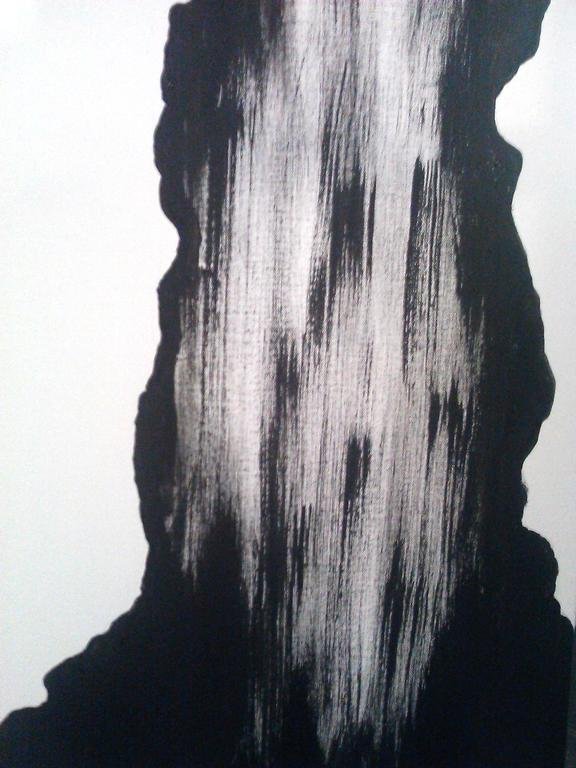
This was a very happy coincidence--I had been planning a simple black silhouette to keep it really abstract, but this started happening and I fell in love. The striations were really simple to make: the trick is to keep the brush bone-dry and use a light touch on paints. Wipe the brush between strokes if you have to to remove excess paint.
All the branches lined up:
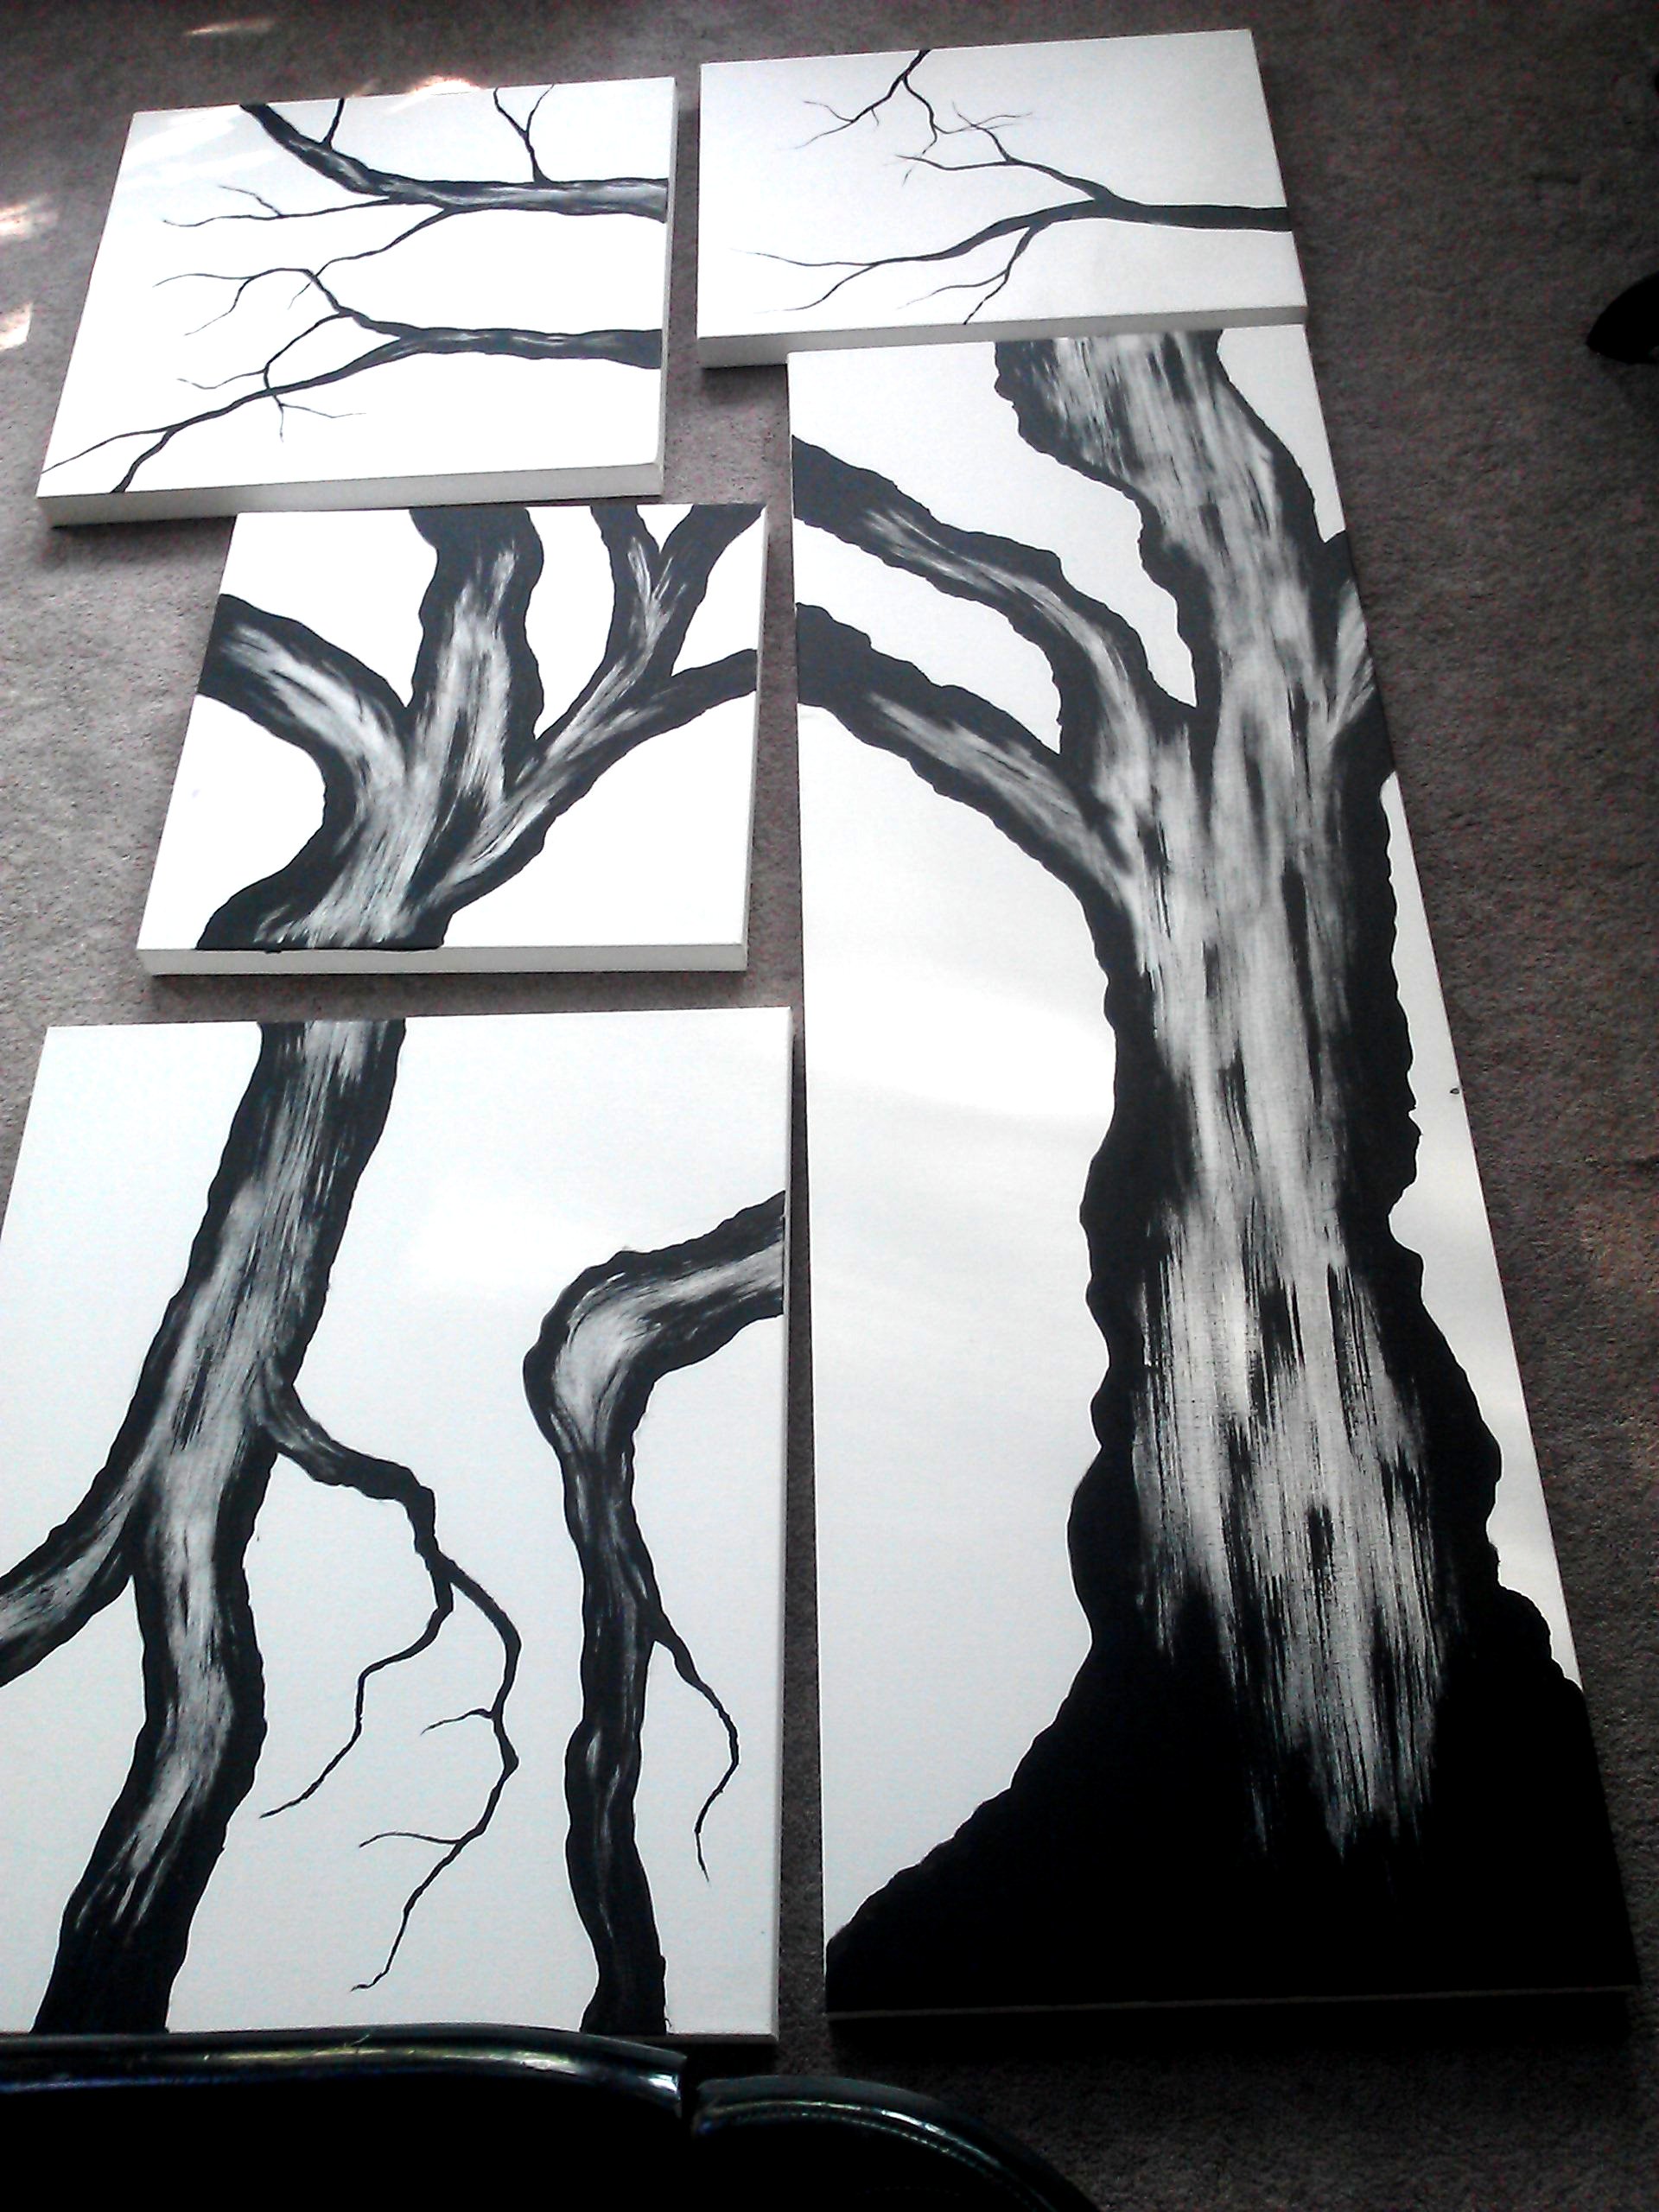
I love these branches. I wish I could have kept it like this, but the client wanted autumn colors. Next time though....
Background leaves:
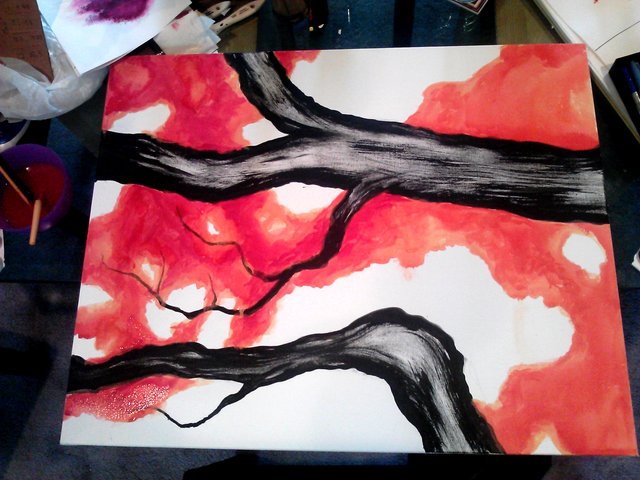
This was done in watercolor, layering red, yellow, and orange in different areas to create depth and variation.
The whole tree:

From here we launched right into the foreground leaves. Unfortunately, by the time that was finished, it was our third consecutive night of getting off work and meeting up to paint well into the night, so we were exhausted and forgot to take close-ups pics. The painting's now in LA with its new owner so I can't easily get more. Boo on me.
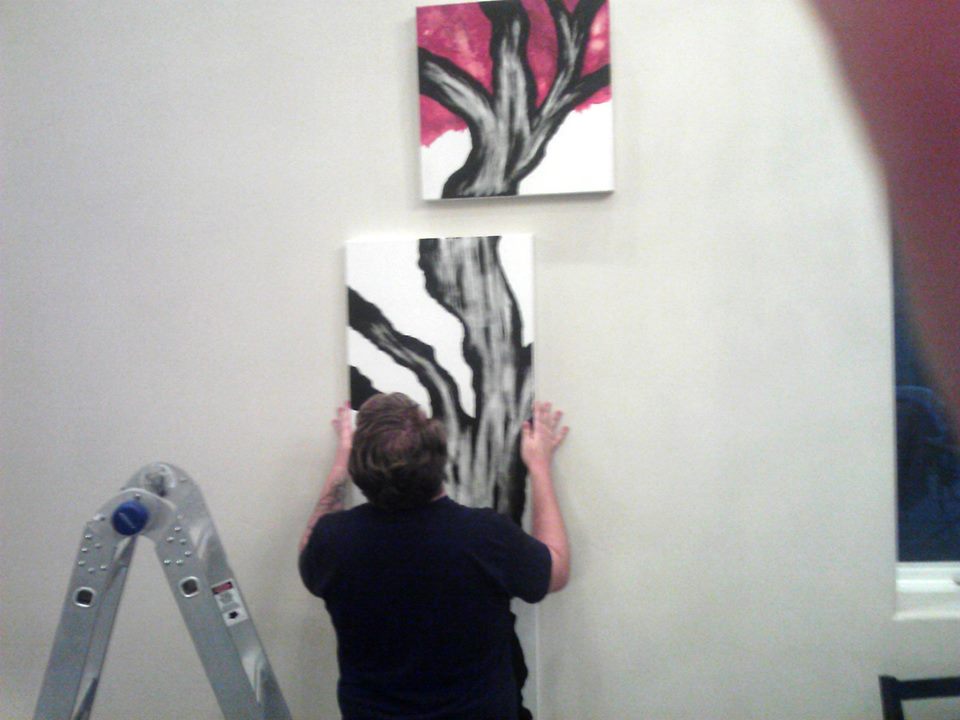
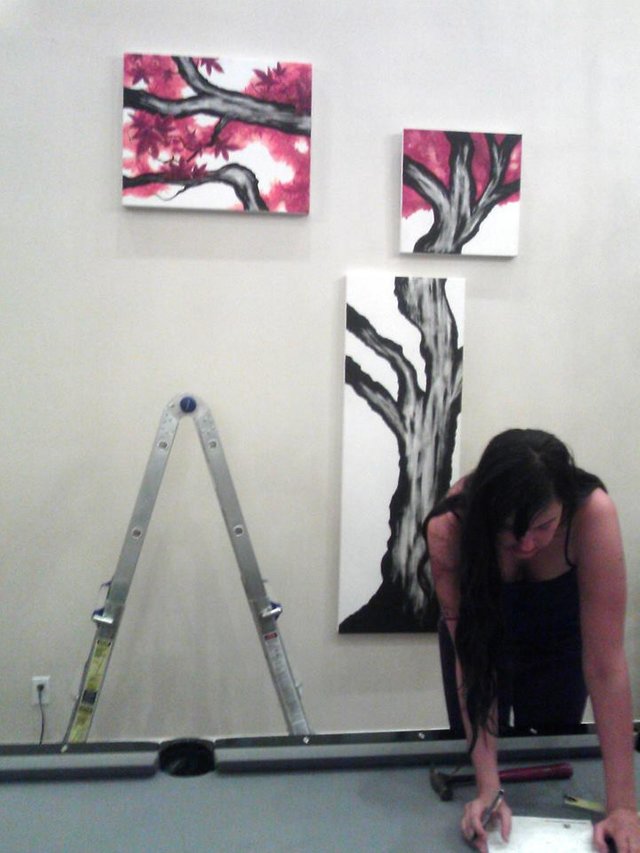
Phase 3: The Hanging, Great and Terrible
Hanging this painting was the hardest part. Hanging one painting straight is tricky. Hanging six paintings straight, all spaced perfectly apart from each other, was nigh impossible. My only advice: use a good ladder, have a good buddy to hold paintings up, and borrow a third person to be your spotter, who can stand back and tell you if it's straight while you two squabble about where to put nails. This is where my placement notes became valuable, I referred to them constantly during the whole process. Some various action shots of us lining the darn thing up:
Phase 4: We Did It!

(I am very ashamed of how blurry this picture is, but what can I say, we're painters, not photographers :P )
To sum up, this was a metric ton of work. Four days, 6+ hour sessions after work, very little sleep, and lots of panic on my part. But I think it turned out pretty great for a first attempt. I can't wait to make more and keep experimenting. Thanks for reading!
Congratulations @rachelkelly! You have completed some achievement on Steemit and have been rewarded with new badge(s) :
Click on any badge to view your own Board of Honnor on SteemitBoard.
For more information about SteemitBoard, click here
If you no longer want to receive notifications, reply to this comment with the word
STOPBy upvoting this notification, you can help all Steemit users. Learn how here!