How to use photo reference to create a realistic painting - A step by step introduction!
Hi all!
Today I wanted to write a post, sharing in the best way I can, my knowledge around a topic that is much discussed in the artworld;

To the left is the finished painting ''Boss'' created from the photo on the right. (Taken by me.)
This is a topic much discussed and deliberated! For some painters, especially artist that paint naturalistic paintings, painting from photo refrence is a complete no,no! The best way, and for the most part the only way, is painting from nature. I can agree on the fact that a camera still can't, and probably never will be able to capture all the subtleties that the human eye can see. I can also agree on the fact that if you have never studied nature and know fundamental principals about form, light and values, painting from a photo can pretty easily show off in your painting.
But!
And this is a big but.. Overall I do not think that using photo refrance for paintings is worth shaming or criticizing!
I belive it's a wonderful tool and a possibility to work with subject matters and composition in new and inspiering ways. It can also be a necessity if you are not in a place financialy or location wise where you can't easily access models or nature.
I've seen and keep seeing fantastic examples of artist using photo referance every day in their art that I admire. Painting from a picture doesn't mean you have to be 100% true to the photo or that you won't be able to make your subject feel ''alive''.
Today I wanted to show an example of painting I recently finished where I worked from photo referance and let you in on what I take into consideration when I create a painting from a photo.
The painting I will be explaining from is this one;

''Boss'', oilpainting on gesso primed panel. Size 30 x 30 cm.
And this is the photo I was working from;

Photo taken by me during a walk here in Portugal where I live in ''Birdpark''.
One thing i will metntion before we start with the steps are the paint mixes.

The mixes used to create this painting.
When working from a photo I always pre mix my colors. This is because I like to clearify my value range before I start.. Remember that when we work from a photo ( as well as when we work from life) we need to compress our colors and values. This is necessary because there is no way we can match to the point all the values and colors we see in real life. We need to make a value string ranging from our darkest option ( usually black) to our lightest option ( usually pure white). The values that we make in between these two counterpoints will determinate how well the lighteffect and form will read in the painting. It is also a good to premix to be able to see how the colors play off each other. Something might not seem red enough, but being put next to green ( the complementary color) it can suddenly become TOO red. Premixing lets you asses these things before you have lots of paint on your canvas.
Step 1:
The first step for me no matter if I paint from llife or a photo is the same; Block in. A block in is a loose general drawing or sketch of the BIG form. Here I focus on placing the big proportion down on my canvas or panel to get the composition going.

Step 2:
Step two is solidifying my block in and making it more spesific. Here i work with thinner brushes in the matching colors of the areas that I am solidifying. For now I am still working very much the same as I would if I was painting from life.

Step 3:
Now in step 3 you can see the first prove of me working from a photo; digging into areas. If I was painting from life I would still be working with the whole form instead of breaking it up into ''piece painting''. This is because the model would be moving and changing so that digging into too spesific details too soon could potentially (and most likely) prove wrong and needed changed later on. With a photo we know this won't happen.

The main reason why i started with the face is because that is the area with the most color. The most chroma. All the rest of the colors and values I put down will relate to this. I really want to use some punching reds so I put these down to be able to play them off with the other colors that will follow.
I won't paint anything to a finish yet, but painting from a photo gives you the freedom to spend some extra time on areas you wish to explore at any point in the process.
Step 4:
Now I want to get the whole, overall visual impression going. Like always I do this by putting down a thin layer of the general color and valye of the areas. If anything, always go a bit too dark in this phase. In oil painting it's always easier to go from dark to light than frm light to dark.
Step 5:
After going in with a general wash of color I add notes of the darkest and the lightes colors. This is, to repeat myself, to set my range, my specter. Remember that when we work from a photo ( as well as when we work from life) we need to compress our colors and values. This is necessary because there is no way we can match to the point all the values and colors we see in real life. We need to make a value string ranging from our darkest option ( usually black) to our lightest option ( usually pure white). The values that we make in between these two counterpoints will determinate how well the lighteffect and form will read in the painting.

Step 6:
After the notes have been put down we can then go in and fill out the larger areas. Remember to squint a lot not to make the contrasts too big and to look at the big proportion as a whole. Another important thing when you start to paint the details is to look at them not just as details but as details relating to a whole as well. Often, and especially when painting from a photo we get too caught up in details and they take on a life of their own. THIS is something that can make a less realistic impression.

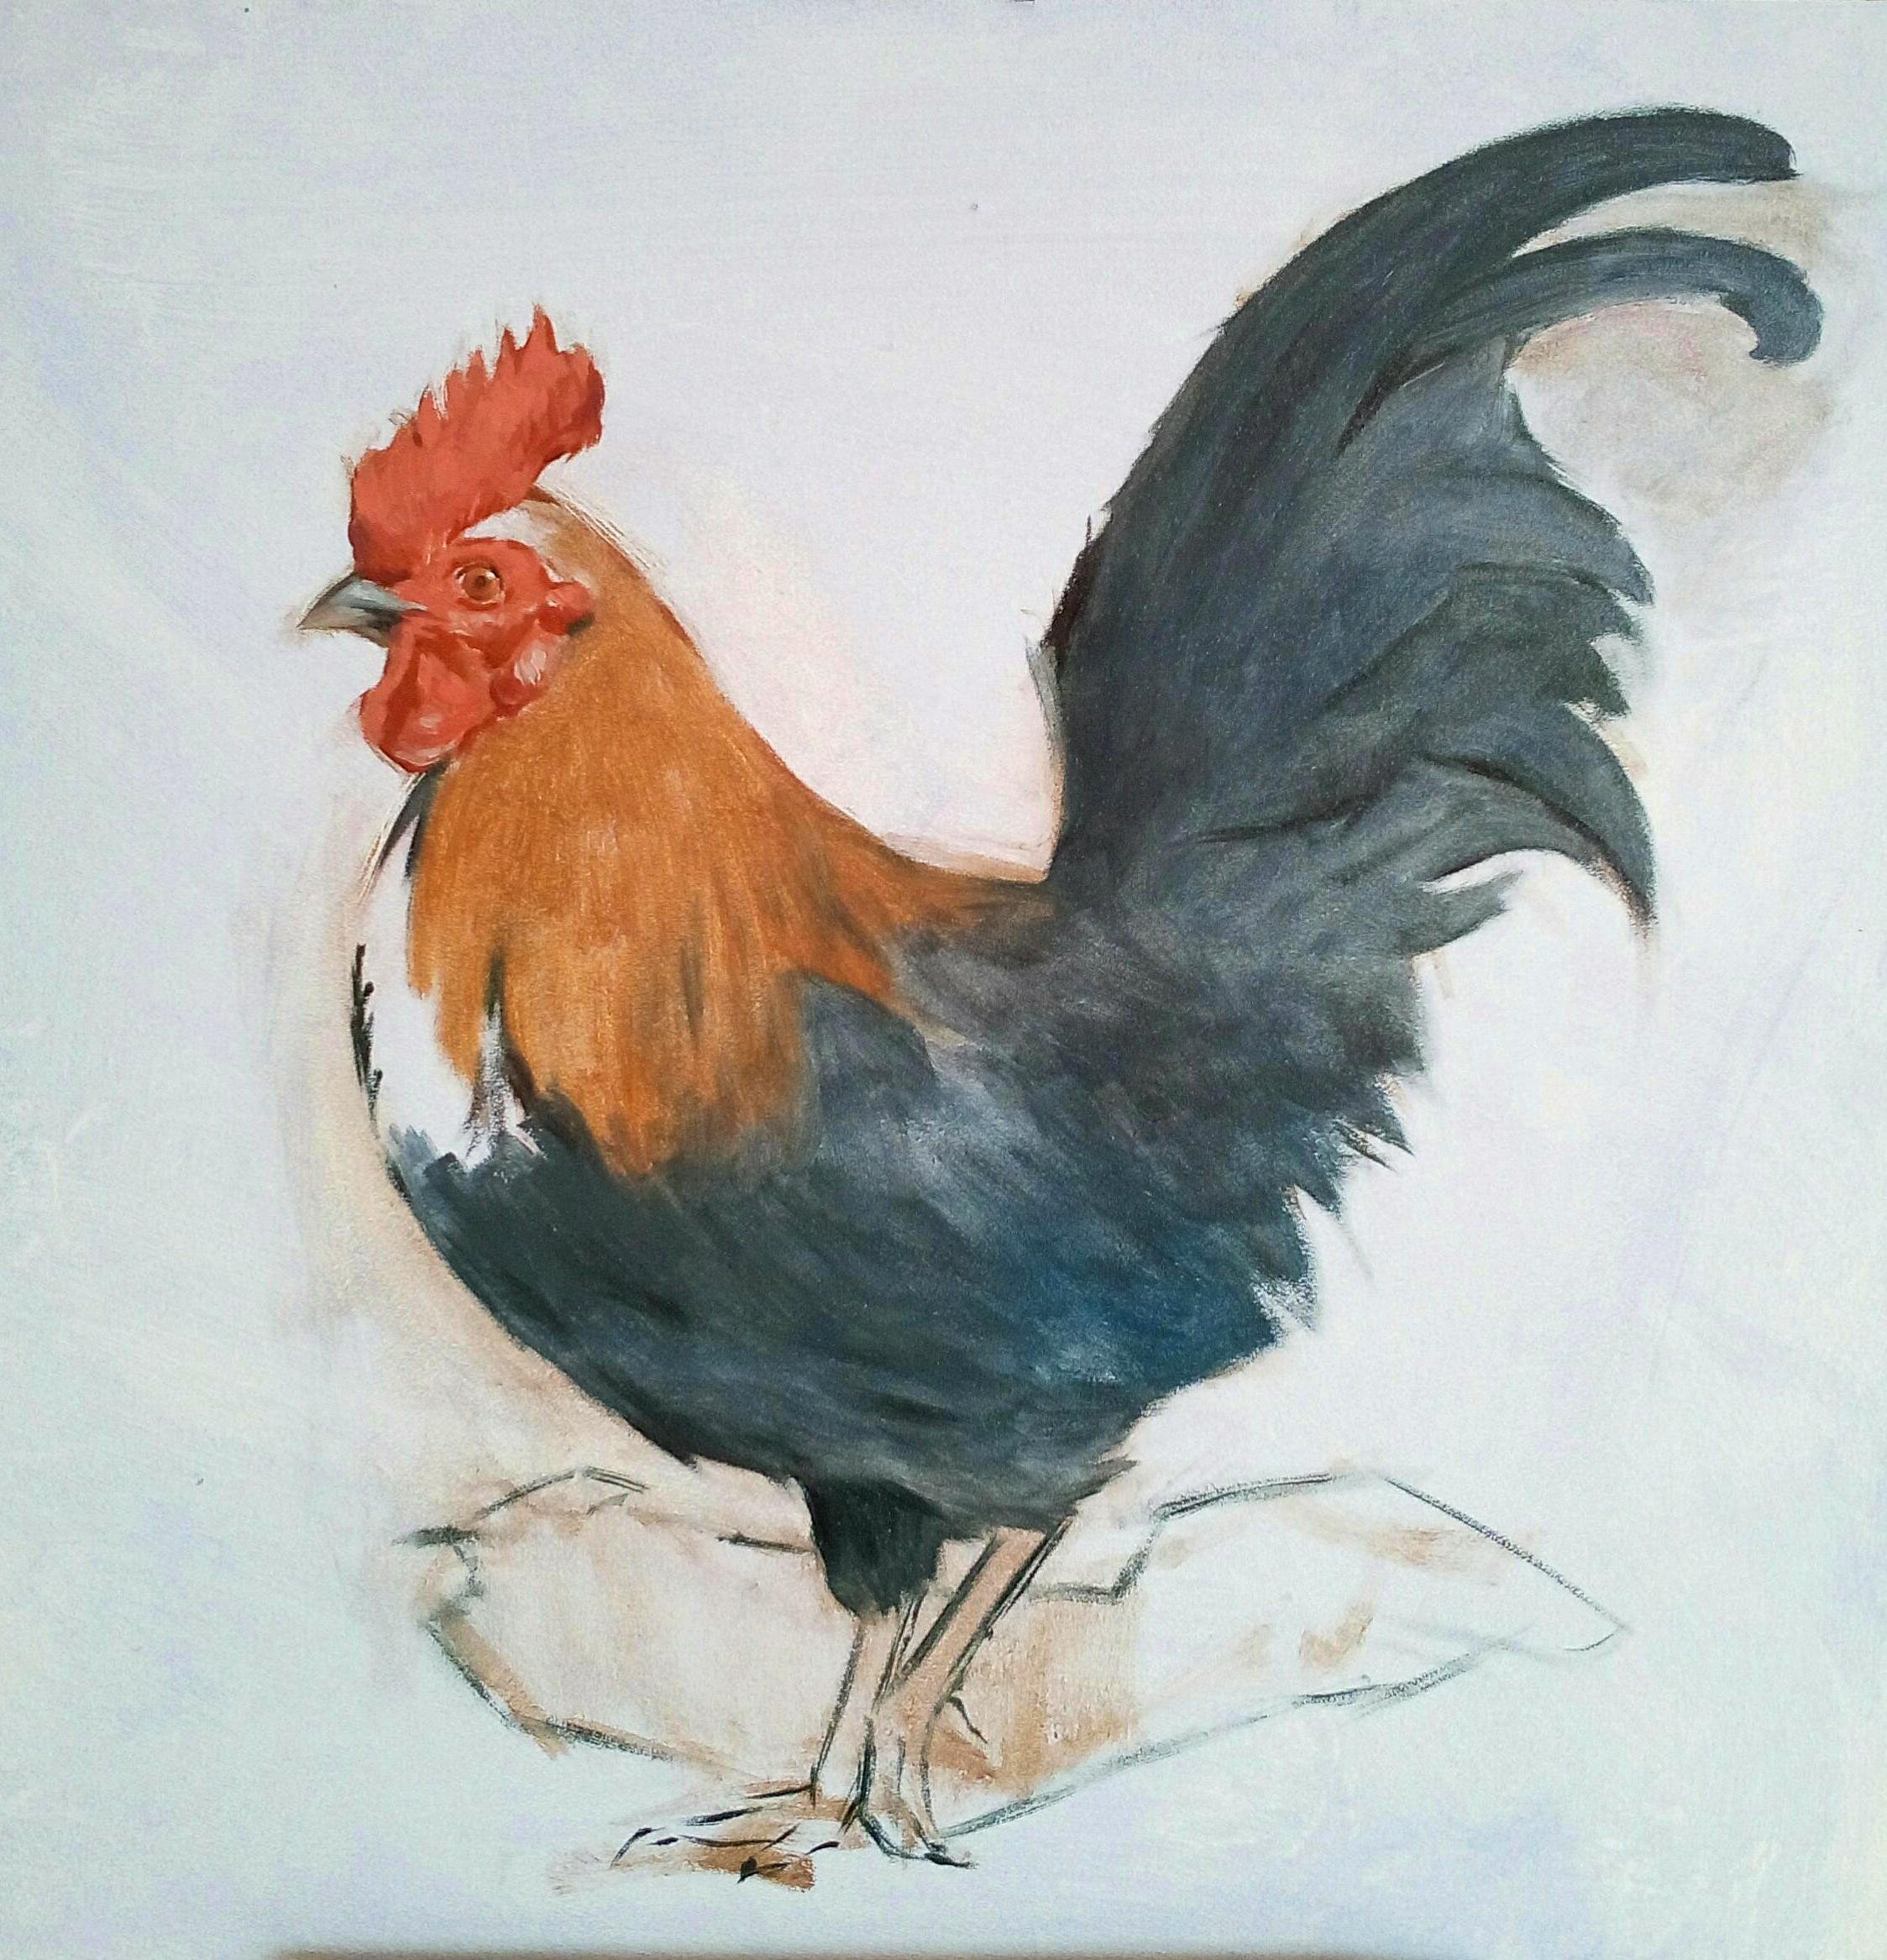
Step 7:
I add in the feet and shadow under the cock to ground my model. As far as the background goes I will keep it light and exclude all the stuff that goes on in the backround of my photo. To me all this things are just distractions and will not add to my painting.

Step 8:
Now it is time for going back to the place I started, the face , and start the round of finish work. This is also the time to add a little extra paint for texture if you prefer that impression.
Now, one of the most important things when you are painting from a photo is to pay extra attention to the line quality. What happens to it? Where is it hard, where is is soft? Where does it almost dissappear? To have a lot of line variation will help convey a realistic rendering of the form.


Here is a close up of the head to let you see how the edge around is being varied.
Step 9:
One of the last steps is to add in the background to help me bring variation to the contour. Here I worked with a very light grey and pure white.

Step 10:
The final, final step is to brighten the shadow under the cock to give it more atmosphere and make it more part of the lighter image. And there you have it, finished!


I hope you found this post interesting, helpful or inspiering! :)
If so let me know your thoughts!
Do you have any spesific questions or thoughts about painting from a photo?
Do you have any experience you want to share?
As always, good people, I wish you a wonderful and inspiering day!
<3

My website;
https://www.marieblomartist.com/
My instagram;
https://www.instagram.com/marieblomfineart/
I agree with you dear @mayasky, sometimes we just HAVE to use photo :) Not all of us are able to work from nature, and still I give painting from nature huge advance. Especially when portraits are done and I know that you understand what I am talking about. But good photo can be also great model for painting, and girl you sure explained and showed that here.
Great oil painting again and happy to see it's 30x30 square shape :)
Aw, thank you so much for your support and encouragement @jungwatercolor!! 😊🎨 It really means a lot! ❤
Yes, sometimes we just have to and I am really passionate about normalizing this as after experiencing a lot of negativity around the subject. It's so great to get so much positive feedback here on steemit, yes!! 😄
...and I think the 30x30 square has become a new permanent addition to my panel collection. ;)
Maginificent painting! Thank you for this beautiful tutorial and sharing your artistic insight, you incorporated so many invaluable hints and observations! This is one very helpful guide.
Sometimes I work with photos and I quite like it. But I had the impression that it could be perceived as a not so great practice. Could you please tell something more about how painting/drawing from photo shows off? What are the most common signs? I definitely need this kind of advice as I'm quite inexperienced and aware of my artistic shortcomings! It would be lovely if you could share your point of view <3
All the best,
Klaudia
Thank you SO much for your comment @shinyforest! :D <3 (Love your name btw..!)
Thank you for taking the time to share your experiences and thoughts on this topic close to my heart. To answer your question, I think in it's essence what makes something look like it's been drawn/painted from a photo is if it looks ''static'' or ''lifeless''. I think the main cause for this impression is when the artist only focuses on copying what they see rather than understanding what they see. Understanding what happens to your subject in a photo requires studying nature, light, form, values and color. It is ofcourse also really important to work from GOOD photos where you DO understand the light situation for example. Some photos have a very flat light and if so, trying to create form and light where there really isn't much to begin with is very hard., especially if you don't really know how those components work.
I hope you got something from my answer and I'd be happy to answer any other question you have ;)
Thank you again Klaudia! <3
I appreciate your support!
Best,
Marie
Well done. I often work from photos when I am trying to capture light on things like fabric. In my latest series of paintings I am getting more and more obsessed with fabric so I use a photo for reference of light in folds and pleats in a gown. It isn't any different than having a model, except they don't have to stand there all the time :) Even the greats used photos once they were available, but they didn't have the advantage of colour but it still gave them composition and light values and form.
Great article. And I am following you now too, as I discovered you thanks to @jungwatercolor
Thank you very much for your support and for sharing your thoughts and experiences on this subject @donnadavisart! 😍
I always admired people who were really good at capturing the light and texture of fabric! ❤ It's not something I've really practiced myself a lot and I have to say I love your work 😊 With the fabric and in general, hehe..
It's also a great point you make about the great masters using photos as soon as it was available to them to help out in different aspects. I don't know if a lot of people know this but it definitely helps to normalize it.
Thank you again for your comment and I am so happy @jungwatercolor helped you find my blog! 😄
Great work! Thanks for pointing out that it is not comfortable for some people, like me, to paint from life. Mostly because of the kind of art I do. This post is very timely for me. I don't know if you saw my post but just earlier today I got accused of drawing from photos. Although I may draw from life from time to time, working from photos is my thing and I will keep doing it.
Thank you for your comment @promisearts! :) I am so happy you could relate to this post and that it happened to find it's way to you like you said, ''timely''. ;)
It's so funny, isn't it, how you said that you were Accused of working from a photo!? The fact that people use the mere fact that you work from a photo to pass judgement on you as an artist and your work is SO narrowminded... I am so happy you can say that working from photo refrence is your thing and you will keep on doing it! You go! :D
You're welcome. Thanks a lot for understanding.
Wow. Another great resource for the art community. You just keep coming with it. :)
I just re-steemed and I am going to look over this more thoroughly when I get the chance later.
Thank You For Being Awesome
AW! :D Thank you so much @art-mess! :D <3 I am so happy you find my posts to be a resource here on Steemit! I apreciate your support so much!
Thank You for being super awesome!
beautiful painting , and i love steps of it <3
Thank you so much @adelepazani!! :D <3
Great tutorial, wish I would have at least some talent for painting.
Thank you very much @zorank! :) I am glad you enjoyed it! :)
Thank you for this, it's very helpful, at least to me it is.
Aw, it's my pleasure @erikah! :) So happy you found it helpful! :) <3