My First Sketch in 2018: BEFORE and AFTER (Pencil Shading)

Trying to bring back My passion that I have once lost for the long time
First of all the I would like to introduce to you the Subject of my drawing.She is Jella, a 4 years old kid with so much cute and adorable personalities and that was the reason that's why she caught my attetion to draw or to sketch again.At her age she appreciated my past artworks and drawings on my sketchpad.And from out of nowhere, despite of her tongue-tied liked speaking because of her age, She wants me to Draw her, and thennnn! that's why. . .
Okay, Back to the topic. To all of you My friends, I made this post to share my little knowledge about Sketching or Pencil Shading and the tools (actually improvised tools) that i have been used on this piece.
Introducing: Pencil Shading:
For me Pencil Shading is used in drawing for the tones or levels of darkness on paper by applying a darker shade for darker areas, and less with a lighter shade for lighter areas(On this matter,I just practicing the pressure on my hand and pencil while shading). And there are various techniques in shading. . . and I think cross hatching and powder shading are the techniques I used mostly on my drawings.
These are the Materials and Tools I used to make this possible :
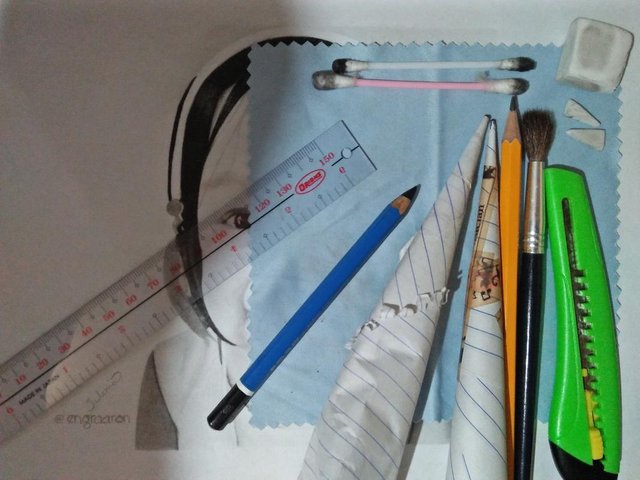
- 8B pencil (ONLY for all Shading Matters. NO CharcoalBar or Powder,Its too expensive for me hehe)
- Mongol-2 pencil ( it is more cheaper than HB :D)
- BondPaper
- Cutter
- Eraser
- Ruler
- Brush (I am not using it for shading.Im using it for removing eraser dust only)
- Cutter (basically this is my Sharpener)
- Cotton buds
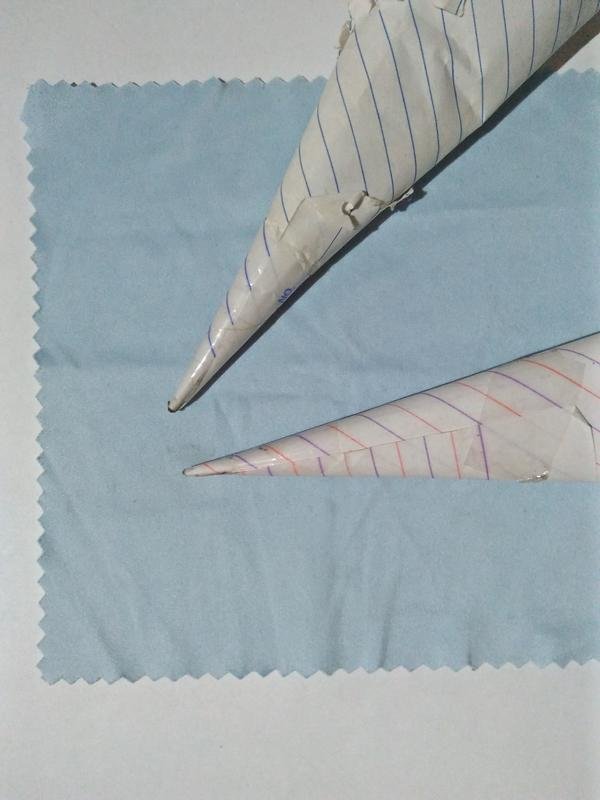
- Improvised Paper Stamp
My improvised Paper Stamp: It is only a scratch paper that rolled to shape like a cone, sealed by a tape and used the tip for Shading the edge part.
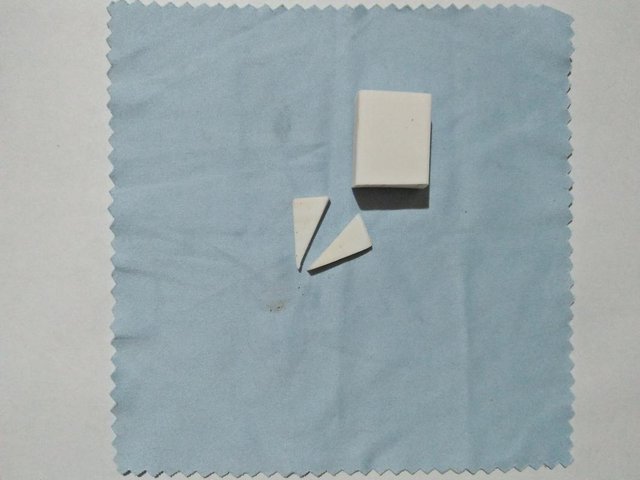
And instead of using Gum Eraser,I only cut a small part on my Eraser using Cutter and shaped it like a right triangle for the edge part too.(And that's why using the eraser this way is also needing a control of pressure of hand to eraser for leveling the shading or tone).
Sorry guys, I'm not a Pro, so this are only the materials/tools I knew and I want to share it to all of you. I don't have enough budget for some expensive tools that's why I made my own and I know some of other aspiring artist doing it too. :)
And now I will show you the Step by Step Process on this Drawing and how it was done.
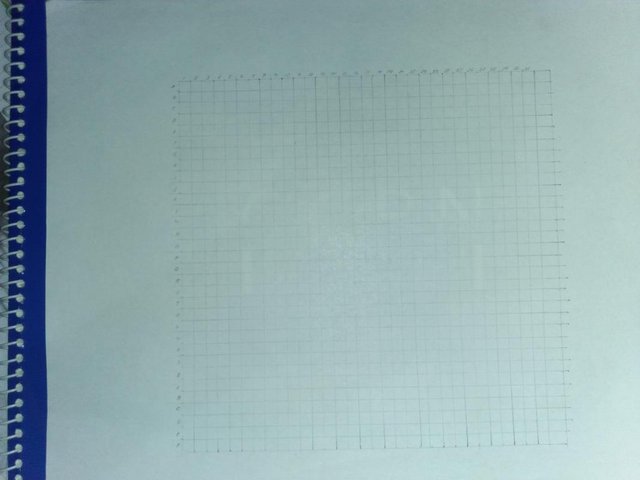
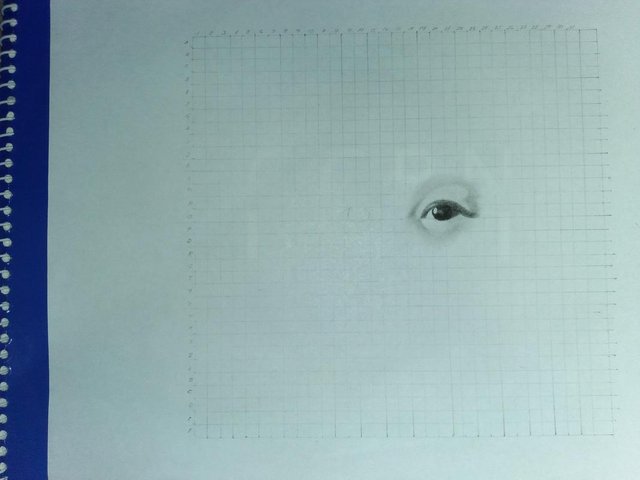
STEP 1 : GUIDELINES OR GRID LINES
First I drew a temporary Grid lines on the Paper and to the Black and white print using Ruler and Mongol2 pencil. Then as a beginner, the spacing of my Gridlines was 0.5 centimeters to make my sketching more precise and to be more aware on proportionality.I also labeled it by numbers on the upper part(horizontally) and by letters on the left part(vertically)
STEP 2 : Start with the Eyes
It is more interesting for me to draw the eyes of the subjects rather than the lining of the face or the other parts of the Subject.Because it makes the drawing to look more alive faster.By the way I drew the outline of the eyes first before I shade it.

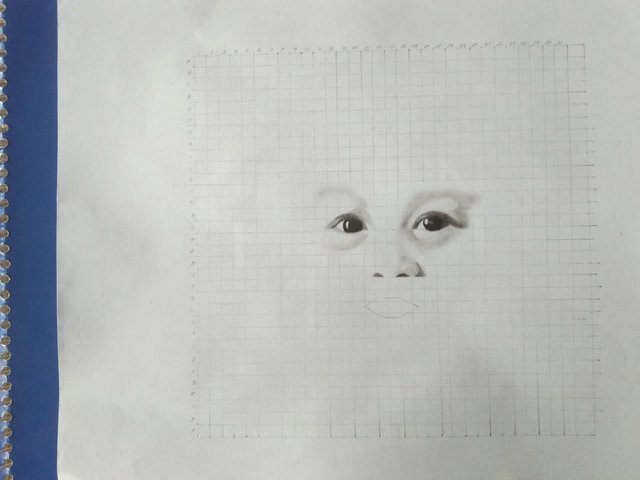
STEP 3 : The Nose and The Mouth
Here,I did not make any outline for the nose, I just followed the guide of gridlines and start shading the dark part using My Paper stamp dipped on the collected shredded dust of sharpened 8B pencil.And for the Mouth,I drew an outline first to make it proportion and then I started to shade it( For me,in shading,using zigzig stroke is not good because it also affects the level of toning of shading,So I am shading my drawing by Parallel stroke of the hand to estimste the level of shading.

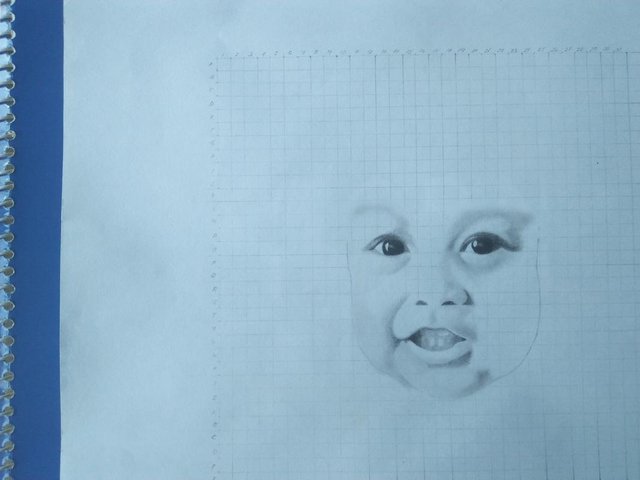
STEP 4 : The Lining of the Face and It's Other Details
The first thing I did here is to draw an outline for the chin part and shaded it to look more the drawing alive.And then I continued to make an outline for the face and detailed it by shading using a cotton buds ( About the cotton buds, I am not dipping it to the collected dust of sharpened 8B pencil, I just scratching it to the tip of it to use as shader )

STEP 5 : The Hair and The Head Phone
The hair for me is the most critical part.Because it is the time to be more careful about the neatness of our drawings.So what I did here, I get a scratch paper to use as My protection while I am drawing the outlines and while I am shading it using 8B with so much pressure to darken it.Next is the shining part of the hair,on this part, I used the tip of the Eraser and poked it slowly to estimate the level of the shinny part.And then after the Hair,I drew an outline for the headphone,then I just followed the gridlines on shading of this part (actually this is one of the hardest part for me,because on the shinning part below the headphone)
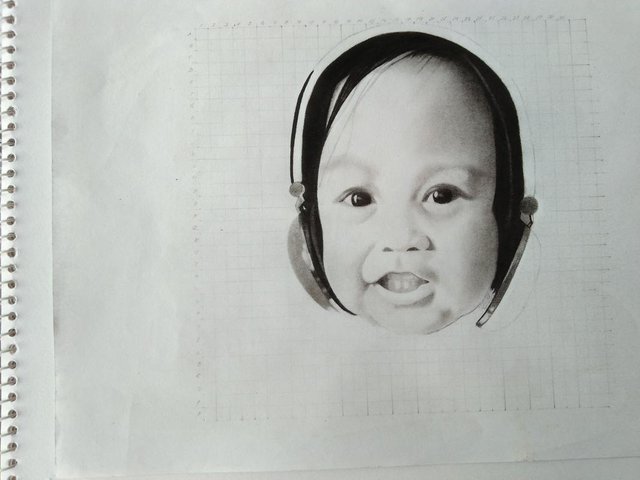

AND THEN THE LAST PART IS
STEP 6 : Shading the Chest Part and Detailing the Shirt
About shading of the Chest on this drawing,I only got a new cotton buds and scratch it very little on the hair shaded by 8B pencilto to use as shader for the chest.And then next is the shirt, and drawing this is my favorite one, because for me it was the part where the drawing looks more realistic because of the crumpled effects of the shirt.And on this part,I drew an outlines first and then followed the gridlines to make the crumpled effect using cotton buds and paper stamp. OOooppps I Forgot!!!,the most important is to Sign your Drawing hahaha
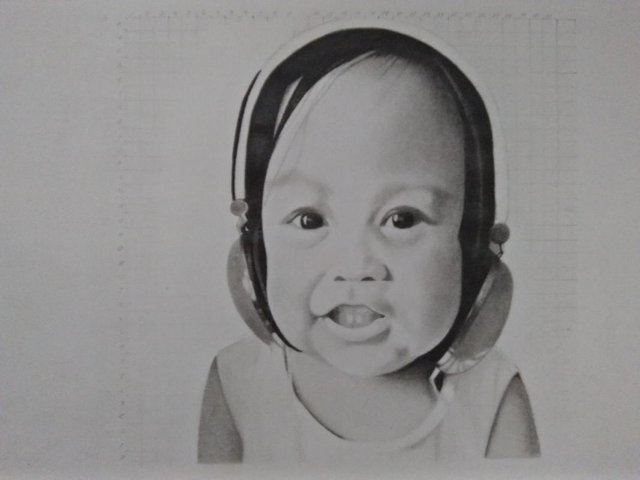
I cropped this drawing and collage it to my reference photo. Hope you like it!

You know what I always told myself that Drawing is not My thing, especially if I look at my tools and comparing it to others. Thinking that I have incomplete materials to make My Drawing more presentable. Then because of this 4 year old Kid (Jella), she made me think on her word that ITS NOT ABOUT THE TOOLS, and YES I guess she was right :)
"EVERY ARTIST WAS AN AMATEUR"
You can check ty Reference Photo Here : REFERENCE PHOTO
I also made a GIF Process
I hope you like it!
Till next time guys.
engraaron,
at your service
Congratulations! You are one of our Weekly featured Authors.
Welcome to Steemit Philippines. Check out @steemph and join us in discord to connect with other Filipinos on Steemit.
Thank You po. "MARAMING SALAMAT"
wow, excellent friend, you have a lot of talent!
Thanks bro.😁
beautiful hand work,very neat. keep up the good work, i just up voted you
Thank you Ma'dam 😄
You've done great kuya aaron! 😊
Thank You for appreciating my work Ms.Jeal. 😁
lupet talaga ni lodi aaron!
wooohhhamazing .. hope you post more :)
Haha Salamat sir.I will
Wow what a work of art! You're the man @engraaron
hey greg.thanks for appreciating my drawing.i hope you like it. @greganthony
wowoweewow! what a great talent! Nice work @engraaron. Lodiiiiiii. upvoted! :))))))))))
wow thanks sir @dwin0603 .I hope you'd find my post interestingly.haha