The Complete beginners guide to Adobe Photoshop Lesson #26 - How to cancel incorrect action in Adobe Photoshop

What is good with digital graphics is the ability to undo the wrong action.
The program photoshop has a whole arsenal of various ways, as painless and quickly undo the unwanted action. All these methods will be discussed in this article.
Step 1 - CTR+Z
I think this key combination is known to almost everyone who works with text documents on the computer. This is a standard system command that overrides the previous action. It works in almost any program and editor.
In Photoshop there is an important difference. If in a text editor, we can at least indefinitely press this combination and will watch as step by step we go back, then in Photoshop it can be pressed only once.
This combination cancels only one wrong action, and a second press returns everything to its place. And so on a circle to infinity.
Step 2 - Step Back
Just start with a little disappointment, since Ctrl + Z is already so "hammered into the hand" that the first time will be hard to get used to. But how to be, if it is necessary to cancel not only the last action, but, let's say, the last 10?
In this case, you have to retrain yourself into another similar combination - Ctrl + Alt + Z. Or use the menu command Edit - Step Back.
There is also a team on the contrary - Step forward, which will return what you brought back. :)
By default, Photoshop remembers the last 20 actions you performed, that is, the combination Ctrl + Alt + Z can be pressed 20 times. But this can easily be changed in Photoshop settings. To do this, open Edit - Settings - Performance.
Step 3 - Palette History
If you are a novice user of Photoshop, then first I recommend to read more about what palettes are in Photoshop and separately what is the History palette.
In short - the History palette displays all your actions for processing the photo and each of them displays a separate line. It looks like this:
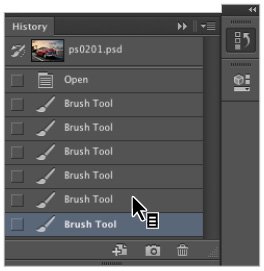
In this example, I used the brush tool many times. Each of these uses is displayed in a separate record, signed with the name of the tool and displayed with an individual thumbnail.
Using the palette is easy - click a certain action in this story and the photoshop will return to the state when this action was committed. All that is after, it became visible pale gray. While you have not done anything, you can choose another action from among the pale gray, but if you returned and applied, for example, another tool, then at that moment the whole pale gray story is erased.
To open it, check the Window - History window.
As in the previous method, by default, the History palette displays the last 20 actions. In the settings Edit - Settings - Performance, you can change this.
This post has received gratitude of 1.00 % from @jout
You got a 0.29% upvote from @postpromoter courtesy of @jout!
I always use ctrl-z for slight errors and use palette history for major errors so I can pinpoint exactly where I messed up. Great post, should help a lot of people getting into photoshop learn there are other ways than just the typical ctrl-z method known by so many.
thx i hope that i will create more usefull lessons for you and mine audience
I hope you'll eventually go over tutorials on simple things like whitening teeth, spot healing, and color correction (like, you can change eye color). They're pretty basic concepts but would help a lot of up and comers. :)
Congratulations @easy-art! You have completed some achievement on Steemit and have been rewarded with new badge(s) :
Click on any badge to view your own Board of Honor on SteemitBoard.
For more information about SteemitBoard, click here
If you no longer want to receive notifications, reply to this comment with the word
STOP