Ideas for a Citrus Bonsai Tree | challenge from @creativetruth
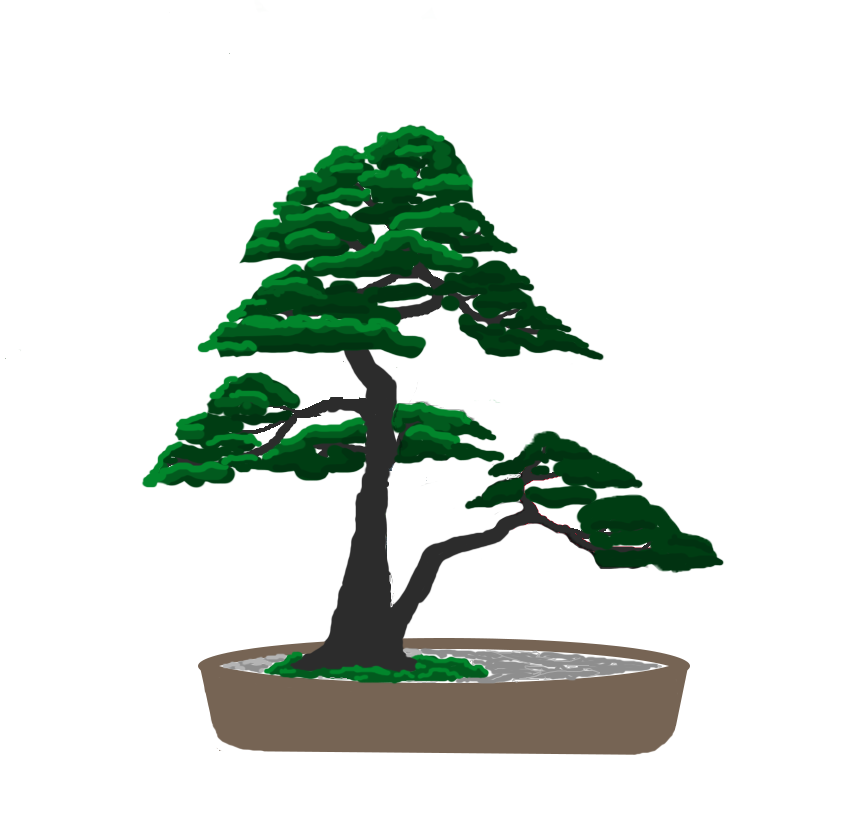
Hello bonsai friends! today reviewing the publications of some friends of the bonsai and gardening of Steemit (something I do almost every day and I like it a lot because I learn many things), I saw this challenge proposed by the curator and friend @creativetruth, being this a bonsai theme I said to myself: I have to take some time to do this challenge hehe, my regards to @creativetruth. Once I had a citrus bonsai, it was exactly a lemon graft, here they call it Persian lemon, but I do not remember what variety they used in the pattern and in the graft, I had it for a long time until I decided to plant it in the house of the hacienda for Enjoy your fruits, then I show you some pictures of him. I hope to remember several things that apply in your crop that can be used for the tree of the friend @creativetruth.
To start, we have to look and analyze this plant very well, so we will notice what the strengths and weaknesses are, both in the bonsai design and the cultivation conditions and techniques. This is why I will start with the shortest, in this case it would be the cultivation conditions, but both parameters should be worked together to achieve a good bonsai tree in less time.

CULTIVATION CONDITIONS:
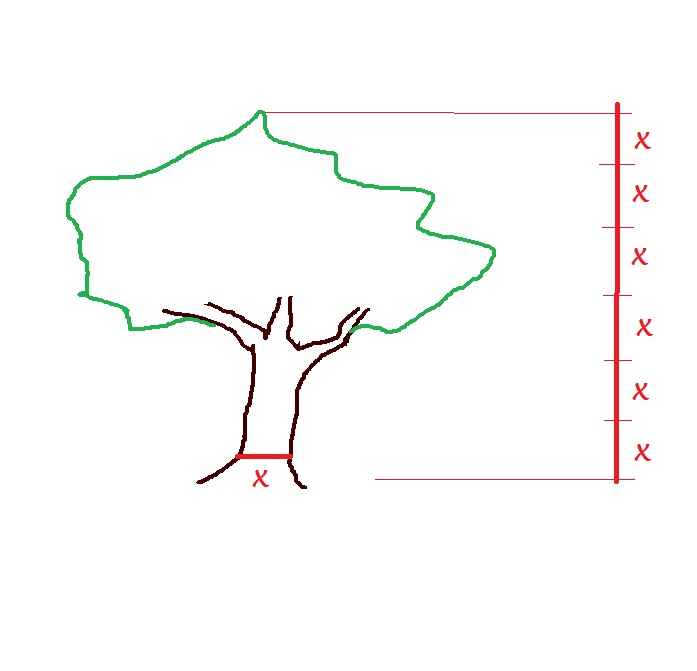
The first thing we must work on is the development of the tree, both the thickening of the trunk and the increase in secondary branching. An ideal bonsai would have a height of about 6 times the diameter of the nebari (6: 1 ratio). Although for tropical trees relations 8: 1 or 10: 1 is acceptable since the growth is more accelerated than the conifers.
The nebari is the lower part of the trunk, just above the roots, the term is Japanese.
So for this small tree, in terms of cultivation, I would apply two techniques to achieve the development I want: one would be planted in a colander with a substrate of thicker particles and the other technique would be that of branches of sacrifice.
1. Strainer technique:
With this technique we will achieve a better root development, with many roots or secondary roots, this root development will cause the crown or foliage to react with a strong sprouting of new branches, which we will pinch to achieve that secondary branch of the foliage that we want to achieve a compact cup.
When I speak of colander I mean a container with multiple holes, both on the sides and on the underside.
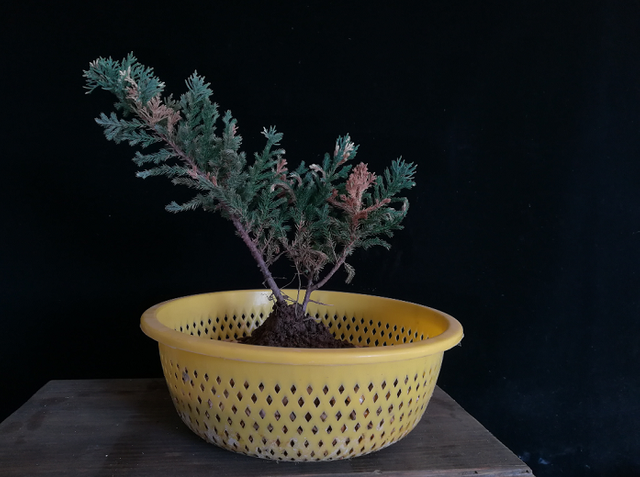
This is an example of the strainer technique, I am using it in this juniper that was attacked by a red spider and is already healthy, but I want it to develop more branching and thickness of the trunk in less time, so I planted it here and I am using fertilization high in nitrogen, in about 6 months you will see how it developed.
If you notice that after a while the growth stopped and you see rootlets wanting to get out of the colander, it is time to put that colander inside a larger container with a substrate similar to the one used inside the colander, this will keep the rootlets and pass to the largest container, this is similar to planting the tree on the ground in your garden and then collect it when it has greater thickness and size. This technique will facilitate the work at the time of making the collection and transplant it to a pot of bonsai.
A typical behavior observed in my lemon plant, is that it tends to take roots down, very deep, rather than to the sides, so you must pay close attention when planting it in the colander.
2. Technique of branches of sacrifice:
With this technique you will achieve the thickening of both the trunk (although it is slower), and the primary branches, but we must be very careful so that the thickness is not greater than desired, remembering that as we approach the apex of the tree the branches and the trunk should be thinner than those of the lower part, more or less conical tendency, never cylindrical. Also be very careful with this technique if you use tutors as the wire, because with the rapid thickening you can mark the trunk or branches and is something that does not look good in bonsai.
This technique is very simple, just let a branch grow freely to enrich the whole part where it is connected and once you achieve the thickness you have in mind for the design of the tree, you go and cut it. Of course, to achieve an accelerated growth you must also provide space to the roots or rather, the technique you mentioned earlier.
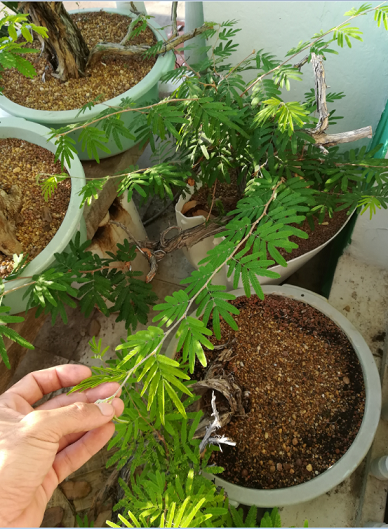
Here I give you an example of how I let the branches grow to swell and then, a few months later, short to define the design of the bonsai.
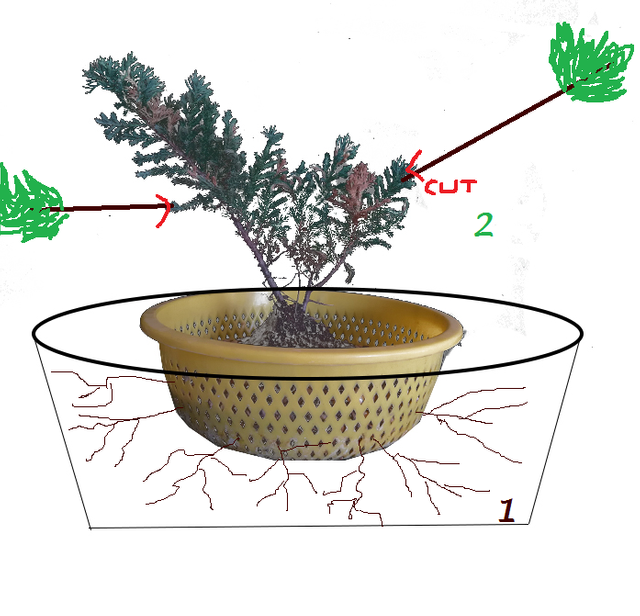
This would be a scheme of the two jobs in terms of cultivation.
Fertilization:
In terms of fertilization, citrus trees in addition to requiring amounts of nitrogen, phosphorus and potassium (N, P, K) have a high demand for micronutrients especially magnesium (Mg), so do not hesitate to make foliar sprays of microelements (currently they already sell fertilizers with this formula). Remember also that to encourage the growth of the foliage we must apply fertilizers with higher concentration of nitrogen (N). Never abuse nitrogenous fertilizers because we can burn our plants, I recommend applying little but constant to much at once. Always apply half the dose recommended by the manufacturer, this recommendation is for friends who are starting in the world of gardening and bonsai.
When you want to obtain fruits, apply Boron and Zinc microelements, in addition to the fertilizer with high content of Phosphorus, this with aspercion to the leaves to encourage the plant to emit flowers, after they are fertilized the flowers apply fertilizer to the soil with high content of potassium, this for the growth of the fruits.
DESIGN OF BONSAI
Speaking of design it is evident that this little tree fits very well into the design of a double trunk bonsai style (SOKAN). A great strength that has this pre bonsai is that being young still has elasticity to bend and direct branches without much difficulty using the fence and the tensors as tutors. One characteristic of citrus trees is that their wood is hard, so it tends to break when bending, so you have to be very careful when you bend the branches.

We know that first of all we must define the front of the future bonsai, I will start from the front already captured in the photograph of the friend @creativetruth. To understand the design on which I will work, we must define the parameters of the double trunk style in Bonsai (SOKAN), these are the most outstanding:
- They are two trees, one large and one small, joined at their base.
- The first branch must be located in the smallest tree.
- Both trees share their base and their radical system and ideally should separate right at their birth, their apices should be oriented in the same direction.
- The largest tree that is the main one must have the thickest trunk. In my Bonsai school we say that in this case the Principal is the Father and the secondary is the mother, in the case of being triple trunk the third is the eldest son and so on.
- At the time of planting a double troop, one of them, the main and highest should be logeramente ahead of the other.
- There will be two trees worked independently but the foliage must make a single composition or a single volume.
The first thing I do is to clean the image to leave only the trunk, then I will number each step I make with this plant to describe it below and to finish I will make a sketch of how this little plant should look.
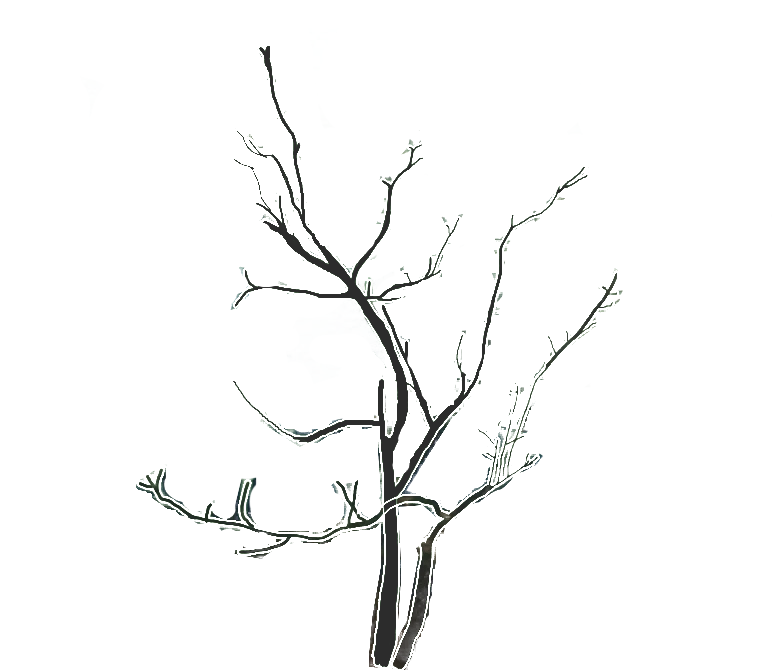
Now, once I have removed the background, I make the numeration of each step I make, the numbering is in red, for the smallest tree and in green for what would be our main tree. I hope you can understand everything that I will explain below:
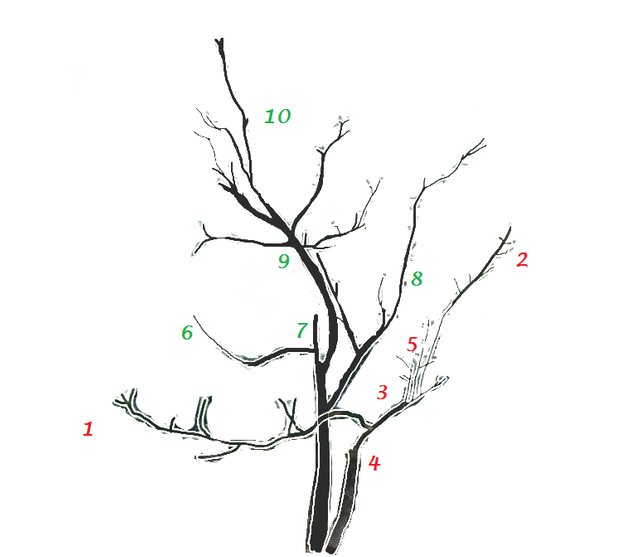
1.This branch is crossing the trunk something that is considered a defect in the bonsai, cut it a little and use it to build the apex of the small tree.
2. Cut this branch, the wire fence next to the small trunk (from the base of the troco, to the tip of this branch) and position it as the first branch or ichinoeda.
3. Just where this number should be the apex of the small tree. This will be achieved by moving the tree with wires.
4. Clamp the trunk as mentioned above and move it to the right.
5. Remove this set of twigs including the stump that comes out below, so that the main branch is clean, in the future the foliage will be structured with secondary branch, now we are interested in assembling the main structure of the tree.
6. This branch would be the first branch of the main tree or the second branch of the composition, so we must develop it, this would be a branch where we would apply the branch technique of sacrifice, that is, let grow and cut in the future.
7.Cut the stump and correct with wire the U that is formed between the branch and the trunk.
8.This branch would use it as a branch of depth, cut it a bit, the wire and the positionary back.
9.This is a critical point, because we have a lot of space without branches, the possible solution is to bend the trunk a bit in this part using wires, but because this part of the tree is very important we can not afford to bend and break that part of the trunk, so I recommend using raffia and a wire guide before wiring and do the doubles, something I recommend doing little by little, since the citrics as mentioned above are very brittle. Also a possible solution is to make a graft of a branch to the right side, opposite to the first branch of the main tree, but this technique must be applied by someone with experience in grafts, so that it is successful and does not leave visible scars.
10.The branches of this area will be cut and we will use them to form the apex of the main tree.
Before making a final sketch of the tree, first I show the image of the trunk when applying a pruning and then with some bends. Here is a representation of the general pruning of the tree:
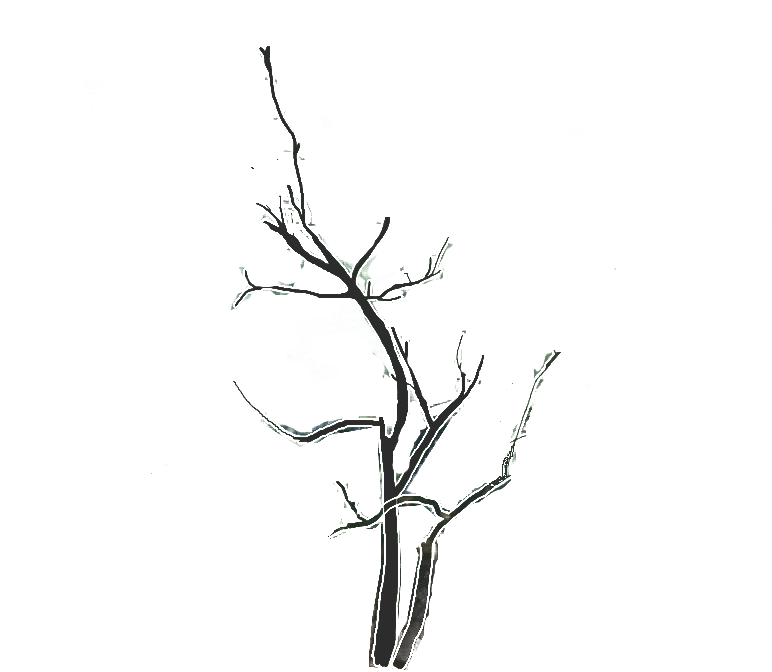
Now, I do the times that I made the fence and fold the branches and the trunk locating them in the places where I need them:
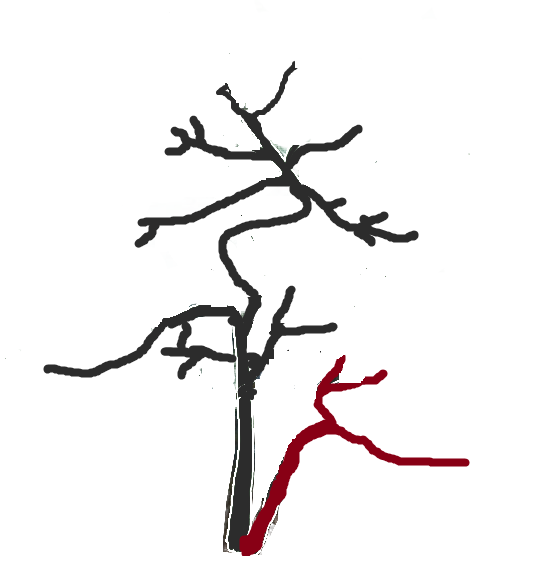
To finish I make a sketch with the Photoshop tool Cs6 more or less what I had in mind from the beginning for this tree. To get to this you have to travel a path of between 6 and 10 years, pruning, wiring, letting grow and cut, defoliation to achieve sheet reduction, placing and removing tensioners, etc, etc and etc ... but I think it is worth sorry to work and wait to get these results, I hope you have especially liked my friend @creativetruth, I would love to know, what do you think of this design for your tree?
Ladies and gentlemen and with you!....................................TA - TAAAAAAAAAAAAAN!!!!

I take this opportunity to include myself in the #TeamBonsai hehehe accept me?...... @romanolsamuels and @imagendevoz
If you liked this publication and want to know more about bonsai, gardening, coffee, chocolate and other topics, follow me! I wish you a happy and blessed day!

My goodness! I just want to cry out "We're not worthy!" after reading all of this. Thank you so much @daniellozada. You were the first bonsai grower I was greeted with here on steemit, and I'm embarrassed to say I had forgotten about your bonsai wisdom, and had no idea about your obvious breadth of years of knowledge and experience until now.
Thank you for describing the elements of Sokan style bonsai. I never knew there was a double tree style. Often I hear it mentioned that planting an even number of trees is not ideal for bonsai. The dreaded four trees in one pot seems to be a cardinal sin for some reason. Design aesthetics is about appealing to the most people, whereas ultimately a home grower can enjoy any design style they want on their trees.
The colander method is very bizarre for me to see for the first time. I assume, you are using normal bonsai soil mix? Is the main purpose of the colander to speed up growth development of bonsai tree and roots, by providing perfect drainage and space for roots to grow healthy? I would have to fasten down the tree tightly so it does not tip over, or alternatively I could put a screen over the soil surface around tree. I get squirrels that dig and pull anything in loose soil.
You have a lot more resources you have equipped yourself with over the years, whereas I feel more like a hobo collector in comparison. I probably won't be able to apply the fully recommended cultivation and fertilizer treatment recommended, but I'll use the materials and fertilizers I have to attempt to keep the three growing strong.
Questions/Clarifications:
7: How would I fix the U shape? slowly open out the left branch away from the trunk over time? If it is flexible, probably the earlier the better.
8: Why is this branch considered useful for depth, but not labeled as the first branch? Is the first branch defined by the largest branch that reaches this level of the design? I noticed your final design blended the foliage from the first branch with the depth branches. The labeling of which is truly the first branch on this tree is what confuses me.
This post was just marvelous, and I am glad you shared with me. I'm going to keep this photo you made. I don't know how to paint digitally that well.
hehehe thanks @creativetruth I'm glad you liked it! It was very fun to work this Sunday in this publication, I really enjoy it! The issue of the even numbers is only with the number four, that for the Japanese tradition, saying four equals saying death, in the case of double trunk trees and group plantings it is allowed to use the two, but it is not use the four, the six, the eight, but from the nine if the even numbers are allowed because the human eye can not decipher it.
As a substrate I use the most similar to the akadama and kiriu, since these two are not available in my country. I use gravel and the size of the particle will be according to the taste of the plant species and I also use a product that is used for the construction of houses called Aliven, which are cooked clay pellets, this makes the effect and the Plants develop a perfect root system. It is necessary to fix the plants at the time of transplant, because a minimal movement breaks the newer rootlets and can stress the tree to death. For the squirrels you can use plastic meshes on the substrate, but if they are a problem, in my farm they are a big headache with the cocoa fruits.
Before in my country (Venezuela) many things were obtained for the bonsai, even the aluminum wire imported from Japan was obtained and the osmocote fertilizer is very, very good and what to say of the Chinese or Japanese pots ... Currently with the bad socialist government that we have seen in the need to adapt daily materials to bonsai, to be able to continue practicing this art, although to me as an agroecologist I like this. For example for the wire issue, we get old copper wires and remove the plastic wrap. In the case of pots, we are currently making our artisan sherds using the paper-concret technique that is nothing more than using recycled wet paper and then mixing it with cement ... and good as well as that many things, but not limits for the materials.
The theme of the U is solved by wiring and doubling progressively, but I recommend protecting the branch with raffia, if you do not have raffia you can use strips of old cloth moistened, I will try this week to upload a publication with examples.
The case of the branch of depth and the first branch is a subject that has caused much controversy and debates in the bonsai school. The ideal is that when we look at the trunk from the bottom to the top we find first a first branch, then a branch of depth that goes backwards and gives the 3D effect, followed by a second branch to the opposite side of the first branch and so on . But those are ideal or theoretical rules, in practice we can find everything. There are many cases where there is no branch of depth between first and second branch, then we must locate from any point a branch to cover that space, and this is where we play with the optical effect.
In this design, the main branch was first the branch of depth and then the first branch to the left. What I did was to lower the first branch to a point where the foliage looks below the depth branch so that it creates the optical effect of having the first branch below the depth. It is somewhat complex to explain it in these lines, could you understand it?
Yes thank you. Descriptions of concepts are always easier for me to grasp. Understanding terms, and what experts mean when they use these terms is what I struggle with, so I appreciate you explaining these things. I even had to look up the word "cultivate" because it has many different meanings and practices, and it can mean something simple like "to raise".
Friend @creativetruth, thinking about it a bit I think you would understand this topic better with some drawings, I will make a publication explaining this topic.
Woah dude, you went all out. I'm definitely gonna have to give you a charged up vote for that. Thanks for the effort @daniellozada.
I'll post back after I finish reading it.
I have to agree that this is some of the most valuable feedback I have ever seen one person give to another - @creativetruth, I think you are pretty sorted after this. And to @daniellozada YOU ARE AN INSPIRATION! Never have I seen such a well of knowledge. Big ups to you! Please continue posting what you post. I look forward to learning from you.
Thanks friend @imagendevoz! let's work as a team to create the bonsai community in Steemit!
very useful information.
thank you @daniellozada
Congratulations! This post has been upvoted from the communal account, @minnowsupport, by dlozada_3 from the Minnow Support Project. It's a witness project run by aggroed, ausbitbank, teamsteem, theprophet0, someguy123, neoxian, followbtcnews, and netuoso. The goal is to help Steemit grow by supporting Minnows. Please find us at the Peace, Abundance, and Liberty Network (PALnet) Discord Channel. It's a completely public and open space to all members of the Steemit community who voluntarily choose to be there.
If you would like to delegate to the Minnow Support Project you can do so by clicking on the following links: 50SP, 100SP, 250SP, 500SP, 1000SP, 5000SP.
Be sure to leave at least 50SP undelegated on your account.
¡@daniellozada! Muy bueno el contenido, sigue asi!
Esta publicación es apoyada por la comunidad de UNEEVERSO, para que al obtener votos automatizados pueda conseguir PROMOCIÓN GRATUITA y pueda darse a conocer a un público más grande. Este contenido lo merece, considera darle reesteem.
¿Te interesa, obtener upvotos y dar a conocer tu publicación?
Te invitamos a unirte a nuestra comunidad, cada día crece más y tu puedes crecer con nosotros.
¿Te interesa conocer sobre nuestro proyecto?: https://goo.gl/cuFExt
¿Te interesa conocer sobre nosotros y sobre actualizaciones de uneeverso.com?:
* Acceso a Uneeverso : https://www.uneeverso.com/registro
* Acceso temporal a Uneeverso : http://uneeverso-oficial.mircloud.host/registro
* Uneeverso en discordapp: https://discord.gg/Y5kM5Kj
* Siguenos: @blickyer @yunior.selbor @sweetvenon @arevaloarcadio @baudilio @jnavarrotovar
Wow. You sound like an expert. I've always wanted to get into bonsai. I already have a collection of medium sized trees in my home in pots and containers ranging from avocado (which I've posted pictures of recently) to mango to tangerine. I like fruit trees. Which is a good fruit tree to start with? My girlfriend bought me a kiwi bonsai kit. What do you think?