blend modes: Create a car composition
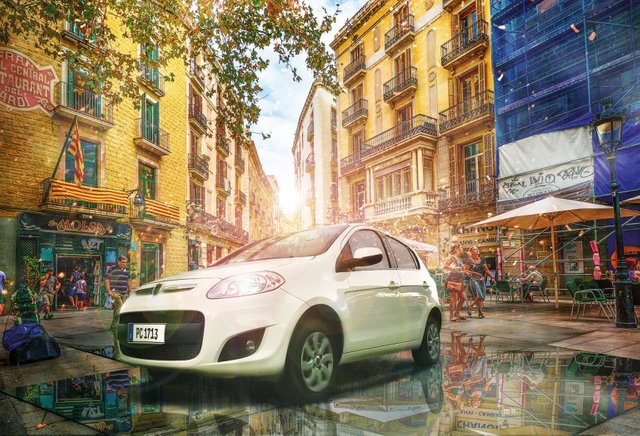
Combine blend modes with lighting techniques and 3D commands to create a fantastical scene
1. Use the High Pass filter
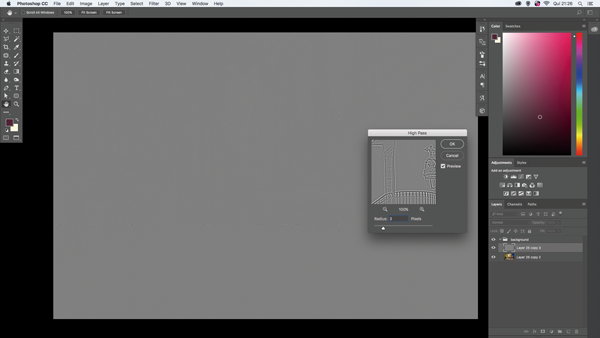
Create a new document (Cmd/Ctrl+N) at 460x310mm, then add the background. Duplicate the layer (Cmd/Ctrl+J), apply the High Pass filter (Filter>Other>High Pass), set to 3px. Change the blend mode to Soft Light at 80% opacity.
2. Create some shadows
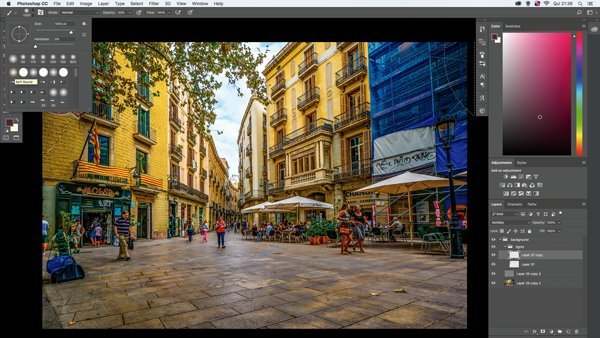
Make a new layer (Cmd/Ctrl+Shift+N), set the foreground colour to #9b854d and pick the Brush Tool (B). Go to the Brush Preset Picker, choose Soft Round, 50% opacity, paint on the sides of the scene, and change the blend mode to Multiply.
3. Draw the lights
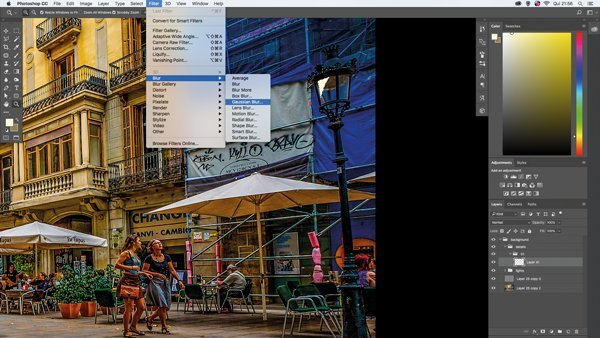
Create a new layer (Cmd/ Ctrl+Shift+N), pick the Pen Tool (P) and draw the shape of the lamp’s light. Activate the selection (Alt+Enter), paint it (Alt+Del) with white, disable the selection (Cmd/Ctrl+D), and apply Gaussian Blur (Filter>Blur>Gaussian Blur), set to 19px. Finally change the blend mode to Soft Light.
4. Blend with Screen
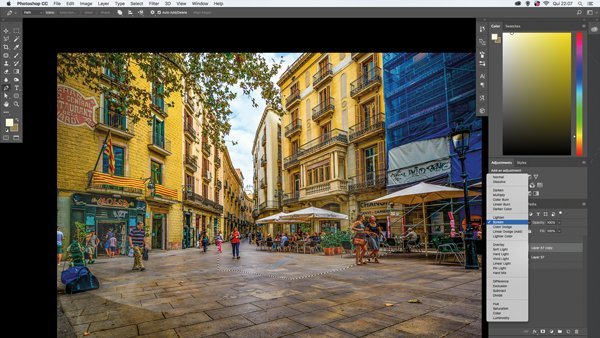
Let’s make the city look a little brighter. To do that, add smoke and place it in front of the people on the street. Then, to erase the black background, simply change the blend mode to Screen.
5. Create the mirror shape
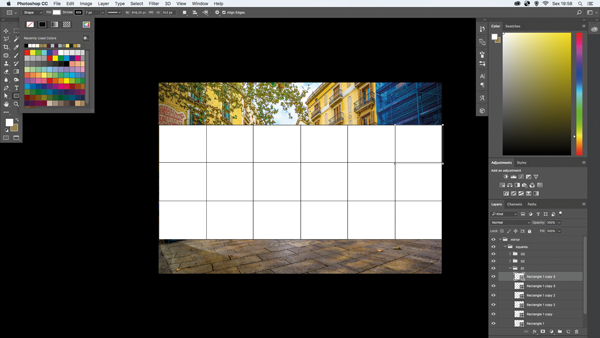
Let’s start creating the mirror that will be on the floor. First, create a new layer (Cmd/Ctrl+Shift+N), use the Rectangle Tool (U), set the Fill to white and the Stroke to black at 7px. Mark out six squares with three columns.
6. Work with 3D
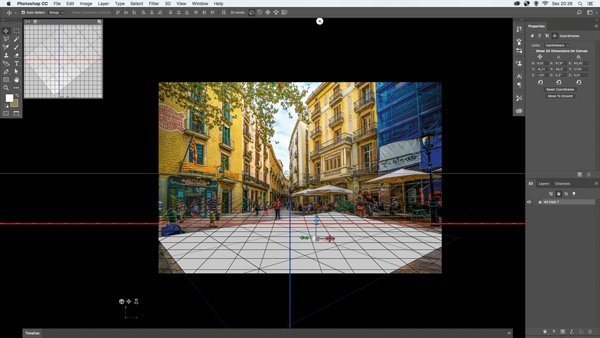
Duplicate the square layers (Cmd/ Ctrl+J), merge (Cmd/Ctrl+E) and disable the original square layers. Go to 3D and select the option ‘New 3D extrusion from selected layer’, then move the axis Z/Y/X to make the perspective look like the image above. Set the Extrusion Depth to 31cm.
7. Free Transform tool
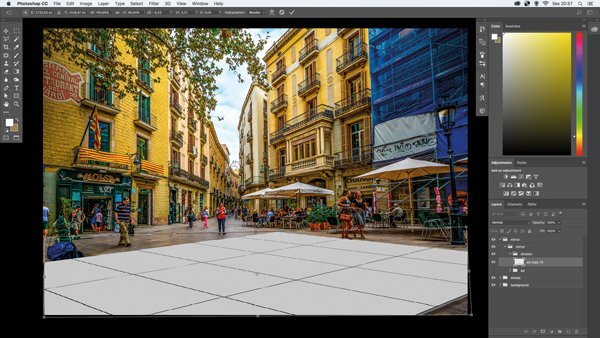
Duplicate the 3D layer, Ctrl/right-click and choose Rasterize Layer. Then disable the original 3D layer, use the Free Transform Tool (Cmd/Ctrl+T), hold Cmd/Ctrl, click on the little squares and adjust the mirror’s shape, as the image above shows.
8. Mask areas
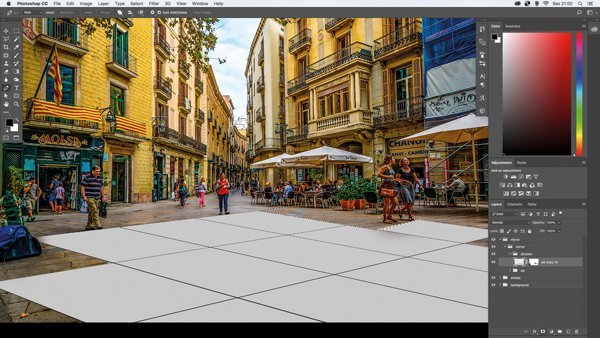
Select the square layer and select Add Layer Mask. Then set the Foreground colour to black, pick the Pen Tool (P) and make a selection around a few squares. Finally activate the selection (Alt+Enter), and press Alt+Del to erase it.
9. Make the mirror’s reflection
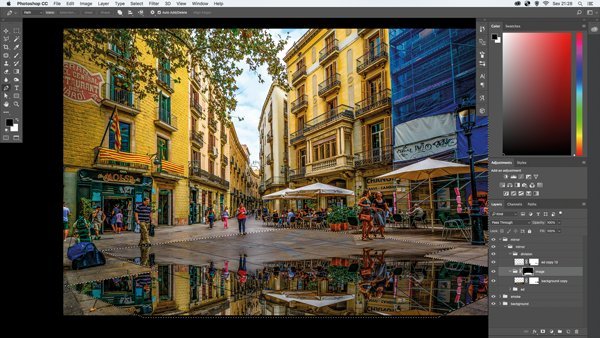
Change the square layer to Multiply, then create a new layer, pick the Pen Tool (P), make a selection around the mirror shape, activate it (Alt+Enter), create a layer group (Cmd/Ctrl+G) and select Add Layer Mask. Duplicate the background layer, flip it vertically (Edit>Transform>Flip Vertical) and place it inside the folder.
10. Bevel effect
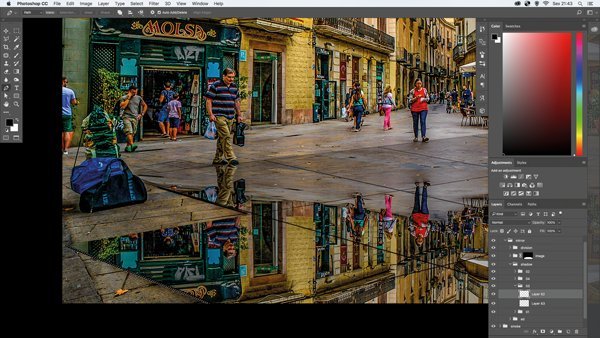
Create a new layer (Cmd/Ctrl+Shift+N), pick the Pen Tool and draw a thin line on the mirror’s extremities. Activate the selection, set the foreground colour to black and paint it (Alt+Del). Follow the same procedure for the other extremities.
11. Link adjustment layers
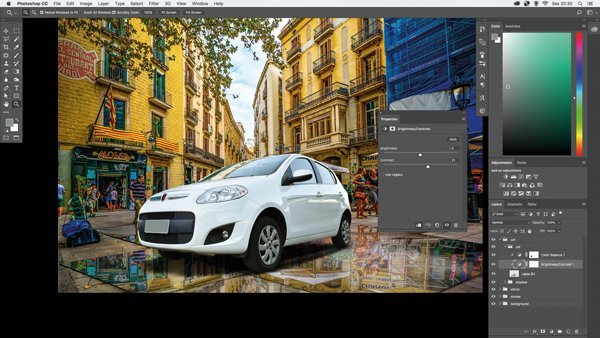
Add a car and place above the mirror. Go to the Adjustment menu, choose Brightness/Contrast, hold Cmd/Ctrl+Alt and click on the car layer, then set it to 0, 21. Repeat the procedure to link a Colour Balance layer set to 5, 0, -26.
12. The Warp tool
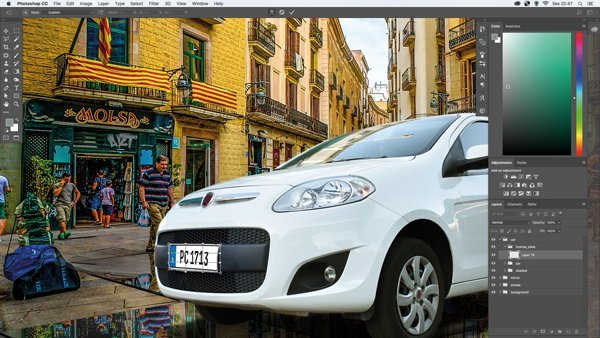
Add a new license plate and place it in front the car. Use the Free Transform Tool (Cmd/Ctrl+T) to adjust the size and the perspective (step 7). Use the Warp Tool (Edit>Transform>Warp) to adjust the shape.
13. Enhance the tyres
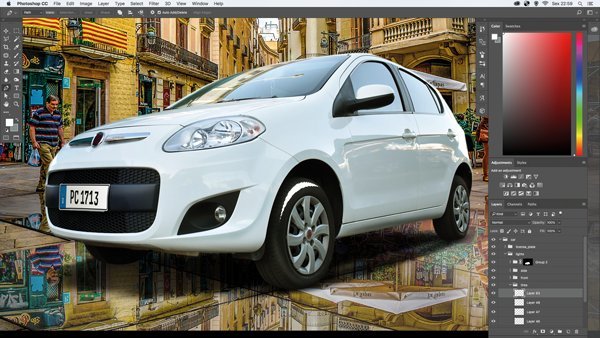
Let’s create highlights to give more volume to the tyres. To do that, create a new layer (Cmd/Ctrl+Shift+N), use the Pen Tool to draw the highlight shape, paint it white, apply Gaussian Blur (12px) and change the blend mode to Soft Light.
14. Set the car’s tone
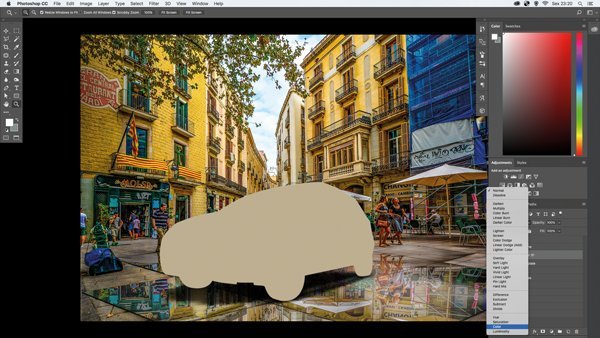
Create a new layer (Cmd/Ctrl+Shift+N) and place it above the car’s layer. Then activate the car’s selection (Cmd/ Ctrl-click on the layer thumbnail), paint it with #c0b193 and change the blend mode to Colour, set to 30% opacity.
15. Create the tree’s reflection
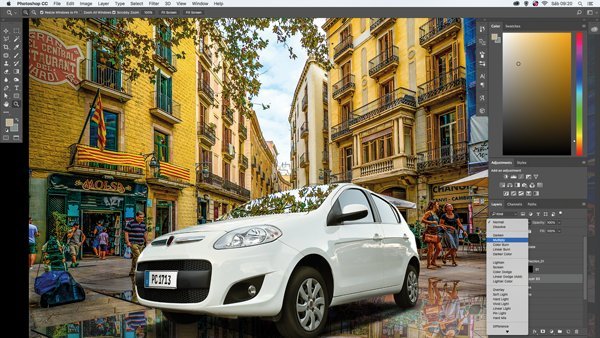
Follow step 9 and make a layer group with a car windscreen-shape mask. Select the background layer, use the Polygonal Lasso Tool, make a selection around the leaves, Ctrl/right-click and choose Layer Via Copy. Place it inside the layer folder and change the blend mode to Multiply (opacity at 30%).
16. Use the Spin Blur
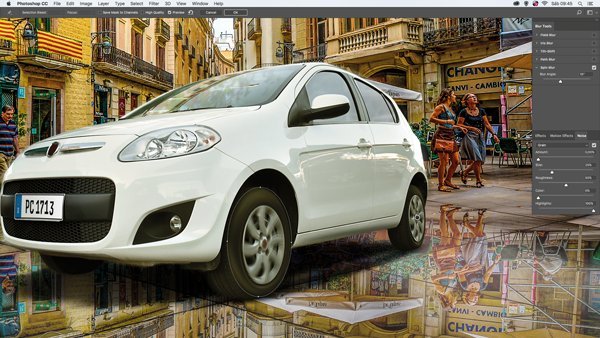
Select the car layer and apply the Spin Blur (Filter>Blur Gallery>Spin Blur). Select the middle circle to place it above the tyre, then use the smaller circles, located at the edges of the larger circle, to adjust the shape. Set the Blur Angle to 15.
17. Make a reflection with masks
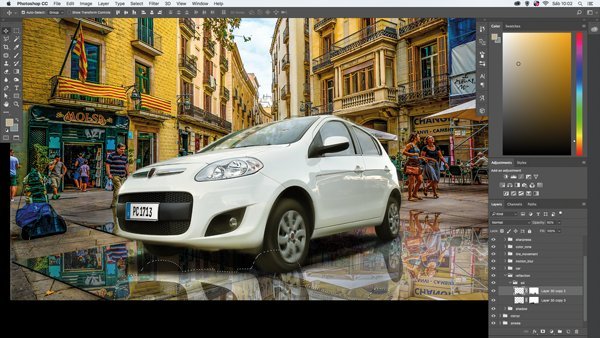
Let’s make the front reflection first. Duplicate the car layer, flip it vertically (Edit>Transform>Flip Vertical), place it below the car and change the opacity to 60%. Select Add Layer Mask, set the colour to black, pick the Brush Tool and erase the unnecessary parts. Follow the same process for the car’s back reflection.
18. Add movement to the scene
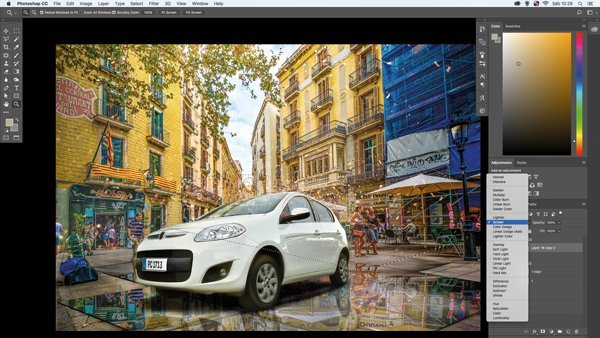
To give a windy look to the scene, add some confetti and change the blend mode to Screen. Then duplicate it (Cmd/ Ctrl+J) until it fills the scene, as the final image shows. To lend more depth to the scene, also place above the car.
19. Create sunlight
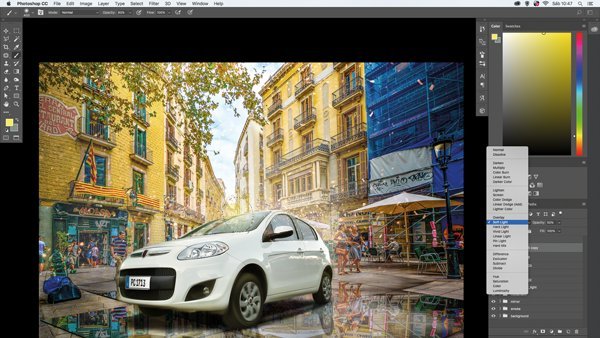
First, create a new layer and place it Round brush (step 2) with 80% opacity, set the foreground colour to yellow (#fff16f) and make the sunlight. Finally change the blend mode to Soft Light with 50% opacity.
20. Warmer colour
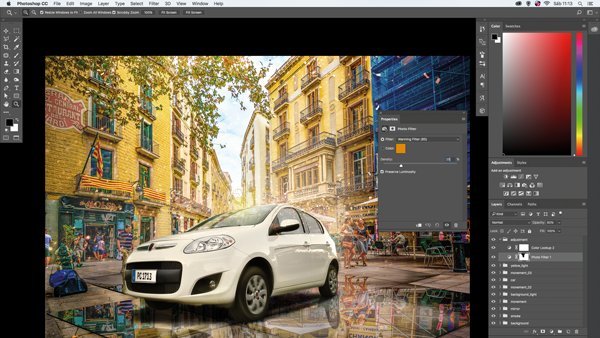
To make the scene look warmer, go to the Adjustment menu, pick Photo Filter and use the Warming Filter (85) with 25% density. Also use Colour Lookup (Crisp_Warm.look) at 20% opacity.
21. Use the Cloud filter
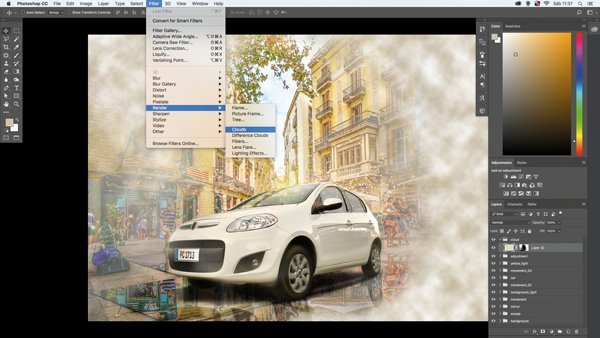
Besides wind, let’s also add a foggy look to the scene. Create a new layer, set the foreground colour to #ccc2a8 and the background colour to white. Apply the Cloud filter (Filter>Render>Clouds). Finally, make a mask (step 17) and erase the effect above the car, as the final image shows.
22. Add lights
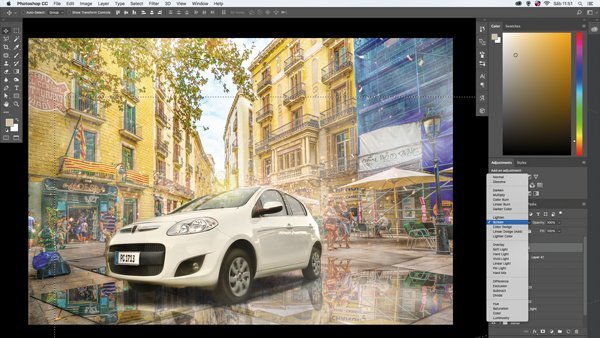
To continue adding fog to the scene, add more smoke, place it above the car and change the blend mode to Screen. Then add more lights to the right side of the buildings and change the blend mode to Screen.
23. Lens Flare effect
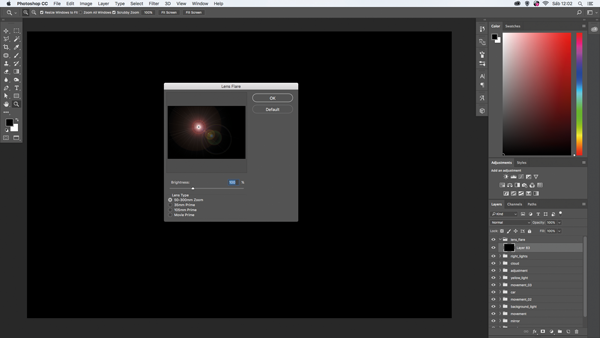
Create a new layer, set the foreground colour to black and paint the scene (Alt+Del). Then apply the Lens Flare filter (Filter>Render>Lens Flare), set the light position, use the option 50-300mm Zoom and change the blend mode to Screen.
24. Adjust the tone
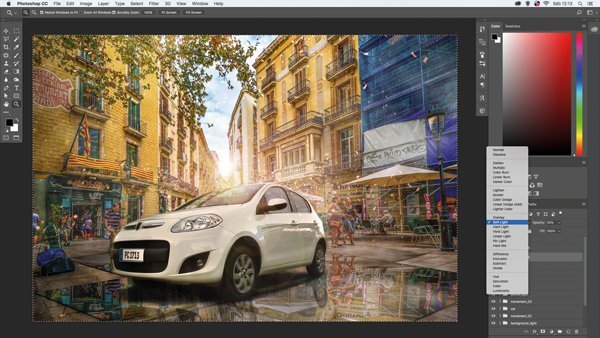
Let’s adjust the colour tone of the scene using blend modes. Create a new layer, set the foreground colour to black and paint the scene, just like the previous step. Change the blend mode to Soft Light with 50% opacity.
25. Shiny headlights
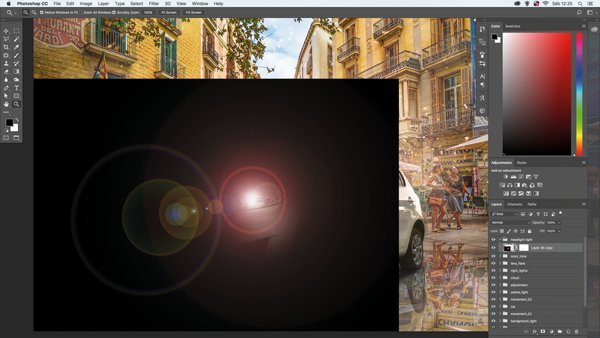
Create a Lens Flare effect (step 23) and place it above the headlights. Finally, to make the light look a little softer, create a mask (step 17) and erase the excess.
26. Set the details
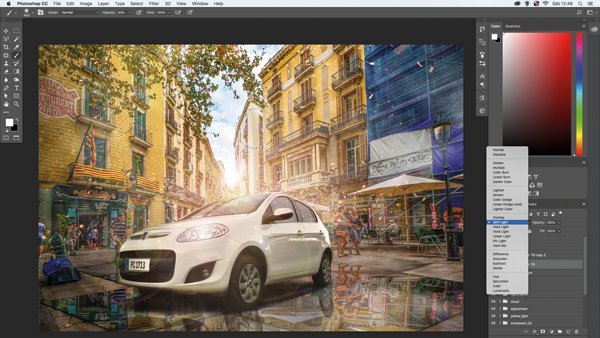
Add more light to give the impression that the scene is taking place on a sunny day. Create a new layer, set the foreground colour to white, use the Brush Tool (B), paint on the top of the buildings, close to the sun’s light. Change the blend mode to Soft Light.
27. Make the final adjustments
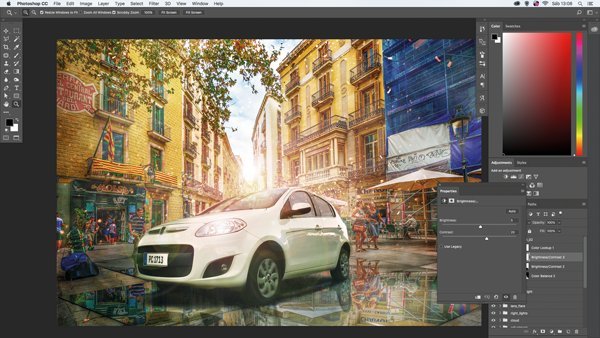
Time for the final colour adjustments to the scene. Go to the Adjustment menu and use Colour Balance set to -36, 0, 0, Brightness/Contrast set to 5, 44 and Colour Lookup (3Strip.Look) with 50% opacity.