ART TUTORIAL: How to paint a bird in WATERCOLOR
This video is based on footage of my live online lesson about painting a bird in watercolor. The text is more a script and comments to a video than stand-alone instruction.

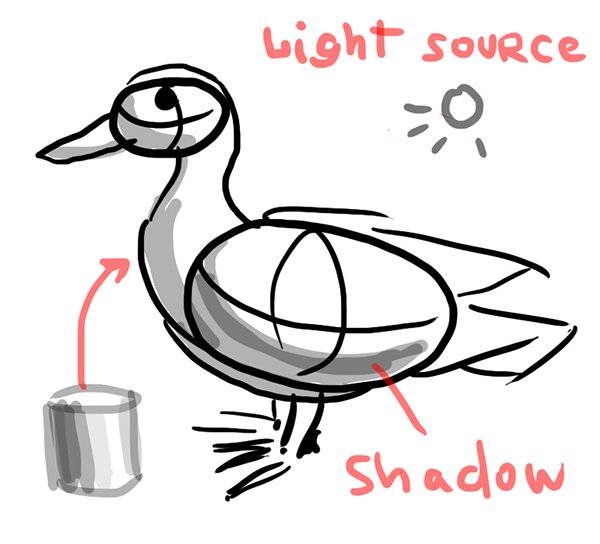
The structure of a bird is quite simple and can be described by primitives. You can see it in this simple scheme where the sphere-like shapes are connected with each other and form a body of a bird. Also, I added a beak, tail, wings and legs but they are not really important in such case. These forms help us to understand the lighting and to render the shadows to make the bird three-dimensional in our painting.
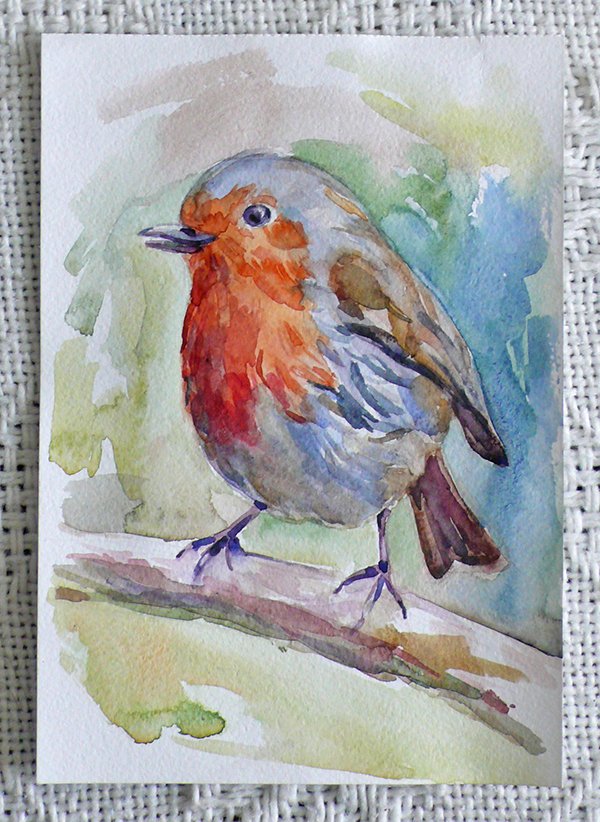
I started this work with a quick drawing. The composition in a page was limited by some quick marks. My lines were very light, I didn't put much pressure on a pencil at the start. At first, the bird looked like a fruit or something but I added some details and it started to look normal. When you are drawing simple animal body like this bird, it's really important to make all details and proportions right.
Then I finished with my drawing and started to cover some parts of an image with water using a brush. The purpose was to make wet in wet pouring with such a watercolor feel. The tone must be quite light at the beginning stage because it's just a first layer of a painting. I started with cold gray and in process was adding some other shades and colors, like warm ocher and brown. I added different shades also inside big pourings before it started to dry up. It's important to leave the light parts of a painting without touching them until the end of our working process. I added some more wet in wet parts like the quite large orange-red spot.
We need to be careful with an eye, and beak because if you'll ruin them on this stage it will quite unreal to fix them later. So I didn't touch them and leave without color just for some time. And while the orange part was drying up I could work with some other parts. For example with shadows on the tail and wing. They also needed to be quite complex in color. After that, I could start to paint legs. The whole process must be consistent, try not to work hard on one part when others are not started at all. I left the patch of reflected light on claws without covering at that point.
Then was added some little dark strokes on a beak and dark shadows on legs. Don't touch wet parts too much if you don't want to ruin them. At that point when I almost filled the first layer of an image, I could complete it with brunch of a tree which is quite diverse in texture and colors in a reference. Also even on middle stage don't forget about the structure of a bird with sphere shapes and cylindrical nature of a brunch. The lower part of brunch is dark and upper is lighter.
Carmine in shadow part and some green after in reflex of a branch. Also, don't forget to make the strokes in a different size to form different types of texture. The background can be added in the end. In general use the reference to understand the lighting better - the light is falling from the up-right side in this photo.
When we start to paint an eye of a bird try to make the first layer lighter than it will be in the end, so you'll be able to achieve needed dark tone after the second layer.I started to render the shadows with some feathers at first. We need to paint a texture and make the lighting map at the same time.

Also, we need to be precise with different colors combinations and to keep warm and cold parts of an object. The lightness is quite cold, that's why shadows are warm. Some parts of a bird are darker than others in their local tone, so we must make wings darker than a back. The second layer of an eye must be more precise and be careful with a patch of reflected light. After all this operations you can add some deep shadows of a beak. Be careful with the eye surroundings to not ruin the light parts. Shadows rendering can be more generalized after texture details were made. Use pouring with a lot of water for this generalization, and the shadow part will be blurrier after such action.
Then I added more deep dark shadows on details like wing's falling shadow. Try to make the whole picture more contrast and expressive but with an accent on the most important parts, like an eye, claws, beak etc. and the parts that are closer to us. Gray part of a bird also needed some texture, especially because it's the closest point to us as a viewer and it has great deep contrast parts.
At the end, you may add some pourings to finish the bird three-dimensional rendering with shadows and lights. Leave the lights where it's needed on a foreground to achieve a contrast. A brunch also needed some rendering but without so many details as a bird. The background doesn't need to be exactly the same as in reference. I did it with different shades of green, blue and umber.
The last but not least: be aware, that for three-dimensional rendering of an object it will be better to make one side contrast with the background and another edge blurrier. In this painting, the dark left side is more contrast than the right side.
Good luck with your art!
Website / Facebook / Trial lesson

Super helpful! Thanks for sharing this! :)
You are welcome. Watch out my oil painting tutorial, I gave it a lot of my time and effort but it wasn't noticed like this one. Of course if it's interesting for you :)
Very cool art :)
Thanks
:)) I hope you make more :)
I'll post a new tutorial maybe even today (if I'll finish it) :)
Cool :) I wait :)
thats really nice
Check out my new video, if you like this kind of stuff, ofcourse.
thank you for sharing! I wanna try this soon :D
bgt jhy