Pink - Step by step (WITHOUT GRAPHIC TABLET)

Hello community! Today I swallow a drawing I made using a reference image that I found on Pinterest. I will explain to you in a brief and simple way step by step. But first I would like to remind you which tools I used: an ordinary tablet and the MediBang Paint application that can be downloaded for free in the Google Play Store.
All right. Let's begin:
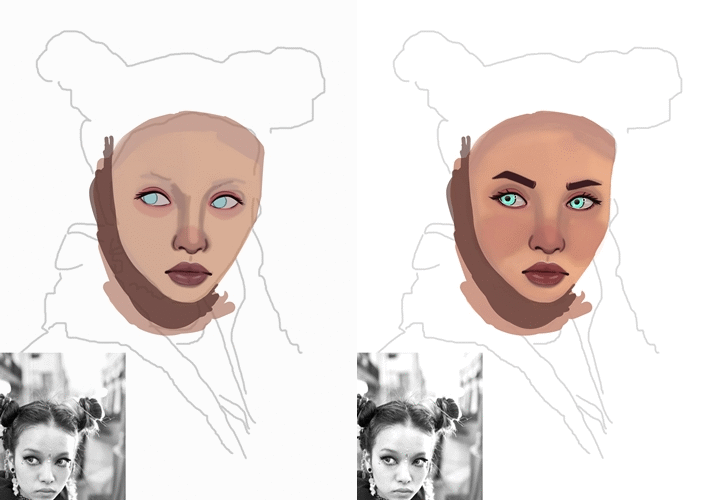
1. First I made a sketch directly on the tablet.

2. On another layer I applied the base color of the face. The layer was at 70% transparency approximately, this in order to be able to add the colors without losing sight of the sketch that served as a guide. I also applied some shadows on the face and the base color of the lips and tryed to shape the nose and lips.

3. Then I took care of doing the outline of the eyes, coloring them and making some details such as lashes and glitters. At the same time I drew the eyebrows, added blush to the cheeks and more shadows to the face and neck. At this point I raised the transparency of the layer to 100% since I didn't need to see the sketch of the face anymore.
.gif)
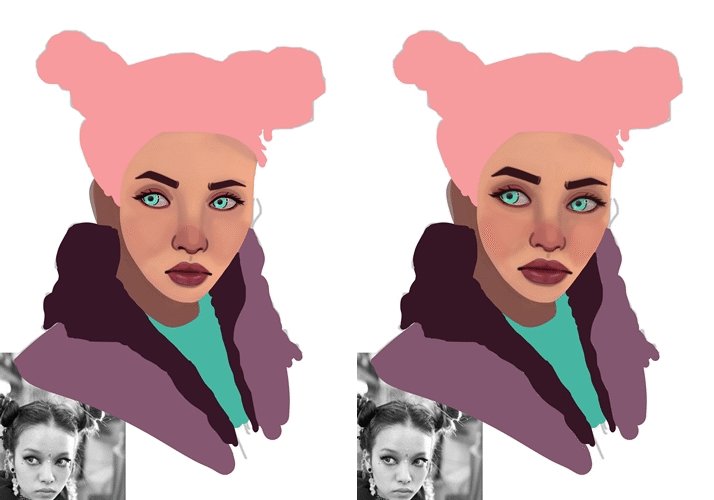
4. Then in another layer, I applied the base colors of the clothes and hair. . I also modified the skin tone by raising its luminosity a little and enlarged the eyes and lips to achieve that caricature look I wanted.
.gif)
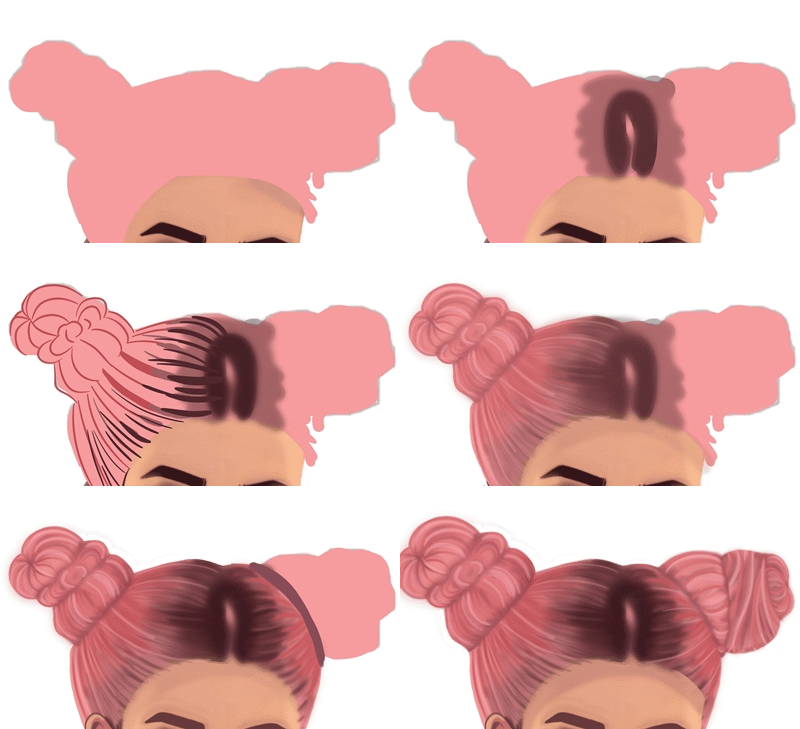
5. Then I took care of making the hair. First I added dark shades in the center to simulate the roots and from there, with different shades of pink, I made strands of hair. Finally I applied the lights in the hair making strands with a very light shade of pink.
.gif)
6. At this point I made the outline for the ear, then I made details and added earrings. I also defined the neck area so that it could be differentiated from the face and clothes and I styled the face. I also added freckles on the skin and accessories on the forehead.

7. Then I made the details of the clothes for them to looked as real as possible. I did it by adding shadows and lights carefully in the areas I saw in the reference image. I also made the background, using a light pink color.

8. Finally, I modified the hair so that the head did not look so big and I blurred the neck area and clothes to focus the attention on the head.

I hope you liked my post. With it I want to show you don't need to have a drawing tablet to get good results making drawings or digital illustrations. You can support me by voting for the post and leaving me comments :3
You have a really cool style!! Love the colours, followed! :)
Thank you very much!!! @joxus ❤❤❤
Hello! I find your post valuable for the art community! Thanks for the great post! ARTzone is now following you! ALWAYs follow @artzone and the artzone tag, and support our artists!
Congratulations! This post has been upvoted from the communal account, @minnowsupport, by anrux from the Minnow Support Project. It's a witness project run by aggroed, ausbitbank, teamsteem, theprophet0, someguy123, neoxian, followbtcnews, and netuoso. The goal is to help Steemit grow by supporting Minnows. Please find us at the Peace, Abundance, and Liberty Network (PALnet) Discord Channel. It's a completely public and open space to all members of the Steemit community who voluntarily choose to be there.
If you would like to delegate to the Minnow Support Project you can do so by clicking on the following links: 50SP, 100SP, 250SP, 500SP, 1000SP, 5000SP.
Be sure to leave at least 50SP undelegated on your account.
This is indeed a nice piece of Art done by you.... What I do appreciate about your post is the fact that you were very detailed with the analysis of how you made the drawing with GIFs to illustrate each process you stated.
Your choice of colour pallete is also Nice. How long did it take you to come up with this ?
Thank you very much, I really appreciate your compliments ❤ Making this piece took me a whole day @ufxpression