TITLE: TRUST THE PROCESS #2 (COMISSIONED WORK)
As a person,who discoveres at an early age or older age that great passion for art and want to become a great artist. most times you ask yourself questions like, can i make it with this? Where do i start? There are so many people in the market? How can i be recognized?
It's funny that many don't find the right answer and jump into art while at the long run you end up not hearing about them anymore.
As a young artist you need to understand that you have a bright and sharp mind that can occupy any thing you set it to do. Having the passion is only a first step and its a good drive . The second step is having a goal
We all understand what Goal means but not many of us apply them. This word holds characteristics like Determination, sacrifice,risk etc
You can not talk about being successful without the word Goal.Many of us set a goal the begging of the year and they end up not fulfil it. Stop thinking its okay to be a failure.
This goals must be written on a paper with the plan. Each time you complete a task you tick it and reward yourself in anyway you think you feel better at that moment.
After this two have been placed rightly,you then left to those questions. Starting art can exciting when you realize people around you smiling and amazed at what you can do with your pencil and paper. You always have the desire to continue putting that amusement on their face cause it gives you joy. But its also important to look into the critics about the art you creating. Be opened to new ideas and be a good listener.
I realise that 80% of successful people talk less and listen more. When you talk you only saying what you already know but when you listen you fill you inner mind with more.with this your can apply it to come out with a better art. Don't be scared to ask people questions like what's the bad thing about this art? What does it needs? Does this art worth the amount am placing on it?
Whenever you asking people such questions you always get a more effective response from people that aren't your friends so go outside your circle.
One key thing about being an artist is each time you create an art, you are never contented you feel its not your best yes! That's a very good feeling after a long while look back and you will see how far you've achieved
Lastly, always pray to God for favor and grace not every popular artist today are the best but they received grace.
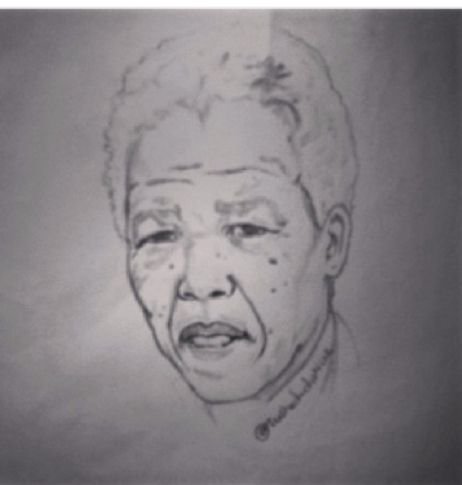
Below is a picture of my sketch in 2014 of Lt. Present of South Africa (Nelson Mandela)
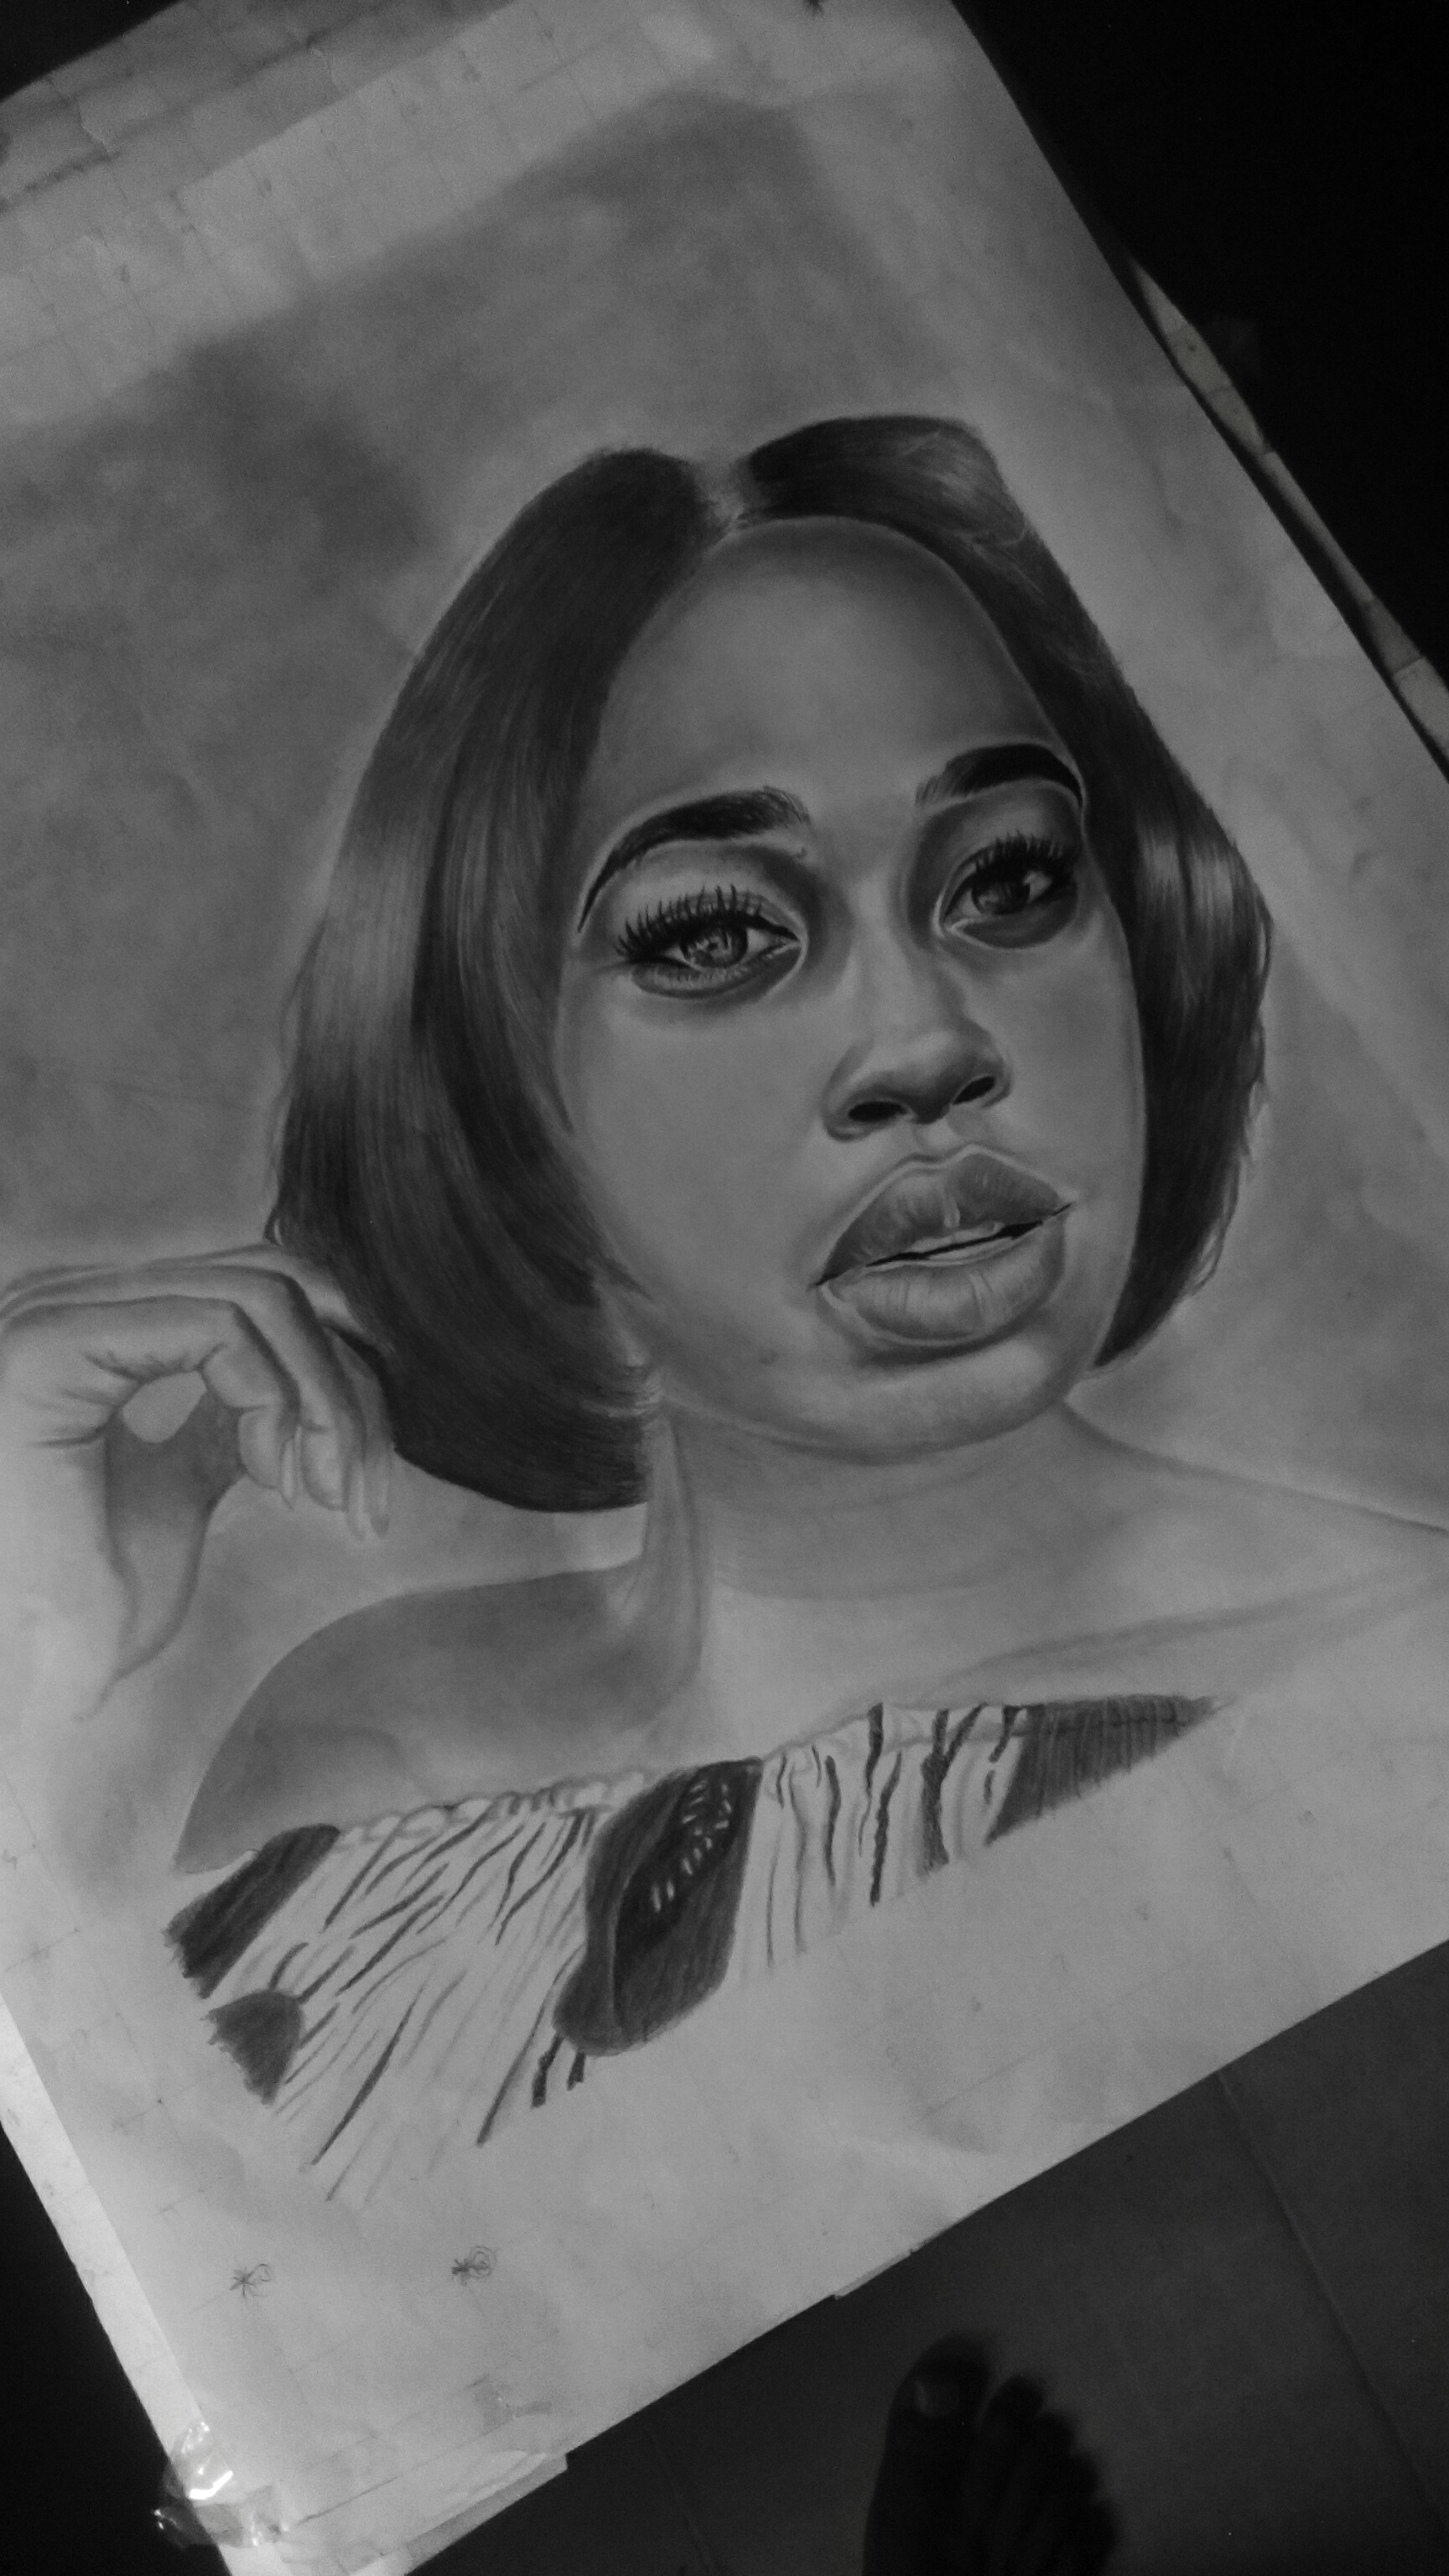
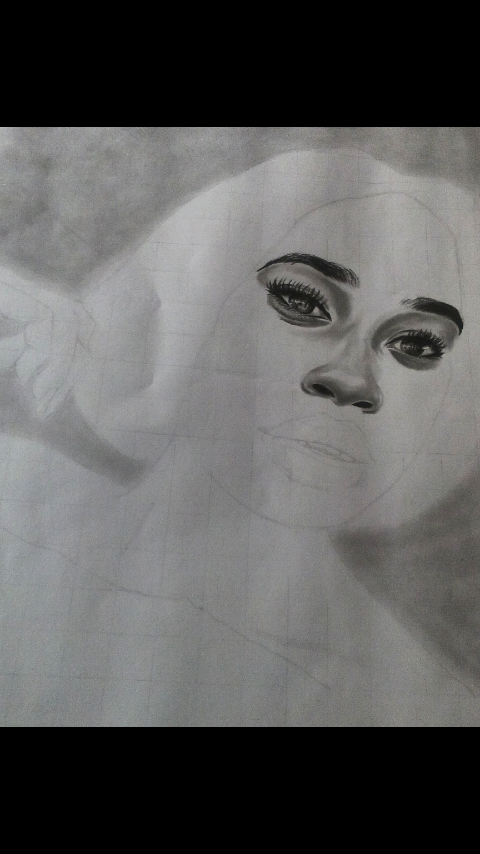
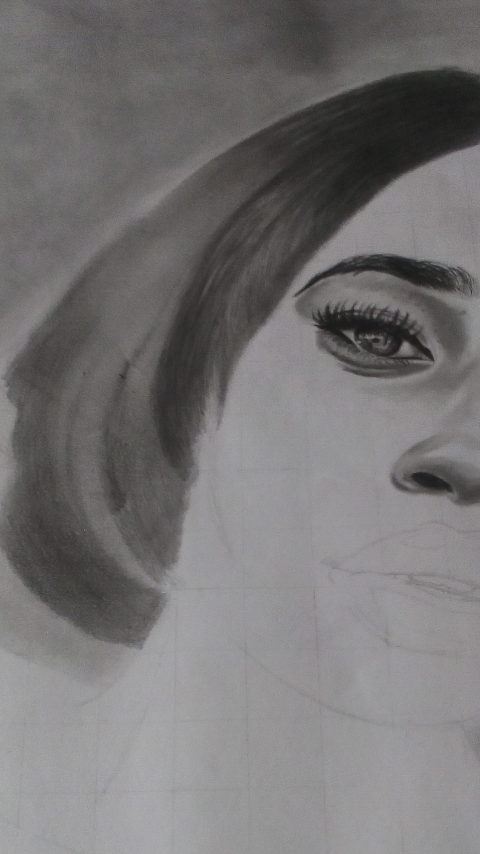
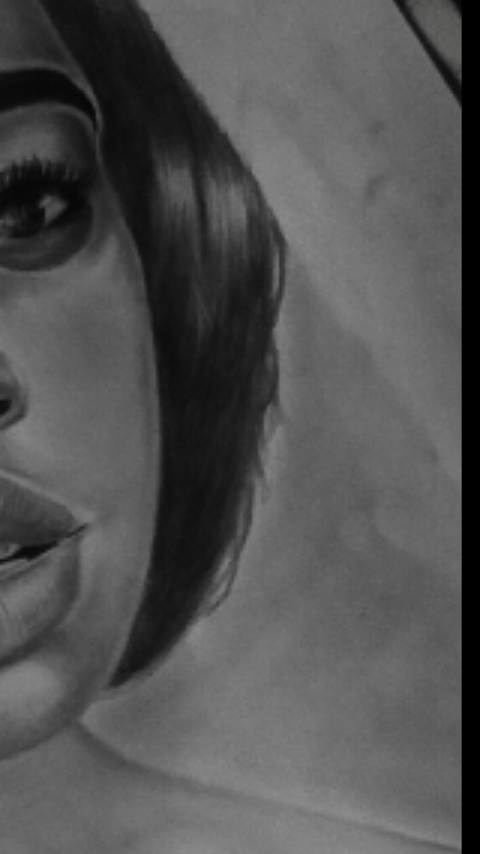
There is always the challenge of trying to draw a realistic female hair as an artist. Mostly whenever they must had drawn the face and it held a perfect resemblance they tend to pay less attention to the other part of the drawing thats a very bad habit if you want a perfect results. Every part of the art requires as much attention given to the facial part of the face. I will give you some hints to achieve this
STEP 1
In this stage,i started creating this piece with a (16x20 size cardboard).i made the background with HB and i blend with sheet of paper in a circular motion through the part i apply the shadings. I create the eye brow, eye lashes and nostril with charcoal pencil you can notice the work by the thickness. charcoal pencil is an amazing tool but can be very messy and hard to remove with eraser sometimes so the kind-of paper you use it on is important. When using it you should be extra careful,you can create a sketch of what you wanna draw bold so it would be easy not to make unnecessary errors. So also i made use of B for the darker layer around the "eye brow" and the .i apply and i blend it more than once with a clean cotton board . Outline while sketching the portion of the face that the light is resting upon such portion requires less "graphite" on it than the other parts.I apply the principle on the nose, i blend around the edges of the nose leaving the center of the nose bright and once am done i blend all together with a new cotton board so as to reduce the concentration of the "graphite" on the highlight area when doing it. you can see it shinning
STEP 2
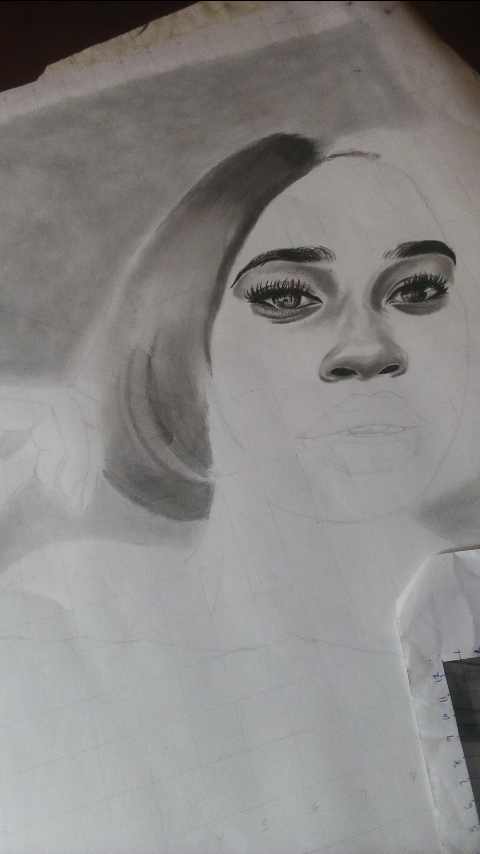
In this second stage,i moved to the left side of the hair. I made use of 4B to create the first layer drawing series of lines in a "descending order" . Then i blend with cotton board the same way and making the lines to fade away. But getting to the center of hair while making the stroke i paused each time. Leaving the center plan and brighter than the other part.
Am trying to create a portion where the light would be resting on.After that, i applied a "thicker" grade of graphite 6B and the edges where darker than before after series of strokes and blending.
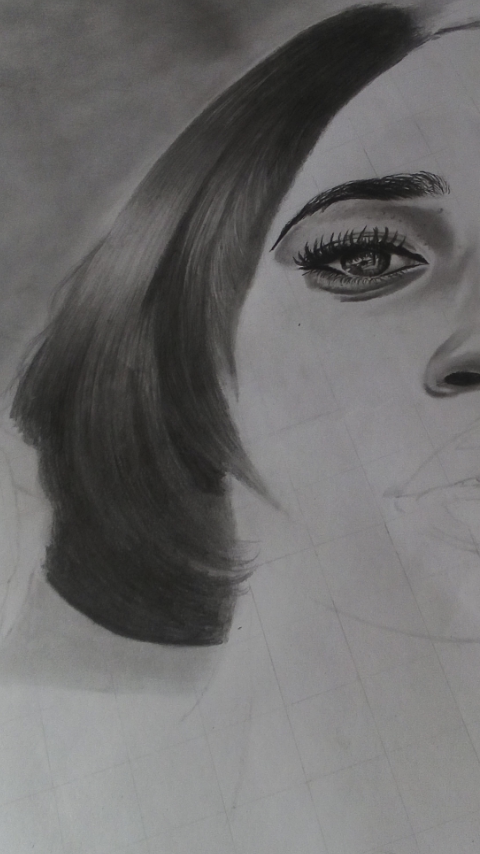
STEP 3
Moving the portion of the left "hair" i applied 6B to follow the flow of the "hair" and giving more details to the "hair" very carefully and slowly. At this point every strokes in make i don't blend it.
STEP 4
I went onto complete the hair with same technique as "step 2". At this point i made use of 7 to make it much thicker. I also apply "mechanic pencils" to make very thin strokes through the white or bright portion of the hair.Last i use eraser to clean up a bit and make waves of hair strands giving it a realistic figure.
STEP 5
At this point,am concentrating on the lips.The lips is not so complicated if you ask me. If pay close attention to details, you will see that the top lips is darker than that of the lower lips. What i did was pick the light grades of graphite pencils like 2H and apply to both the top and bottom simultaneously and blend it with blending stump. Then after you move to the dark part of your grades gradually to lets say HB .Then finally i focused on making the top darker to differentiate both lips so i apply B and detail the shadow around it with 2B. While inside the mouth with "charcoal pencil".

STEP 6
In this stage,i move my shading to the cheeks part of the face.here i apply H at first to both side. And i blend through with cotton wool.Then after i did the same thing all over and blend the second time.
The "chin" part, i apply the same H but left the middle for the light details and made shades around it with 2B and i blend everything all together with cotton board
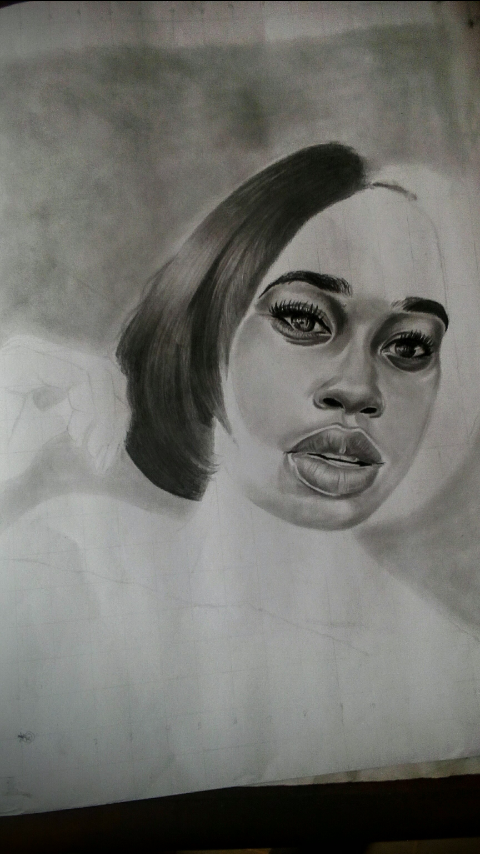
STEP 7
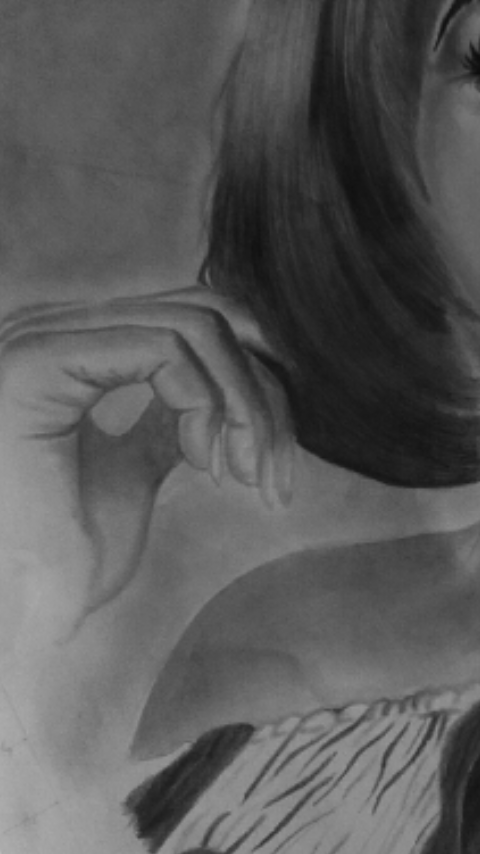
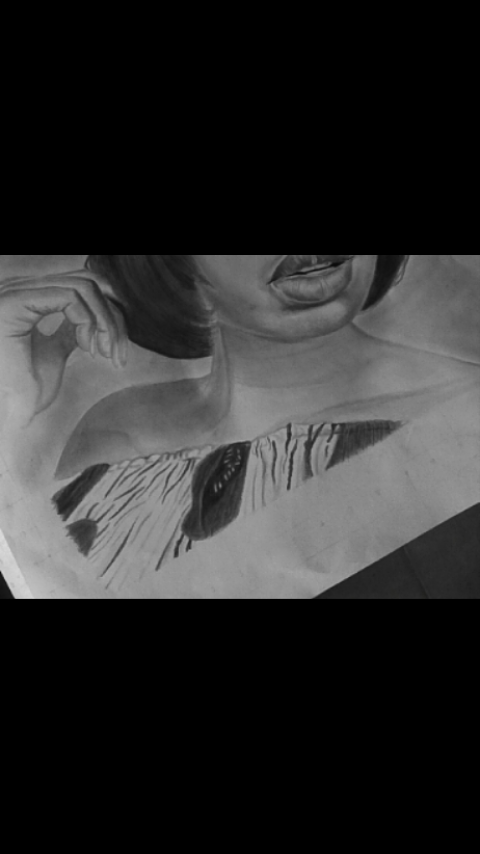
A perfect details of the hand gives a good result. That's why it's important for an artist to also work a quality pictures so apply details would be easy. After i have sketch i have sketched what the hand looks like i then start shading to bring it to life. I made use of HB to create the "first layer" on the "finger" and i spread the "graphite" to the other parts with my stain cotton board . While the darker part,i apply 2B and i blend everything all together so they wouldn't be too much on the paper.Also you realise the "tumb" is darker cause of the shadow. I was able to do that with 2B
STEP 8
Now drawing the cloth. All the dark designs was done with 2B and the ligher part with H. For the right "shoulder" the shadow of the hair is suppose to make it darker when i wanna shade it so i just apply B and i blend with cotton wool .while for the right portion i made use of H very carefully and i blend
It.
STEP 9
I did the same technique i use in creating the left part of the hair. Am just going to include the details about how i did the waves around the edges. I made use of 2B so as to give it a more realistic figure. Avoid making your art flat if you wanna achieve a realistic portrait. It's time consuming but its worth at the end.
STEP 10
Finally there we have it.
You have to understand that the tool you use is a bonus if you have an outstanding creativity in you that's what makes you a good artist. The tool in the hand of a novice is less productive.

"If you set your goals ridiculously high and it's a failure, you will fail above everyone else's success." by James Cameron
Thank you for reading
Have a nice time on steemit!
I love the art work so beautiful.
Thanks
Welldone sir...
Lol thank you ma
Congratulations! This post has been upvoted from the communal account, @minnowsupport, by akinolaadedamola from the Minnow Support Project. It's a witness project run by aggroed, ausbitbank, teamsteem, theprophet0, someguy123, neoxian, followbtcnews, and netuoso. The goal is to help Steemit grow by supporting Minnows. Please find us at the Peace, Abundance, and Liberty Network (PALnet) Discord Channel. It's a completely public and open space to all members of the Steemit community who voluntarily choose to be there.
If you would like to delegate to the Minnow Support Project you can do so by clicking on the following links: 50SP, 100SP, 250SP, 500SP, 1000SP, 5000SP.
Be sure to leave at least 50SP undelegated on your account.
great step by step!! thanks!
You welcome
Stay tuned for more
Congratulations @akinolaadedamola! You have completed some achievement on Steemit and have been rewarded with new badge(s) :
Click on any badge to view your own Board of Honor on SteemitBoard.
For more information about SteemitBoard, click here
If you no longer want to receive notifications, reply to this comment with the word
STOP