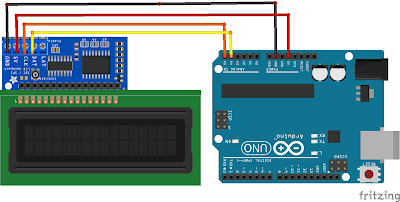
I2C LCD control using Arduino Uno
LCDs are commonly used in projects to display various information of the system. The most common LCD is 16x2 that can display a total of 32 characters. However the use of the normal LCD is a hassle because it involves many wires, roughly about 11 pins of the LCD need to be wired. Instead I2C ( pronounced I square C) LCD can be used and only 4 wires are required: GND, 5V, SDA and SCL.
The address used by the I2C LCD can be found using I2CScanner program. The common address is 0x27 or 0x3F. Check out the program at the link below.
https://playground.arduino.cc/Main/I2cScanner
The library for the LCD can be downloaded from:
https://bitbucket.org/fmalpartida/new-liquidcrystal/downloads/
The code below displays " Hello Arduino " and the number of objects detected by the optical sensor which is of NPN type ( active low). Active low means that when the sensor detects an object the output of the sensor goes to logic 0 ( LOW) and when it does not detect, it becomes logic 1 (HIGH).
#include <LiquidCrystal_I2C.h>
LiquidCrystal_I2C lcd(0x3F, 2, 1, 0, 4, 5, 6, 7);
int inPin = 7; //optical sensor signal pin connected to Arduino digital port number 7
int count=0;
void setup()
{
lcd.begin(16, 2); // Begin the LCD with naming the type of LCD
lcd.setBacklightPin(3, POSITIVE);
lcd.setBacklight(HIGH); // on the backlight
lcd.setCursor(0, 0); // Bring the cursor to home position. lcd.home() does the same
lcd.print ("Hi Arduino!");
lcd.setCursor(0, 1); // Set cursor at beginning of second row
lcd.print(count); // display the count value
}
void loop()
{
val = digitalRead(inPin); // read the sensor signal at pin 7
if (val==LOW) // if detect object
{
count++;
lcd.print(count); // display the number of object detected
}
else
{
// do nothing
}
}
