Aquaponic Beginner's DONT'S and DONT's Guide - What NOT to do!

TABLE OF CONTENTS:
Preface - Bridging the Gap
(1) - Less Is More: Overstocking
(2) - Don’t Overfeed
(3) - Which Media Bed Materials to Avoid?
(4) - Incomplete Nutrition: Beyond Aquaponics
(5) - Water Flow: Evenness, Frequency, and Resistance
(6) - Auto Siphons
(7) - To Glue, or Not to Glue
(8) - Temperature Effects
(9) - Heating & Humidity
(10) - Using Wood Structurally
(11) - Algae
(12) - Predators/Pests
(13) - Don’t Use Tap-Water, Unless It’s REALLY Good!
CONCLUSION
***TAKE-HOME LIST OF DON’TS - Quick Reference
***USEFUL LINKS
Preface - Bridging the Gap
Unless you are a multi-professional who happens to already possess most of the skills (carpenter, agriculturalist, plumber, hydrologist, etc.,) and experiences to naturally simulate a natural ecosystem, it is very difficult to envision all of the smaller pieces needed to make an intermediary aquaponics system run at it’s best. Don’t get me wrong, this is not rocket science, but there are plenty of unforeseen aspects and obstacles that will arise when planning an aquaponics system as a beginner.
Over the course of a 4-5 year aquaponics hobby, I have stumbled through a fair amount of trials and tribulations; obstacles and mini-disasters. My intent with this “don’ts and don'ts” guide is to pass on some of my beginner experiences to you. This guide can provide a shortcut through time spent working out the “kinks”, so that you can “bridge the gap” between excellent production and some of the obstacles that commonly plague the beginner.
(1) - Less Is More: Overstocking
It is likely that you may want to try to stock the maximum amount of fish that your tank will accomodate. This is common first mistake and is understandable, since it seems logical to try to get as much valuable protein out of your garden as possible. However, from a perspective of a commercial garden/farm, fish are harvested only once a year (every 9 mo. at best) compared to up to a dozen times a year for some leafy greens. On top of that, you will find that for the time, effort, and money it takes in breeding, processing, and adhering to regulations to finally market the fish, the plant-side of the system will almost always end up bringing in more revenue more consistently. Of course, if you are just feeding yourself, family, and friends, the regulations and processing equipment is reduced. If you just keep a few fish for pets (like Koi or Goldfish) the labor and costs are further reduced. Keeping the stocking densities at a medium to low rate in the beginning will ease the biological load and cause less problems. If, or when you decide to raise the stocking densities, it will be necessary to build a good solids filter, biofilter, and aerobic “off-gassing” tank to handle the higher amount of waste and water-fouling that happens when fish are packed tightly together (see disease problems with commercial fisheries). This is why it is it is best to start light: with just a few to a few dozen 15-cent feeder-goldfish. They are cheap and will do a great job at “pioneering” your system.
Keep the “pioneer-fish” living/working as best as you can until you have a good robust colony of filtering bacteria built-up to recycle the waste. An API test kit can be bought for cheap, and will test levels of ammonia, nitrite, and nitrate, which can indicate how well your microbiology is colonizing and converting nutrients (look up “cycling in aquaponics”). You will likely spend more time and money dealing with replacements and foul tanks if you just guess about these levels as a beginner-- especially with pH, which is crucial in all soilless growing techniques (pH strips can be purchased alone for less than $10).
Feeder goldfish are a dollar-per-dozen, and many of them will survive the initial “rough phase” of colonizing the nitrifying/converting bacteria that you need to create a safe and productive ecosystem for fish and plants. By the way, most species of fish that are typically used in aquaponics (Tilapia, Trout, Koi, Bass, Goldfish) will get along just fine if kept in the same size-range. The new fish can’t be too small to fit in the mouths of the others (or large enough to eat any of them). I’ll never forget the bass I saw in our last system that was swimming around with orange tail-fins sticking out of its’ chops. Don’t stick a bunch of big voracious bass in with a bunch of smaller goldfish unless you don’t mind a reduction in population!
(2) - Don’t Overfeed
Feed the fish too much/too often, and problems will accumulate. Any food that ends up uneaten will fall to the bottom. The collected food will foul-up the tank with extra nitrite/nitrate, as well as possible pathogens and other undesirables that you don’t want to grow. Most fish food is mainly made of up other fish and marine life, which of course can harbor many of the same diseases that may attack your fish. A good rule of thumb is 2 mouthfuls twice a day for each fish. I also feed about ½ to ⅔ of what I think they will eat based on how much was eaten in the previous feed to begin. I then wait a couple minutes, watch, and throw in more if they are eating it quickly. If not, I hold off until later or the next day. I hardly ever feed more than 3 mouthfuls-per-fish in a single sitting.
Fish go into a “frenzy” while feeding in a healthy state and will appear very excited when you come around (anticipating feeding time). This is a good time to take mental notes on their behavior, because if they do not frenzy the same way and the water temperature has not dropped, this can indicate that problems are accumulating. Also, take notes on any unusual swimming or behavior like: fish darting around violently, swimming/floating at funny angles, white streaks/strings, and other possible disease symptoms (Google common fish diseases). If there is a lot of food that is sinking and not getting eaten off the bottom of the tank, feed less. If they are not finding the food quickly that means they are not hungry enough.
If they eat too much, the potential for disease increases quickly. My poor Koi fish, “Fatso”, battled with an awkward swim-bladder problem because of a combination of eating too much and living in poorly circulated, cloudy water. “Fatso” developed strange swimming habits and an inability to float upright in a balanced position. Koi will keep eating as long there is food in front of them, and until they get sick. However, they can live quite a while without food. You can always put more food in, but it can be very difficult to take it back. I learned this the hard way: watching about ⅓ of my fish population float to the top after just a couple of months of running my system. Bottom-feeders (like Koi or Goldfish) especially can go a surprising amount of time without food and are much more likely to be healthy in a fasting/feeding situation than in a glut of food. Of course, the best is to feed a moderate amount 2-3 times every day.
Inexpensive automatic feeder machines can be purchased, but they can be also be disappointing in their promise of convenience. The one I bought was too small for the feed, which was for 6-8” juvenile Koi, and it didn’t fit well on the tank. I ended up going back to hand-feeding, because I was coming to the tank at least a couple times a day anyway just to check it out-- just out of interest and enjoyment. Maybe if I spent a little more money on a better feeder (more than $15), the automated route could have worked out better.
(3) - Which Media Bed Materials to Avoid?
This was a dilemma for me: options for plant-bed media. Any media larger than about ¾” will restrict the amount of air pockets/oxygen near the root zone, and anything smaller will wash around and get caught in the pump. River rock/gravel is a popular choice because of price and availability. The gravel that I used was very heavy and ended up having too much lime-- keeping the pH high and the nutrients locked-out. Another popular option that I also used was Hydroton clay pebbles (a.k.a LECA). I like them, but they get pretty expensive when filling a large plant bed, and it can be harder to find. Hydroton is more pH-stable, lightweight, and less abrasive to the soft bodies of composting worms (which yes, you definitely want to have in media beds to take care of sludge and old roots). However the optimal intersection of availability, quality, and price seems to be either red lava rock, gravel (limestone-free!), or river rock (limestone-free!) in a media bed.
My overall personal favorite is lava rock; but I’ve read that sometimes lava rock is used to clean industrial-waste sites, so you may want to check to see if it is safe for fish and edible plants before purchasing. Hardware stores will normally be able to look at the MSDS (material safety data sheet) for the material and see if there are any hazards. Home Depot told us that the inventory they had at the time was probably not safe for fish and food production (may differ at your location), so we bought ours from a smaller local supplier who specializes in landscaping materials like rock, soil, etc…, and were able to take a little more time asking questions. They also spent more time answering any questions we had.

(4) - Incomplete Nutrition: Beyond Aquaponics
You may have doubts as to whether or not fish waste alone can sustain robust plant growth of such heavy feeders as tomatoes, peppers, etc., You would be right to have these doubts, as many beginners will experience less-than-optimal nutrient levels in the initial stages of the system’s use. This is because there will normally be a less diverse - and lower level of - microbial activity than in a mature, “cycled” system. Also, the lack of certain nutrients in fish feed can be a problem. When the only thing doing well in my system was salad greens and some herbs, I started to question the fertility of my water. This prompted a series of realizations: I needed to find another way to add more diverse nutrients in order to grow heavy feeders (i.e. tomatoes, peppers) with any comparable production to soil. It was also apparent that I would be waiting some months in order to build up enough converting microbiology for serious production. There were also major pH issues that needed to be tackled head-on.
The first and main reason why nutrients are not available to plants is most often a pH issue arising from either hard water or the grow media. Most plants like a slightly acidic pH of around 6.5, while fish enjoy a higher pH-- upwards of 8. A neutral pH of slightly above 7 seems to be a good compromise. This balance favors the plants, but fish will still do well in this range. It also buffers against an “acidic crash” that can happen suddenly if there are not alkaline ions in the water. The water coming out of the faucet at my last setup location was a soaring 8.5, and I made the mistake of adding crushed eggshells to the solids filter on top of already having hard water to begin with. I also assumed the lime content of my gravel was not going to change it a whole lot...big mistake! No amount of flushing with reverse osmosis water seemed to be able to bring the pH down after all of those carbonates had already settled in.
High pH can be difficult or impossible to bring back down, but it is less common than the low pH situation, which is fortunately much easier. It is more common to see a pH plummet after about a year of running the system. Suddenly, all of the pH buffers in the water become consumed and exhausted by the microbiology. The water becomes saturated with acidity, and most of the microbiology then dies off as a result of its’ own overproduction and saturation. This is why it is good to add eggshells or treated tap water in very small quantities. Spend some time and get an idea of how the pH in your system acts before adding too much. Additions make take several days for the full effects to run their course. You can take a sample cup of your system’s water and add a measured amount of pH buffer to that before you add it to your working system to test the effects. A good way to avoid high pH is to start with reverse osmosis water or distilled water to begin with. That will be better to work with than a water that is already saturated with an unmanageable amount of alkalizing ions that keep pH too high to allow the plants to use the nutrition that is available in the water.
Iron deficiency is a common problem in aquaponics systems. Typically, even with a good pH range, very little available iron comes through the fish waste from commercial feed. Also, iron becomes quickly locked-up at high (and low) pH ranges. This is why the DTPA iron that you buy from the garden store is chelated, so it is available at a wider range of pH levels. Chelating agents are made using toxic materials, which may warrant some caution when adding chelated iron.
Both iron and nitrogen can also get locked out in anaerobic conditions. This is one reason to keep an “air-stone” and pump to oxygenate the water. Most aquaponics setups are designed for leafy greens or other plants that don’t mind being deficient in some nutrients. However, if you want to produce heavy feeders like tomatoes it is very possible. Just try to keep the water oxygenated (will supercharge everything) and wait until your system has built up a very diverse and robust bacterial filter. After that, make sure to feed your fish a quality feed and/or supplement with minerals that are fish-safe in small doses. Some bottom-feeders like Koi can even be fed broken-down table scraps which will impart the nutrients from your leftover food into the system.
I will always be fascinated with the symbiosis that can be created between fish and plants in aquaponics. However, in doing some “Googling” about adding organic amendments to Aquaponics, the term “Bioponics” came up. In the version of Bioponics that I found, grasses and weeds are soaked in the fish tank like big tea-bags. These systems are run with or without fish. Expanding and diversifying this concept, I use any combination of organic nutrients and amendments that are fish-safe that I either buy or make at home. The amendments processed at home can often be done for little to no money-- on the wages of our ancestors. They can be made from common materials normally considered undesirable. Since the plant’s needs can be completely taken care of by these various natural “teas” and/or commercial organic hydroponic nutrients, the system won’t topple if there are problems with the fish. The main idea is to bring a wider spectrum of macro and micro nutrients to the system that are derived cheaply and naturally from other plants, food compost, seeds, or commercial products in order to grow the “heavy-feeder” plants, and get “bumper-crops”. Even though it’s maybe not necessary, I always like to keep fish to make the system more alive and diverse; as well as for lots of cheap and naturally-made nitrogen. It also makes it more interesting to observe (and to show others) with fish in the system.
Plant nutrients and more can be found in garden stores, hydroponic shops, or of course online. However, when possible I prefer the DIY route, which includes worm/compost teas, leaf tea, fermented plant juice, water calcium, and other natural farming techniques. Many common weeds like dandelion can be soaked in water to make a fertilizer tea, since most are great nutrient accumulators (see Gaia’s Garden by Toby Hemenway). You may be amazed how far simply adding a good un-sulfured molasses to your water can go to kick-start growth. Google “Bioponics” and “Natural Korean Farming” techniques for more information. This is advanced gardening, but at the same time “stupid-simple” to implement. These ancient methods are tried and true across generations of wise and elite farmers who had an intimate link to the natural world, and a sustainable way of empowerment. Now we are returning to these techniques, with the additional empowerment of modern materials and tools. If practiced with attention, bioponics and ancient natural farming techniques can be the sustainable empowerment that allows you to take fertility into your own hands outside of the petroleum-driven economy.
(5) - Water Flow: Evenness, Frequency, and Resistance
Water distribution is important in general for optimal functioning of the system. Does the water evenly and frequently distribute itself over every saturated surface available? Are all the saturated surfaces coming into contact with “fresh” incoming waste-water on a frequent basis? The nitrifying bacteria live on all of these surfaces and are fed by the oxygen, ammonia, and nitrite in the water. There should be no “dead spots” which don’t get much circulation of incoming water. The bacteria thrive where there is a good balance of oxygen, water, and nutrients, so growth will be best where this occurs-- bacteria and plant alike. The distribution will never be perfect, but just keep in mind when designing that the water should flow as evenly as possible, at a rate of at least the size of the fish tank per-hour. So if you have a standard 55-gallon rain barrel, you want to aim for 55 gallon-per-hour (GPH) or more on your pump. More is better, but you can over-do it when too much bacteria gets dislodged and can’t grow properly because of violent water flows. Also take into account that if the pump is lifting the water vertically, it will bring the pumping ability down, so the rating needs to compensate for any lifting of water (there are charts for this online as well as on the box of many pumps). Another style, called air lift pumps, are much more efficient on power than the standard magnetic type that are common for aquariums. There are many how-to’s on YouTube and Google for this.
Something to be aware of when designing is possible resistance or clogging over time. Specifically it is important to make sure that the fish tank PVC is sized so that the outlet is significantly wider in diameter than the inlet. Over time, your outlet may become partially blocked by slimes and solids, which causes the tank to overflow (if water is being pumped into the tank faster than it can escape through the outlet). This equals headaches. I would advise at least 2” PVC for the outlet at the very minimum for any fish tank 50 gallons or above. I know larger piping is more pricey, but if it constantly clogs you will end up wanting to replace/upgrade eventually anyway. You can taper it down with reducer fittings before the water reaches the plant beds to distribute flow, if needed. It is much easier to clear clogs out at these points, and usually will clear out by simply opening and closing the plant bed valve to build up pressure and release the “gunks”.
Setting up your pump inside of the fish tank instead of a separate sump tank or bio-filter will make for frequent clogs and maintenance. This is one reason why most larger hobby designs are CHOP (constant height, one pump) systems, where the sump is at the lowest point, pumping up water to the fish tank; which then overflows into a grow bed (or series of beds), and then back down into the sump tank. The larger waste-solids will be caught by the media in the bed(s) before they make it back to clog your pump in the lower sump tank. This way, the pump filter (on smaller models) has to be cleared much less often. Smaller pumps (regular aquarium pumps) have smaller openings, and are not built to handle as many solids as a larger pump that may be build for a sludgy pond, pool, or fountain. Generally, the larger the pump, the less maintenance there is with slowing/clogged water flow. Checking up on the pump flow made up a significant part of my ongoing maintenance hassles. A side note: if you are doing DWC (deep water culture/floating raft), make sure to add a media or bio-filter before the waste-water hits the rafts, otherwise roots can get completely coated with waste-solids.
Don’t install the downspout in the middle of the plant bed. Instead install all the way to the edge, opposite of your inlet water. That way water will flow across and nourish the entire plant bed; not just the half where the flow is strongest. This is less critical with an ebb-and-flow than with a system that has a constant flow or trickle, which seems to be what many beginners gravitate to, since it cuts-out the messy siphon part (which is very understandable).
(6) - Auto Siphons
The drainage from your grow beds must constantly move downward if linked together in a pressurized fashion. If it returns back to an upward slope - even ever-so-slightly - water and air-bubbles can get trapped inside the drain pipe. These will move back up into the siphons, causing them to malfunction. Again, this mistake is more likely to happen with larger systems that have multiple beds plumbed together than simple systems with just one grow bed. Also, if you link the drainage in a way that is not pressurized, this can be eliminated.
It was a very drawn-out, frustrating experience to troubleshoot this problem when it happened to me. I set up a larger system involving 5 “IBC” totes (275 gal.) as plant beds, draining down a terrace into a fish bed on the level below. All 5 beds were linked together down-slope to drain back to the sump. When I built this long drain pipe I did not initially realize that I would actually have to shift back uphill (just an inch or two) in order to get clearance back into the sump tank-- which was ended up sitting a few inches higher than expected on the terrace level below. Due to time, I ignored intuition and set it up anyways, not fully realizing the effect. Later when the system was “fired up”, we experienced a strange version of “whack-a-mole” that involved auto-siphons instead of mole-heads! The water and air was being trapped in the drainage pipe, causing pressure and air bubbles to pop back up into the grow bed siphons. These air bubbles can be a problem when you link your grow bed outlets together in a pressurized way. So, instead of linking drainage with a tee or elbow, use a hole saw to drill an inlet hole in your drainage pipe that is slightly larger than the inlet (may have to use a PVC reducer adapter). Then an inlet can dropped/connected straight down into the drainage holes, and the drainage will not be pressurized like it would be if press-fitted into elbows or tees. This will eliminate the problem of the bobbing-auto-siphon/whack-a-mole game.
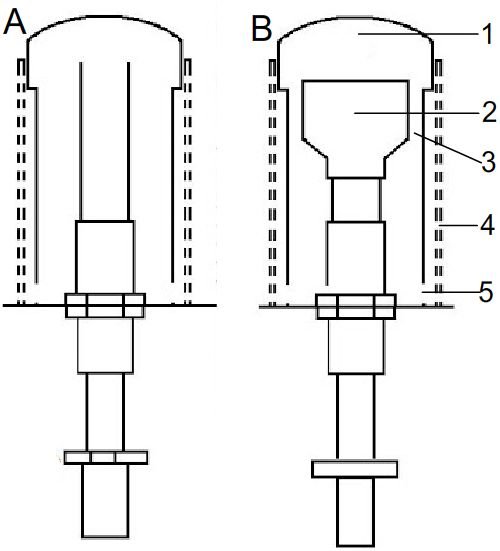
If the downspout for the auto-siphon is leaning (if the top opening is not level) it may have issues starting the siphon since air can still get through one side of the opening. Through YouTube, I recently came across a very interesting alternative to the auto-siphon, called a “u-siphon”, or “v-siphon”. Basically you can skip the hassle of needing a covering piece for the downspout by simply turning the downspout back down into the water and terminating at the drained-level. It could look something like the example I saw on a YouTube video (pictured below, credit to user Michael H). This would be used with a 4” media guard placed around it just like a normal auto-siphon.

(7) - To Glue, or Not to Glue
I have never actually used PVC-glue for any of my 3 smaller systems, or the two larger “IBC” systems. This did work in some situations, and was regrettable in others. Basically, the rule I came up with is: if the water travels downward or level to the connection and fills the pipe while doing so (not just a trickle), it’s best to glue. If it is traveling up or shortly falling over-and-down, it’s probably OK without glue (especially outdoors or in a hoophouse). It also depends on where the connection is. Sometimes it happens to be in a place where it just drips back into the system, or a tank. Is it indoors or outdoors? Leaks may happen unexpectedly, so if you are renter and growing indoors it’s best to be careful and glue it tight!
When it comes to attaching PVC to tanks, grow beds, etc., forget the expensive bulkhead fittings and go with Uniseals. They are cheaper, easier, and do the job very well.
(8) - Temperature Effects
If it gets cold around the fish tank, the rate of feeding can slow dramatically. As a cold-blooded animal, the metabolism of a fish is hard-linked to heat (and the lack of it). Fish may even stop eating almost completely depending on the species. This is perfectly normal and to be expected. Vigor/activity will also visibly slow or disappear until temperatures rebound. Few types of fish will eat much at all under 50F, and therefore will produce much less poo/fertilizer in cold water. Most species slow their metabolisms and eating under 70 degrees-- even cold-hardy types like Goldfish and Koi. The bacteria also slow their metabolisms, and therefore valuable nitrate production and plant growth.
Overfeeding protein-rich feed when it is too cold for the fish is an easy way to invite disease. To be extra-safe, it is best to also use a “winter feed” that has less protein and more carbs during cold-spells. The carbs will give the fish some much-needed energy for the winter “slowdown”, and will not go rancid in the water nearly as much as a protein-heavy feed might.
This means a choice must be made between choosing breeds that are cold hardy and expecting a dip in production/feeding rates during cold weather, or finding a way to heat & retain heat in your space. This will allow you to keep metabolism high and also to keep warm-water breeds like Tilapia, Bass or Perch, if you choose.
Cold temperatures also will slow down the ability of your bacteria to convert ammonia to nitrites and nitrates, which should be taken into account if you are planning on producing a winter, early spring, or late fall harvest. Also, since this is a soilless medium and has less temperature buffering capability, the roots of heavy feeders like tomato, peppers, and melons can become too cold to keep producing and ripening.

(9) - Heating & Humidity
So you have decided to extend your season with heating. This means you likely have a temperature difference of 20F or more between your fish tank and the ambient air around. This difference makes for condensation, evaporation, and water loss. If you have a domed or a slanted roof, it can be used to recover the moisture around the perimeter (in concert with some sort of waterproof tarp/lining); but if you don’t, you may end up with problems down the line with rotting or having to add buckets of water each day to the system. I was adding at least a gallon per day to offset the evaporating of the uncovered warm water in our cool basement. I ended up slowly bringing the water temperature back down after a couple of weeks of heavy humidity in our rented basement, and decided to just live with the dip in winter-production to avoid such issues. If heating the water, it is wise to design with condensation in mind and make sure that the ambient air has a way to stay warm as well as the fish tank water (this may not work as well inside a residence where rot in the ceiling/walls could be a concern). Heating the air as well can mean more energy use, but again photovoltaic solar (or even passive solar) is a sustainable alternative to power electric heaters. Also, water has high thermal mass which stores heat, buffers against temperature changes, and radiates heat back out into cool air. In addition, if dirt is kept bone-dry around the greenhouse area using moisture barriers, “annual thermal inertia” can be used to store summer heat for winter in the dry dirt (works best in dry climates but is possible in wetter areas as well). The Permies forum is a good place to check for more information on these passive solar energy-harvesting techniques.
(10) - Using Wood Structurally
If you are going to build any part of your system with wood, it’s good to be aware of the effects that moisture will have. No one wants to have to find a place for stressed fish while they rebuild the entire system just because one rotted structural section cannot be replaced or fixed without shutting the whole thing down. This has happened to me, where wooden supports rotted out from under a plant bed that I had set up to drain to a sump underneath. Since it was full of heavy gravel and plants that were almost mature, I was stuck watching the plant beds’ gradual descent into the sump tank-- until it ultimately took it’s final plunge. I would not design with wooden supports again unless I was sure they would not receive any drips and/or significant humidity. Even so, I would only use it on non-structural pieces. By the way, treated lumber can also rot-- just not as quickly or easily.

(11) - Algae
Don’t let algae grow rampant! A little here and there is no biggie if kept in-check; but if it invades the surface of the entire fish tank, it will hog-up precious oxygen. The lack of oxygen will then encourage other nasties like molds and fungus gnats. Algae grows where there is both nutrient-containing water and light consistently present. It is a common mistake to leave the top of the fish tank exposed to too much light, and also to let the inlet spouts to the grow bed drip onto the top surface of the media. Make sure the water inlet for your plant bed is well buried under your growing media by a couple of inches.
Fish need a small amount of shaded daylight; but get sun-burned when fully exposed. They like a shade cloth or some form of dappled shade over the tank (like through the canopy of a bush or tree). Plecos and snails can work well for the algae that does persist. There will always be some here and there but hopefully a balance can be struck. By the way, look for black flex hose (instead of clear) to prevent light from feeding algae if you can. Algae can become so thick in clear hose that it starts to slow down water flow or stop it completely.
If you are wondering if it is really worth it to pump in extra oxygen, it usually is. You don’t want your fish to be white-water rafting, but try to get some bubbles in the tank. Air supports fish health, root health, nutrient conversion, and beneficial bacteria. Try to get an air pump that is rated for the full volume of your tank, or as close as you can. If you can’t incorporate air bubbles in or can only push a small amount, your system will still run OK. However, the lack of oxygen in the water will significantly decrease plant production, bacterial life, and increase chances of diseases. Even though it is an aquatic environment, everything that lives in an aquaponics system enjoys all the oxygen that it can get.

(12) - Predators/Pests
If you are raising fish outdoors in an open pond or any other open tank, you will probably need to put a net or covering over the top, so that birds, cats, or other predators do not descend onto your bounty (or pets). If you have cats or other loveable domestic predators this also may apply to indoor systems. Bugs tend to drown themselves in your sump; even occasionally rats! I have found a rat face-down floating in my sump pool and have seen videos of damage to aquaponic strawberries by rats. Of course if your bed is outdoors, consider the control measures you might take if the critters in your area decided to get bold (and they probably will if they are around). Also, speaking of predators, make sure your net for catching fish is not too small or your fish may try the most annoying escape attempt onto dry land. On the other hand if the net is too big, the small fish get away in the smaller spaces and corners of the tank.

(13) - Don’t Use Tap-Water, Unless It’s REALLY Good!)
City water (tap/municipal water) is usually treated with chlorine to sanitize. Unfortunately this will also “sanitize” the productive bacteria that your fish and plants rely on to grow well. Many cities also add chloramine on-top of the chlorine. Chloramine is much harder to remove; but chlorine can be evaporated out of the water by simply letting it stand for a day, aerating for several hours, or passing through a charcoal filter (like Brita). I have heard that adding a good organic unsulphured blackstrap molasses may work as well. Do a quick Google search to see if your city uses chloramine. If it does, it would be much better to get some reverse osmosis or distilled water from the grocer instead of using that on your fish and bacteria. RO water is not too expensive if you buy it in bulk from the dispenser machines at your grocer, and it’s usually about 6-6.5 pH (which is easy to nudge up with a little bit of tap water or eggshells). Chemicals that make the chloramine safe are available at the pet/aquarium store, if necessary. You may be able to get away with some chloramine water that has sat out for a day/night with a bit-o’-luck. However, the very first set of fish I ever kept was wiped out by attempting to transport in a bowl of untreated tap water, so I tend to stay on the cautious side of things when it comes to the water I keep my fish in.
---------------DON’T PANIC!---------------
Do not feel encumbered by the number of issues that are addressed in this guide. Aquaponics is actually an ancient and simple system in general. However, the modern applications of creating a symbiosis between an aquatic and horticultural environment using our tools and technology are still developing. Unexpected issues should be expected with such ambitious explorations.
For many of us, the first system we see working in real-life will be ones we build ourselves. The issues tend to be dealt with head-on as they arise, completely unexpected. I expect most beginners will probably encounter many of the same problems as I did, and will now be able to avoid them, utilizing my past failures. Work smarter, not harder! (TOC)
TAKE-HOME LIST OF DON’TS
Quick Reference
-Don’t start your system with a heavy investment of fish! More is less in the “pioneering” phase.
(If using floating rafts) -Don’t forget a bio-filter for solid waste.
-Don’t neglect the need for oxygen via bubbles, water agitation, waterfalls, and drips!
-Don’t mix sizes of fish that are able to eat each other. Separate fry when born.
-Don’t feed too much or too often. “Two mouthfuls twice a day”
-Don’t be too quick to choose a grow meda.
(pH leaching from limestone content? Toxic contents?)
-Don’t underestimate the power of a steady pH in proper range on nutrients and fish . Check your source water and the media after sitting in the same water for a few days to make sure the media won’t start to raise the pH.
-Don’t expect to grow heavy feeders like tomatoes at first. Focus on leafy greens until the system gets into gear and you are able to feed larger fish with a more diverse feed (and possibly supplement the water with organic nutrients/amendments).
-Don’t size the outlet of your fish tank the same or smaller than the inlet. Water should be able to leave faster than it enters-- with the exception of the grow beds near the valves.
-Don’t pump straight out of the bottom of the fish tank. This is where most of the solids settle and the pump will require more maintenance unless it’s a big pond skimmer or heavy-duty aquarium pump. The pump belongs in the sump.
-Don’t underestimate the benefits of evenly distributed water and a high frequency of water exchange across root surfaces of the plants and throughout the entire hydrologic system.
-Don’t allow any air to get caught your siphon drain-lines and cause them to malfunction.
-Don’t install siphon down-spouts (outlets) with any significant leaning-angle to it. The uneven top will cause slow or non-working siphons as the water struggles to cover the inlet as it passes.
-Don’t feel like you have to glue PVC parts if they won’t receive substantial water pressure (or parts that will just drip back into the system anyway). If you are renting however, just glue it all.
-Don’t forget your winter feed and winter feeding routine if the temperatures drop in the water.
-Don’t try to heat a fish tank in a cold room (20F difference or more between water and air) unless you have a good way to recover or hold-off the water losses to condensation and have no walls or ceilings to worry about rotting.
-Don’t build structural supports with wood unless you can protect them from moisture and/or dry them out with adequate ventilation if they do get wet. Using wood on an indoor aquaponic system usually ends in black mold, which is a health hazard.
-Don’t give a pass to too much algae in the fish tank. None should exist in the grow beds. Sunlight and nutrient water should never both be available in abundance to the algae.
-Don’t buy clear flex hose. It will just get clogged with algae.
-Don’t underestimate the mutual interest that bugs, critters, and other life-forms in general may have in your simulated ecosystem.
-Don’t subject your fish or beneficial bacteria to chlorine and chloramine in tap water. You may be able to get away with a very small amount that has sit out for a night or aerated to off-gas chlorine.
---Be quick but don’t hurry. Take care, but don’t worry.
Useful Links:
Abundant permaculture info --- www.permies.com
Comprehensive source of equipment--- www.theaquaponicssource.com
Originator of the term “Bioponics” --- www.bioponica.net
Craigslist.org --- Rain barrels, IBC totes, and other materials
Ebay.com --- Good & easy source for cheap pumps
Youtube.com --- DIY aquaponics university
[END]

You are at the top, my friend. I hope to stay that way
Thank you. Are you a bot?
This is a great post @returnofbonsens! I wish I'd seen it when I was starting
@ligayagardener glad you liked it. Do you mean you with you saw it when you started gardening or when you started on Steemit?
When I started designing my system
Oh man. What problems did you end up having?
Nothing serious. Lack of N, algae, turbidity. We managed to work it all out
By algae I assume you mean too much not a lack of, correct? Glad to hear it worked out overall.
Great Post. its refreshing to see a fellow aquaponic pioneer who is informed. The Bioponics is a great idea..
I found out about almost all of these same issues the hard way.. when I started there wasn't hardly any information out there that wasn't fraught with problems. I would never suggest to anyone, building an IBC tote system like you see all over the place, with the pump in the fish tank and the grow bed as the bio filter..
Talk about a messy nightmare.. GEEZ...
I also found that the SEA90 salt works wonders in aquaponics, and it helps to control snails. The fish and the plants can handle changes in salinity, not so with snails.. and it dissolves lots of micro nutrients as well.
Keep up the good work..