Hecho a mano un bolso para ti/ Handmade a bag for you/@elinorrg
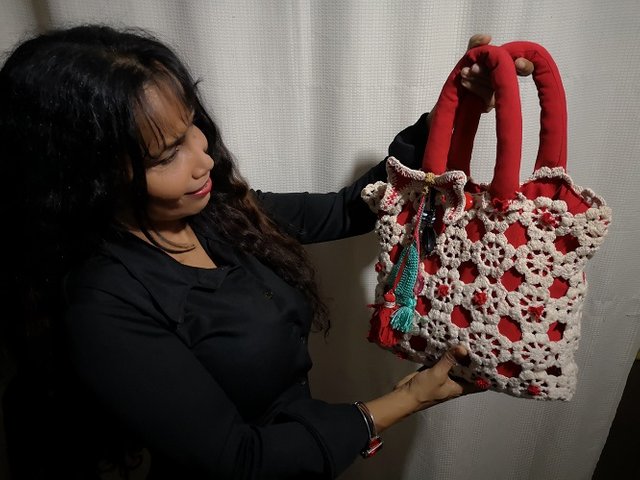

Greetings to all of Hive's friends. Friends this time I offer you another art. The art of weaving with Pabilo. Siii Pabilo, the one that you use to tie the Halcas. It is a thread that can have many uses apart from its use in the kitchen. The wick thread can be found in different types and different colors, the one you want will look beautiful. It can be obtained at the market, supermarket or a leftover that has remained and has not been used. In my case it was a leftover that I had saved. In this post I am going to show you step by step the making of a very cool bag for all occasions. The bag apart from the fabric has a lining inside the color you want and the decoration depends on your creativity. It is a very simple fabric. The bag is made up of various flowers to be knitted. The flowers are very easy to make and joined one by one to form the bag. The size and color of this depends on how you want it. Below I will show you step by step this beautiful art.
Bolso casual elaborado con hilo pabilo
Materiales:
- 2 Rollos de Hilo Pabilo de su preferencia
- Aguja de tejer # 1.75mm
- Tela para el forro
- Accesorios (opcional)
- Hilo de coser
- Aguja
- Tijera
Casual bag made with wick thread Materials:
- 2 Rolls of Pabilo Thread of your choice
- N° 1.75mm knitting needle
- Lining fabric
- Accessories (optional)
- Sewing thread
- Needle
- Scissors

Procedimientos:
1er paso
Utilizaremos este esquema para tejer la flor
Procedures:
1st step
We will use this scheme to weave the flower
 |
| |
|
Se forman 12 cadenetas y luego se unen como se muestra en la foto 4, foto 5, foto 6, foto 7 y foto9
12 chains are formed and then joined as shown in photo 4, photo 5, photo 6, photo 7 and photo9
 |
| |
| |
| |
|
2do paso
Una vez unido se procede a formar los puntos bajos, foto 10 y puntos altos, foto 11 y foto 12. (guiarse por el esquema.)
2nd step
Once joined, the low points, photo 10 and high points, photo 11 and photo 12 are formed. (Guide by the scheme.)
 |
| |
|
3er paso
Y llegamos en la parte final de la flor, la formación de sus pétalos por puntos bajo y puntos alto, foto 12a y finalmente la flor formada foto 13. De esta flor vas a realizar las cantidades necesarias dependiendo del tamaño que lo quieras y luego la unes cosiéndolas con aguja e hilo para ver el siguiente resultado, foto 14 y foto 15.
3rd step
and we arrive at the final part of the flower, the formation of its petals by low points and high points, photo 12a and finally the flower formed photo 13. From this flower you will make the necessary amounts depending on the size you want and then the You join by sewing them with a needle and thread to see the following result, photo 14 and photo 15.
 |
| |
| |
|
4to paso
Ahora formaremos la base del bolso. Esta puede ser formada por las misma flores o por un rectángulo con punto bajo o punto alto, depende de su gusto. En este caso yo hice el rectángulo con punto bajo. (ver foto).
4th step
Now we will form the base of the bag. This can be formed by the same flowers or by a rectangle with a low or high point, depending on your taste. In this case I made the rectangle with a single crochet. (view photo)

5to paso
Una vez elaborado ambas partes se procede a unir el rectángulo formado de flores con el rectángulo formado con punto bajo (ver foto)
5th step
Once both parts are made, the rectangle formed by flowers is joined with the rectangle formed with a low point (see photo)

6to paso
Ahora realizaremos el forro y el asa de la siguiente manera:
Ver foto 1. Se cortaran
2 rectángulos de 32 x 8
3 rectángulos de 29 x 8
2 tiras de 10 x 50
2 rectángulos de 18 x 8
y se procede a pegar las piezas como indica la foto 2 y se cosen las tiras para el asa y el lazo y se voltean, foto 3
6th step
Now we will make the lining and the handle as follows:
See photo 1. They will be cut
2 32 x 8 rectangles
3 29 x 8 rectangles
2 strips of 10 x 50
2 rectangles of 18 x 8
and the pieces are glued as shown in photo 2 and the straps for the handle and the bow are sewn and turned, photo 3
 |
| |
|
7mo paso
Ahora se cose el forro con el del tejido, foto 17, quedando terminado como se ve en la foto 18.
7th step
Now the lining is sewn with the fabric, photo 17, being finished as seen in photo 18.
|
 |
|
8vo paso
luego pegamos las asas. El asa lo puedes rellenar como en mi caso o dejarlo normal
8th step
then we glue the handles. You can fill the handle as in my case or leave it normal
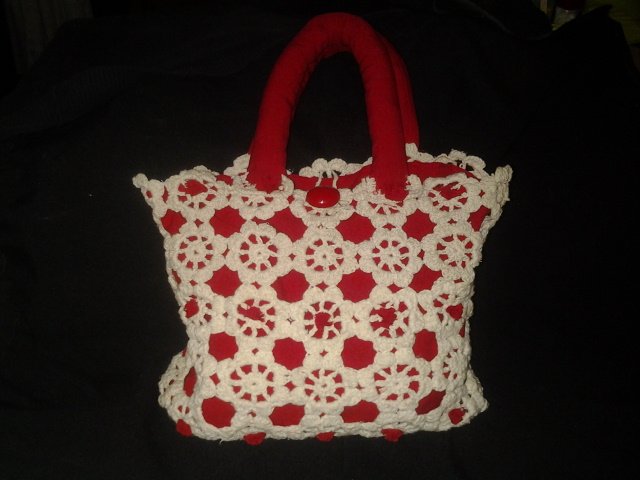
y por ultimo la decoración con los accesorios que depende de su creatividad
and finally the decoration with the accessories that depends on your creativity
)
Apreciaria sus comentarios para mejorar y gracias por apoyarnos en este tiempo de cuarentena
I would appreciate your comments to improve and thanks for supporting us in this time of quarantine
Greetings and have fun with your family