Re-making the 20th Century Fox Animation
Hello there, this is my first Steemit post, I'm very excited about this great new platform.
Without boring you to death, allow me to introduce myself briefly and tell you what I do.
Recently I took a calculated risk and started running my business full time (VSGFX, Inc.) It's been a 3-year process saving up and buying all the gear I needed to run an animation/video and graphic design business. The computers, cameras, software, accessories, studio, etc. It's really not a cheap field to get into, but these fields have been my passion for around 10 years now, and I've freelanced enough.
This project was an interesting one for me. I've always wanted to re-create a popular cinematic logo reveal, such as the 20th Century Fox intro. A great client of mine wanted to create the same reveal for one of his music mixes, but of course changing the "20th Century Fox" part to his title: "Speed Garage Of The 21st Century". It took me about 20 hours of work, keeping the budget in mind.
Here is the video sample of the final animation:
The challenges of making this animation:
- No 3D models available, have to model from scratch
- Camera movement from scratch, only by looking at reference video
- Making mountains and city in the background
- Finding and editing the right look for the sky
This is the only video reference I downloaded and used to re-create this animation:
Making the 3D models
The first challenge was the 3D models, which I made in Blender, great open source software by the way. I just couldn't find any good models of this scene, free or paid. I soon realized I'll have to do everything from scratch. So I started in Adobe Illustrator and found the font that resembled the 20th Century Fox the most. Lined everything up, exported as .SVG file type and brought it into Blender. Once I had my text right, I made it into a mesh and extruded it just right to get this long text look. The original reference has some nice bevels on the corners of the text, so I had to do the same. Fixed my UV mapping so the texture will fit nicely.

Then, arguably the next biggest challenge was the pedestals surrounding the 3D text. I was pretty surprised to find out that there are all kinds of weird perspective issues with this scene, I'll tell you what I mean. When you look at the scene and pause the reference video early on, you can see the surrounding area has stairs, lights and walkways. If you look at the stairs, you can imagine how tall a person would be, and some surrounding lights and buildings just don't fit the size.
Problems with perspective and sizing
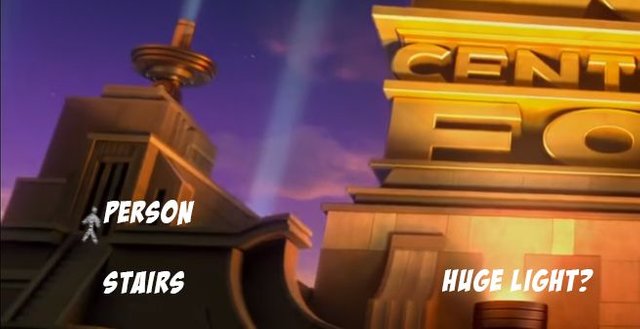
It took about 8 hours to get the surrounding areas right. I was playing with the camera lens - which is super wide by the way - and moving things around until they looked as close to the original as possible.
The camera movement
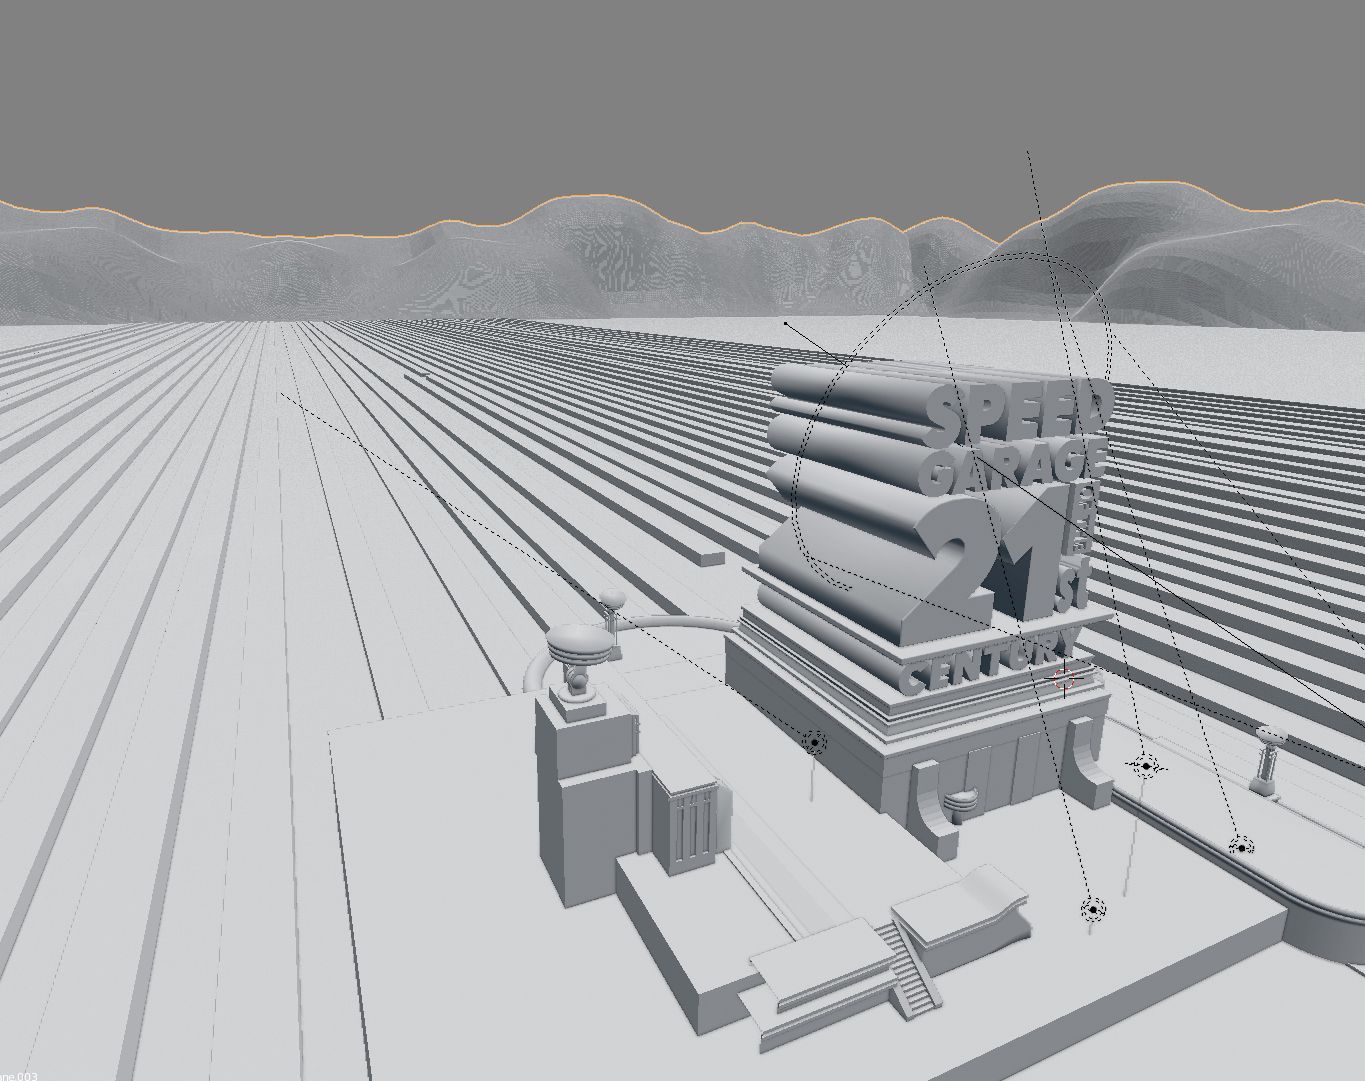
This is the point when I realized modeling wasn't done. When you look at the reference, the camera pans from the top and looks up at the text. You can clearly see the city in the background, the mountains and the sky. My original thought was that I'd make a "skybox" that has all this in there, but that was not happening. It's a big project, to find the city from the right angle and make a whole spherical map from scratch. I searched high and low for a similar image, free or paid, but it wasn't happening. Before I jumped into it, I wanted to finalize the camera movement. I basically paused the reference video at certain key points and set the camera to the same spot in After Effects. (Oh, by the way, by now I exported from Blender and imported into Element 3D plugin in AE.) Then adjusted the keyframes and bezier curves to fit the camera movement. This took about an hour.
Fox is my city
Creating the background city was a pain. I tried a couple different ways, but ended up with a pretty rudimentary solution, I thought it worked pretty well. I went on Google Images and downloaded about 10 images of cities at night from birds-eye-view. I stitched and blended them together in Photoshop into a 4k x 4k pixel image and made it seamless so I can repeat the image without seeing the seams. Then, in Blender, I created a big big plane broken up into long rectangles to simulate the streets and houses. Note that you may have to full-screen the animation and switch to high quality to see the city in it's full context, I probably should have made it brighter.
Making the city background in Blender
Finally, the Sky
This was the point I realized I should have a paid subscription to a stock image site, I decided to go with Adobe Stock but there are other great ones out there. There was just not a free spherical sky map I could find, but I got this one from a sunset and had to edit it quite extensively. I layered some stars behind the clouds, just like the reference had it, and it worked. In the reference, when the camera stops, you can see the clouds moving. I achieved this effect by rotating the sky image slightly. This took about an hour.
Other composite trickery
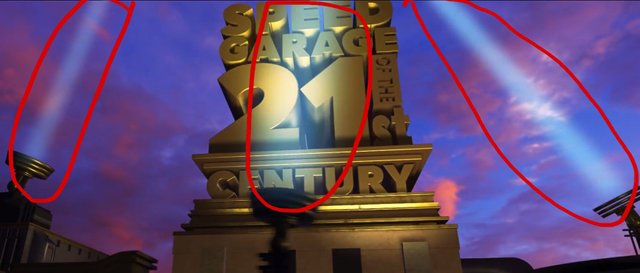
The last challenge for me was the light rays coming from those lights. There are 6 of them in total, I believe I only did 4, though I modeled all the light fixtures. I was only in After Effects at this point, specifically in Element 3D, and I since I just couldn't make a "real" light look so foggy and "beamy", I just went with adjustment layers with masks on them. The downside? I had to place them in 3D right on top of the lights and move them separately, matching the rotation of the lights. Talk about a pain in the butt, but it turned out pretty neat in my opinion and it gave me a lot of options to play with opacity and feathering.
In Conclusion this was a really fun project for me, and I'm planning to take a second pass at it to improve it even more. The limitations I had was mostly the budget. I realized the shortcuts I needed to take to get things done faster and meet the client's budget, but I might jump back at it when I have some free time.
Thank You
If you got this far, I'd like to thank you for stopping by. I welcome any input and criticism on this or any other projects. I have many other ones done and in the works, I also live-stream at times when I'm making these, I'll be posting them here on Steemit as well. See you soon! Much love.
Victor.
Congratulations @victorsavelle! You received a personal award!
Click here to view your Board of Honor
Solid work brother! Love all of it! Your passion, attention to detail and willingness to educate others! Keep it up and I'm looking forward to our collaborations!
Congratulations @victorsavelle! You received a personal award!
You can view your badges on your Steem Board and compare to others on the Steem Ranking
Vote for @Steemitboard as a witness to get one more award and increased upvotes!