Into to 3D Max 2017 week one. Download and Install 3D max for free for 3 years and make cool stuff.
In this class, we will open up the 3D max interface and create a simple table top scene, apply textures and render out a JPG to show to your friends.
Step 1: open 3D max 2017 by clicking on the window icon in the bottom left of your screen and typing in 3D Studio and it should come up. It should already be installed on your computer at school. But if you are working on your own computer and want the software you can download it for free and use it for a 3 year license period.
- Go to https://www.autodesk.com/education/free-software/3ds-max
- Sign up to the service using your email and create a password. You will need the email to get the license number for the software you are downloading. While the software is free to students every copy needs a # attached to it so they can collect data on how and what you do with it.
- Choose your language (Eng) , operating system (win 64) and version (2017) , I would suggest 2017 as this class will be in 2017. If you download 2018 I will not be able to load the files and see your work. Your files from home will not work on the school’s computers as they also have 2017 installed. Download the software and install it on your home computer. Downloading can take all night on a slow connection as it is 12GB.
4.When you first open 3D max it will ask you
->

Choose classic and click continue.
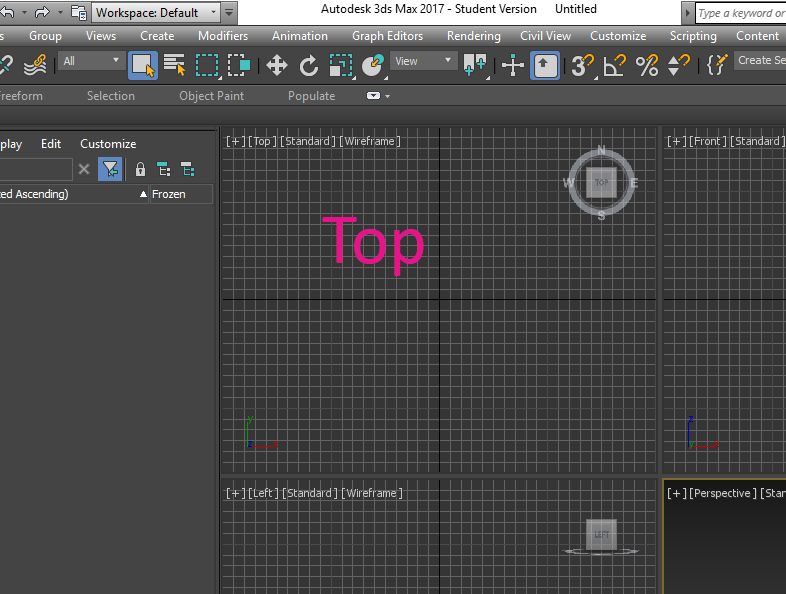
Then it will ask you what type of startup template you want, choose original startup’,
->

It should look like this:
->

Create a box using the box creation tool on the left side of the screen under the create tab
->
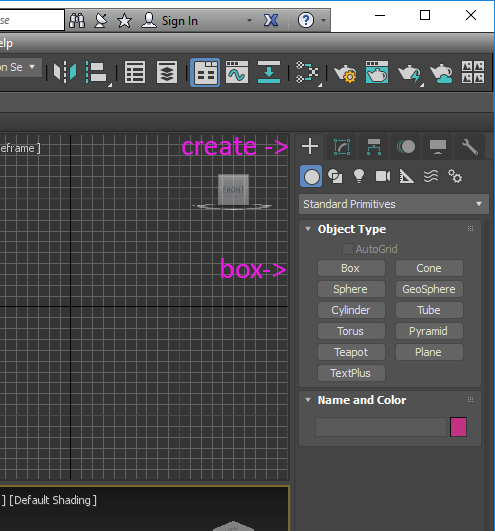
->
In the view marked ‘top’. Make the table with the dimensions of a table top.
A table top can be 36 inches by 54 inches and about 2 inches thick. You are working in the ‘top down’ view or ‘birds-eye’ view.
Box with dimensions

Table top in top view

It is best to work in real world sizes in max so files imported into new scene has the same relative scale.
Table Top in the Middle of the screen where the 2 darker grid lines cross

When you create the box you can just type in the dimensions in the parameters box on the middle right side of the screen:
->
If its not in the middle use the move tool to center it in the screen.
The middle mouse wheel is both a wheel and a buton

When pressing down on the wheel and not rolling it you can 'pan left and right or 'slide the picture left and right or up and down

->

->

->
Use the green ‘Y’ and red ‘X’ arrows to move the table top up or down left and right into the middle of the screen. When you want to scroll up and down on this web page you can use your middle mouse wheel to move up and down, but in 3D Max the middle mouse button can zoom in and out and slide the screen around.
Use the middle mouse wheel to zoom in and out on the screen. Press down on the middle mouse button (mouse pointer icon should turn into a hand icon) to slide the screen left and right up and down.
->
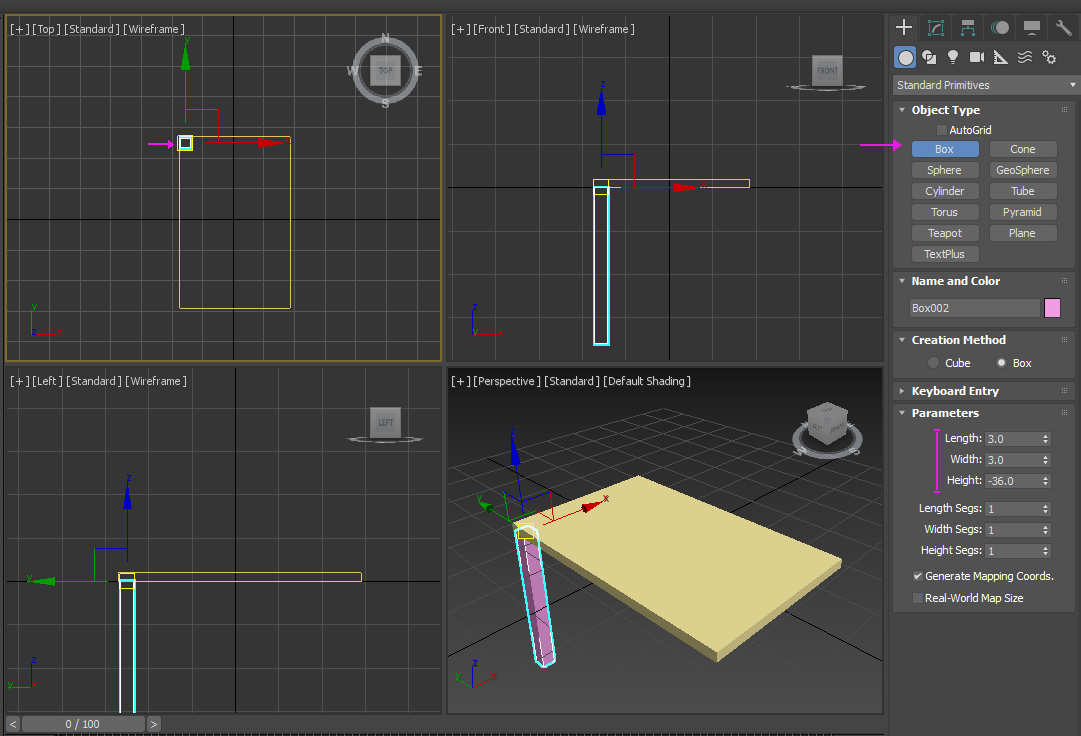
Create a table leg in the top view (2x2x36 inches) and place it on one corner of the table.
Use the box tool again
->
Why -36? Because you are traveling inversely thought he X,Y plane along the ‘Z’ axis or just going down the ‘Z’ axis instead of up. If you look in the left view panel you will see the leg below the table top. If it is not in the right place move it into position with the Move tool.
->

If your table leg really does not look right you may have not started to draw the table top in the top view. The table top drawn in the top view was resting on the’0’ x/y plane. It was neither up or down but at ‘0’ go back and make the table top again if it does not look like this
->
Naming Objects
We need to start to name our objects. Naming objects is very important when creating a 3D scene. Most 3D scenes have hundreds of parts and they all need labels. Bad names can lead to confusion so name the object in a descriptive way. Always start with naming something and numbering it. Do not start number things at ‘1’ but at ‘001’ This is called ‘number padding’. If you have taken a computer programming course you know that padding a number with some number spaces is a good thing if you are creating array’s or a matrix. So double click the box1 (or right click to choose ‘rename’ from the drop down menu and rename box 1 ‘table top 001’ and ‘table leg 001’
->

Drop Down Menu

Renamed table top and leg

Now we are going to select the table leg and copy it so we have 2 table legs. You can just choose the name 'Table Leg 001' from your name list on the left-hand side of the screen. When you have many objects in your scene its can be better to choose the name object quickly instead of hunting for it on your screen.
Now that the leg is selected Press the space bar on the keyboard to lock the selection or go down to the bottom of the screen below the time line and click the padlock icon highlighted in magenta below. (you can also just click the icon instead of using the space bar.)
This will not let you lose your selection which can happen when you click to move something and choose another object by mistake.
Lock Selection Tool

use the move tool
While the table leg is selected while holding the shift key on your keyboard make a copy of your leg across the top of the table along the 'X' axis (the red arrow on the move tool handle on the leg).
Once you have put it on the other side of the table a pop up window will appear asking if you want to copy the leg (notice that the leg automatically has been named Table Leg 003)
Copy Window

With your mouse over the top view window in Max press the ‘alt’ key and the ‘w’ key on your keyboard. This should maximize your top view window so it is full screen.
Don’t like using keyboard short cuts? You can click the ‘Maximize Viewport’ button at the bottom right of 3D Max.
Maximizing the top view window

Use your middle mouse scroll button on your mouse to zoom in and out and center the table top on the screen
Middle Mouse
Top View of Table is centered and zoomed*
Notice that I have selected both legs by clicking both ‘table leg 001’ and ‘Table leg 002” because I am going to hold shift and drag the legs down to the bottom edge of the table top.
Copy 2 legs to 4

Notice that the list now has 4 legs. Click OK to accept.
Click the ‘Maximize Viewport’ button on the bottom right of the screen to go back to the original 4 ‘top’ ‘left’ ‘front’ and ‘perspective’ windows. Or press Alt +’W’.
maximize window button
Now let’s look at the whole table in all four views.
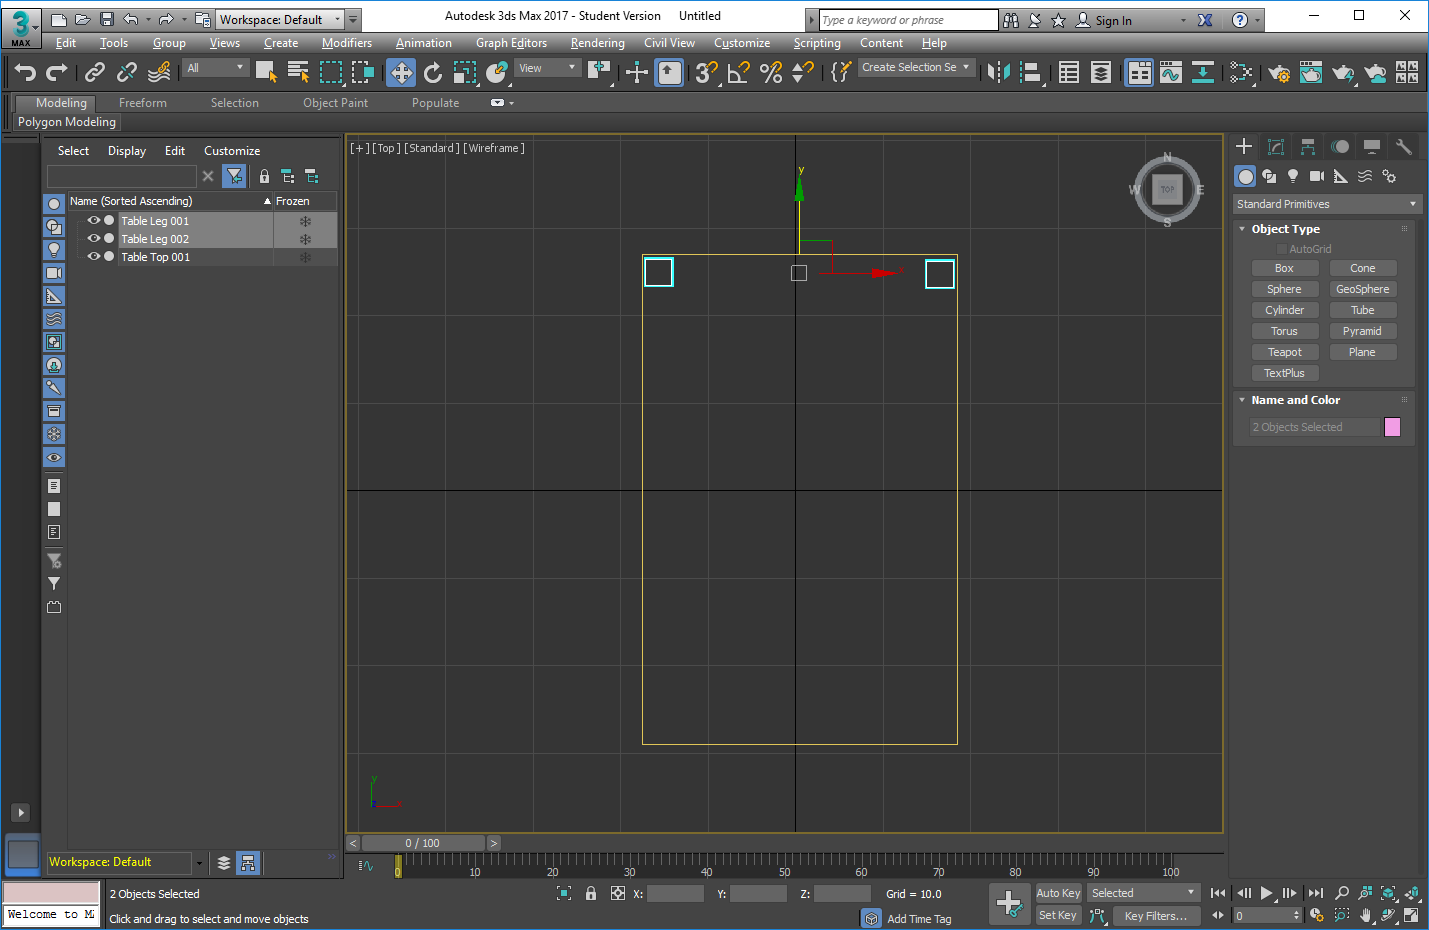
1.Select the table top and all four legs from your name list.
- Click the ‘Zoom Extents all Selected’ all button one the bottom right corner of the screen (it’s above the ‘Maximize Viewport toggle)
Zoom Extents All Selected

Now let’s group the table legs under the table top so we don’t lose our legs when we move the table. In the name list drag the name of each leg into the table top name and it will auto group below the Table top.
Table Grouped with Legs

Saving our work. 3D max has a hierarchy when it comes to saving files. There is not just one file associated with a 3D max file. There are the scene files models in those scenes that need to be saved as well as the ‘paint’ on those models called ‘texture’ files, Animation files and script files.
To get started we need to tell 3D max that we want to save this file in our Dropbox.
Dropbox Logo

I have found that using drop box is a great way to use 3D max. If you don’t have a Dropbox go to dropbox.com and download Dropbox onto your computer. This will come in handy later when you work with groups on projects. You can see each other’s files and you can’t forget it at home or have it stolen. One year of drop box cost as much as a hard drive but you get a few GB for free when you sign up which will be plenty for a 3D max project. So Drop box should be free for you for this cass and you should not have to buy anything.
Download Drop box, install it and create a 3D max folder in your drop box folder. Then make a folder in that folder called ‘week 1’ If you do one of my tutorial each week you will learn 3D Studio Max.
Your Dropbox should look like this once installed

Go to the cyan (turquoise?) 3D max icon on the top left corner of your screen and choose 3d -> manage -> set project folder
Set Project Folder

Click down into the drobox folder –> 3D max -> Week 1 and choose week 1
If you did not yet make you folders you can make them here as well.
Dropbox Project folder assignment

Now let’s go back the top right corner click the 3Ds Max logo and go to save as -> save as -> table 01. You will notice that your computer knew to go right to your directory.
Save our file – we can all this table 1.
Save File

Lets make that table top look like a nice wood top. I will google ‘wood floor’ and look under the google images tab to find a jpg of a wood floor. I will save it into dropbox -> 3D Max -> week 1 -> sceneassests -> images
Save Wood Floor File to: dropbox-> 3D Max -> week 1 -> sceneassests -> images

Now lets load that material editor and apply this wood material to the table.
If you set up your files the way I did you will find the wood texture almost automatically. Click the material editor icon along the top ribbon near the teapot render icon.
Material editor Icon Location boxed in Magenta

A Slate Material editor should pop up that look s like this:

Click and drag the standard material out and click on ‘Diffuse color’
When you click on diffuse color the navigator next to the material should load all the inputs. Find and click on the word ‘none’ next to ‘diffuse color’ tab in the navigator and a dialog box should pop up.
**Double click 'none' next to diffuse color **

click on 'bitmap' to load the wood texture

Click on bitmap to load the wood texture and you should immediately see the wood texture, just click it to select it and click open to load it.
load wood texture

You can’t see the texture on the table until you assign it to the table top. Select the table top and then click the assign material to selection icon.
Assign material to selection

Show material in the window

Click the render button along the top ribbon on the right side to see a better render.

your render should look something like this

Now let’s make a floor for this table. Click the create tab on the right side of the screen and choose plane.
Go to the the create panel and click plane

Go back to the top view port you used to create the table top. In the ‘top’ viewport roll back a little with your mouse wheel so the table become a little smaller in the top view port. Click and drag a large square over your table.
Your top view port should look like this

Now look at the ‘perspective view port and you will see the floor is slicing through your table. You will also see the dimension inputs for the floor plane length, width and how many divisions It has. Set the divisions to 4 and the length and width to 400 inches.
Setting floor dimensions

We can fix this by looking at the ‘left’ view port. You can click on the table top with the move tool and move it up in the ‘Y’ Axis. The table should move up so the legs appear to be resting on the floor. Now look back at the perspective view.
Left View Port Y Axis table move

Click zoom extents icon in the bottom left of the scene like you did before. You will notice that all four windows zoom in to the table top because you probably still have it selected. But if you had nothing selected it zooms out all the way to the width of the floor in all views. That is how the ‘Zoom Extents’ tool is supposed to work.

Now let’s add a checker pattern to the floor by first opening the material editor.

We will make another standard material by clicking and dragging it out and this time we will click on the name and rename it ‘Check Floor’
(go ahead a rename the wood texture ‘wood table top’ while you are at it we forgot to do that before.)
Input Checker Floor

** assign material to floor and view material in view port**
Now you see the floor but the pattern is too big. Let’s change the inputs on the floor texture to update that. Instead of 1x1 square on the floor how about 16? Click on the Diffuse checker box to edit the parameters of the checker patter. And under ‘tiling’ change the number from 1 to 16 in both the ‘U’ and ’V’ direction. The ‘U’ and ‘V’ are the ‘X’ and ‘Y’ of texture coordinates.
UV Checker update from 1 to 16
Now click on the ‘Perspective view and use the middle mouse when to zoom in on the table and then make a render of it. You render should look like this: .
the render button looks like a tea pot
your render should look something like this

Now lets set up a camera and make a better picture.
Let’s add that wood texture to the legs. Select the legs, go to the material editor, select the wood material, and click on the assign material to selection button.
matirial editor

assign material button
all wood table

Now let’s create a camera go to Create -> cameras -> target and click and drag out a camera in the top view of the table so the camera is looking at the table.

In the ‘TOP View’ put your mouse somewhere away from the table and click and drag back toward the table so the camera it is looking at the middle of the table. Notice how now you have a camera called ‘Camera 001’ ‘Camera 001.target’ along with your table on your ‘objects’ list next to your ‘top’ view. The camera take the pictures and the camera target controls what the camera is looking at.
**Camera Creation in 'TOP' view

Now Lets change the perspective camera view to the new camera you just created. First go to the ‘Perspective window and click on the word ‘perspective and choose Camera-> Camera 001

Now with the move tool select the camera and move it around while looking through the perspective window. You will see how the perspective window changes. Now from the object list select the Camera 001.target and got to the ‘Left’ view and move it up in the ‘Y’ axis from the floor up to the table top. While you are moving, the camera keep an eye on the perspective widow to see how it updates.
Moving the camera target

Select the perspective window and click the render teapot button to make render.
When the render window pops up you will see a disk icon in the top left corner.
Save from render window

Click that and the ‘Images’ folder will come up again (with your wood texture in it) save the file as ‘yourFullName wooden table’. You just saved to the drop box folder so now you can get the drop box app on your phone and share it online. If you are in my class Submit it into the online assignment in canvas to get credit.
Outstanding tutorial! Where is a link to the class? Did you write this originally for the class or for Steemit?
I wrote it for the class and for Steemit - I am sending my students to Steemit to show them how great it is.