Build an Android Studio Gallery App Like QuickPic Google Photos FOTO Piktures A+ and Camera Roll

Hello and welcome to this Android development tutorial. In this tutorial we will learn how to create a gallery app for Android.
If you will enjoy reading and contributing to the discussion for this post, will you please join us on the YouTube video above and leave a comment there because I read and respond to most comments on YouTube?
If you find anything helpful in this video or funny, will you please leave a like because you will feel great helping other people find it?
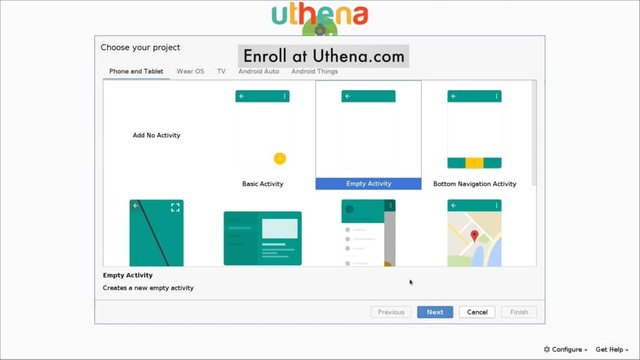
We go and open Android Studio and click on "Start a new Android Studio project." We click on empty activity then we click on next.
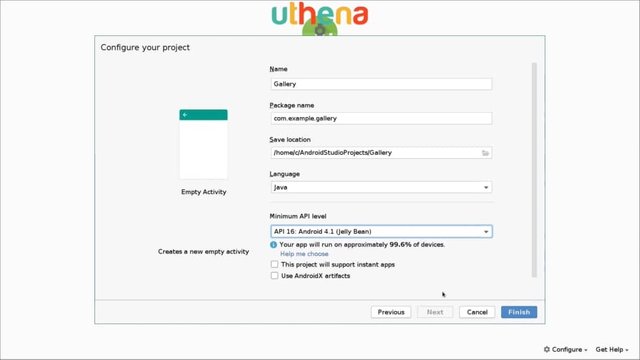
Here we will write the name of our application. In this case we will call it just a gallery. We will make sure that the language we select is Java and the minimum API level, we will select at least 16 this time. We’ll go and click on finish and we will wait for the IDE to load our Android studio project.
What we will do is scan the device for image files and then we will build a ListView that will contain all the elements we need. Maybe the most important one being the image view which will show the images that it finds. Then we will start adding more features and improving the code. To accomplish these we will use one external library which will be the glide library. The glide library will enable us to load images more efficiently so it’s kind of a must to use an external library, and glide library is one of the best if not the best available.
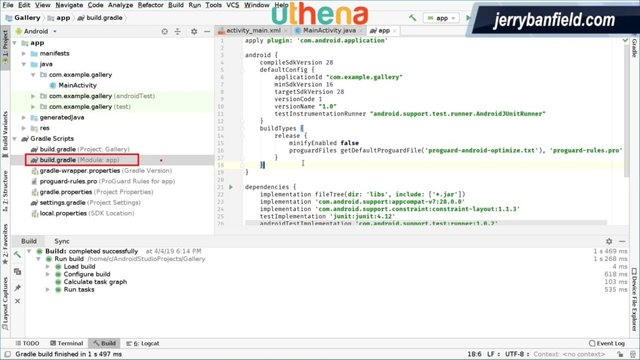
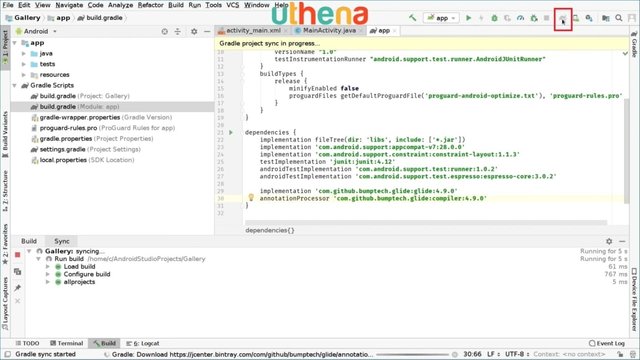
The first thing we will do is we’ll go to the left side on the project navigation screen. We will click on Gradle scripts and we will open the build.gradle file - the second one - which says module app, so don’t be confused with the project. We will open the second one - the module app one.
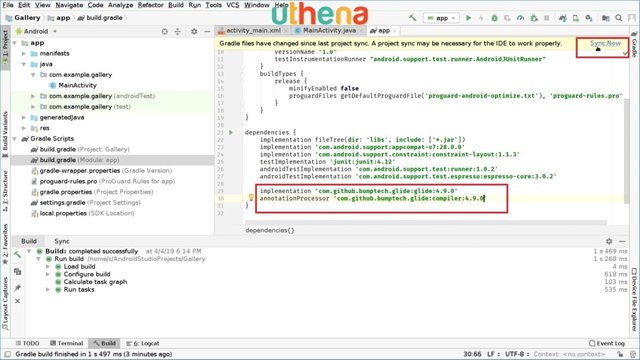
Then we go to dependencies of that which is at the bottom and we will include our dependency that will basically get the required code, kind of library, for us to use it in our application. We will type in implementation, then a single quote com.github,bumptech.glide, okay? Colon, glide and the glide version which at the time of recording the latest is 4.9.0. We will also add an annotation processor which includes some documentation and useful information about the glide, so we will type annotationProcessor single quotes com,github.bumptech.glide:compiler:4.9.0. We can now click on sync right here at the top bar. We can click on that.
If you don’t find it you can also go and search for the elephant button which is right here and click on it.
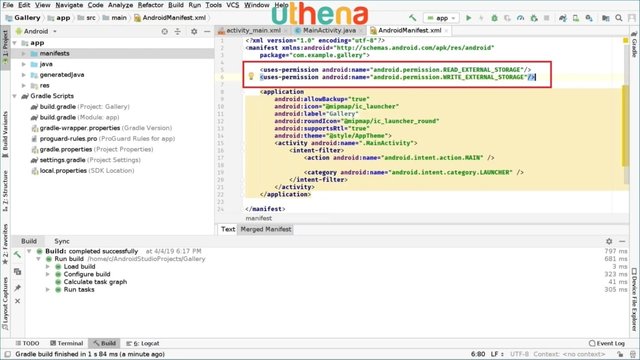
Every time we modify this file, we have to sync the project in order to make Android Studio aware of what we are including. We will be getting the files from user storage. For that we will have to ask for permission to do that. So we go to our manifest file, and we will open an element, and type users permission. We will go and search for READ_EXTERNAL_STORAGE and we will also add another permission which will be WRITE_EXTERNAL_STORAGE.
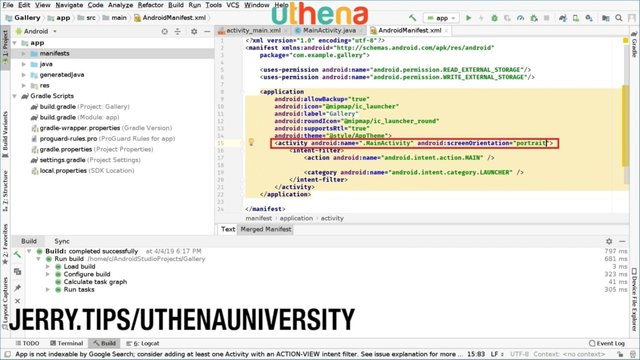
Once we’ve done this, we can now close this, but before that we will add the orientation here to the activity. So we go and say screenOrientation, and we will set that to Portrait which tells the system that our activity will work in portrait mode.
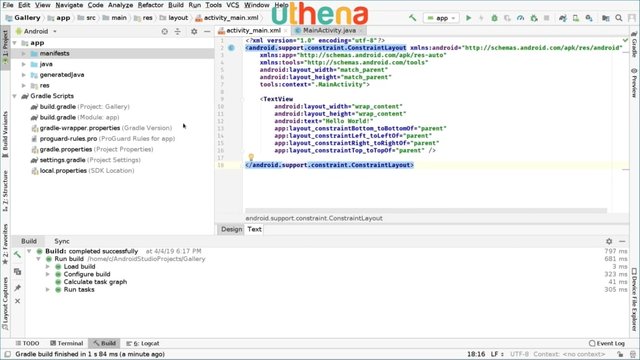
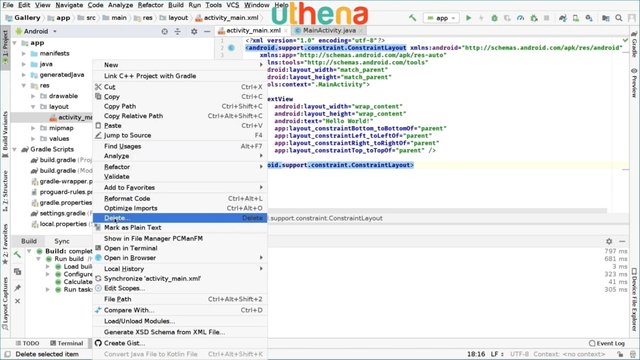
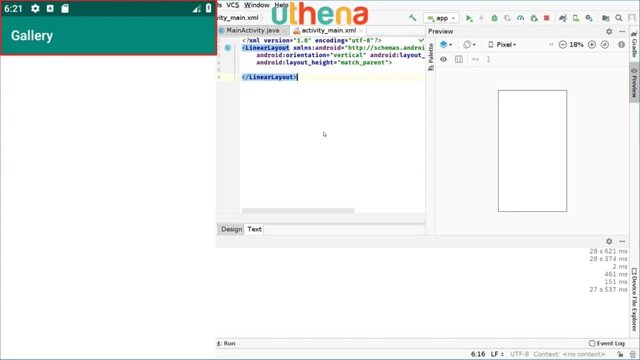
Then we go to your main_activity.java and we can see the code the IDE auto-generated for us which is useful. We will leave that for a moment and then we will switch to activity_main.xml. If we switch to text mode, we can see that uses constraint layout which is kind of a complex layout. We don’t really need to, so we will change that with a linear layout.
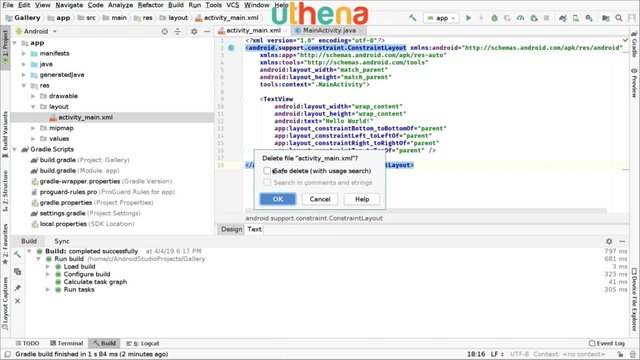
For that we will go to the left side under the res layout folder and we will delete this file. So click right on activity_main.xml and click on delete.
If you have this checked please uncheck them and press ok.
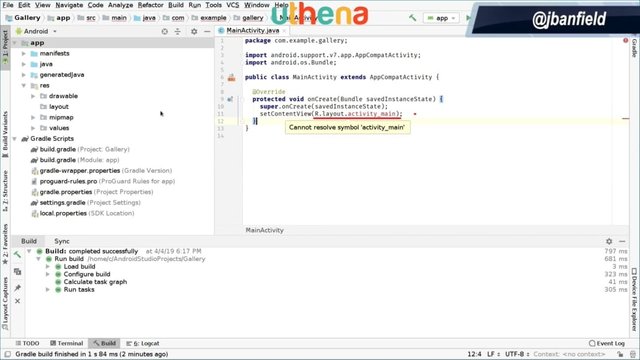
Right now, the file has been deleted and this is missing that’s why this activity main here is in red. We will create it, don’t worry right now.
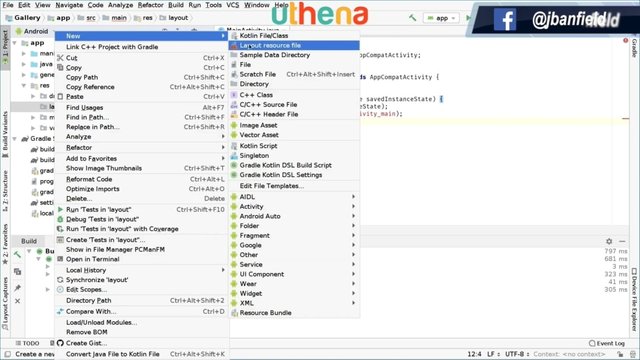
We go and right click on the layout folder under the res folder and we go and click on a new layout resource file.
Inside this the new file name will be activity_main, so the same name previously, but on the root element we will change it to linear layout just as that.
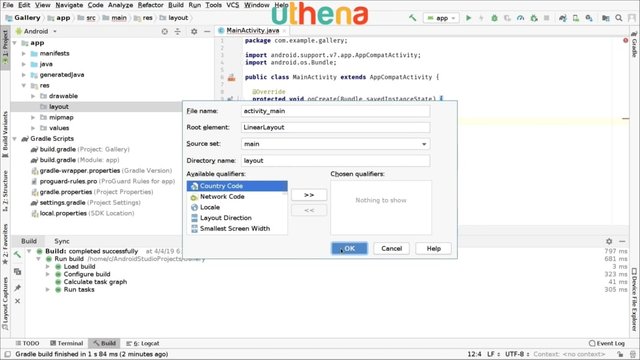
Then click on OK and the IDE generates this layout file for us.
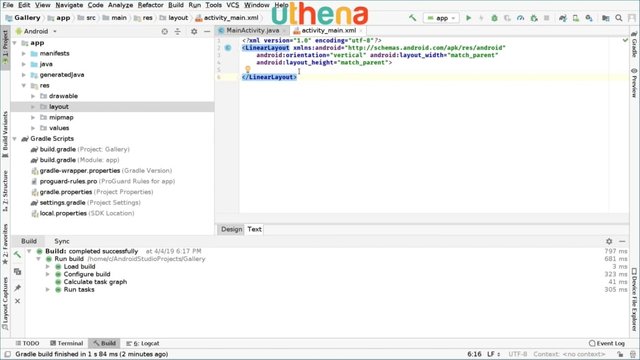
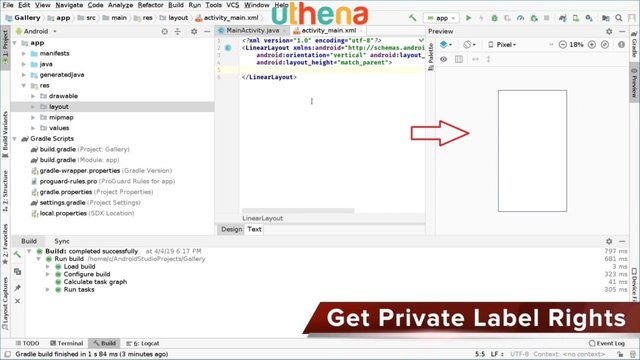
If we go and open the preview right here, we can see that it’s empty which is great because we want a clean UI.
If we run the app right now, we can make sure everything is working fine which should be. I’m running this on this emulator right here on the left side of my screen as you can see. The app is being compiled down here and will be sent to the emulator as soon as it completes the compilation process.
This is how we compile apps. You can press shift F10 or you can also go to the run menu and click on run. Now that the app is compiled we can go to the emulator and see if it works great.

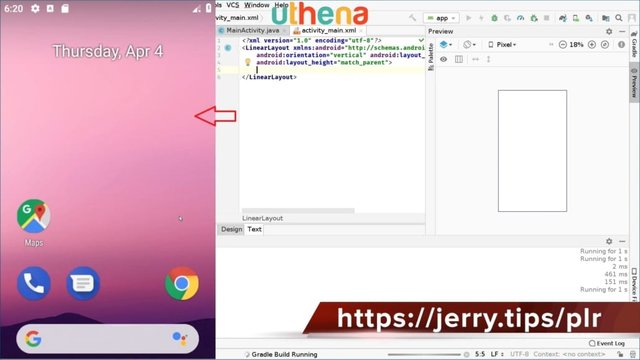
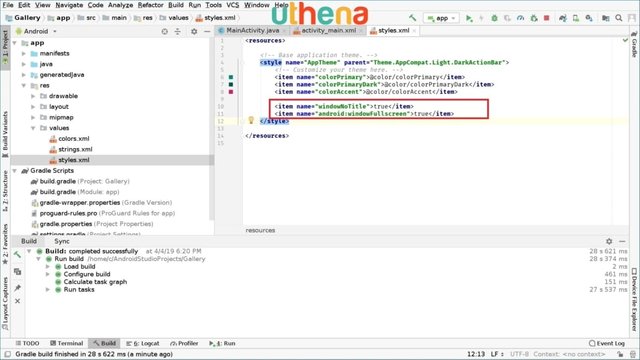
It says gallery. But we want something even cleaner, we don’t want this gallery right here, and we don’t want this top status bar, so we will hide it.
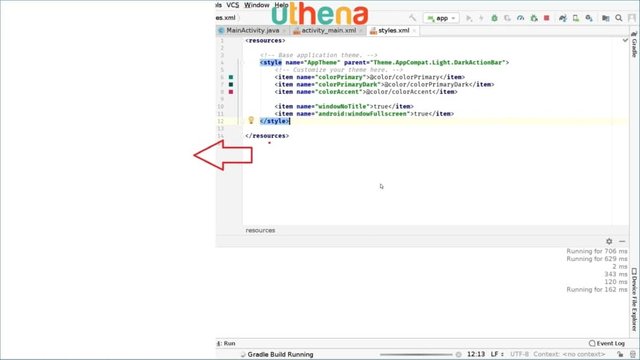
How can we hide them? Well, we will go to the values folder and style.xml and we will create a new item under this title right here. We’re going to type the item name and we will say windowNoTitle as I just wrote, and here we will type True because we don’t want the title. Also we’re going to type on the full screen and we will say windowFullscreen, and we also type True.
Make sure you have added both of those options and run the app again to see if the changes took effect. I’m waiting for the app to be compiled. It’s compiled and now everything is white so nothing else. Very, very clean UI.
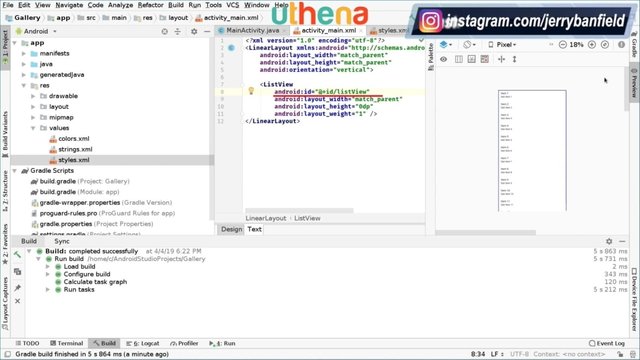
We’re going to go to our activity_main.xml and inside here we will create a ListView which will enable us to show the pictures or the images we have to the user. We’re going to open an element and type ListView, the width we will set that to match_parent, the height will be set to 0 DP, and the weight will be set to 1.
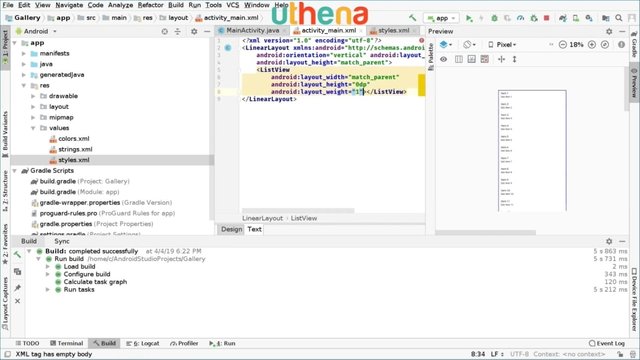
Why do we do this? Why don’t we set everything to match_parent because later, we will add some more elements, but for now this is everything that we can do right now. Of course we have to add an ID to this ListView object. We go and type ID and we will call it ListView. That’s great.
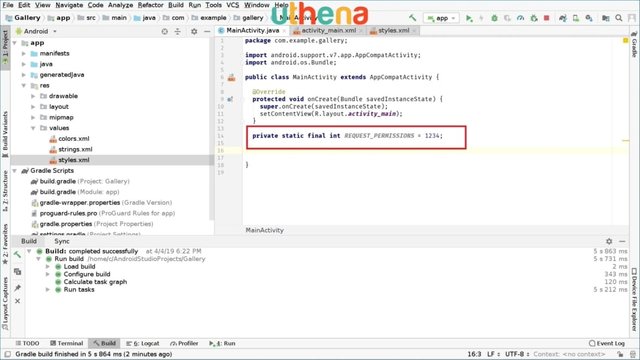
If we run the app right now we don’t we won’t see that many changes because we haven’t initialized it in code. To initialize our ListView in code we will go to our onResume method. We’re going to override this. Why would I do this on onResume instead of onCreate? Well, the reason is simple. Since we need permissions, we need to check that we have permissions to search for files. First we will check if we have those permissions and if not we will ask the user to give those permissions.
We’re going to use private static final int and REQUEST_PERMISSIONS and this is just a code we will use. For example, I will use the code one, two, three, four. It doesn’t really matter. It’s just an ID, an identifier, okay?
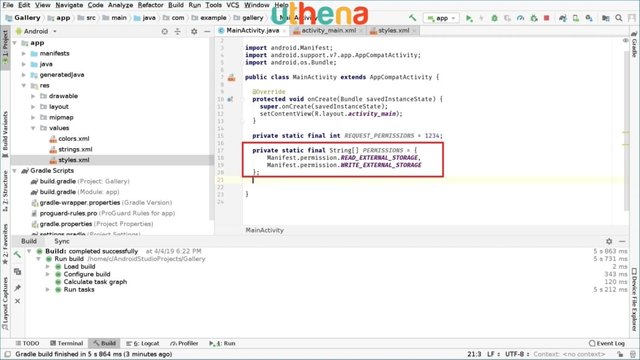
Right now, we will define the permissions. I have the same permissions on our manifest file. To do that we will go and type private static final String array and we will call this string array PERMISSIONS. We will assign this and, of course, end it with a semicolon. In Java you always have to end the line with a semicolon, and right here we will type Manifest.permission.READ_EXTERNAL_STORAGE then we’re going to put a comma here, and again Manifest.permission.WRITE_EXTERNAL_STORAGE. Great. Now we have to find the permissions we need and our permission request code.
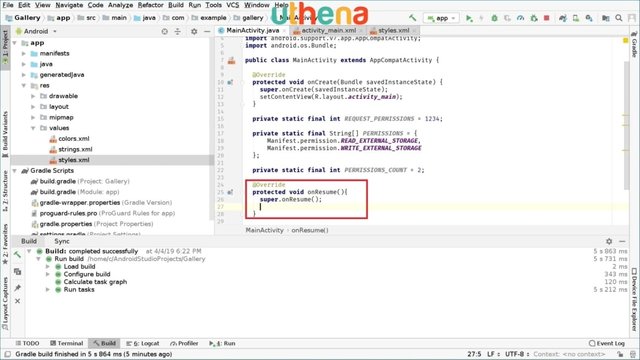
The next thing we will define is an integer that will store how many permissions we are asking for that will help us to check if every permission that we ask was granted or not.
You can call it private static final int PERMISSIONS_COUNT. In this case, we’re only asking for two permissions so we will set this up to number two. We will ask for permissions on the onResume method because maybe the user went to the settings app on the phone and it disabled permission for our app. That’s why we want to check that every time the app is resumed so we can use @override protected void on onResume. This is the on resume method and inside this we will call super.onResume().
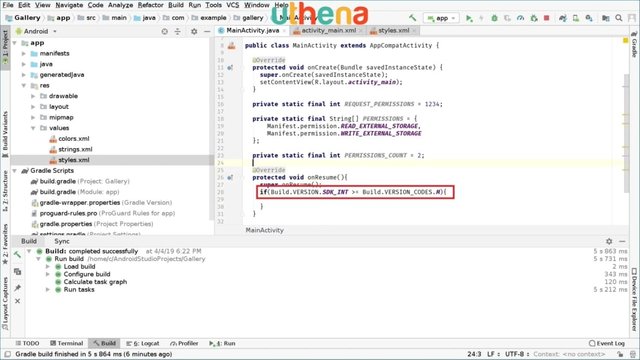
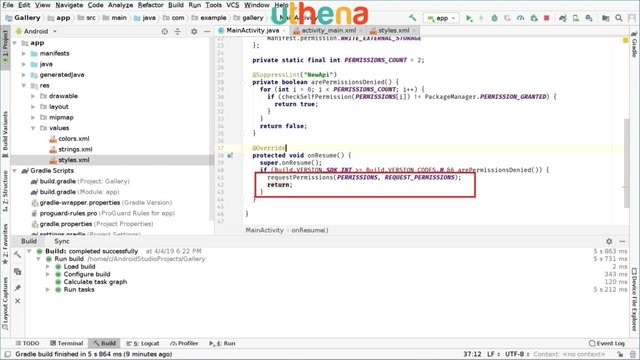
Inside the onResume method, we will have to check if we need to ask or not for permissions. The first thing we need to know is which APIs need permissions, so the APIs that need permission are Android Marshmallow and above which is SDK 23 or Android 6.
We will check the current version of Android. For that we will go and say if Build.VERSION.SDK_INT is greater or equal than Build.VERSION_CODES.M. If it is greater or equal than Marshmallow, we will request permissions.
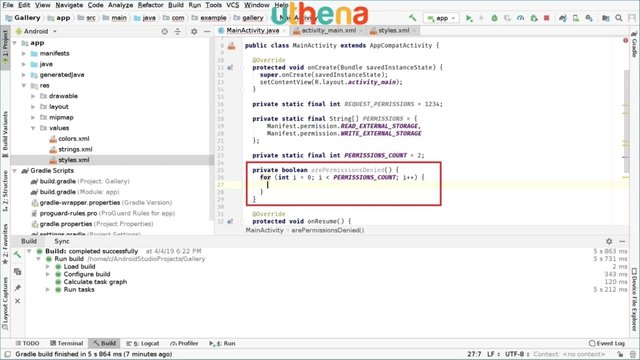
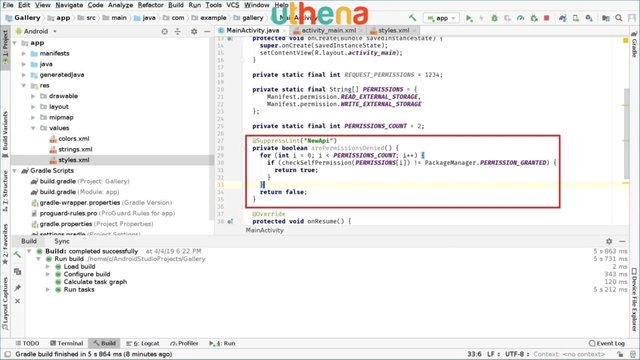
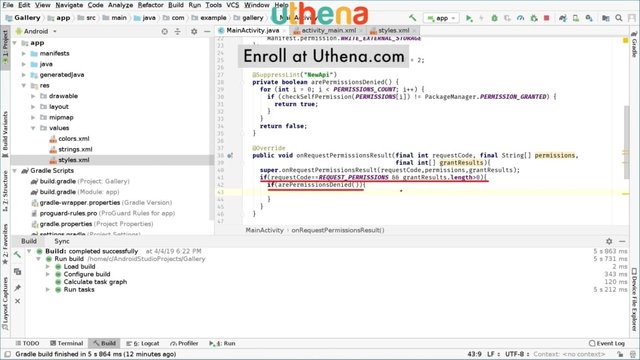
Here we can maybe check if the permissions are all ready granted. So how can we check if permissions are already granted? We created a method for that. We’re going to call it private Boolean. We want to know if they are granted or not. In this case, we’ll call it arePermissionsDenied, for example. Inside this method we will create a for loop that will check if the permissions we need in this case are granted or denied or whatever the case may be.
Here we’re going to go and say for int i=0; i<PERMISSIONS_COUNT; i++. This basically checks for all the permissions in this case too.
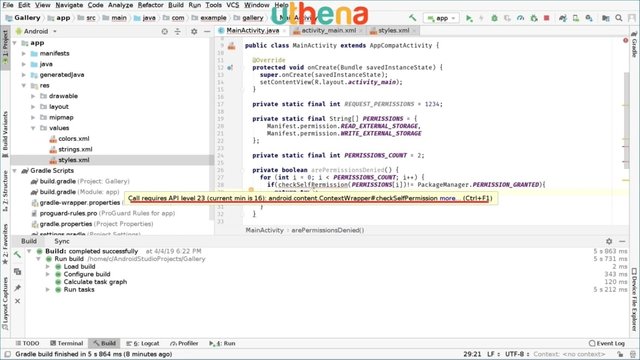
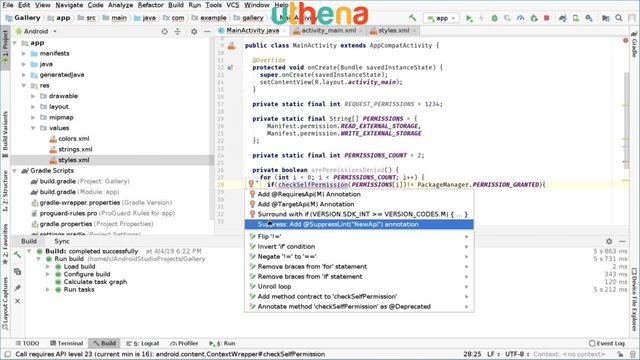
Here we go and say if checkSelfPermission and we will pass PERMISSIONS[i]. If this returns a result that is different from PackageManager.PERMISSIONS_GRANTED which we will return true. Here we have a warning which says that this call API requires level 23, but we are already checking that, so we can ignore this.
We’re going to ask suppressLint API notation. Now the warning is hidden.
If the permissions are not granted we will return True because this is to check if permissions are denied. Otherwise, we will return false. Make sure you have your method the same as mine.
Here inside the onResume method we will check if the permissions are or not denied. The first condition to ask for permissions is that the device should be above or equal to Android Marshmallow. Second, if the permissions are denied, we also want to ask for permissions. How do you ask for permissions? It’s pretty simple. We’re going to say requestPermissions and we will pass the first parameter will be our permissions array, and the second one will be permissions code which is REQUEST_PERMISSIONS. Make sure you have the same as me and here we will return in order to avoid it running the next code twice.
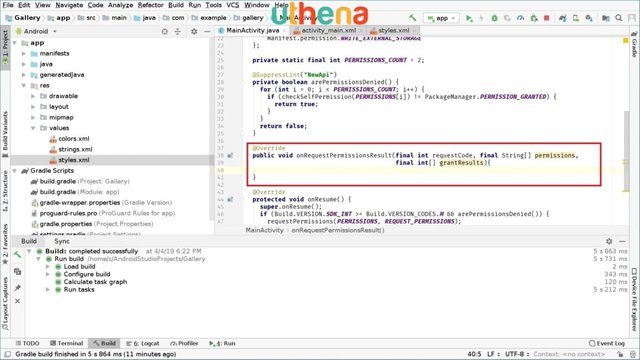
In this case, the user grants or denies our permission. I will explain that just now. After the user clicks on the grant or not the permission, we have to know if the permission was or not granted. For that we will override the following method. The method we are overriding is public void onRequestPermissionsResult, so we are getting the result of the permission we requested. Inside this will have the following parameters. I would like to use finals but okay. Final int requestCode. We also have final String() permissions and we also have final int() grantResults.
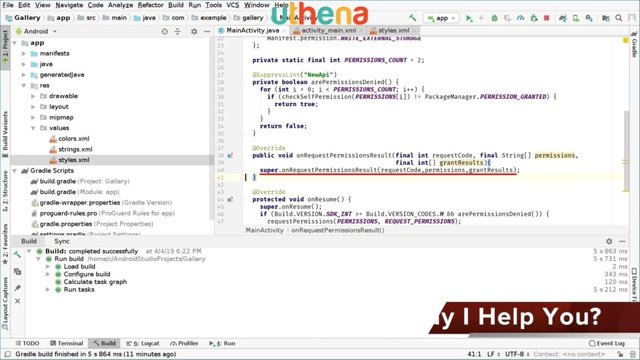
Inside the method we’re going to say super.onRequestPermissionResults, and the first parameter we’ll pass is requestCode, the second is permissions, and the third is grantResults.
The next thing we will do right here, we will check if the request code is the same we sent. We will go ahead and ask if requestCode is the same as REQUEST_PERMISSIONS, and we also want to check if we have any results. For that we’re going to say and if grantResult.length is greater than zero which basically means is not empty, and here we’re going to call again arePermissionsDenied to know if the user granted or not. We’re going to say if arePermissionsDenied here we will clear the application data which is a cool hack that enables us to keep asking for permissions.
To do that we will go and say two parenthesis pairs and inside them we’re going to say ActivityManager, and outside that parenthesis we’re going to say Object.requireNonNull(obj: this.getSystemService(ACTIVITY_SERVICE). This can be useful and here we’re going to say .clearApplicationUserData. This can be useful if we want to clear the application data. If not we can have a different approach, but here we were using this and we will say recreate();.
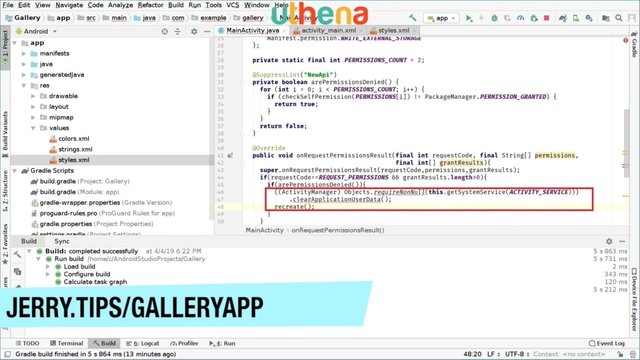
That will be it for now and as you can see it again says we need API 19 but we already checked that so we’re going to suppress notation warning.
If permissions are denied, what happens if they are not denied? So they are granted. We have to call onResume. We’re going to go and right here we have to initialize everything. Here we initialize our app which we will do in the next part of the tutorial.
This Is Part Two Of How To Make A Gallery Application For Android.
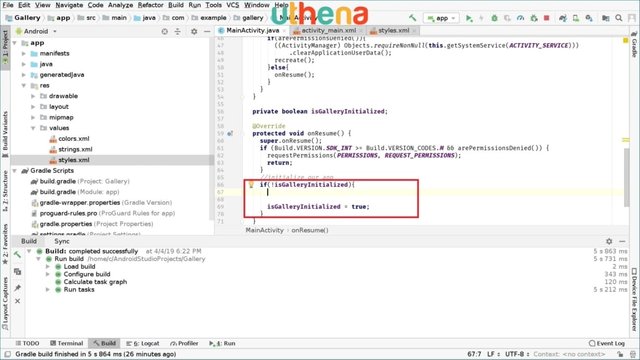
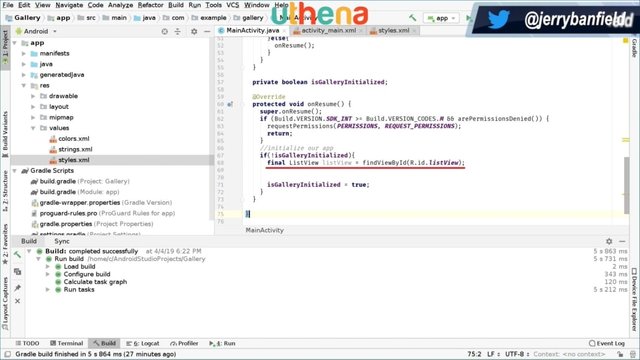
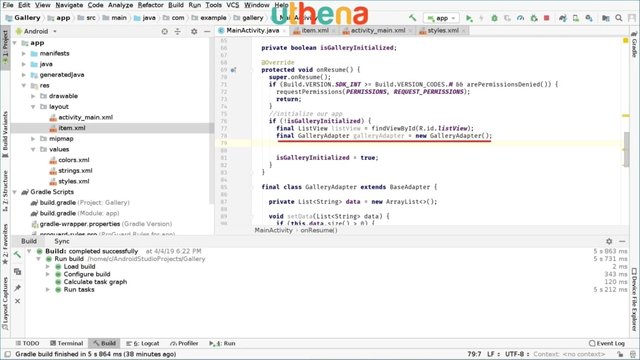
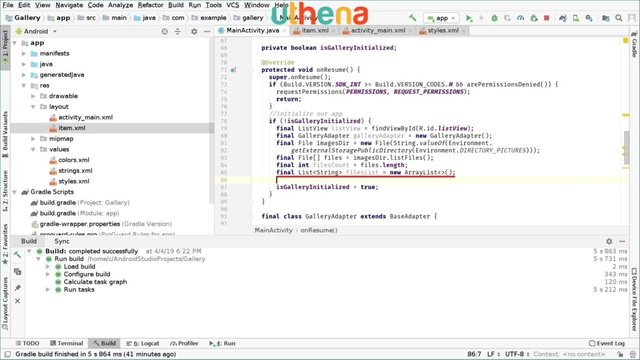
In the previous tutorial, we setup up the permissions we required like reading and writing files. In this tutorial, we will continue setting up the next features of our Android application for our gallery application. On onResume method, after we do this we will check if we have initialized our app previously because onResume is called so many times, we don’t have to initialize the app. We don’t want to initialize the app that many times that’s why we create a flag outside it - a global variable - which will be private boolean isGalleryInitialized. Remember as default that flag is set as false so we are going to check if that flag is false before we can initialize the app.
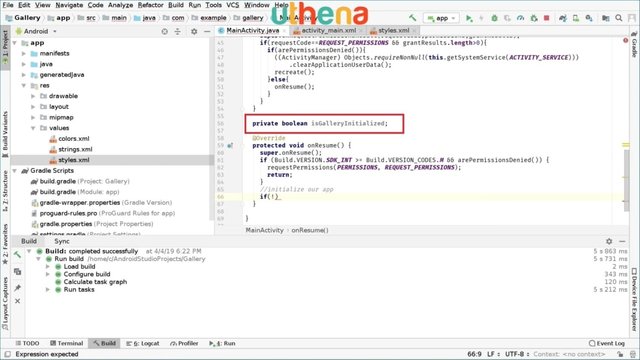
If isGalleryInitialized is false we will initialize the gallery app. Of course, in the end we have to set that flag to True because after this the gallery will be initialized. That is the last line of the if statement and now we’re going to initialize our app.
To do that we will get the ListView item we created previously. So we’re going to say final ListView listView = findViewById(R.id.listView).
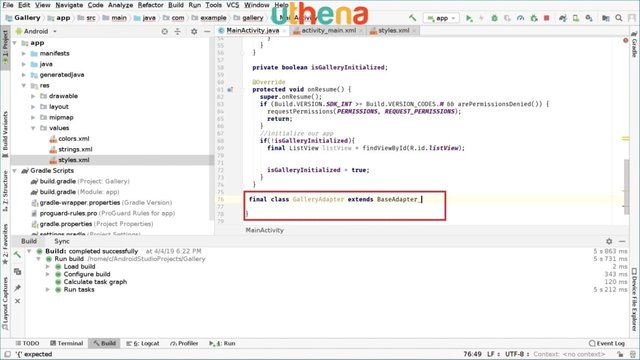
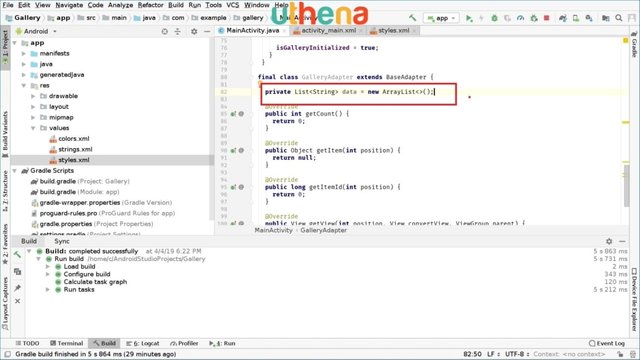
We have to create the gallery adapter which we will use the list view and update each of the cells of the ListView and then every cell will be an image. We’re going to go and create that adapter. For that we’re going to go and say final class GalleryAdapter. So this is an inner class. We do it for convenience to keep everything inside one file. We’re going to be in final class GalleryAdapter and this will extend to BaseAdapter. We open brackets and here we have to implement methods.
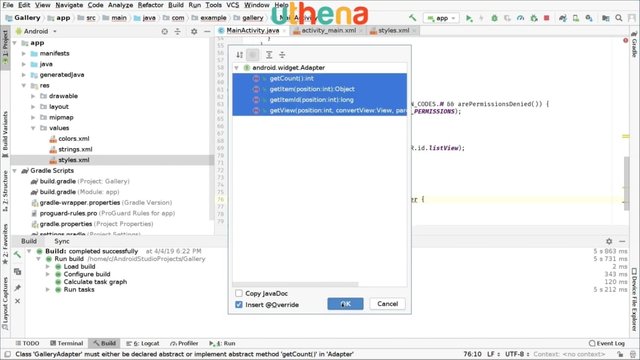
We’re going to go and check and click on the warning sign and click on the implementation method and click on okay. When we click on okay, we find that some methods were implemented.
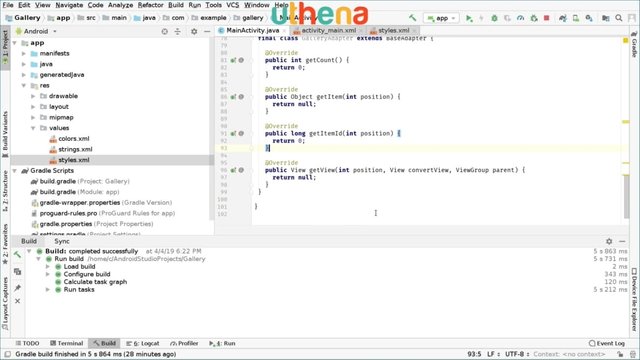
Right here we have all the methods we need.
We will work with file paths and directories and all of that. For that we will create an array list that will store the data that we will use. Right here we go and type a private list of strings and we will call this data, and we will set it to the new ArrayList<> as you can see right here.
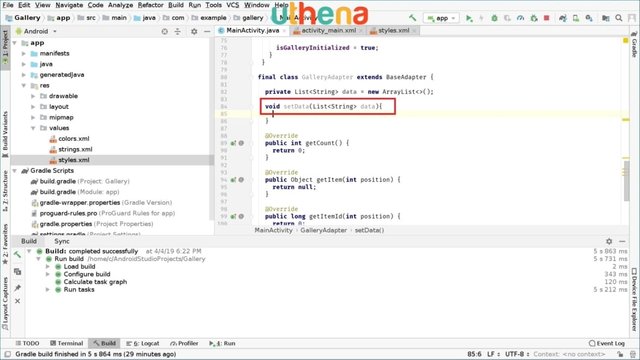
Next we will create a method that will enable us to set data from our main activity class. Here we’re going to say void setData and its parameter we will have to pass the new data and the data we update. So in this case it will be a list of strings and we’ll call it data.
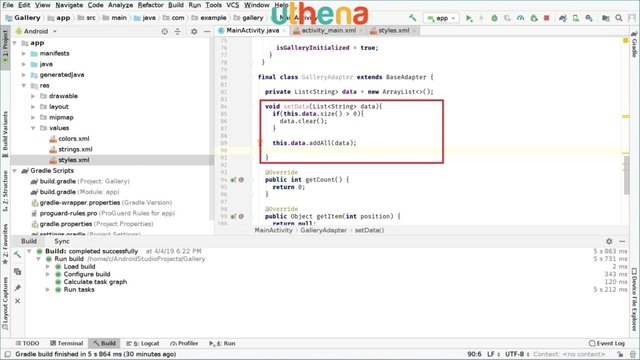
Right here we will check if the data that previously existed was greater than zero in length so we can clear it if we need it. To do that we go and say if this.data, which means the outside data, this.data.size is greater() > 0 which means it contains something, we will clear the content. So we’ve got data.clear(). After that we’re going to say this.data.addAll and we will update with the new data, so we pass the data element.
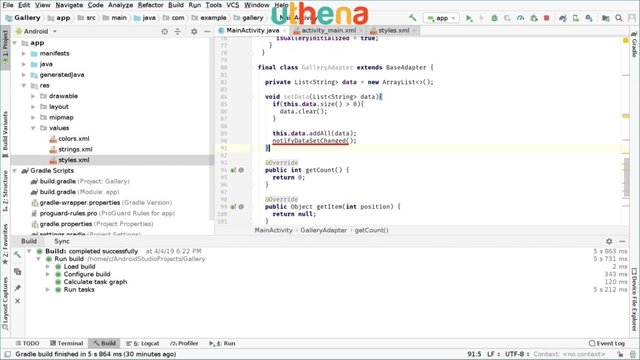
After we update the data, we have to tell the adapter that we have new data, and please update it to the screen. To do that we call notifyDataSetChanged, which is great.
That’s it for the setData method. On the next method which is getCount we will return the size of the data so as simple as saying return.size() and that’s it.
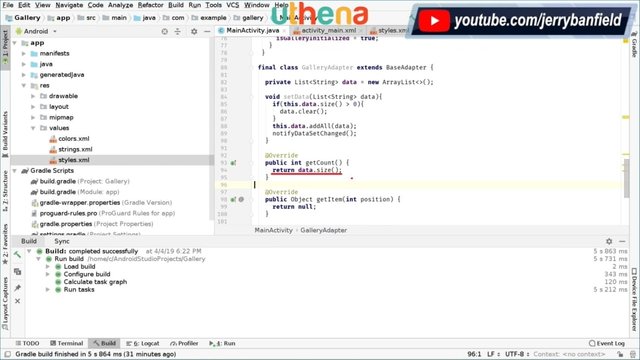
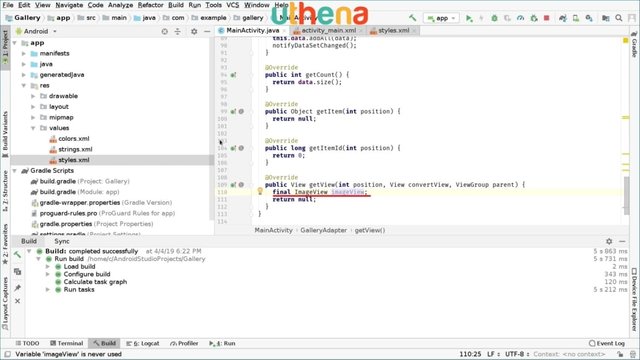
We went down into GetView. These other two methods won’t be used so we leave them as they are. Here on the GetView method, we have to update the image. To do that we are going to say the final ImageView, we’ll call it an imageView. What is this imageView thing? You have to import the image view library too so make sure you import it.
ImageView is the actual image that will be shown to the user but to access that image, we have to create that in the XML code. To do that we go to the left side and in the layout folder we will right click and then on the new layout resource file.
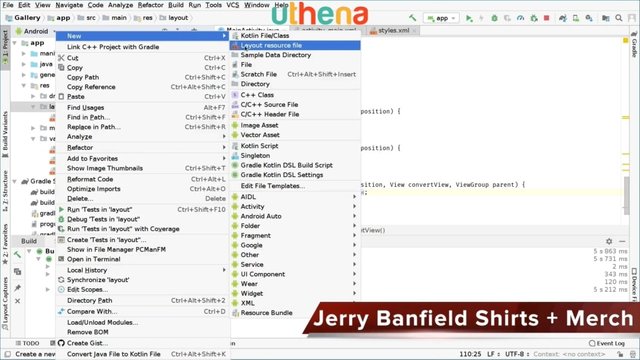
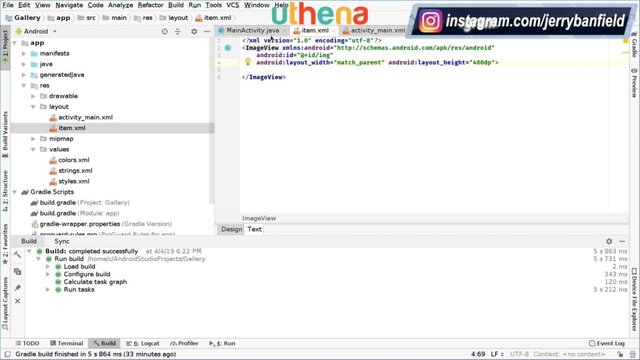
Inside here, we will create our item which is kind of like a cell. In this case, I will call it item as file name. As a root element, I’ll call it ImageView because we are using an image view.
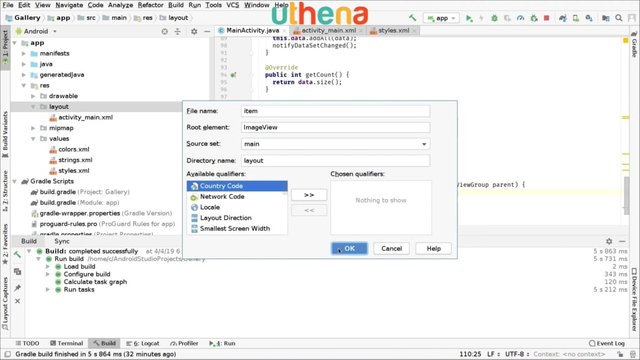
We press on okay and right here we have our image view. Additionally to this we have to add an ID, so we go say ID and the ID will be added will be img, for example, which is short for image. The width is match_parent which will fill the whole device width and the height we can set a height here, for example, just for testing purposes can be 400 DP, for example. I can change that later if we want or whatever.
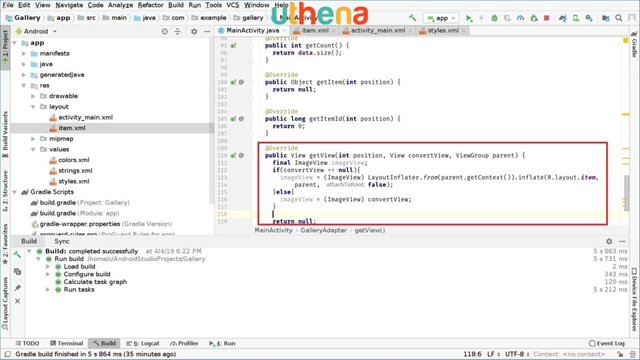
Right now, we have created our item and now we can continue to our main_activity.java file. Here we created the final ImageView imageView. Which creating a final thing is not that interesting so we won't create a final or do we have to? Let me see. I don’t know. Final means that it cannot be assigned later so we won’t create it final. Maybe if we have to change we will change. We therefore delete the final thing. Here we will say if convert view which is the view that it’s passed, so if convert view is null, so it doesn’t have contents or anything, we will the set the view. Or maybe we have to make it final. So we’re going to go and say final.
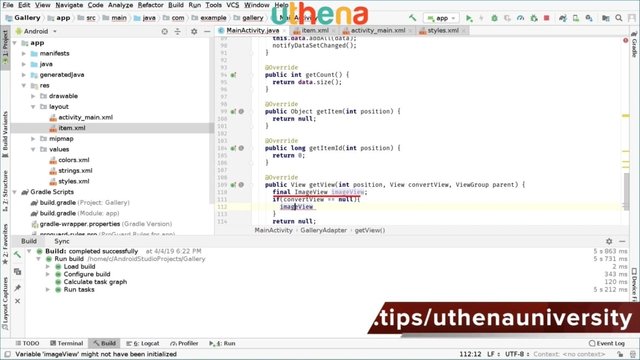
ImageView equals (ImageView). Here we will write LayoutInflater.from. We open parenthesis - and say parent.getContext(). Then we go outside these parenthesis and type .inflate, and here we will type the name of our item layout which is R.Layout.Item. Then we will add the parent which in this case is just called parent and the false flag which is attachToRoot. This is in case the convertView is null. If it’s not null, so you’re going to say else we will sign ImageView and we will cast this to ImageView and this will be convertView.
We have to load the image to load and for that, we will use the glide library we imported in the previous tutorial. You're going to say Glide.with. We would like to load this MainActivity. This is because that’s our main activity. So (MainActivity.this).load (data.get(position). This will get to the path of the image file that we want to load. Remember data contains those paths and we tell data to get the position of the current element and it will get the current image. We’re going to say this and we will also add a parameter that it’s centerCrop in order for the image to be centered, and we will tell you where we want it to load. We’re going to talk about (imageView) and it’s as simple as that.
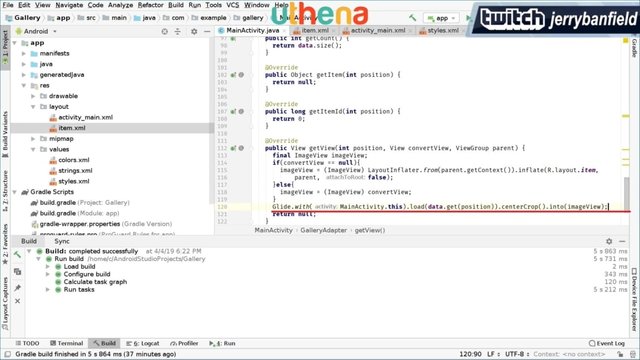
Glide is pretty easy to use as you can see. It’s a great library and, of course, we have to return our ImageView. That is great. We have created our gallery adapter class. We will have to continue to our onResume method and start showing images. To do that we go to our onResume method. We have already created ListView. Now that we have an adapter we will create it as well. So the final GalleryAdapter and GalleryAdapter will be assigned to the new GalleryAdapter(). Pretty simple and easy.
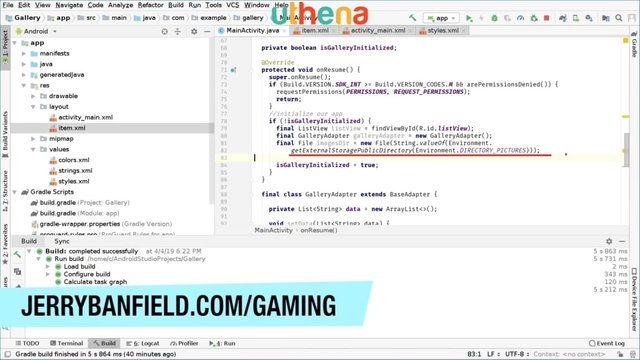
We will scan for the image directory. For that we are going to say final File. We have to import Files. So final File imagesDir. Here we can type a new File and here we will fetch the image directory in the way or in the form of a string. You can say String.valueOf. We open parenthesis and say: Environment.getExternalStoragePublicDirectory. I will type a new line right here in order for you to know better what’s going on. Of course, remember to end the line with a semicolon as always.
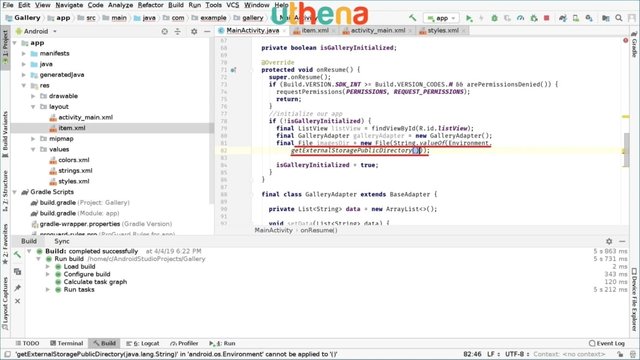
Inside these parentheses right here, we will specify the folder we want to get access to. In this case, it will be Environment.DIRECTORY_PICTURES, for example. So these are the pictures. In the case of photo images we have the same directory. So we can later add support or choose between one of those, but for simplicity I will choose pictures right here.
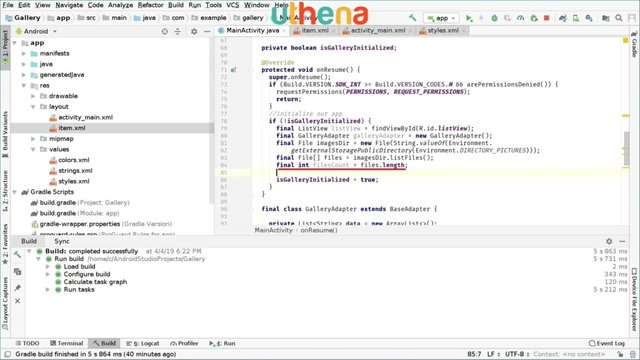
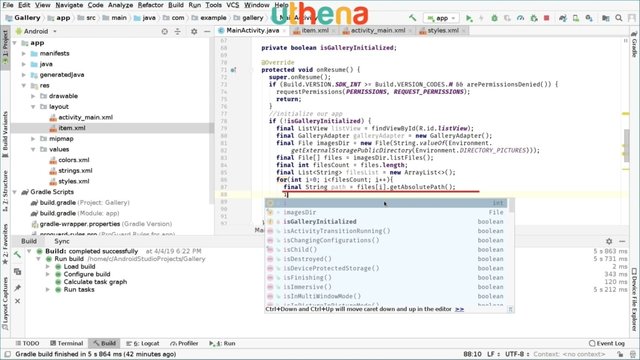
Now, we will get how many files we have there. So you can say, final File[], I will call these files, and inside these I will say ImagesDir.ListFiles(). At least we’re in the files. If we want to store how many files we have, we’re going to say final int FilesCount and this will be set to files.length.
Now we have how many files we have. We will create an array of lists that will be passed to the adapter and the adapter will be used to show the images. We can say, final List<String> and I will call it filesList. Inside this we’re going to say new ArrayList<>. As simple as that.
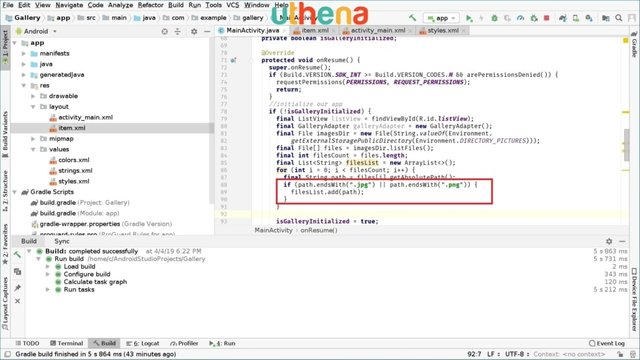
Now we will create a for loop that will check if the file is an image then it will be added to the list, if it’s not an image it won’t be added to the list. As simple as that. We’re going to create a for loop. For int i=0; i<filesCount; i++ and inside this for loop, we will create a final string path, and this will be set to files[i]. We will get the file at the i index and we will say .getAbsolutePath.
The path variable stores the actual path and the file path. So we’re going to check if the path endsWith - and here we have to specify an image extension, for example, .jpg. That’s an image extension. We can also specify another one like saying or path.endsWith .png, for example. Whatever the case may be. If the path ends with jpg or png, we will go and say filesList, and add path. So we’ll add the path of the image to the file list.
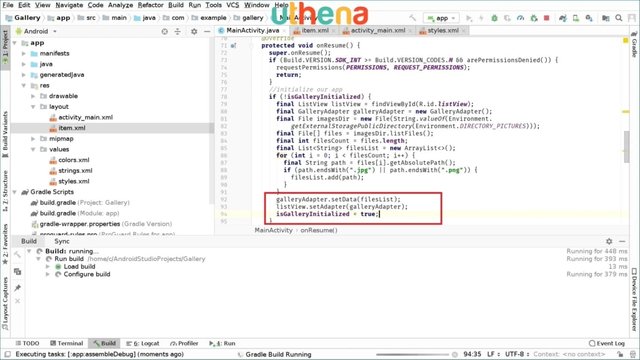
Once we’ve done this for the loop we are going to set the data. For that we are going to say galleryAdapter.setData(filesList). Here we’re going to talk about ListView.setAdapter(galleryAdapter).
We have all the code we need in order for us to start running our application so I will run the app right now and check if everything is compiled and runs fine. Make sure you have everything the same as me so you can go alongside me with the tutorial.
We’re compiling and it’s installing the apk and it’s installed. As you can see here it asks us for file permission.
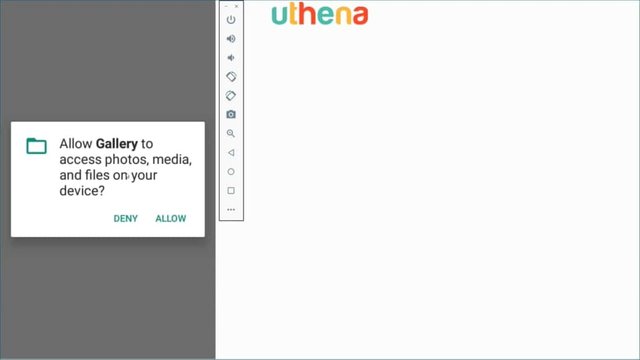
We will click on Deny to check if it works, right? If we deny it, it will close the app. As simple as that. If we open a gallery again it will ask us again. If we keep denying this it will close the app. Now we have to allow it. If we allow this we are allowed access and this is showing nothing because we don’t have anything.
I don’t have pictures so I will download pictures and move them to that directory. I will enable Wi-Fi access right now. Make sure you have pictures or you can download them with me if you want. We will open a web browser. Here we will search for pictures. Inside the images right here, we can really open any pictures and start downloading..
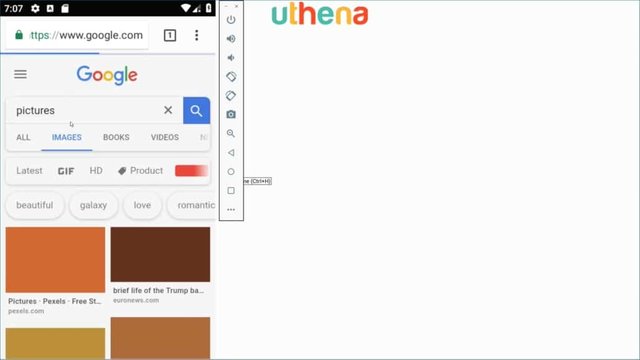
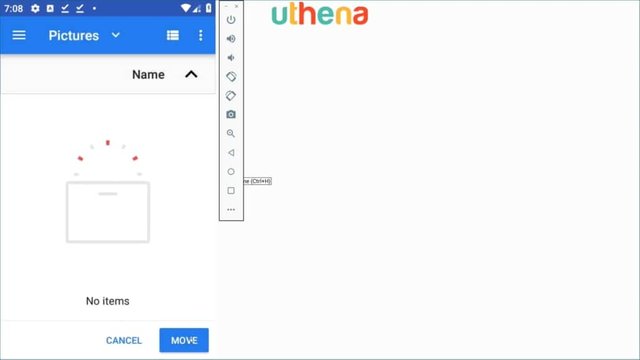
What happens when you download an image? Well that image goes to the download folder, but we want it to be in the picture folder, so we have to move them, so we’re going to open a file manager and in downloads we will select the image we just downloaded and we will move them to the picture folder. We'll go and say move on. We will click on Pictures and we will have everything there.
Now, we can open our gallery app.
GET MORE OF THIS COURSE
Would you like to continue learning about the Build an Android Studio Gallery App Like QuickPic Google Photos FOTO Piktures A+ and Camera Roll Course? If you are interested will you please buy the complete course, Build an Android Studio Gallery App Like QuickPic Google Photos FOTO Piktures A+ and Camera Roll Course, on the Uthena Education Platform..
You can also get the first hour and ten minutes of the course completely for free on YouTube.
Thank you for reading the blog post or watching the course on YouTube.
I love you.
You’re awesome.
Thank you very much for checking out the Build an Android Studio Gallery App Like QuickPic Google Photos FOTO Piktures A+ and Camera Roll Course and I hope to see you again in the next blog post or video.
Yu may also like this post: Code Your Own Video App Player in Android Studio!
Love,
Jerry Banfield.
Posted from my blog with SteemPress : https://jerrybanfield.com/build-android-studio-gallery-app-like-quickpic-google-photos/
Congratulations @jerrybanfield! You have completed the following achievement on the Steem blockchain and have been rewarded with new badge(s) :
You can view your badges on your Steem Board and compare to others on the Steem Ranking
If you no longer want to receive notifications, reply to this comment with the word
STOPTo support your work, I also upvoted your post!
Vote for @Steemitboard as a witness to get one more award and increased upvotes!