How to Mine Crypto in Your Own Home Part 1 - Initial Setup
Thank you for reading the four part instructional series on How to Mine Crypto In Your Own Home by myself @mwojteck and @damianwhite63. We hope you this will spark your interest in mining as it has for us. Much of what we included in these articles we have discovered by thorough research and in some cases, trial and error and basically this is the most efficient outcome. You can choose to follow the advice or go your own way. In most cases we've found out the hard way what works and what doesn't. There are online forums like www.1stminingrig.com and Facistbook pages like ethereum mining (pretty entertaining but not helpful), but there is a lot of information out there that is just flat out bogus and will cause you to waste valuable time and even worse; money. In the same regard, we hope that while you are going through this process if you find something that works better or is more efficient, please let us know! Lastly, just a standard disclaimer, anything you attempt in this series of articles, we are not responsible for. So if you burn down your house or you assemble the rig and can't get it to work don't blame us. We assume that you have a proficient understanding of computer hardware, software, and have a basic knowledge of cryptocurrency.
Seeing as this will be posted in Voluntaryist and Agorist pages, we trust that the readers are self responsible and won't use the coercive power of the State to threaten us if something goes wrong. The purpose of these articles is to spread the knowledge of cryptocurrency to friends of liberty.

Budgeting ROI
The very first thing you should do before you consider getting into mining is profitability and ROI (Return On Investment). How long before you pay off the initial hardware purchase at current crypto prices? The site we found most helpful to do a rough calculation is:
https://www.cryptocompare.com/mining/calculator
You will need to think about what type of graphics cards you want to purchase, which cards will yield the greatest Hash per Second (H/S) that is how many algorithms per second your GPU can solve per second. I won't go into the weeds here, but it's interesting to find out what your graphics cards are doing when you set them to mine crypto. 1st Mining Rig has some guides as to how many hashes that specific GPUs will pull for specific crypto currencies. I'll go over exactly which GPUs we selected and where we purchased, but for now let's make some assuptions in order to make a rough calculation of profitability:
-The average GPU will pull around 20 H/s with a modest overclock
-You've chosen to mine Ethereum (ETH)
-You've chosen to purchase 6 GPUs which will use approx. 1000 watts of power (rough calculation)
-The average energy price in your area / region is $0.06 per KWh
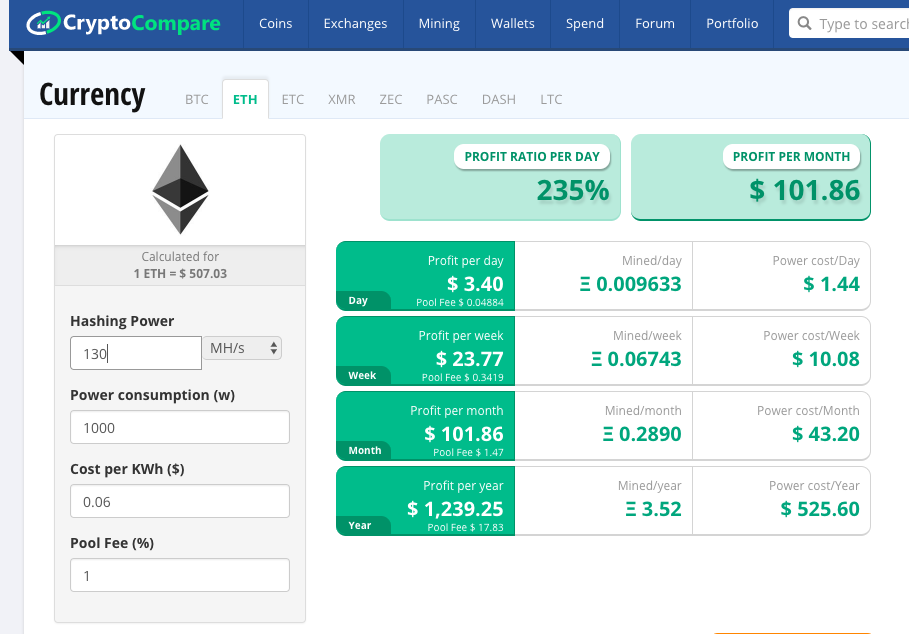
You can see that based on current difficulty levels on 4-14-18, the profitability per month is about $101 or $1,239 per year. Given this very rough calculation you can use this for the purposes of determining what your Return on Investment (ROI) will be. Let's keep this in mind when we put together the hardware list. Also, you can determine roughly how many cents per KWh you are paying either buy looking at your energy bill or by visiting:
https://www.chooseenergy.com/electricity-rates-by-state
You can see that if you live in a part of the world where you have low power rates, you could have a significant advantage over say, someone that lives in California whose power bill is about 18 cents per KWh. If you do pay significantly more per KWh for energy, it may not be worth it to build a rig. It may be worth it to take the money you would have spent on a rig and just make a straight purchase of crypto through an exchange or a trusted friend.
Selecting Hardware
Once you have determined that you can at least make some profit on mining and the price of power is low in your area / region, you can then begin to put together a list of a hardware assembly list. There are a couple of choices you are going to need to make before putting together a full list. We will tell you what we prefer using and what has worked for us, but feel free to experiment or deviate from the list:
-CPU / Motherboard: Intel vs. AMD --- We used Intel
-Graphics Cards: NVidia vs. AMD --- I have both, but we both prefer NVidia for many reasons (power efficiency, ease of use in linux, open source software, drivers support, increased hashrates, ability to overclock in linux)
-Operating System: Windows vs. Linux --- We use Linux. If you would like to use Windows, this guide can still probably be followed for the hardware assembly portion, but installation and software is based on Linux. We use Linux Ubuntu 17.10 or 16.04 LTS.
So let's put together a shopping list based on our preferred recommendations and assume you will follow this advice. We can get a rough total price. I can also give you a heads up that when you go to purchase the GPU's this will be the most difficult thing to buy, simply because at times it seems like it has been easier to buy drugs than it has been to buy more than 3 GPUs at a time.*

The Shopping List
Disclaimer: Always check if hardware is compatible with other hardware. We have done our best to lay out hardware below and what works for us, but always double check that you are buying the correct CPU for the correct motherboard, if GPUs are compatible with boards, if memory is compatible with the motherboard by referring to the manufacturer's website and downloading a copy of the manual prior to purchase.
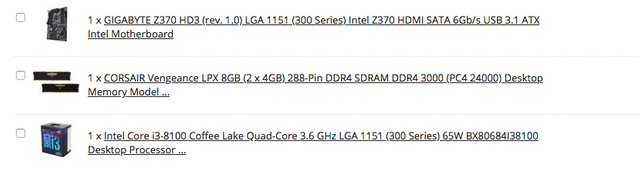
-1 x GIGABYTE Z370 HD3 (rev. 1.0) LGA 1151 (300 Series) Intel Z370 HDMI SATA 6Gb/s USB 3.1 ATX Intel Motherboard -- $119
@damianwhite63 uses a Crypto Mining Motherboard which has the capacity of 12 GPUs. If you think you will purchase more than 6 GPUs at any point, use the below motherboard, it will save you money on hardware costs in the future:
-Biostar Motherboard TB250-BTC PRO Core i7/i5/i3 LGA1151 Intel B250 DDR4 Supports 6 AMD and 6 NVIDIA graphics cards - $134 (*You will need a DVI connection for this board or a DVI converter)
-1 x CORSAIR Vengeance LPX 8GB (2 x 4GB) 288-Pin DDR4 SDRAM DDR4 3000 (PC4 24000) Desktop Memory Model -- $109
(I had a heck of a time getting 2 3000Mhz sticks to work in this motherboard, maybe take a look at Ballistix 8GB Kit 2X4GB 2400MHz 1.2V UDIMM. You can pick this up for around $72.
-1 x Intel Core i3-8100 Coffee Lake Quad-Core 3.6 GHz LGA 1151 (300 Series) 65W BX80684I38100 Desktop Processor -- $119
I usually like to spend a little extra on the CPU. From an ROI standpoint, you should be buying a cheap Celeron CPU, but my thought is if there is a time where I no longer want to mine with this PC it can double as a gaming PC. At least with the quad core, if things head south in the crypto market, you have a sweet gaming PC.
-Graphics Cards:
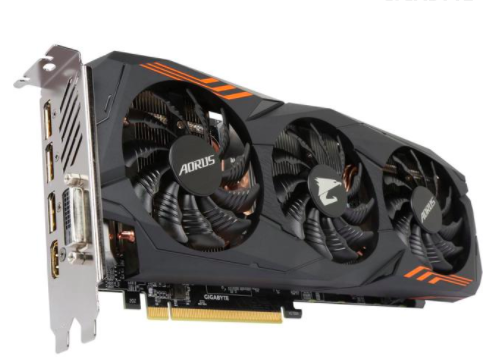
-1 x GIGABYTE AORUS GeForce GTX 1060 6G REV 2.0, GV-N1060AORUS-6GD R2 --- Ave. Price $369 x 6 = $2,214
We have a funny story about purchasing GPUs later on. Also, DONT BUY ON EBAY. Most likely people have picked through the GPUs and are selling you a piece of crap with crap memory. Better to spend the extra money and buy new, or if you are reading this when crypto prices are high or at the beginning of a new supply cycle, there could be a shortage of GPUs. You are better off being patient and waiting. Purchase them one at a time if you have to, depending on your budget.
Other Hardware (most of this you can get on Amazon or Microcenter)
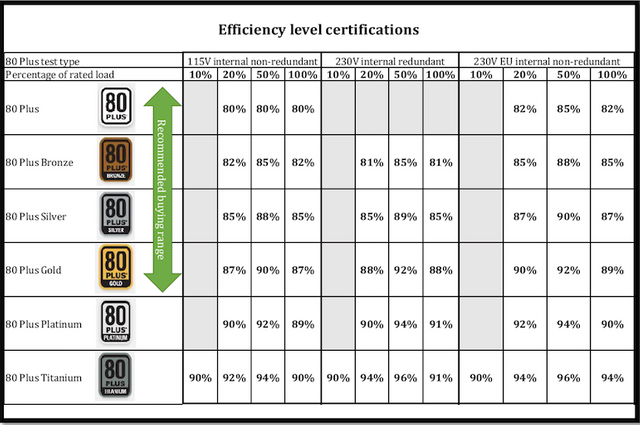
-2 of Corsair RMx Series RM750x 80 PLUS Gold Fully Modular ATX Power Supply (CP-9020179-NA) -- $109 x 2 = $218
Why we chose 2 power supplies instead of 1 1500w. Power efficiency and better bang for your buck. One PSU is going to be more expensive and is going to work twice as hard. Also take our advice on PSU ratings, gold is ideal, bronze is bad, platinum is overkill from an ROI standpoint. You can take our word for it or take a look at this chart:
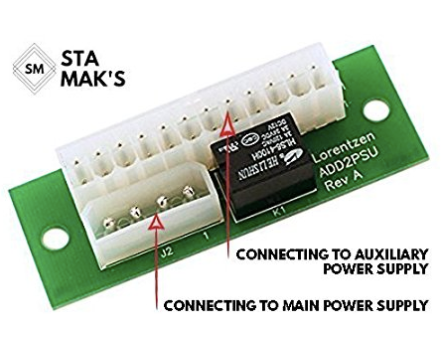
-Stamaks 2- Pack Multiple Power Supply Adapter ATX 24Pin to SATA Dual PSU Power Supply Sync Starter Extender Cable Card for Ethereum ETH ZEC Mining -- $14.95
-SanDisk SSD PLUS 240GB Solid State Drive - SDSSDA-240G-G26 -- $69.99
-Electop 2 Pack 2 Pin SW PC Power Cable on/off Push Button ATX Computer Switch Wire 45cm -- $5
-ASUS VS248H-P 24" Full HD 1920x1080 2ms HDMI DVI VGA Back-lit LED Monitor -- $132
-6-Pack PCI-E 16x to 1x Powered Riser Adapter Card w/ 50cm USB 3.0 Extension Cable & MOLEX to SATA Power Cable - GPU Riser Extender Cable -- $52
If you are planning on doing more than 6 GPUs in your rig, you'll need to purchase more risers
Other Supplies you might need:
-Vornado® Personal Air Circulator small fan -- $29.99 at Bed Bath & Beyond
-Zip Ties -- $5 local hardware store
-100 Pcs Flame Retardant Nylon Screw Mount PCB Supports 12.5mm High - $10
-Common: 1-in x 12-in x 8-ft; Actual: 0.75-in x 11.25-in x 8-ft) Whitewood Board -- $15 at Lowes or Hardware Store (for cutting and mounting motherboard if needed)
Rig Cases
This deserves its own sub section simply because it is an area where you could go horribly wrong and end up with a sweet looking case, but end up adding months to your underlying ROI calculation. If profitability is your end goal, as it should be, try and follow this advice. Buy a cheap shelving unit from Amazon, or better yet, my last rig case was a metal shoe rack I got a Wal-Mart for $15. We have seen people on the forums spend hundreds of dollars on open air frames from places like GPU shack. They look cool, but lets face it, they are not necessary. You could literally shove your GPUs and hardware in two milk crates and it would work. My first rig, I spent almost $60 constructing my own aluminum open air frame. It looks cool, but in the end it turned out to be a waste of time. Heres the preferred frame:
-AmazonBasics 3-Shelf Shelving Unit on Wheels - Black - $26
Total Estimated Price: $3001.93
More about ROI
Now that we have a rough total of how much it will cost for rig hardware, let's do a quick calculation of how long it will cost to make up the initial investment at current crypto prices, using the assumption that we are living in a low power price region and we have chosen to mine Ethereum (ETH) with a 6xGPU rig:
($3,000 initial investment) / $100 per month profitability at current crypto prices = 30 months / 12 = 2.5 years
Now before you throw in the towel, thinking that you can't wait 2 1/2 years to make up an initial cost of investment, also consider the price of crypto. Let's look at the average price of Ethereum (ETH) in just the last year alone:
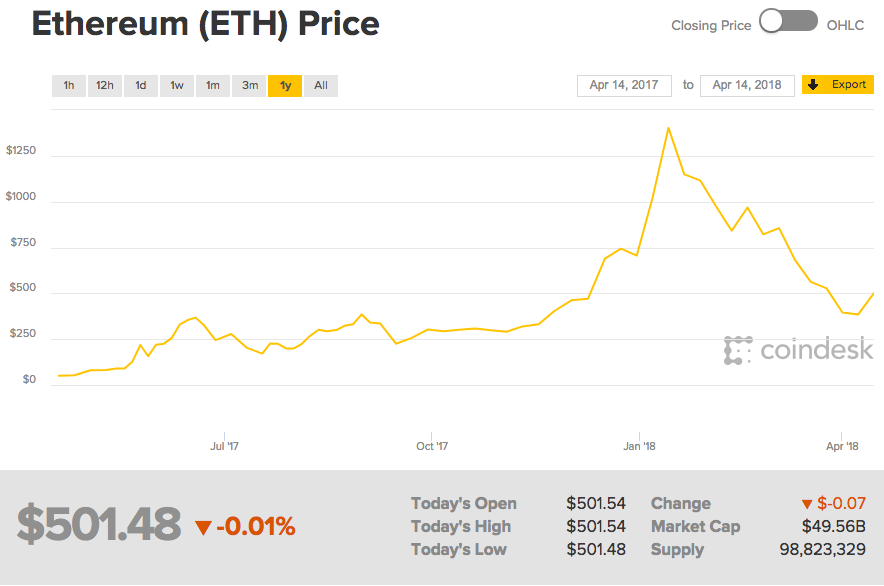
In just the same two year time period, the price of ETH went from just over $10 to over $1200 which is >1000% increase. Realistically, the price is just as likely to fall as it is to increase, but recently the general trend has been positive. Consider that 2.5 years is a worst case scenario and once you start mining, start thinking in terms of the units of the underlying cryptocurrency vs. fiat.
If you are on a budget and need to pay off the increased power costs as they occur, you'll need to exchange the crypto for dollars and pay off the power bill. This is not something that we do, but it's totally understandable if you need to. Try to AVOID USING COINBASE for a number of reasons, the first one being they suck. The second reason is the fees are so unreasonably high, transaction times are slowed during congested periods. The third is you have to give up your life history and a DNA sample (well maybe not the DNA but you get the point) to open an account there. You are better off paying a slight premium and exchanging through ShapeShift https://shapeshift.io or Changely https://changelly.com. @damianwhite63 will cover more of this in a later article, but out of principal, we as voluntaryists avoid any wallet or exchange that affiliates itself with banking products (example, bitcoin visa cards) if possible. Also, fuck Ripple (XMR). Otherwise, what is the point of all of this anyhow?

Other Profitable Cryptocurrency That We've Mined:
-Monero (XMR)
-ZCash (ZEC)
-Vert Coin (VTC)
-Zen Cash (ZEN)
Assembly
So now you've made the ROI calculations, you've got your shopping list together, you've done a second ROI calculation based on your total shopping list price, you've ordered all the hardware, selected your operating system, now it's time to assemble the hardware. I will just provide a high level step by step on what you will need to do to get your rig up and running.
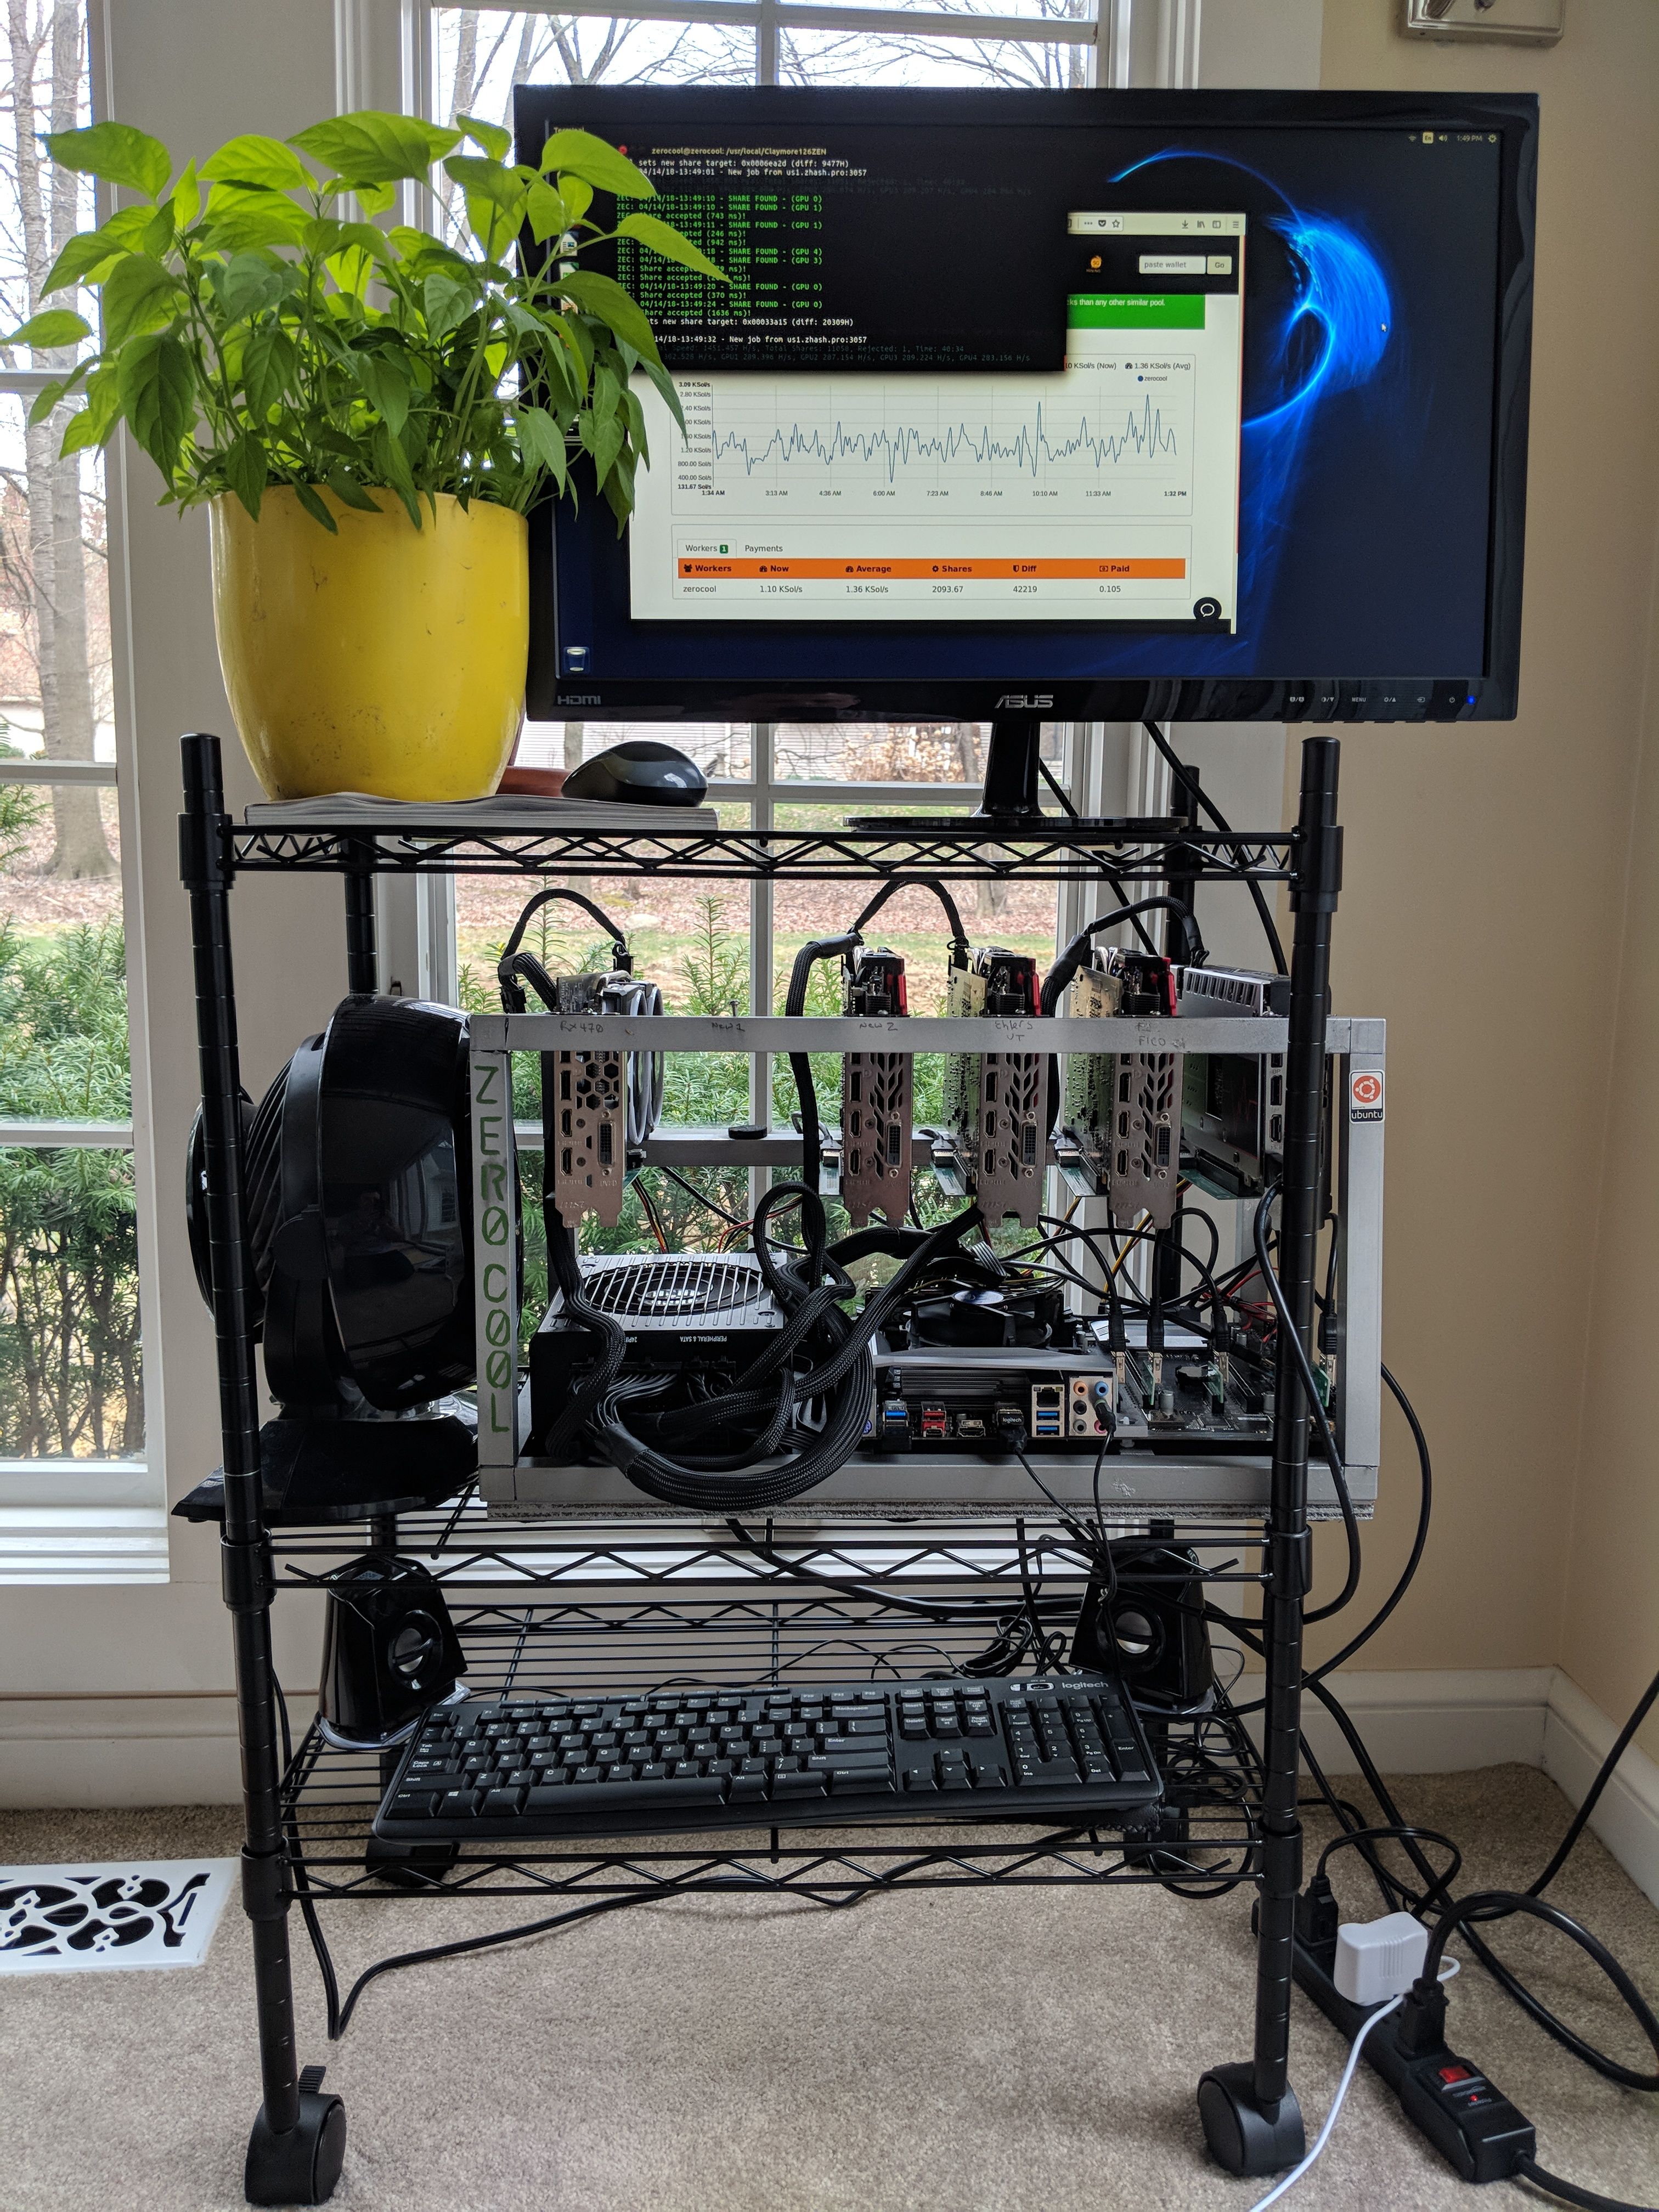
-Assemble the Amazon shelving unit and space the shelves out enough to where the very top will fit the monitor, the middle shelf will fit the GPU's (wait until you have at least have one GPU so you can measure the total space between shelving units. You want to give yourself enough room, but also keep in mind that the risers only have a limited length). It would be helpful if I gave you the spacing measurements on my rig and you can use them as a guideline:
-Top: Monitor, mouse, household plants, other household items
-Between 1st and 2nd Shelf (from the top): 16"
-Between the 2nd and 3rd Shelf: 8"
Also keep in mind that if you are using a two power supply rig, you'll need to arrange the power supplies either off to one side or place the motherboard between the first and second PSU. You can place the optional household fan (if you bought one) for extra cooling in the back or front of the unit.
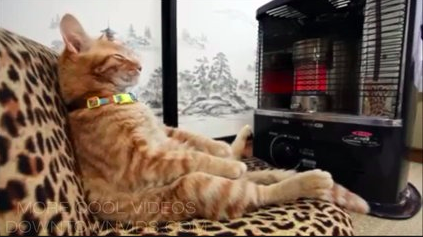
These same rules of thumb would apply to a shoe rack, other shelving unit, or any other open air rig you decide to purchase. You will want to keep a good amount of space between each GPU in order to displace the heat. The other tip is that you want to place your rig in an area that is cool or an area (if you live in a cold climate) you may want to supplement heat in, such as a bedroom or glass sunroom. My rig has supplemented the heat in our sunroom for two winters now. Once you start mining you will realize how much heat these GPUs give off.
General Hardware Assembly Tips
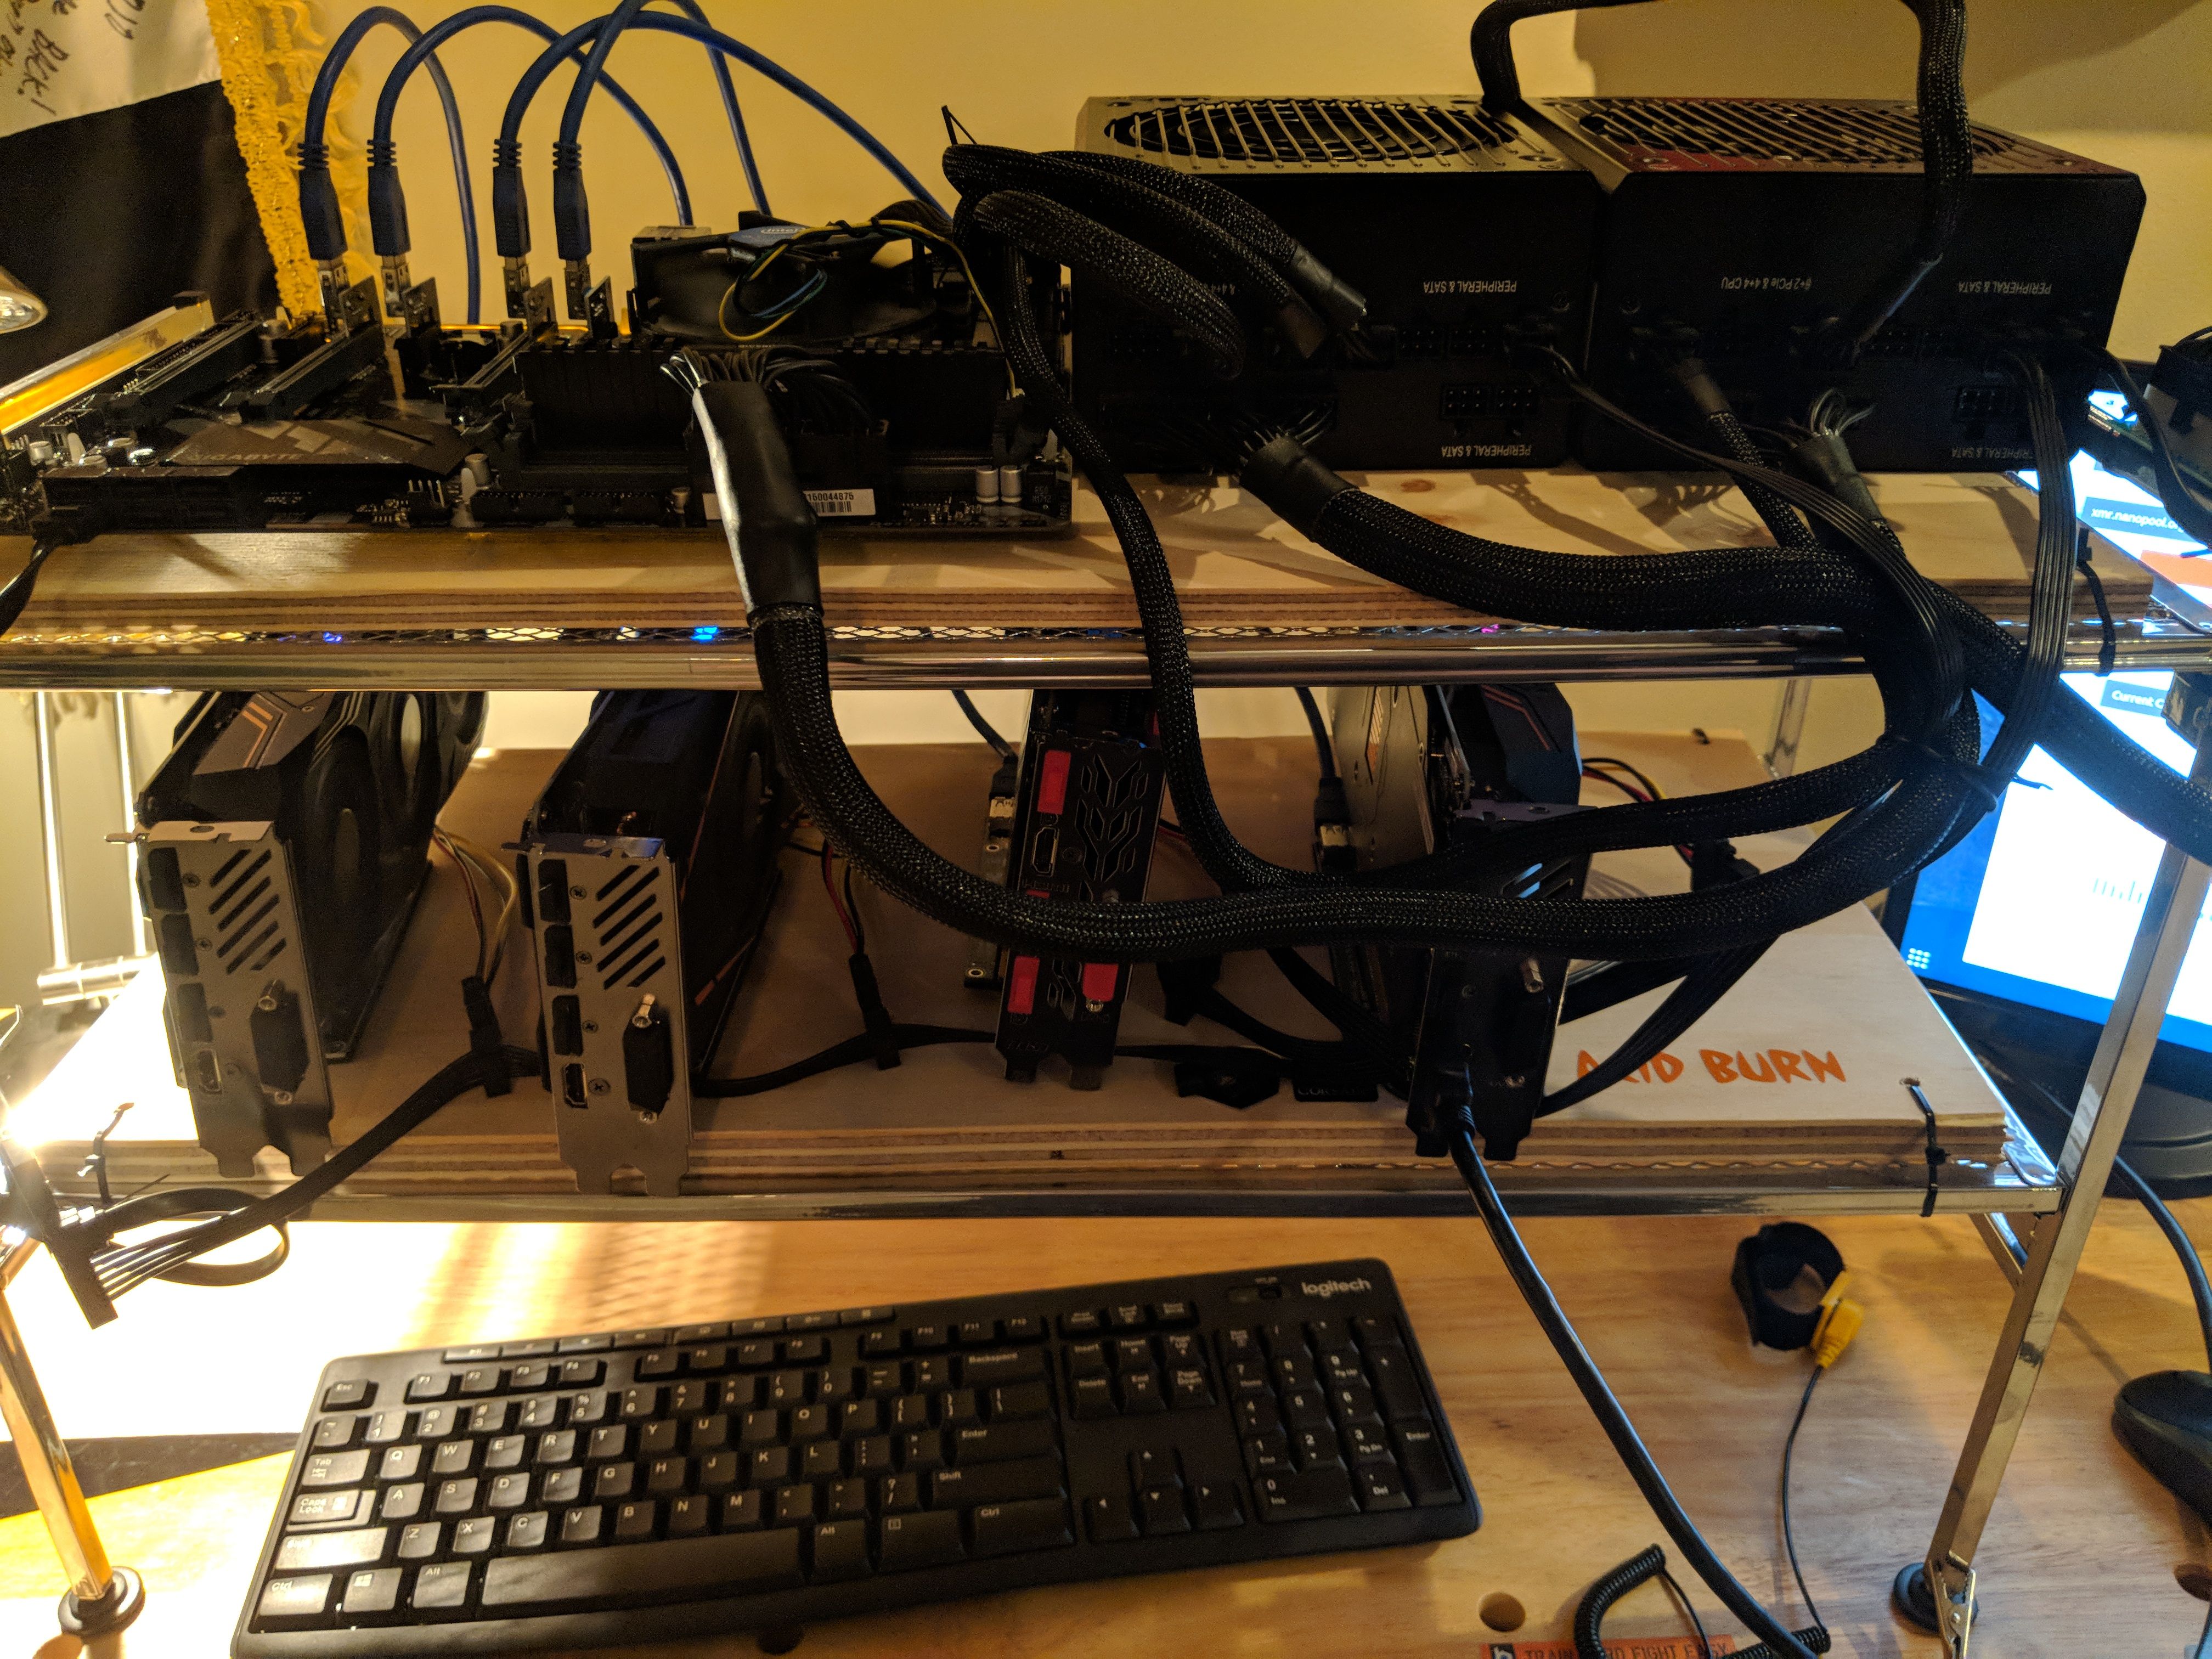
Now that you have the shelving unit arranged, here's a few tips you can use to assemble your hardware in a way that is most efficient. In your shopping list there was a wood board you can purchase from the local hardware store. This is what i've measured, cut, and used to mount the motherboard. As you can see from my second rig below, I measured the size of the shelf, then cut the boards to fit and drilled holes in each of the four corners. Then I basically used zip ties to keep the board steady. The plastic motherboard mounts on the optional list you can use to raise up the motherboard. I lined up the motherboard where I wanted it, then used a pencil to mark where the holes were in the motherboard (don't add risers to the holes near the CPU since that's where you're going to mount the CPU fan). You can mount the motherboard any way you want, but one thing I'd caution against is letting the motherboard touch bare metal. You don't want to just strap the thing down on the bare shelving unit or you'll short it and it just won't start up. If the wood board is too much work for you, you could use the plastic static bag that came with the board to sit between the shelf and the motherboard, and this may work for you, at least until you get it assembled and test it to make sure it boots to the bios screen. Last but not least pop in your memory sticks.
So you have the motherboard mounted, the next thing to do would be to install the CPU. There's really only one way to do this, line up the notched arrow on the top of the processor to the notch on the motherboard. When in doubt consult the manual. If it is in the wrong way, it won't fit.
Power Supply Linking
Use the cables that came with your power supply to link the two power supplies together. The purpose of the link on the shopping list is to start both the PSUs at the same time. You will need the molex to 6 pin connector which will connect to the main power supply and then the larger connector is going to go to the auxiliary power supply. It may take some time to link them, but we think the added time to hassle with it is worth it for the added power.
You will also need to connect on the On/Off switch to the two pins on your motherboard. Consult your motherboard manual to determine which two pins the button connects to. It should be labeled red on most boards and have a +/-.
I've used paperclips to start boards, but the power button is only $5, why not just spring for an on off switch. You can also take one out of an old computer.
Connect Risers and Mount GPUs
Connect your risers and mount your GPUs. The easiest way to mount GPUs to a shelving unit is to zip tie them underneath the first shelf. You can see from my rig below, I actually have just let them sit on the second shelf. This is okay too, as long as they are not moving around a lot, that will cause reboots and freeze ups when you are running a mining rig that has to run for months at a time. I would suggest only connecting one GPU to the PCIE x16 port and then making sure this works first before connecting the other ones. Make sure you get a boot up first. I installed the operating system before connecting the other GPUs. It's just a lot easier and if there are any problems, you can diagnose them relatively quickly.
*The Funny Story About Buying GPUs
So @damianwhite63 and I were planning to go to Microcenter to try and purchase some GPUs at a reasonable price. He ended up not going but I decided to check it out. It is literally easier to buy drugs than it is to buy a GPU at this place. I don't know if you're familiar with Microcenter, but it's basically a tired old computer store, a remnant of the early 2000's tech boom where everyone was building a computer. Since then, it is mostly frequented by gamer types and hobbyists still looking to build a PC for fun. But lately apparently the store has been flooded with miners looking to purchase 10+ GPUs. So I go there and they are so serious about not selling to miners. The staff there tries to interrogate you or find out if you are using the hardware for mining so that they don't have to sell you GPUs. The sign in one of the cases says, 1-2 high end GPUs $299, 3 or more $10,000 each. It's like they literally do not want business from people, or they have this attitude like miners are these criminals that must be avoided at all costs. So I go in there and I'm trying my best to try and act like i'm buying this hardware for gaming and I ask one of the clerks about the GPUs, an ASUS Nvidia 1060 6GB I think it was, and the next thing he starts talking about is how these miners have been coming in here and buying them up and how they are so scarce. "Yea, man that sucks. I'm just trying to play games and these miners are trying to ruin it for me. Any chance you could get me a deal on this card?" You can tell the guy is getting nervous. He pulls me aside and says, "Give me a few minutes and I'll see what I can do." 10 minutes later he comes out of the back room and quotes me $299 on the GPU, so I take it. But the funny thing is, I had to sit there and act like a gamer the whole time or the guy was not going to sell me this thing for under $400 if at all. So if you are thinking about going to Microcenter, brush up on your gaming etiquette and your social engineering skills and you'll have yourself a $299 GPU 1060 in no time!
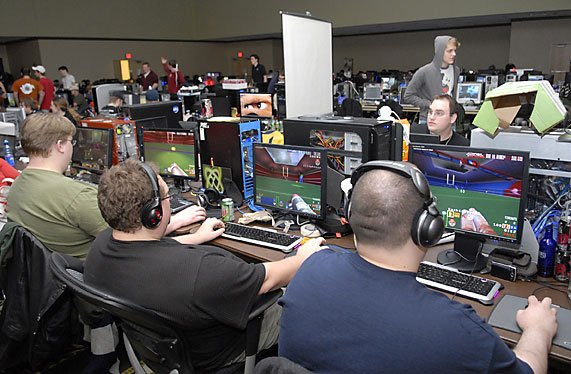
"Nothing to see here, just some gamers looking to get the next best high end graphics card."
We hope you got something out of Part 1: How to Mine Crypto In Your Own Home. Stay tuned and follow @damianwhite63 where he will give you Part 2: Choosing an Operating System (why Linux is preferred), pools vs. solo mining, and software setup.
Link to part 2: https://steemit.com/anarchy/@damianwhite63/how-to-mine-crypto-in-your-own-home-part-2-selecting-the-operating-system
If you like what you read so far and we helped you get on your way to mining, we would be grateful for your donations:
Ethereum (ETH): 0x31d8e17b34E064a5C7Ac12D58f56f1aBd1831Da0
Monero (XMR): 49euXTZHXcnRDy5MrKFHirBRXjKuZtEYujjCKcwrDuCiKBgev7E2DztaFC4JKP4ZCuN8J3Pp971HHFAcph6dujRTTFdNgbh
Laissez-faire

Great post and amazing setup !
Thank you! Be sure to stay tuned for the fourth and final part coming up!
Resteemed your article. This article was resteemed because you are part of the New Steemians project. You can learn more about it here: https://steemit.com/introduceyourself/@gaman/new-steemians-project-launch