VW Vanagon Auxiliary Battery and Solar Setup

Power is an absolute necessity in the modern day and it becomes especially scarce when on the move. We need a way to have access to 120V (standard home electrical power) as well as lots of USB power. In this post I will show you how to do that.
This post references my Wife's series which I highly recommend reading.
https://steemit.com/adventure/@jayjayjeffery/thinking-about-living-on-the-road-part-2-of-4
Last year I installed an auxiliary power system in our VW Vanagon. In this post I will show you how to properly add an auxiliary battery and solar panel to you vehicle. No need to worry if you don’t have a Vanagon, just apply the following system to your vehicle and customize as you see fit.

Our van with a Renogy 100 watt solar panel mounted on top!
System Schematic
To make things clear, lets jump right into the system schematic. If you don't have experience with this don't be intimidated. It simple DC wiring and is great for everyone to learn. If you're in need of help just ask below in the comments or search out a friend.Obviously this can be customized and tweaked based on your particular setup.

The flow is rather simple. Its all 12 volt DC. Red wiring means positive and black means negative or ground. All grounds are connected to the vehicle frame.
Remember to always use fuses, the more fuses the better. Don't skimp out on this step as it can be costly. If you need help sizing your fuses, please say something in the comments below. Make use of a multi-meter, it can help you out a lot.
Lets Talk Batteries
Your vehicle most likely has a 12V battery already in place. We will refer to this battery as the main engine battery. The system consists of a second battery that we will call the auxiliary battery. It is important to have a dual battery system so that when camping or boondocking you won't need to worry about running your engine battery dead. This can be very important.Say you are camping a good distance out in the wilderness and away from anyone else. This system will give you the peace of mind to be able to run your auxiliary battery all night and be able to start the engine right up in the morning. These two batteries will be isolated from one another in this system.
The auxiliary battery will be capable of charging directly from the engines alternator when the vehicle is running. The is made possible by a device called a battery isolator. The battery isolator is wired directly to you ignition wire and will connect both batteries in parallel when the engine starts via a built in relay. When the engine is shut off, the batteries are isolated to preserve your engine battery.
A secondary means of charging is by the solar panel. The solar panel provides a charge to your auxiliary battery whenever there is sun shining onto it, regardless of the engine being on or off. It's such a great feeling taking that solar power and pushing it into your battery all day long.

If your stereo system is wired to your engine battery (most likely), you will need to change that so it can be powered from the auxiliary battery. I assume you want to bump your music loud throughout the evening and also be able to start your engine the next morning and be off.

Notice the reoccurring theme here; protect your engine battery from running out of juice so that your power pleasures don’t leave you stranded out in Timbuktu.
For our system, we decided to install a 100 AH (amp-hour) battery. This means that you can draw 100 amps for 1 hour, 50 amps for 2 hours, or 1 amp for 100 hours, or any combination that multiplies to 100 AH. A rule of thumb is to never drain your battery lower than 50%. The more you do this the quicker it decreases the capacity of your battery. Another factor that alters the capacity of your battery is temperature. In really cold weather your capacity will diminish quite drastically and in hot temps you’ll get slightly more capacity. Through years of working with battery systems, I would recommend at least 200 AH capacity to constantly run cell phones, computers, fan, lights and other electronics. Obviously if you are a low power user, keep it at 100 AH. This is personal preference, but if you have the space and budget for a larger capacity battery then do it!
In our Vanagon, the engine battery is located under the passenger seat. In order to connect the auxiliary battery to the engine battery a 4 gauge wire is run across the floor and covered by a rug.
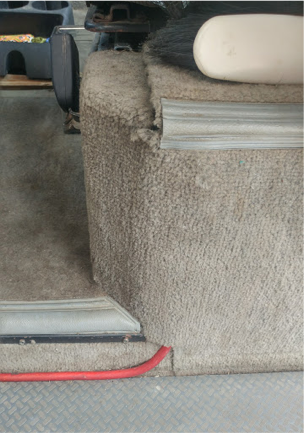
4 gauge wire connecting the two batteries through the isolator.
Show Me Your Power!
An electronic display is installed to monitor system voltage, current, and instantaneous power draw.
Display to show power usage and battery health.
Crammed Spaces
The majority of the system is installed in the small compartment near the water tank. It is not the most ideal location. It makes any maintenance very difficult. I did it this way because we are tight on space in the van and need all the room we can get.
Battery, inverter, charge controller, battery isolator and fuses cramped in a tight space.
Switches Make Life Easy
The battery isolator is controlled by the state of the ignition. Instead of directly connecting the wire straight to the isolator, adding a switch and LED inline is highly recommended. Ours is installed just to the right of the steering wheel. This allows the auxiliary battery to be disconnected at any time, even when the engine is running. There are a number of reasons why a disconnect switch is good to have, I'm sure you will be thankful to have one! Also, the warming green light visually ensures you of charging.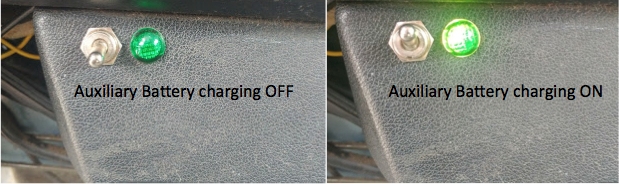
Parts
Here is a list of the parts you'll need to get the going. You may choose different parts than the ones I show. For example if you want to fork out the dough to buy a full sine wave inverter rather than the cheaper modified sine inverter. You can also double the amount of solar power if you have room for another panel. All these items are found on Amazon.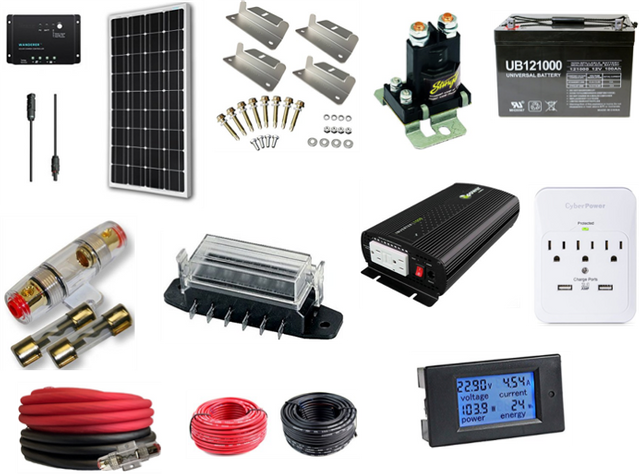
Renogy Solar Panel & Charge Controller
Solar Panel Mounting Hardware
Stinger SGP38 80-AMP Battery Isolator and Relay
Universal 12v 100AH Deep Cycle AGM Battery
American Terminal 60 Amp Inline AGU Fuse Holder
HELLA 6-Way Lateral Single Fuse Box
Xantrex 1000 Watt High Power Inverter
CyberPower Surge Protector 3-AC Outlet with 2 USB (2.1A) Charging Ports
4 gauge wire
10 gauge wire
Voltage, Current & Power Display
Thanks To My Helpers!
 My nephew who loves batteries and switches (left) and our Trill dog who is extremely helpful (right)
Good Luck and Be Safe
Please take your time and make sure you properly install this system. If installed incorrectly it could lead to short-circuit damage and possibly fire.If you like this content and would like to see more please up-vote and follow.
Please leave any comments or questions below. I would love to help you with anything I can.
Please share any setups you have designed!
This is a really helpful article! I hope my followers can use it too! Thanks for the time you put into it and thank goodness Trill Dog was there to advise. (:
I also think the #thl community would like this