Photoshop Down & Dirty Tricks#1 Design with Grid Elements
I viewed this effect on a movie poster, but it has some uses. Once the base grid created, you can add just about any image for any purpose. While we’re generating the effect, try to be open-minded as to various ways of using this technique for different types of design scenarios.
STEP ONE:
Go below the File menu, choose
New, and generate a new document
that is 9 inches wide by 12 inches tall
at 125 ppi, and make assured the Background
Contents pop-up menu is
fixed to White.

STEP TWO:
Go to the Photoshop (PC: Edit) menu,
under Preferences, and pick Guides,
Grid, & Slices. Since we want to create
four squares across, in the Grid sector,
enter (2.25) in the Gridline Each field and
leave its ( pop-up) menu set to Inches.
Then, enter 1 in the Subdivisions area
below. The default grey colour to the right
would work fine, but I prefer something
more visible. So, click on the colour swatch
and choose a different colour. Here, I’ve
chosen a shade of green. Click OK when
you’re done.

STEP THREE:
Go below the View menu, under Show,
And choose Grid. In your image window,
you should now see a 4-column grid
going across the canvas.

STEP FOUR:
In the Toolbox, click-and-hold on the
Rectangular Marquee tool, and choose
The Single Row Marquee tool. Click on
the 1st horizontal grid line at the top
of the document and it will add a selection
1-pixel high and the width of the
document, snapping to the grid line.
Then press-and-hold the Shift key (to
add to the existing selection) and click
on the other horizontal grid lines to
add selections to them.

STEP FIVE:
Next, go into the Toolbox and grab
the Single Column Marquee tool (also
nested beneath the Rectangular Marquee
tool) and use the same process
to add selections to the vertical grid
lines (remember to press-and-hold
the Shift key to add to the current
Selection). Once the selections are
made, click on the Create a New Layer
the icon at the bottom of the Layers panel
to Create a new blank layer. Press
D to set your Foreground and Background
colours to their defaults of black and
white, and then press CommandDelete
(PC: Ctrl-Backspace) To fill the selections with white. Press Command-D (PC: Ctrl-D) to Deselect and
then press Command-’ (apostrophe;
PC: Ctrl-’) to turn off the grid.

STEP SIX (6):
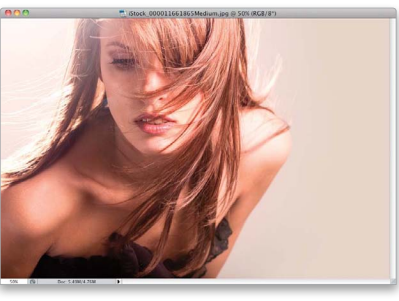
Open the model shot we are going to use
in the design (or whatever image you
Might want to use). I liked this picture,
because of the lighting and the post
tuning of the model in the composition.
Switch to the Move tool (V) and click
and-drag
(or copy-and-paste) this image
into the grid layout file.
STEP SEVEN (7):
Click-and-drag this image layer under
The grid layer in the Layers panel. Then,
place the image at the top edge of
the canvas, like you, sees here.

STEP EIGHT (8):
Click on the Add Layer Mask icon at
under the Layers panel to add
a layer mask to the model layer and
then choose the Gradient tool (G) from
The Toolbox. In Options Bar, click
on the down-facing arrow to the right
of the gradient thumbnail and select
the Foreground to Transparent gradient
(the 2nd gradient from left
in the top row and click on the
Linear Gradient to the right of
The gradient thumbnail. Press X to set
your Foreground colour to black, and
click-and-drag the gradient up
just a little bit, beginning at the bottom
edge of the photo, to fade the image
into the white background.

STEP NINE (9):
Now, to make grid lines a little
thicker, we will use a simple layer style.
Click on your grid layer (Layer 1) to
make it active, click on the Add
a Layer Style icon at the under the
Layers panel and choose Stroke. Click
on the Color swatch and set the colour
to white. Then, set the Size to 2 pixels
and make sure the Position pop-up
The menu is set to Outside. Click OK.

STEP TEN (10):
click back on the layer of the
model to make it ready and press Command-J
(PC: Ctrl-J) To duplicate it. Then, press Command-Shift-U
(PC: Ctrl-Shift-U) To remove the colour
from this duplicate layer. Go under the
Filter menu, under Distort, and choose
Diffuse Glow. Place the Graininess to 3,
the Glow Value to 5, and the Clear
Amount to 10. This will wave out the
highlights a little and give us a stylish
texture over the entire image. Click OK.
(Note: These settings will vary with
several images, so be sure to experiment
with other settings to get the
look you want.)

STEP ELEVEN (11):
As a result of the Dispersed Glow filter,
The image is left a little flat. However,
you can stiffen up the contrast a bit
by pushing Command-L (PC: Ctrl-L)
and running a simple Levels adjustment.
You can see here, I’ve adjusted
the Input Levels shadows (black) and
midtones (grey) sliders to darken the
Shadow areas. Next, modify the layer’s
blend mode to Soft Light, which will
add some stylish contrast to the image.

STEP TWELVE (12):
Now, back to the grid layer. Click on
it to activate it again, and select the
Magic Wand tool from the Toolbox (or
press Shift-W until you have it), and
Click inside one of the squares. Press and hold
the Shift key and select two
other squares (like you see here or
However many you’d like). Once the
selections are done, create a new
blank layer, fill the square selections
with white, and then deselect.

STEP THIRTEEN (13):-
Click on the grid layer and use the
Magic tool, once again, to select
Three more squares. Then, with your
Foreground and Background colours set
to their defaults of black and white,
click on the Create New Adjustment
Layer icon at the under the Layers
Panel and choose Gradient Map. This
will make the elected grid squares
black and white same you see here, giving
As a very cool finished effect. Feel
free to play around with other adjustments
or colours to get different results.

STEP FOURTEEN (14):
Finally, just leave in some text (here,
I used different styles of the Futura
font) and you have a finished layout.
You can see here how I used the white
squares to act as frames for the text.

FINAL IMAGE

THANKS FOR WATCHING

Congratulations @jasmine.clarke! You have completed some achievement on Steemit and have been rewarded with new badge(s) :
Click on any badge to view your own Board of Honor on SteemitBoard.
For more information about SteemitBoard, click here
If you no longer want to receive notifications, reply to this comment with the word
STOP