13 Useful Art Painting Techniques that Beginners Should Try
In this post I would like share some acrylic painting techniques for beginners
First I like to explain why I recommend use acrylic painting to start with as a beginner.
Acrylic is typically the easiest for beginners to start with. While there are many kinds of paint available in art stores, the three most common types of paint are oil, acrylic, and watercolor. When you’re exploring different painting techniques as a beginner, I recommend acrylic paint to start with.
Acrylic paints are incredibly easy to work with and dries very quickly, makes it ideally to paint more layers or make adjustments. This is useful when learning techniques like scumbling, which involves painting colors on top of one another without blending.
Acrylic paints are also versatile and durable on a wide range of surfaces.
Acrylic is thick enough that it can be treated almost like oil paint, but it can also be watered down and treated almost like watercolor. It can also just be itself. You get to decide how you work with acrylic.
Finally, acrylic paints are water-soluble, so they are easy to clean up.
Because I recommend acrylic for your first paintings, I’ll be talking about beginning painting techniques assuming that you’re using acrylic. You can use oil or watercolor for most of these techniques, but the process may vary. Don’t be afraid to experiment with other mediums just because I’m not doing that here.
1. Impasto (mixture)
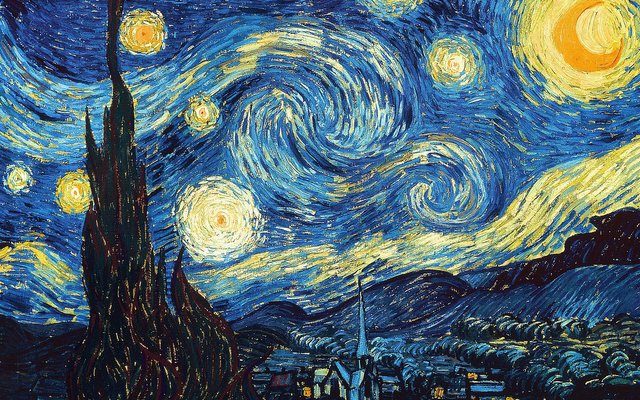
Apply a thick layer of paint on the canvas, so that it mounds on the canvas, brushstrokes get more noticeable, adding a special texture to the painting. You can also apply the paint with a palette knife. Allow the canvas to form peaks and valleys. Van Gogh is well known for his brushstrokes of thickly laid-on paint. And this technique is called Impasto.
See a collection artworks of Vincent Van Gogh: https://www.vangoghmuseum.nl/en/art-and-stories/stories/where-is-the-starry-night
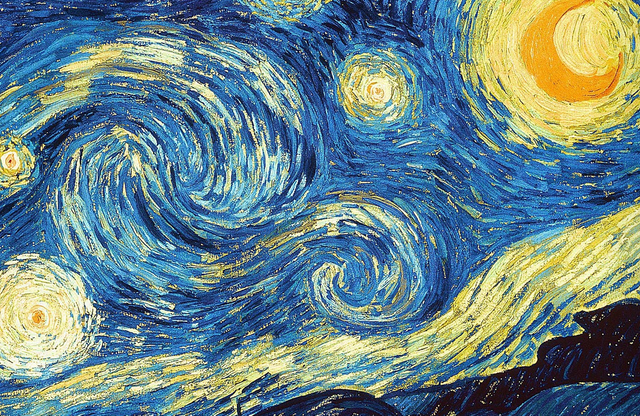
closer look of Starry Night by Van Gogh
2. Dry Brush Painting
When using the dry brush method with water-based paints, the brush should be dry or somewhat damp prior to loading it with paint, then apply to a dry canvas.
Dry brush painting makes it easier to add distinctive shapes or layers because the paint won't blend into all the layers you already have underneath.
3. Scumbling
Scumbling is a dry brush painting technique, to modify a painting or color by applying a very thin coat of opaque paint to give a softer or duller effect. You paint the canvas with a layer of paint and allow the paint to dry on the canvas. Next, apply a new color over the paint with a dry brush, allowing the brush marks and brush strokes to show the layer of color underneath.
To read more about scumbling technique, you can check out this article which explains in detail and with examples Scumbling - drawpaintacademy.com
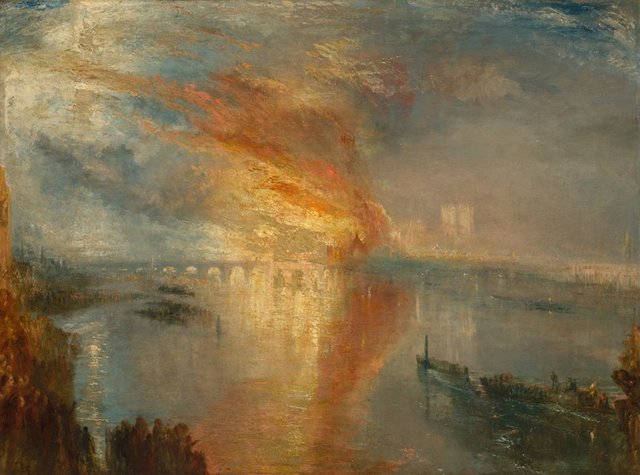
The Burning of the Houses of Lords and Commons by J. M. W. Turner
4. Splashing Acrylic Paints with paintbrush or milk frother
Painting could be so much fun! Ever try splash paints with a milk frother? Now is the time. Load a brush or milk frother with paint and fling it at the canvas. It’s great if you could roll the canvas to a cylinder when using the milk frother, if not you should as least use a cover to prevent the paints fly everywhere.
Paint pouring and splattering is a great way to add texture and interest to your paintings. You can thin down the paint beforehand if you want to avoid drips or keep the canvas upright if you don't mind a little dripping. Either way, this technique is a great way to add depth and dimension to your work.
5. Dab with Stiff Bristles, Paper Towel or Sponge
Dip a stiff-bristle, paper towel or sponge in thick paint and dab it on the canvas to create a sporadic, randomized texture that’s different from typical brushstrokes. The first application of paint on the canvas will be thick, but the paint will thin with repeated applications. For a different look, try wetting the sponge before dabbing paint on the canvas. The paint will soften at the edges when applied to the canvas.
6. Try Cotton Cup Tips for Stippling
To try stippling technique, you just dip a long, pointy brush into a large dollop of paint and poke the canvas to create a tiny dot. Pushing harder, or using a wider, circular brush, will create larger dots.
A trick to save massive time when you need to paint a lot of dots, just tie a bunch of cotton cue tips together then dip in the paint and dab on the canvas.

Some artists use these dots to show that objects are shining, sparkling, or shimmering. You could use this technique to add highlights to things like waves, waxy fruit, and glass. Add depth to your starry night sky by making a variety of dot sizes in a few different colors, like yellow, gray, light blue, and white.
7. Try spraying wet paint layers with water to create splashes and drips
Want to make it look like it’s raining or show that something’s melting in your painting? Try spraying wet paint layers with water to create splashes and drips and help the paint run together. Or, add clear acrylic medium to your paint so that the color drips and runs.
You can also pour paint from different heights to make psychedelic backgrounds or add an eye-catching finish to your abstract art, depending on your color choices and pouring technique. Create puddles and pools of color resulting in swirls, waves, splashes, marble-like finishes, and bubbly textures.
8. Try Palette Knife
Painters not just use palette knife to mix colors, but also use it to get creative on the canvas too. Use the flat side of the knife to lift paint off the palette, then spread the paint on the canvas like it’s a butter knife spreading butter on a roll, to create smooth areas or thick ridges, waves, and dollops of paint.
Use the edge of the knife with a slightly touch of paint, you can create thinner and straighter lines than a brush could achieve.
9. Go deeper to layering
Acrylic paint dries quickly, making it ideal for adding thin layers on top of background layers that have already dried. This is a technique that professional artists often use to create an underpainting, which is effectively a sketch of the final artwork.
In addition to this, thin layers also add depth and color to the finished painting, such as deeper shadows or more striking highlights. To achieve this, consider using a warm underpainting with a color like burnt sienna (brown), or a cool underpainting with ultramarine blue (blue).
10. Use Different Tones of the Same Color
You don’t have to use lots of different colors to create an eye-catching painting. Instead, try using different shades, tints, and tones of a handful of colors.
Van Gogh’s Starry Night is a great example. The variety of blues, yellows, and whites create movement and depth throughout the painting.
11. Make a Color Mixing Chart To Remember Your Combinations
As you mix up your paints and discover new combinations, it is beneficial to have a record of your findings. By creating your own personal color mixing chart, you will be able to remember the different hues you made and recreate them faster and more efficiently next time. Also, knowing how to craft your colors will produce prettier hues—plus, you’ll save a lot of money in pigment because you’re not having to buy every tube of paint in the color you
Get a piece of paper and draw a chart with 1-inch squares. Write the names of your colors along the top and left side, and then in each square, mix the colors.
12. Use Painter’s Tape for Clean Lines and Shapes
Painter’s tape is the perfect tool to keep paint off specific areas and create clean, sharp lines and shapes. Try this technique to paint buildings, bridges, stripes, geometric patterns, and more.
13. Use Torn paper for painting mountains
It is basically what it sounds, just tear a piece of paper in a free style, place the torn page edge side on top of the spot where you expect your mountain will be, brush paint starting from the paper down. You will get a clean and natural looking mountain line super easy, while it is hard to achieve by painting using paintbrush without lots of practice.
It’s a perfect help for far away mountain landscape paintings.
Experiment with Different Painting Techniques
Experiment with different techniques, or different media, just try and have fun, there is never a mistake here.
With practice, you’ll begin to develop skills and confidence in your painting. It’s a wonderful journey — enjoy it.
Wow! I learn a lot from your article. Such a great help. Thanks