How can I make a 2 drop peyote bracelet?
Hi There.....Are you creative?
I am way too creative for my own good.....There is not enough time for me to do all the things I love to do. At the moment I am most into beading and since today is Monday.....Needleworkmonday.....I thought this might be a great time to share a beading pattern with you 😊
Pattern 2 drop peyote (18 cm or 7.09 inch)
It is best to use Toho or Miyuki beads size 11 to get the best results
Most importantly, you'll need a slide clasp that is approximately the same width, or slightly more narrow than, your bracelet band.
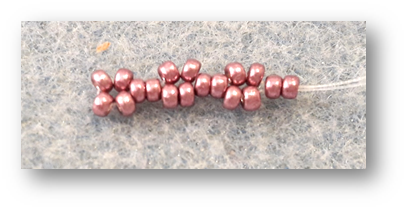
Pick up a bead and go through it again to make a knot. This will be your stop bead. Pick up another 11 beads so that you have 12 in total (stop bead included).
This will be your first row and you now are starting your second row. Pick up 2 beads and pass your needle through the 3th and 4th bead of the first row. Pick up 2 beads and pass your needle through the 7th and 8th bead of the first row. Pick up 2 beads and pass your needle throught the 11th and 12th bead of the first row (as shown on the image below).
The second row is ready now and you are starting the 3rd row now. Pick up 2 beads and pass your needle through the 3th and 4th bead of the second row. Pick up 2 beads and pass your needle throught the 7th and 8th bead of the second row. Pick up 2 beads and pass your needle through the 11th and 12th bead of the second row. (as shown on the image below).
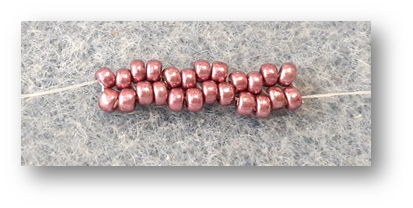
Repeat this pattern until you have a length of 16.5 cm or 6.50 inch. Make sure to always pull tight your wire to get nice and even beadwork.
Attach the slide clasp by picking up 2 beads and pass through the first metal ring on the clasp from front to back. Pick up another 2 beads and pass through the 3th and 4th bead of your end row (as shown on image below).
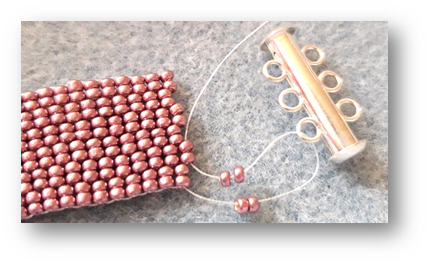
Pick up 2 beads and go through the second metal ring on the clasp from front to back. Pick up another 2 beads and pass through the 7th and 8th bead of your end row.
Pick up 2 beads and go through the third metal ring on the clasp from front to back. Pick up another 2 beads and pass through the 11th and 12th bead of your end row. Make sure to pull your wire tight to make your the closure fits tight. (as shown on the image below).

Pass through these last beads and metal rings again in the opposite direction to make sure the thread is secure.
Attach the clasp on the other end the same way you did on the first end of the bracelet.
And finished.....It's that simple 😋
Hope you like my blog post.....Until next time.....Have a great day
Renata (Seadbeady)
Behind every unique handmade piece is a lot of hard work. It's a labor of love and every piece you buy will make someone's day a happy day.
Want to be on my blog next time ?? Want me to review your product?? Just send me an email 😊

Congratulations @seadbeady! Your post has been placed in the spotlight for this week's @NeedleWorkMonday Featured Post!
Thank you for your quality post and for being apart of the needlework community!
#NeedleWorkMonday is an initiative that supports and rewards the needlework community while inspiring the Steemit blockchain.
For more information on #NeedleWorkMonday and the @needleworkmonday community please visit our FAQs!
yay tx so very much :)
This post was shared in the Curation Collective Discord community for curators, and upvoted and resteemed by the @c-squared community account.
If you are a community leader and/or contest organizer, please join the Discord and let us know you if you would like to promote the posting of your community or contest.
@c-squared runs a community witness. Please consider using one of your witness votes on us here
Thank you so very much :)
Your creativity makes me surprised... Thanks for sharing your work here..
I am also trying to be creative on my way...
tx so much - hope you have fun :)
You make it seem so effortless. When I attempted beading (that was like a million years ago!), I can't seem to make it work! hahahaha
maybe you had the wrong beads :D
probably. I did not really want to invest on expensive beads then because I am a beginner.
I love the intricacy of bead weaving @seadbeady and have always wondered how to work such a weave. The bracelet is beautiful! Thank you for showing this to us the steps. Interesting how the bracelet is weaved using 2 beads at a time. What does Peyote mean in this case? And what type of thread do you use for this bracelet? I haven't been able to find a thin enough elastic thread that would fit a bead hole that small.
it is made with fireline thread of 0.15 mm - peyote it the type of stitch and it is actually the same but you take just one bead a time - I use a big eye needle for this :)
👍You have received a 100% upvote with over 19k of build token, please keep up the good work and embrace the http://www.build-it.io community.
tx so very much :)
you are starting out very well, I think that when you want to do things you just have to put in the desire and the rest comes along. congratulations and I hope to see the final result. happy day
tx so very much :)
How lovely and what a great color. And what kind of lock do you need at the end?
It is called a slidelock of in het Nederlands schuifsluiting :)
This is very beautiful! I see my questions have already been asked by other Steemians and answered.
Thank you for sharing the process with us. I love the color of those beads! We want more, show us more! 😁😄 I hope you’ll be back soon ~
haha, who knows I will definitely think about it :)
Hee Hee! Okay! 😄😉
My grandmother works, she knows a lot about jewelry and I have seen her do things similar to this one, how nice to see everything here in steemit, excellent post
tx so very much :)