Self-Publishing with ProWebWriter on a $0 Budget - Part 2 - Editing, Proofreading, and Cover Creation
I am working on a series to help Steemians who would like to self-publish their work. If you missed Part 1, here's a link:
I know this seems like several steps in one and it is, but the editing and proofreading process doesn't take many steps and is simple to explain.
Please read through the entire post before you get started.
Let me preface my editing and proofreading tips by saying:
Most professional authors and self-publishers will tell you to hire an editor, but that doesn't fit in with our ZERO budget. I've never hired an editor for my work, and it probably needed it, but I still make consistent passive income regardless.
What You Will Need for Part 2
- Your fully written and formatted manuscript in Google Docs
- A Canva.com account
What You Will Learn in Part 2
- How to edit with ZERO budget
- How to proofread with ZERO budget
- How to create a book cover with, you guessed it, ZERO budget
The Editing Process
I would suggest letting your manuscript sit for a few days after you finish writing it before you begin the editing process. I have had manuscripts I let sit for YEARS...it's not like they expire or spoil. You will be editing and proofing right from Google Docs. It will auto-save your edits.
The idea here is to look on the work with a fresh perspective.
Go through and edit for flow. Add that thing you forgot. Elaborate in certain spots. Whatever you feel enhances your story for the reader.
Let it sit again and repeat at least one more time.
TIP: If you have friends or family who enjoy your writing and have decent editing or proofing skills, you can always get them to take a look at your work in exchange for the chance to read it before anyone else.
I actually created an email list of "beta readers" from Facebook for this purpose. They proofread for me and leave me a review in exchange for reading my book for free.
The Proofreading Process
Readers tend to notice typos and grammar mistakes before they see editing errors or problems with flow. If you are a writer with any experience under your belt, then you know how difficult it can be to proof and edit your own material.
If you are proofreading your work yourself, these 5 steps will help you catch most of the errors:
- As you write, proofread each paragraph as you complete it.
- Proofread your previous day's work, when you sit down to write for the day. At this point, you have proofed each paragraph and each section of writing you've completed.
- Scan the manuscript as a whole for any spelling errors picked up by your editing program (look for the squiggly red lines).
- Proofread the entire manuscript.
- Proofread the manuscript backwards sentence by sentence checking for structure and spelling errors.
When you complete these steps, you've proofread your manuscript 4 times. Call it good, or proof it one last time for good measure. You can always rely on your beta readers for this.
Don't forget to re-download your Word file. Delete the old one.
Creating a Cover for Your E-book
I don't want you to feel intimidated here...your cover is important and people DO judge books by the cover, but it is possible to create a great cover for your book without being a professional designer.
If you don't already have one, create a Canva account. You can sign in with your existing Facebook or Google account or create your account with your email address and password. It's totally FREE.
Canva creates a crazy amount of different graphics and documents. You may very well find it useful for other things in addition to book cover creation. For example, I used it to create the graphic title for this series of posts.
Step 1. Click the + icon if you don't see Kindle Cover in the frequently-used items across the top of your account.

You will find the Kindle Cover under the Blogging and eBooks heading.
Step 2. Click Kindle Cover to begin designing. It will open in a new browser tab.
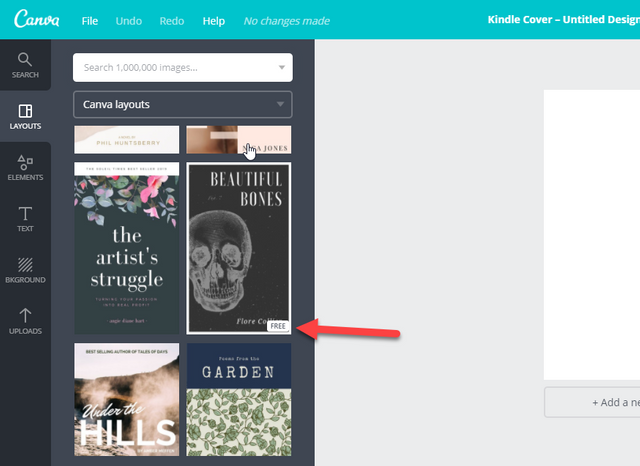
There will be a number of examples in the Layouts tab to the left of your workspace. I always design from scratch, but if you choose one of these, know that your cover may not be exclusive or original to your book.
Also, you have to watch the items you use in this space from all tabs. Some of them are paid items. Free items are annotated with "Free" as shown below.
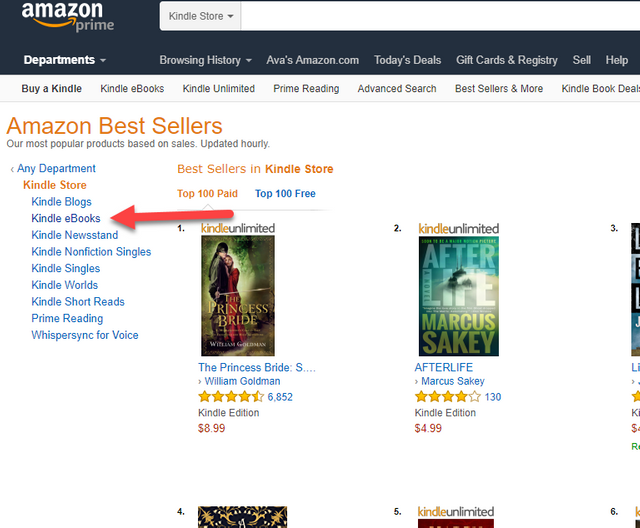
Step 3. Let's do some research. We want to take a look at the best sellers in the Kindle Store on Amazon.
Click Kindle eBooks in the left navigation.
This opens a huge list of genres that go well beyond what my screen shot can show:
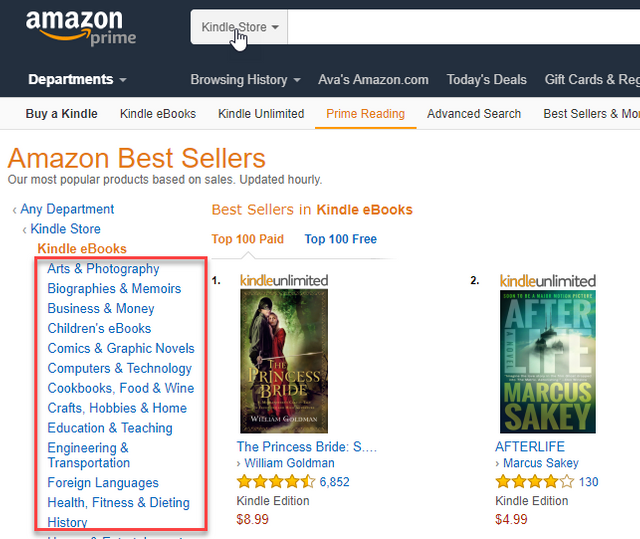
Find your genre.
I chose Mystery, Thriller, & Suspense to use as an example.
There's a couple things you should notice here:
- Selecting a genre opens up a list of sub-genres beneath it most of the time. Explore until you have been as specific as possible with your own book.
- There are two lists available to you here: the Top 100 Paid and the Top 100 Free.
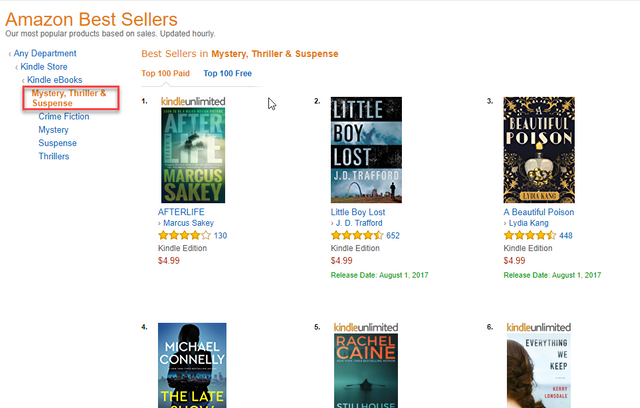
We will be concentrating on the Top 100 Paid list, but it's worthy to note here that you can get TONS of free books by perusing the Top 100 Free lists as well as check out what your competition is putting out. Also, there is one of each of these lists for each genre and sub-genre.
Scroll through the Top 100 Paid list for your genre and take note of the book covers. Which ones do you like? Which ones do you think would fit your book and be simple to replicate? If you would like to save a few examples, just click onto the sales page for the book on Amazon and right-click; Save Image as.
NOTE: By "replicate" I don't mean copy. I mean create a similar derivative.
These are actual covers of books that are already selling well. Use them as examples. Pay attention to things like:
- The large, easy-to-read fonts. You can easily read the title and most of the time, the author even on the small thumbnails
- Colors
- Images
- Simplicity
I wouldn't consider these cover designs to be really complicated. Most of them consist of one simple image making up the entire background of the cover with large, plain fonts.
Let's find an example to work with as if we are creating a cover for our book.
From my example, I chose the #4 listing for Stillhouse Lake by Rachel Caine. Here's the cover:
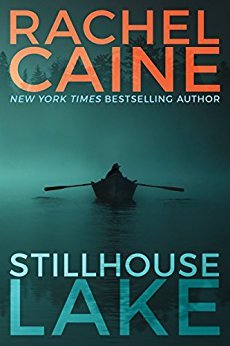
Note: We are NOT copying Rachel's cover. We are using the ideas and elements to create our own.
I like this cover because of it's simplicity, the colors, and the large, plain fonts.
Let's pretend that we are publishing a book titled Faded Sky by Jane Doe. The loose storyline is about a pilot who disappeared with their plane without a trace. So, we are sticking to our Mystery, Thriller, & Suspense genre.
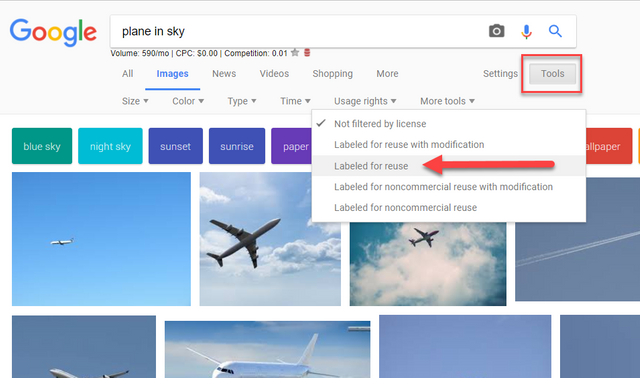
Step 4. Find a suitable stock/royalty-free image to use. You can try searching your keyword on a free image site like Pixabay or Pexels. I like to just use Google and filter my search so that I'm searching multiple free image sites at once.
Type your keyword into Google. Select Images to perform an image search. Click the Tools button. Click Usage and select Labeled for reuse from the drop-down menu.
I found this image on Pexels through the above search that is suitable for my cover:

When you find a picture you like, visit the site and check the licensing to make sure you can use it commercially. If you can't, you'll have to select one that you can.
Step 5. Upload your image to Canva. Click the Uploads tab in the left navigation. Click the green Upload your own images button. The image will upload to Canva.
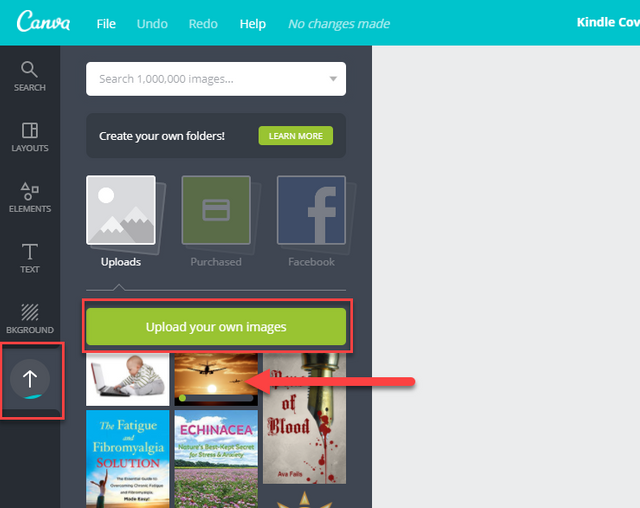
Step 6. Use the uploaded image in your design by clicking it. The image will be added to your workspace. You can see it is selected and surrounded by anchor points so that you can resize it.
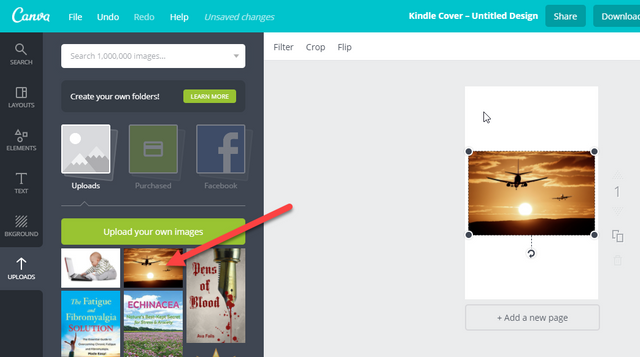
Step 7. Click and drag one of the anchor points to resize your photo. Click and drag to reposition it where you want it in your workspace.
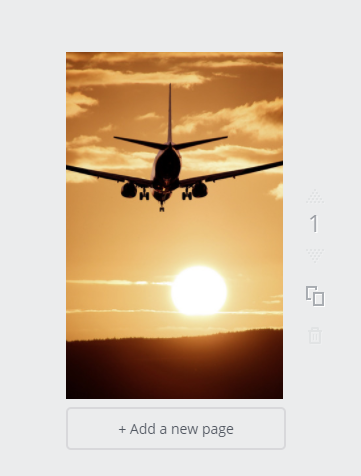
Here's what we have so far:
Step 8. Click the Text tab in the left navigation. Click Add Heading. The Add Heading text box now appears in the workspace and we can edit it for size, font, and color.
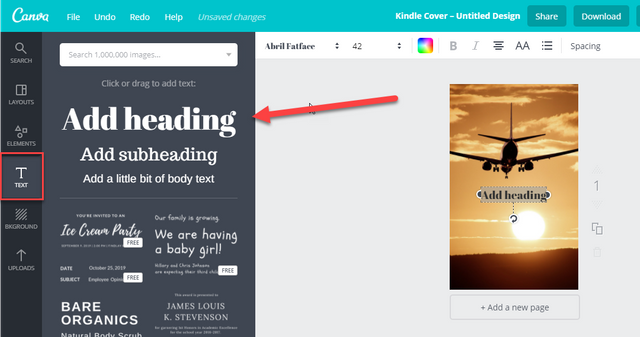
Step 9. Type your title. Use the tools across the top of your workspace to edit your text size, font, style, color, etc.
TIP: I use a browser extension in Chrome called Colorzilla to match the colors in my photo to color my fonts.
To add a custom color in Canva:
- Click Colorzilla and hover your cursor over the color you want to match. Click. Colorzilla will automatically copy the 6-digit hex code to your clipboard.
- With your text element selected, click the colored square in the toolbar above. Click the + icon.
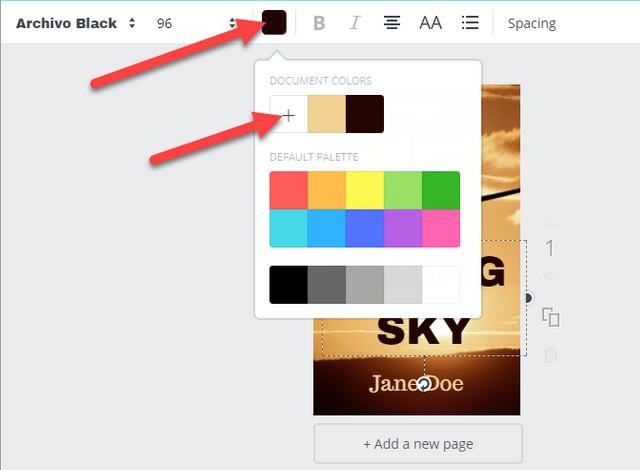
- Paste the 6-digit hex code from Colorzilla into the box.

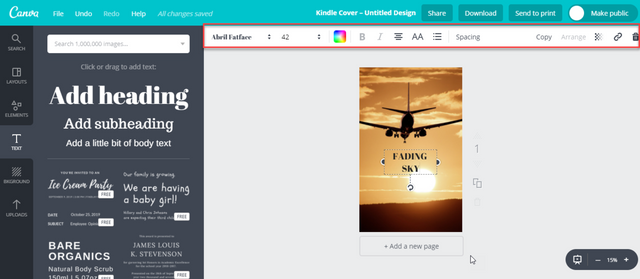
Step 10. Repeat the process for your author name.
Make sure you are pleased at this point with how your cover looks and where everything is placed.
Step 11. Download your cover in JPG format.
Click Download in the top bar. Select JPG from the drop-down menu. Click the green Download button.
Your cover will download to your computer.

NOTE: Feel free to download your cover in any other format as well. JPG is what you will need to upload with your manuscript to KDP and other platforms.
How Did Our Cover Turn Out?
So how does our cover look?

I don't think it's too shabby and it was super simple to make, right? Just an image and a couple lines of text.
Wrapping Up Part 2
What do you think? Doable? I think so. I know you can do it!
Coming Up
In Part 3, we will upload your files to KDP! This is the publishing step! Once you complete it, you are a self-published author!
If self-publishing a book is something you're interested in, I hope you will follow me so you don't miss any of this series. If you missed Part 1, here it is:
If you have questions, please comment. Your question could very well help another Steemian. I will respond here. If I've forgotten anything, I will add it to the process.
Thanks for reading!
This gem of a post was discovered by the OCD Team!
Reply to this comment if you accept, and are willing to let us share your gem of a post! By accepting this, you have a chance to receive extra rewards and one of your photos in this article may be used in our compilation post!
You can follow @ocd – learn more about the project and see other Gems! We strive for transparency.
Beware of Google Images -- they do not always get labeled properly
It is actually much safer to use a source such as Pixabay as the person that uploads has to actually tell the site what others may or may not do with them.
I enjoyed learning new tools -- especially Canva -- My cover for Lost Lizzy is so basic that it borders on painfully unprofessionally done.
Hello! I love what y'all do, and I'd be honored to be a part of it. I tried to stress in my post that creators need to check the licensing of the photos they use. I suggest Google Images and filters because it's the only way I know to search multiple sites at once. I ended up using an image from Pexels in my example cover which is much like Pixabay.
Free free to share and all of the images are mine with the exception of Rachel Caine's book cover, so please don't use that one. Thanks again! You guys ROCK!
This post received a 5% vote by @minnowsupport courtesy of @creativesoul from the Minnow Support Project ( @minnowsupport ). Join us in Discord.
Upvoting this comment will help support @minnowsupport.
Nice post. But a word of caution for people creating a self-published book on a budget...do not skimp on editing and your book cover. I made this mistake with my first two books.
Customers on Amazon are ruthless and will tear into you if they find any grammatical or punctionation mistakes in your book. They expect it to be perfect. What's worse is that if you have to re-upload your manscript to KDP / CreateSpace, your book may go off the market for 24-72 hours causing you to lose your best-selling ranking.
If you do your due dilligence, you can find affordable (and sometimes free) editing. If people are interested I can discuss this in detail.
Regarding your book cover - you can get a high quality cover on Fiverr for anywhere from $5 to $30 too. Your book cover is the 1st thing people see on Amazon...and if you don't "wow" them in a few seconds...you may have lost a customer.
Anyways, great post...just wanted to post this comment for this reading your blog post to make sure they know the consequences of skimping on editing and book cover design.
I agree, don't skimp, but don't pay a million dollars for it either.
Any money you invest puts you in the red. Make sure you find the right people to work with. <<< This is harder than it sounds.
I have edited all of my own books first, and then had friends, family, and beta readers run through them as well. I haven't had a problem with bad reviews.
It was more important to me as a writer to publish my work than to not do it because I couldn't afford to pay someone a living wage for services.
I also didn't have much success with Fiverr cover designers. That's why I don't mention it in my article. It adds more moving parts to the process than there needs to be.
Utilize your network first.
Thanks for taking the time to write a well-thought-out comment.
Awesome tutorial on editing, proofreading and cover creation. I'm thinking of writing ebooks to publish on Kindle and this was rather useful. Thanks!
I'm glad you found it useful! That's my whole reason for publishing this series. Good luck with your journey!
fantastic posts, great stuff !! I'll keep an eye out for you, gl ! peace
I'm glad you enjoyed them! Good luck and peace to you as well.
I use free Grammarly downloadable app for proof-reading and excellent spellchecking, check it out.