Tutorial: Building a web app with React, Redux, and the Steem Javascript API, PART 2
https://github.com/facebook/react
Building a web app with React, Redux, and the Steem Javascript API, Part 2
Image from mit.edu
In part 1 of this this tutorial we learned how to install the Steem.js library in a React project. After getting set up with `create-react-app` and the API we wrote a simple React component and used `console.log` to output user profile data in the browser. This was a simple and straightfoward way to get started using APIs in a React environment.
After looking through documentation on Github I came to the realization that Steem.js is no longer the premier API to use when working with the Steem blockchain using Javascript. A newer, better documented API is now available. The dsteem API has replaced Steem.js as the go-to Javascript API. I will keep Steem.js installed in the project in case there are functions from that API that aren't available in the newer dsteem library, but in this part of the tutorial we will be migrating to the new API.
In this part of the tutorial we will migrate to the dsteem API, create a React component called Utopian.js that will display data pertaining to Utopian fetched from the Steem blockchain by the API, install node-sass-chokidar and get our project set up to use SCSS for styling, and we will also start thinking about the best way to structure the project itself. The component we create will display hot posts from Utopian and display the author, title, link to the post, and the amount of money paid/pending for the post.
What you will learn in this tutorial:
- Installing and sending requests to the dsteem API
- Iterating through the (very messy) JSON data returned by the API
- Displaying the data from the API in a React component
- Setting up and using node-sass-chokidar in a React project
- Basic React project structure when working with multilple components
Requirements:
- All of the requirements from Part 1 of this series
- dsteem API
Difficulty: Intermediate
Getting started
Let's start by installing the new API:
npm install dsteem
Now that dsteem is installed we can make a new component called Utopian.js and import the library into it and start making API requests to the blockchain. Create a Utopain.js component in the src folder of the app:
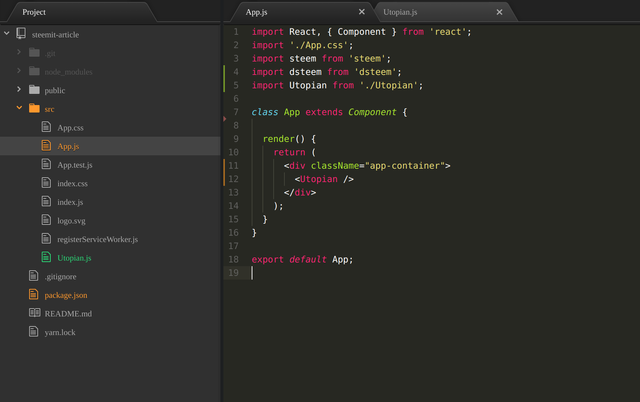
Structure of our project
Initially, our Utopian.js component will look like this:
import React, { Component } from 'react';
import dsteem from 'dsteem';

class Utopian extends Component {
  constructor(props) {
    super(props);

    this.state = {
      utopianCash: []
    }
  }

  render() {
    return (
      <div className="utopian-container">
        <h1>Utopian Component Displayed</h1>
      </div>
    );
  }
}

export default Utopian;
Be sure to import the new component into the head of the app.js component and to display it in the return method via <Utopian />. Now we have a very basic component set up and imported to app.js. Run npm start and you should see this:
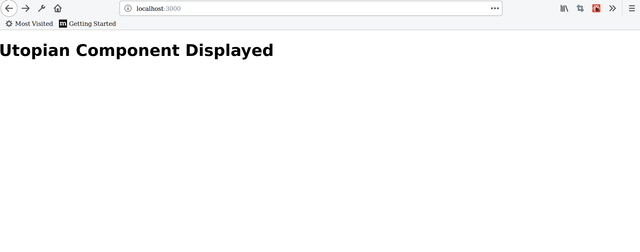
Our very basic
Utopian.jscomponent is displaying
Formatting and sending requests to dsteem
We will send requests to the API in a componentDidMount function. For those who are new to React, componentDidMount is a lifecycle method that runs when the component mounts. It is common practice to put API requests inside this method.
Check out the dsteem documentation and familiarize yourself with how to make requests. The documentation shows us how to make a request in pure Javascript:
var dsteem = require('dsteem')

var client = new dsteem.Client('https://api.steemit.com')
var key = dsteem.PrivateKey.fromLogin('username', 'password', 'posting')

client.broadcast.vote({
    voter: 'username',
    author: 'almost-digital',
    permlink: 'dsteem-is-the-best',
    weight: 10000
}, key).then(function(result){
   console.log('Included in block: ' + result.block_num)
}, function(error) {
   console.error(error)
})
This gives us the gist of using the API in Javascript, but using it in a React environment is a bit different. In order to use the API in out Utopian.js component we need to import the client function via import { Client } from 'dsteem'; and set a variable equal to :
`const client = new Client('https://api.steemit.com')
so that we can easily use the Client function via the variable const later in out code. We will create this variable within the componentDidMount method.
Utopian.js should now look like this:
import React, { Component } from 'react';
import dsteem from 'dsteem';
import { Client } from 'dsteem';

class Utopian extends Component {
  constructor(props) {
    super(props);

    this.state = {
      utopianCash: []
    }
  }

  componentDidMount() {
    const client = new Client('https://api.steemit.com')
  }

  render() {
    return (
      <div className="utopian-container">
        <h1>Utopian Component Displayed</h1>
      </div>
    );
  }
}

export default Utopian;
The Utopian.js component is now set up to use the dsteem API and now we can format our query and send out the request
Setting up the API request to retrieve Utopain posts
To send requests to the API that retrieves posts by discussion the API uses the following convention:
client.database
       .getDiscussions('POST CATEGORY GOES HERE',  SEARCH QUERY GOES HERE)
       .then(result => {
        // Javascript promise is returned, handle what you want to do with the retrieved data here
      })
The getDiscussions function is one of many functions the API uses to retrieve posts from the blockchain, and will return posts based on the parameters we pass it. In order to use it we need to pass it two parameters: the category, and the search query.
Category
As per the documentation there are several different categories we can pass the
getDiscussions function. They are active blog cashout children comments created feed hot promoted trending votes. Utopian.js will return the top posts from Utopian-io, so we will be using the hot category in our request.Query
The second parameter passed to
getDiscussions will be the query. The query tells the API what we are trying to retrieve and allows us to set a variable equal to some key/values pairs. We will pass the key/value pairs tag: utopian-io to let the API know we want to retrieve utopian-io posts, and limit: 20 to limit the amount of posts retrieved to 20.Our query variable will look like this:
var utopianHot = {
       tag: 'utopian-io',
       limit: 20
     }
The full componentDidMount method will look like this. Note that we are saving the retrieved data within .then ( the promise) in the Utopian.js's state via
this.setState( {utopianCash: result } );
  componentDidMount() {
    const client = new Client('https://api.steemit.com')

     var utopianHot = {
       tag: 'utopian-io',
       limit: 20
     }

     client.database
       .getDiscussions('hot', utopianHot)
       .then(result => {
         this.setState({ utopianCash: result});
      })

  }
Add a console.log in the render function and log out the data like so:
render() {
    console.log(this.state.utopianCash);
    return (
      <div className="utopian-container">
        <h1>Utopian Component Displayed</h1>
      </div>
    );
  }
When ran the outputted data should look like this:

The data retrieved by getDiscussions
If we open one of the nested post objects it contains a lot of data pertaining to the post:
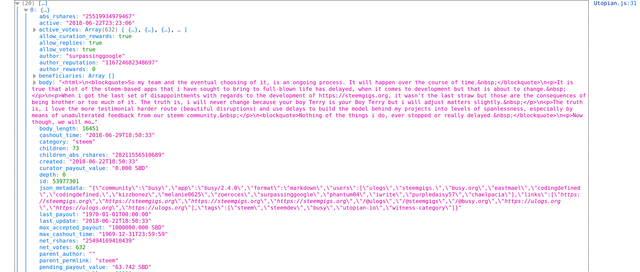
Some of the many object properties nested within the data
Now that we can see the data and how it is formatted we can work with the data and display it in our React component. Due to the fact that the JSON data contains deeply nested objects within objects it is going to be tricky to properly iterate through this data and display it.
An object within an object within an object
The JSON data returned to us by the API consists of very deeply nested objects. Having objects nested within objects nested within objects makes it very difficult to iterate through the data and grab what we need.

My expression when trying to iterate through deeply nested JSON
After much frustration I was able to successfully display the data in a very sloppy and drawn out manner. The solution I came up with to access the data we need for this component looks like this:
render() {
    const posts = Object.keys(this.state.utopianCash);

    let page = posts.map((post, i) => {
      return (
        <div className="utopian-container">
          <p>
            <strong>Author:</strong>
            {this.state.utopianCash[posts[i]]["author"]}
          </p>
          <p>
            <strong>Title:</strong>
            <a href={`https://www.steemit.com/`+this.state.utopianCash[posts[i]]["url"]}>
              {this.state.utopianCash[posts[i]]["title"]}
            </a>
          </p>
          <p>
            <strong>Pending Payout:</strong>
            {this.state.utopianCash[posts[i]]["pending_payout_value"]}
          </p>
        </div>
      );
    });


    return (
      <div className="utopian-container">
        {page}
      </div>
    );
  }
Let's break down what is going on:
The posts variable is storing the data from this.state.utopianCash and calling the Object.keys method on it. Object.keys takes an object and returns an array consisting of all the keys of that object. This allows us to call the map method on our data like so:
  let page = posts.map((post, i) => {

})
Now we are able to iterate through our object using the map method, which is an array function, even though our data originally came from an object.
In the return function we can display whatever data we want from the JSON like this:
{this.state.utopianCash[posts[i]]["author"]}
The data stored in the component's state is called and we iterate through it using posts[i] and we can select which piece of data we display by writing the property name in the following array i.e. ["author"].
As you can see this isn't a very pretty way of displaying the data in our component. It is drawn out and sloppy and not easy to work with. In part 3 of this series I will teach you how to use the json-query package to simplify how we iterate through nested JSON data, but for the sake of brevity I will stick with this for now.
Run npm start and check out how the data looks in the browser:
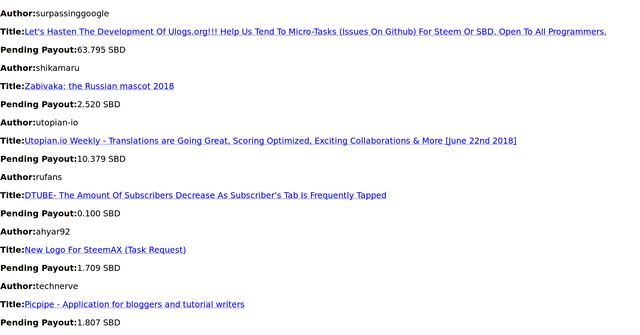
The data from
Utopian.jsdisplayed in the browser
As you can see the data displays and we are retrieving current posts from Utopian-io in our project. Each post shows us the author, title and link of the post, and pending payout in Steem backed dollars. It is there, but it aint pretty. The next step is to install node-sass-chokidar and get this component to display in a more visually appealling way.
Let's get Sassy
In order to make this component and it's data prettier to look at we are going to integrate the Sass preprocessor into our project via the node-sass-chokidar package.
To install the package run npm install node-sass-chokidar. If you run into a weird permissions error with npm, which is common if you're on Linux, check out this StackOverflow post.
In order to set the project up for node-sass-chokidar follow the adding a preprocessor directions provided by create-react-app. The instructions are fairly simple.
After following the instructions for adding the Sass preprocesser in a create-react-app project the file structure of our project should now contain a styles folder that contains a file named _Utopian.scss and our App.css file should be manually renamed to App.scss. After renaming that add the following import statement @import "./styles/Utopian.scss"; to import the _Utopian.scss file we created in the styles folder. Note that in the styles folder _Utopian.scss is prefixed by an underscore but when it is imported to App.scss via the import statement we leave out the underscore. This is the convention and without doing this properly node-sass-chokidar will not work and you will get a compile error from npm.
After node-sass-chokidar is set up and your project has the appropriate structure add the following to _Utopian.scss to add basic styles to the elements and make the data more presentable:
.utopian-container {
  background-color: #ecf0f1;
  height: auto;
  width: 90%;
  margin: auto;
  text-align: center;
}

.utopian-items {
  width: 20em;
  height: 15em;
  margin: 1em;
  background-color: #3498db;
  display: inline-block;
  vertical-align: middle;

  a {
    text-decoration: none;
    color: #f1c40f;
  }
}
Here is the result of the styles we have added:
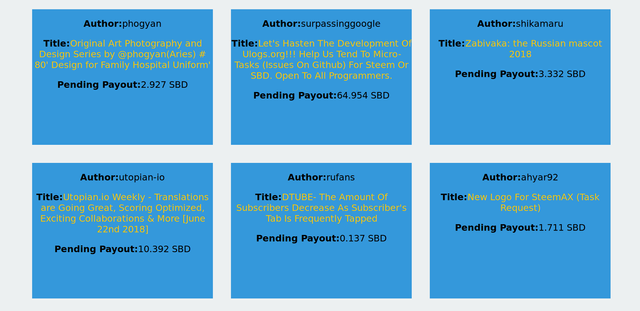
Utopian.jswith added styles
Our data still isn't beautiful but it's much easier to look at with some basic styles applied. I will be adding more scss and making this project more visually appealing in future tutorials. The purpose of this part of the series was not to teach Sass in depth or make a finished project.
End of Part 2
This conculdes Part 2 of this series. In this segment we learned how to get set up with dsteem, format a request to the API, store the retrieved data in local state, use Object.keys and map to iterate through nested objects and display the data, and how to get set up with node-sass-chokidar.
In the next tutorial we will work on the styling of the project, pull more data from the API so we can create a more practical project that interacts more with the Steem blockchain, and we will start navigating away from using local state and towards using Redux in our project.
View the project online:
https://codesandbox.io/s/github/Nicknyr/Steem.js_API_Tutorial
Proof of work:
https://github.com/Nicknyr/Steem.js_API_Tutorial

I thank you for your contribution. Here is my thought;
Your contribution has been evaluated according to Utopian policies and guidelines, as well as a predefined set of questions pertaining to the category.
To view those questions and the relevant answers related to your post, click here.
Need help? Write a ticket on https://support.utopian.io/.
Chat with us on Discord.
[utopian-moderator]
Thanks for the positive feedback. I'm having fun with this tutorial and maybe it will even have practical use beyond teaching i.e. maybe it can even go live and Utopian could have a site that displays top posts from previous weeks/months.
Hey @nicknyr
Thanks for contributing on Utopian.
Congratulations! Your contribution was Staff Picked to receive a maximum vote for the tutorials category on Utopian for being of significant value to the project and the open source community.
We’re already looking forward to your next contribution!
Contributing on Utopian
Learn how to contribute on our website or by watching this tutorial on Youtube.
Want to chat? Join us on Discord https://discord.gg/h52nFrV.
Vote for Utopian Witness!
Hey Good Work, its indeed a very good tutorial, really easy to grasp, and it helped me to learn a lot, here I would also like to add that I regularly follow official blogs of worlds best web development firms like DCS, GoodCore Software and others because such blogs of web development firms are current according to latest web developments and designing standards, and they did really helped me a lot to understand web app development processes, I would suggest other budding developers to do so too.