Drawing Tutorial | Method 1 of 2: How to Draw Anime Characters | 10% reward payment for @steem.skillshare by @hidayat96
Assalamu'alaikum...
Hello friends of the #steemskillshare community that I respect. How are you all? I hope that you are all well and always in the protection of the Almighty God.
A few days ago I posted my short introduction in this community. And on this occasion, allow me to share knowledge with all of you about "How to Draw Anime Characters".
Anime itself is a popular style of animation and drawing that originated in Japan. Drawing anime characters can seem difficult, especially if you see your favorite anime made professionally. Luckily, anyone can learn to draw anime characters and the process is quite simple if you break it down into small steps.
Below I will show you the tutorial.
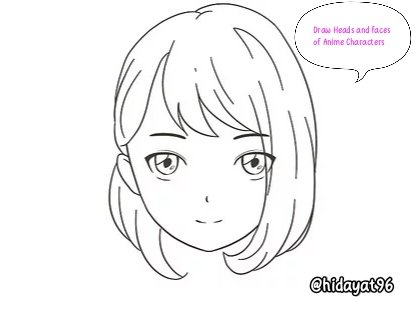
Method 1 of 2: Draw Heads and faces of Anime Characters
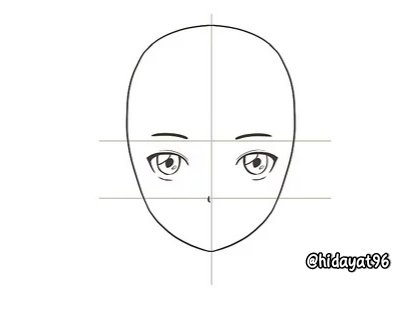
1. Draw an oval and divide it into 4 parts.
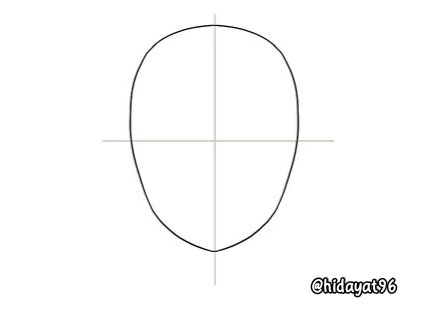
This is the basic outline of the anime character's head. The proportions don't have to be exactly the same, but make an oval that narrows at the bottom to become the chin. Then after drawing the oval, draw a horizontal line through the middle. Then draw a vertical line through the center that intersects the horizontal line. Later you will use these lines as guides to draw the facial features of the character.
- If you want to make a character that has a wide face, then slightly widen the bottom of the oval so that it is only slightly narrower than the top. And if you want the character to have a slim face, then make the bottom of the oval much narrower than the top. Anime characters don't use just one head shape so you are free to experiment with as much as you like.
2. Draw the eye under the horizontal line.
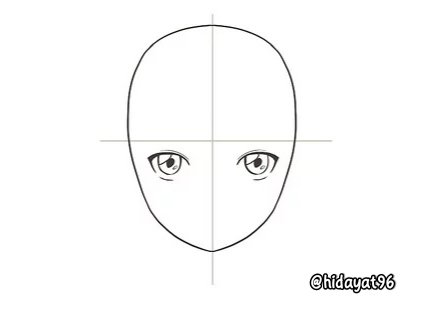
The eyes of anime characters are large and exaggerated, and usually take up between 1/4 and 1/5 of the face height. To draw this anime eye, start by drawing thick upper eyelashes just below the drawn horizontal line, and on one side of the vertical line. Then draw a semi-circle that goes down from the top lash, and make a black pupil in the center. Next draw a horizontal line under the semi-circle as the lower lashes. Finally, shadow in the surroundings around the pupil, and leave some space so that it looks like it's reflecting light. Then do the same on the other side of the vertical line to create the second eye.
Tips: Adjust the shape and size of the eyes depending on whether you are depicting a masculine or feminine anime character. For a feminine character, make the eyes taller and rounder, and apply some thick eyelashes at the top of the eyes.
3. Make eyebrows above the horizontal line.
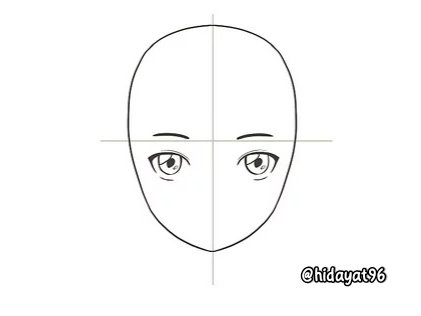
Draw a long, descending curved line for each eyebrow. My advice, make it slightly longer than the upper lash line you drew for the eye. Then thicken the tip of the eyebrow in the middle of the face.
- If you are drawing a feminine anime character, make the eyebrows quite thin. However, for masculine characters, thicken the eyebrows so that they are more conspicuous on the face.
4. Add the nose between the horizontal line and the chin.
The nose on the anime character is quite faint and is only visible when we look at the character from the side. To draw an anime character's nose, I recommend drawing a short, simple vertical line along the center of the face at the midpoint between the horizontal line and the chin. Then make the line longer if you want the character's nose to appear bigger.
Make the nose the smallest feature on the character's face.
The nose will overlap the vertical line you drew. To see it more clearly, make it darker than the vertical line, or erase the vertical line around the nose.
Masculine anime characters sometimes have noses that look more conspicuous, but that's not always the case. If you want the character's nose to be clearly visible, then draw a horizontal line under the vertical line as the bottom of the character's nose. Also, make a triangular shadow next to the nose so it looks like the light is coming from the side of the character.
For certain anime styles, for example chibi, you don't even need to draw a nose.
5. Draw a mouth about halfway between the Nose and Chin.
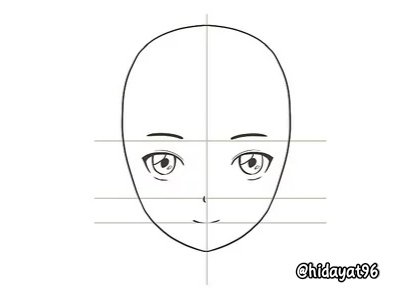
Similar to the nose, the mouth of the anime character is usually simple and vague. To draw a mouth, make a horizontal line that is more or less the same as the eye. You don't need to make a lips, and make the mouth as the second smallest feature on the face of anime characters after the nose.
Lump up the mouthline if you want the character to smile, or down if you want the character to look disappointed.
If you want the character to smile and show teeth, then draw an upward curved line below the horizontal line created as the mouth. The white space between the curved line and the horizontal line should be half the length of the mouth. This space will become your anime character's gear.
6. Add ears to the side of the head.

If you want your character to have hair covering their ears, then skip this step. But if the character is going to have short hair, then draw narrow ovals on each side of his head. Make the tops of the ears parallel to the horizontal line through the center of the face and the bottoms in line with the bottom of the nose. After that make ear holes inside each oval.
- Experiment with the size of the character's ears if you want to make them bigger or smaller.
7. Draw the hair on your anime character's head.
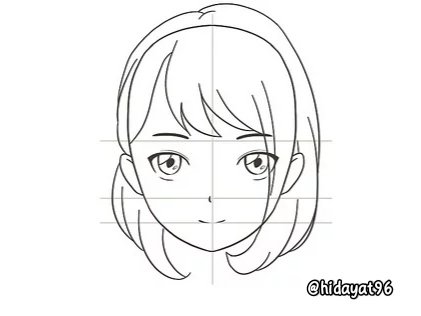
The hairstyle you choose depends on your taste, but anime hair usually has pointed ends and clear sections. You can also draw short, medium, cropped, or long wavy hair styles. Whatever hairstyle you choose, don't draw every strand of hair. Instead, create large sections of hair, such as 4-6 sections that taper at the ends.
If the anime character has long hair, then draw 2 coda. Each on each side of the head with a pointed tip. You can also draw her hair pulled into a bun on top. In addition you can also describe the bangs by making 3-4 sections of hair that come down from the forehead of your anima character.
For a shorter hairstyle, you can draw 3-4 sections of clear hair that are sideways on the character's forehead. Then you can also make the anime character's hairstyle without bangs and draw some lines from his hairline to the back of his head so that it looks like it is combed back. But if you don't like it, you can also describe the bob hairstyle to the chin which is divided into several thick sections.
8. Erase the horizontal and vertical guide lines that you drew.
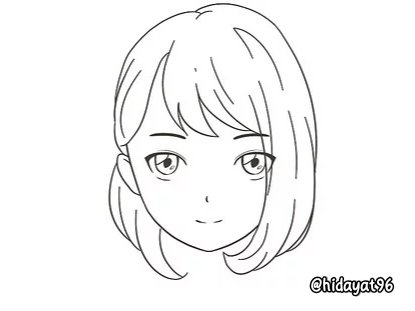
- Delete it carefully, so you don't make a mistake. Then once you delete the two lines, the head and face of the character are done.
That's all I can share on this occasion. However, if there are words that are less pleasing, please forgive me. In this community I also need advice from great people like @papi.mati and @milakz so that in the future I can post and contribute well. I also thank @papi.mati for accepting me and providing input and also many things about this Steemskillshare community. See you again in my next post, friends...
My greetings and respects to the admin of the community and also to the moderators:
@milakz
@daytona475
@papi.mati
@ftz
@abu78
@jenesa
About me

@milakz
@daytona475
@papi.mati
@ftz
@abu78
@jenesa
About me
Thanks for sharing this educative information here
Hi @hidayat96, see what I got below:
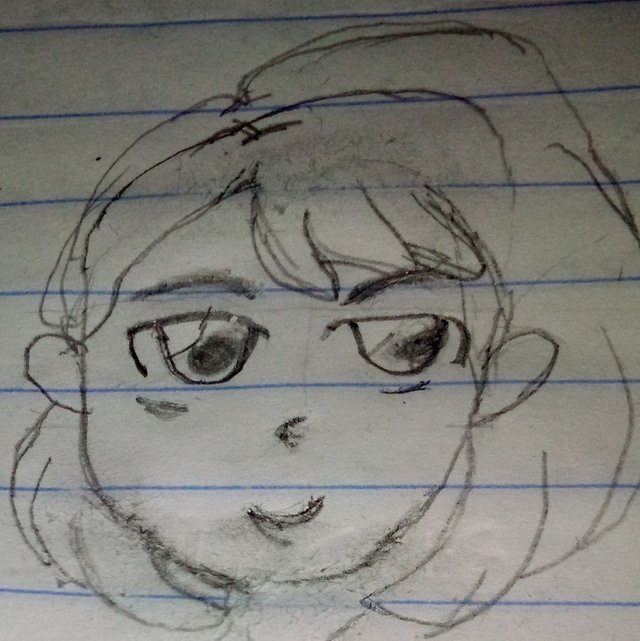
Will keep practicing. You may as well expect a better one.