Building A Content Management System Using The MEAN Stack - 9 (Front-End Development)
Repository
https://github.com/nodejs/node
What Will I Learn
The codebase for this tutorial is based on MEANie an open source content management system by Jason Watmore.
This is the ninth in the series of tutorials on building a content management system using the MEAN technology.
In the last tutorial we created the index.html file, the application states and the partials files for the blog front end.
In this tutorial we will start work on the home and posts view for the blog section of the CMS.
For the home view we will be infusing the posts list and other lists we created in the partials section.
We will also work on the post details, tag list and month list view. The last two we already started work on them in the last tutorial.
N.B;- LINK TO THE EARLIER TUTORIALS IN THIS SERIES CAN BE FOUND AT THE END OF THIS POST
Requirements
- NodeJS and NPM,
- Angular
- MongoDB
- Code Editor
Difficulty
- Intermediate
Tutorial Contents
Home view
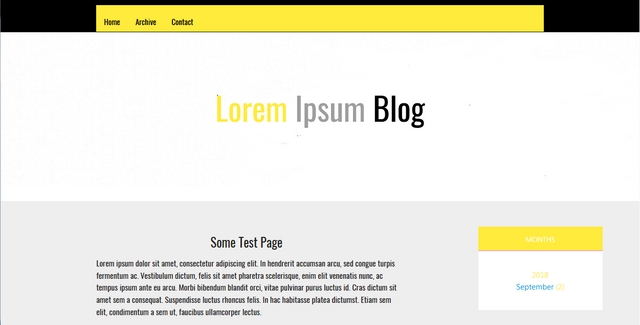
In order to display the full post list on the blog home page we first of all need to add a view for that.
In the blog folder go on and create a new directory home and in the directory add the file index.view.html in it.
Below is the code in the index.view.html file
<%- include('../_partials/post-list.html') %>
What the line above does is to simply include the post list layout added in the _partials directory in the front page of the blog.
We worked on _partials in the last tutorial before this one.
After saving the file and reloading the frontpage at http://localhost:3000/ we'll have the following display
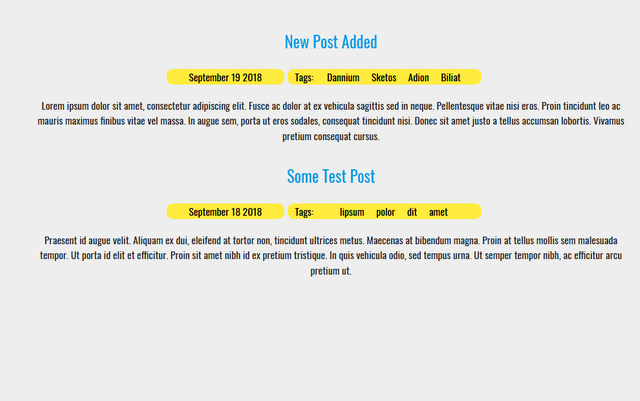
Posts
In this section we will create the views for all post features on the blog.
In the blog directory create another directory posts where we will add all the code.
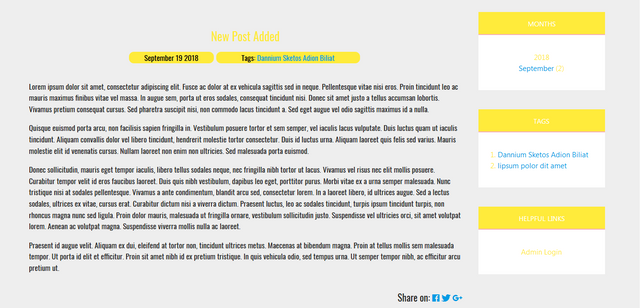
Post Details
Click on the post title of any post on the home page would open up the full post for the reader to view.
We need to create a layout for the page where this full post will be displayed, we will refer to the page as post details page.
Here we will create a layout for the post details page.
In the posts directory add a new file details.view.html
<div  class="row post-area">
    <div  class="col l12 m12 center center-align">
        <h5  class="center-align yellow-text post-details-title post-title-area"><%= locals.post.title %></h5>
    </div>
    <div  class="post-metadata">
        <div  class="col l3 m3 post-publishdate yellow black-text center-align">
            <%= locals.post.publishDateFormatted %>
        </div>
        <div  class="col l8 m8 yellow black-text center-align post-tag-slug">
            <% if(locals.postTags && locals.postTags.length) { %>
                <span>
                    Tags:
                    <%- locals.postTags.map(function(tag) { return '<a  href="/posts/tag/' + tag.slug + '">' + tag.text + '</a>'; }).join(', ') %>
                </span>
            <% } %>
        </div>
    </div>
    <div  class="col l12 m12 post-summary-area">
        <div  ng-non-bindable><%- locals.post.body %></div>
    </div>
    <div  class="col l12 m12 share-post-area">
        <p  class="right">
            <span>Share on: </span>
            <a  href="http://facebook.com/sharer.php?u=<%= locals.url %>"  target="_blank"><i  class="icon ion-logo-facebook"></i></a>
            <a  href="http://twitter.com/intent/tweet?url=<%= locals.url %>&text=<%= locals.post.title %>"  target="_blank"><i  class="icon ion-logo-twitter"></i></a>
            <a  href="https://plus.google.com/share?url=<%= locals.url %>"  target="_blank"><i  class="icon ion-logo-googleplus"></i></a>
        </p>
    </div>
</div>
All the code for the post details view in enclosed in the element <div class="row post-area"></div>.
In the first column on the row we have the post title which is contained in a <h5></h5> header tag and is outputted using the ejs directive <%= locals.post.title %>
We have another column where we output the publish date for each post using the directive <%= locals.post.publishDateFormatted %>.
The next column output the post tags using the code
<% if(locals.postTags && locals.postTags.length) { %>
    <span>
        Tags:
        <%- locals.postTags.map(function(tag) { return '<a  href="/posts/tag/' + tag.slug + '">' + tag.text + '</a>'; }).join(', ') %>
    </span>
<% } %>
The code above checks if an array of post tag exists, if it does exist and the length of the array is not equal to zero the map() method is called on the function.
The function returns a link for each tag in the link of tags that leads to view displaying all the posts associated with the tag.
The next column will contain the post body displayed using the directive <%- locals.post.body %>.
Here's a snapshot of the post details view below
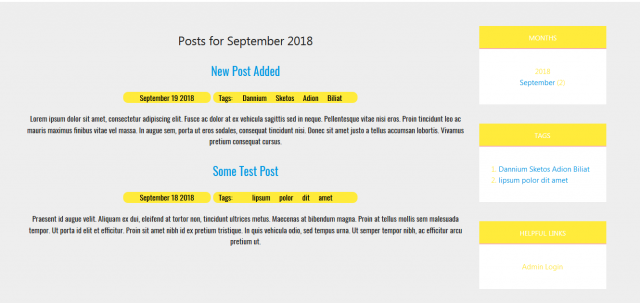
Month View
In the month view we will output posts based on the months they were created.
To create the month view add a new file in the posts directory as moth.view.html.
In the file paste the following code
<div  class="container">
    <h5  class="center-align">Posts for <%= locals.monthName %> <%= locals.year %></h5>
</div>
<%- include('../_partials/post-list.html') %>
In this file we set the header with a <h5></h5> header.
The month and year is derived through the directive <%= locals.monthName %> and <%= locals.year %> respectively.
In here we include the posts by month list with the line <%- include('../_partials/post-list.html') %>.
Here's a screenshot of posts filtered by month view
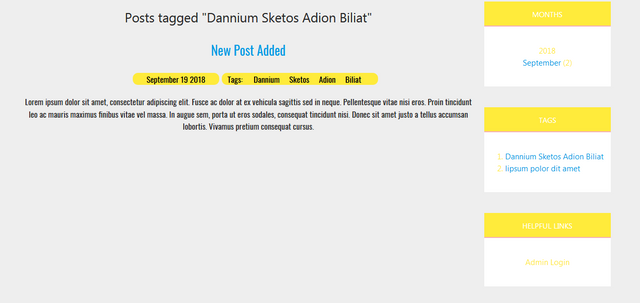
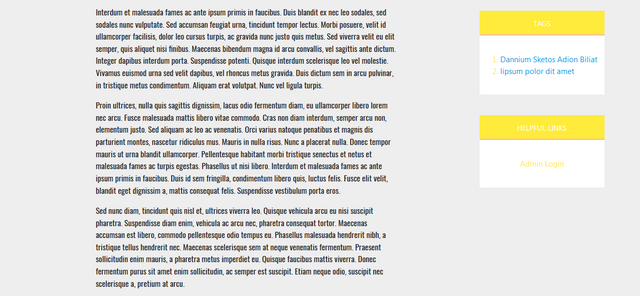
Tag View
So we are creating a view where posts will be displayed based on the tags associated with them.
In the posts directory create a new file tag.view.html and in the file paste the code
<div  class="container">
    <h5  class="center-align">Posts tagged "<%= locals.tag %>"</h5>
</div>
<%- include('../_partials/post-list.html') %>
Just like in the month view we wrapped the header around a <h5></h5> header tag and derive the header text dynamically from <%= locals.tag %>.
We then get the list of post associated with the requested tag using <%- include('../_partials/post-list.html') %>.
The screenshot for post filtered by tag list.
Pages
For all the pages created in the admin section we would need to create a view to display the page details.
To carry out the above create a directory pages in the blog directory and add the file details.view.html
In the file add the following code
<div  class="post-area">
    <div  class="container">
        <h5  class="center-align"><%= locals.page.title %></h5>
        <div  ng-non-bindable><%- locals.page.body %></div>
    </div>
</div>
In the page details view we have the page title outputted through the directive <%= locals.page.title %> while the page content is outputted through the <%- locals.page.body %> directive.
You can locate each page in the application by using the url format below
localhost:3000/page/page-slug
page-slug should be replaced with the slug set when creating the pages in the admin area
Here's a screenshot of the page view
In the next tutorial we will create a view for the contact and archive view of the application.
Curriculum
Building A Content Management System Using The MEAN Stack - 2(Create Controller Modules 1)
Building A Content Management System Using The MEAN Stack - 3 (Create Controller Modules 2)
Building A Content Management System Using The MEAN Stack - 4 (Create Services Modules)
Building A Content Management System Using The MEAN Stack - 5 (Front-End Development)
Building A Content Management System Using The MEAN Stack - 6 (Front-End Development)
Building A Content Management System Using The MEAN Stack - 7 (Front-End Development)
Building A Content Management System Using The MEAN Stack - 8 (Front-End Development)
Hey, @gotgame!
Thanks for contributing on Utopian.
We’re already looking forward to your next contribution!
Get higher incentives and support Utopian.io!
Simply set @utopian.pay as a 5% (or higher) payout beneficiary on your contribution post (via SteemPlus or Steeditor).
Want to chat? Join us on Discord https://discord.gg/h52nFrV.
Vote for Utopian Witness!
Hi @gotgame!
Your post was upvoted by @steem-ua, new Steem dApp, using UserAuthority for algorithmic post curation!
Your post is eligible for our upvote, thanks to our collaboration with @utopian-io!
Feel free to join our @steem-ua Discord server
Hello! Your post has been resteemed and upvoted by @ilovecoding because we love coding! Keep up good work! Consider upvoting this comment to support the @ilovecoding and increase your future rewards! ^_^ Steem On!

Reply !stop to disable the comment. Thanks!