How To Make a Tiny World

Howdy! For those of you interested in creating a tiny world of your own, I decided to share the recipe.
Techy Recipe:
You will need:
- 1 camera
- 1 wide or ultra-wide lens
- 1 tripod
- 2 scoops patience
- 1-3 hours to taste
Preparation Time:
Usually 1-3 hours
Instructions: Shooting
Combine camera, lens, and tripod and set in an interesting area, preferably wit grass below and sky above. Overhanging trees will add significant bitterness in post-production. You need to create a panoramic view, so take photos in a 360º sweep, being sure to overlap them quite a bit. At 24mm, I would suggest at least 16 photos. You'll actually need a little extra wiggle room at the ends, so sweep about 400º. Wider angles are better, as you get more sky and ground in the frame.

Instructions: Stitching
In a powerful computer, combine the images using Adobe Photoshop's PhotoMerge: Panorama. Other programs may work.
- Use automatic (or cylindrical) setting
- Let stand for several minutes, until fully merged
- Your finished panorama should have overlap at both ends
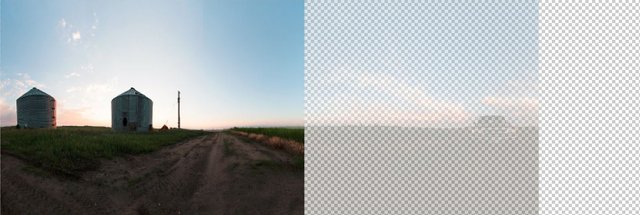
To create a seamless panorama, it's important to make sure the ends meet up correctly. An easy way to do this is as follows:
- select half of the image, cut, and paste (Photoshop will automatically create a new layer for it.)
- Do the same with the other half of the panorama.
- Place the halves on the opposite side of each other
- Set the top layer to 50% transparency, so you can see through it
- Zoom in on a feature that exists in both ends and match them up
- If necessary, use the eraser tool with a strong feathering to blend the two ends.
If you look closely, you will see that it didn't match up well. My tripod got bumped. Don't let your tripod get bumped!
TIP: You can also fill the background (checkered, here) layer in with a solid color. I use hot pink, because it's easy to see where you need to crop.
When everything's lined up and well blended, re-crop the image. Be sure to inspect the ends closely. Make sure to crop the top and bottom, so that there aren't any white/transparent bits showing. It should look something like this:
I checked the "correct for perspective" option in PhotoMerge, and this was the result. It still works.
Flip!
Rotate your panorama 180º, and it's time to see if it came out well-done. Click Filters-Distort-Polar Coordinates, and select "rectangular to polar coordinates."
It looks messed up, right? Click Image, Resize, and Image Size. Uncheck "constrain proportions." You need to create a square image. I usually type 3072 x 3072 pixels.

As with any freshly created good, you may need to do some tidying up. The center of your tiny world may look strange. Try grafting something there and doing some creative blending.
Share:
Serves 4. (Not really)
Thank you for taking a look! If you enjoy my work, please click the upvote button. Comments are also greatly appreciated.
Additional Tips
- When shooting, try tofind a place where the sky at the top of the frame and the ground at the bottom remain fairly consistent through the 360º sweep. This will yield b etter results.
- Before applying the polar coordinates filter, you may wish to work the top of the image, so that the color is consistent. The Offset filter (under "other" in the filter menu) is useful, when you get to the "edges."
- Whether you crop rectangularly before or after chopping and alligning the images shouldn't matter, but I've found it easier to crop a rectangle first. Photoshop's edge snapping works to your advantage, this way.
@fotosdenada


Hi fotosdenada you made a nice tutorial this time, I never thought about doing that but now I had something new to check out, thanks.
mit sonnigen Grüßen aus Andalusien
Don Thomas
Thanks! It's a lot of work, but fun and the results are interesting.
Ojalá pudiera volver a Andalucía...
Yeah that´s what I guess, an if so and you find a way to come back to Andalusia let me know I would be glad to see you here.

And by the way good luck for your coming interviews ;)
with sunny greetings from Andalusia
Don Thomas
Thanks :)
Wow, thanks again for the tutorial...I was wondering how you did that :)
Hey, there is a portrait contest going on that I thought you would do well with...just saying :)
Thanks! I may be out of commission for awhile, though. A hinge on my laptop screen seized up and my attempt at repairs did not go as hoped... I spent most of the day on it and the last-ditch effort (epoxy to hold the screw plate where it tore) will likely be insufficient.
On the bright side, I have a couple promising interviews coming up!
cool tutorial I will have to try this sometime
It's fun, though a bit time-consuming.
@fotosdenada Yeah it does seem a lot of work but the end result can be awesome
That's so neat! I'd love to be able to do this. My computer barely handles running photoshop sadly. I would have never known you could do something so neat though if you hadn't shared this. Thanks!
Thanks! Yeah, it's a fun way to produce an image. I still prefer honest, un-photoshopped photos, but it's fun to do something a bit different from time to time.
https://steemit.com/news/@bible.com/6h36cq
nice panoramic photo technique.
Thank you for your sharing.