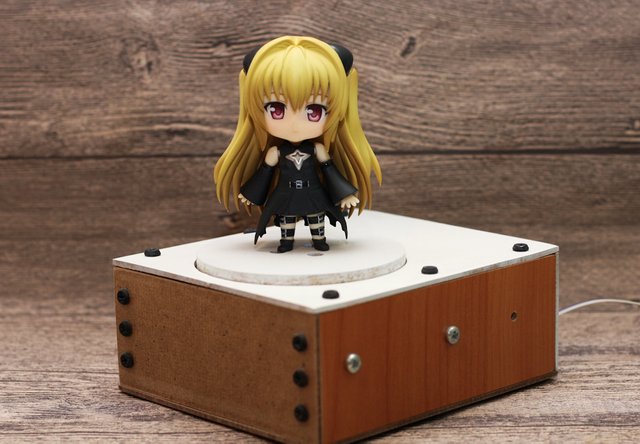
Turntable made out of an old HDD
Repository
https://github.com/beetlevc/turntable
Introduction
Modern hard drives is a miracle of technology. Many of you probably have already tried disassembling old hard drives before. It's common knowledge that you can get a pair of powerful neodymium magnets out of an old hard drive, but everything else usually goes straight to trash. Today I'll show you how to make better use of your old trusty hard drive, so it could serve you longer. I'll show you how to transform a broken HDD into a turntable used in 3D scanning applications. Let's get started!
Preparing HDD
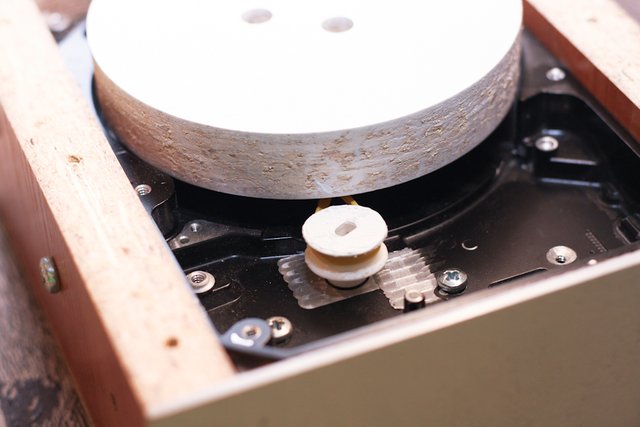
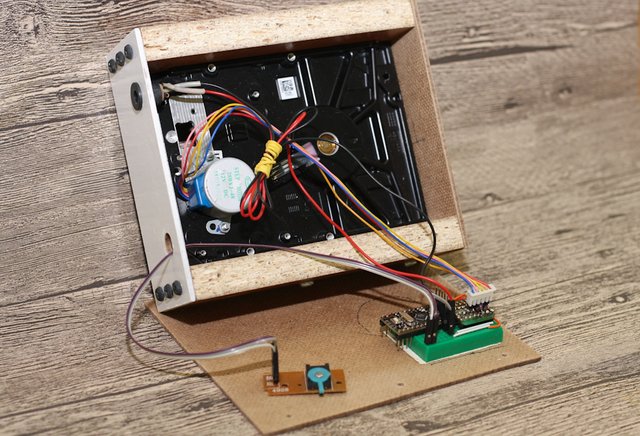
The hard drive is an ideal candidate for our task. It has an incredibly precise spindle with literally zero play, which is essential for smooth non-wobbly operation. The spindle is firmly secured in an aluminum casing, which is also a good thing. Unfortunately, HDD motor is not designed for low-speed or step-by-step operation, so we'll have to install another motor. A cheap 28BYJ-48 stepper motor will do. Every hard disk model is a bit different, so I cannot give you exact instructions here. Simply look at your HDD and find some place where you could drill holes to install stepper motor.
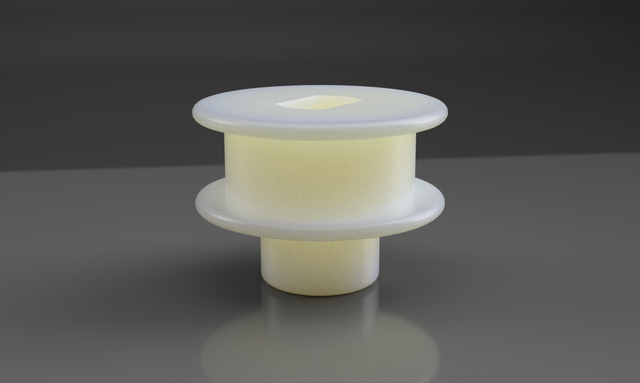
We will also need to transfer torque to HDD spindle somehow. The easiest way to do that is to use a 3D-printed pulley and some rubber bands. See project repository for a printable 3D model of the pulley.
The end result should look like this:
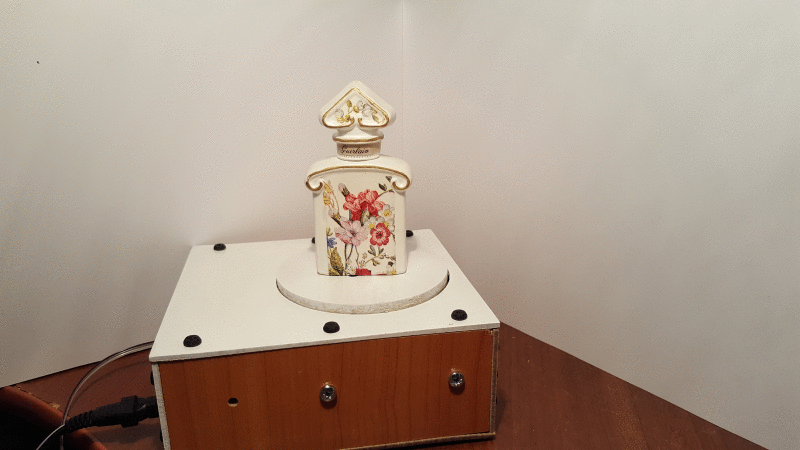
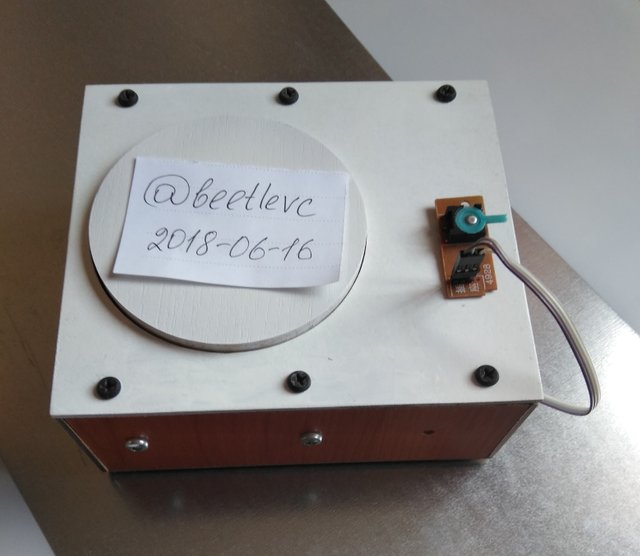
Enclosure
For this project, I made an enclosure out of 1/8" MDF and 16mm thick laminated particle board. It came out robust and heavy. On the back side, I left holes for standard 5.5mm power jack and for the controller cable. I used my CNC router to make the enclosure, but it can be cut with hand tools just as well.
See project repository for a complete CAD model of the enclosure:
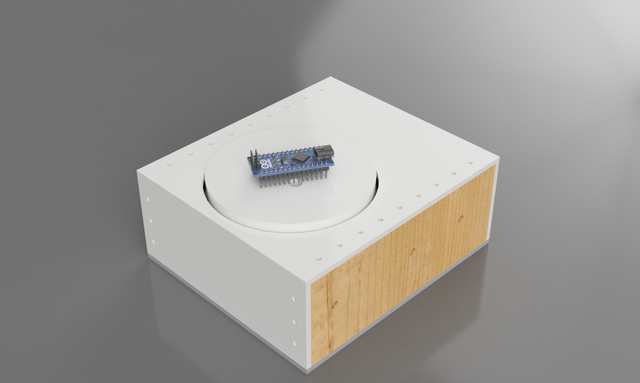
Electronics
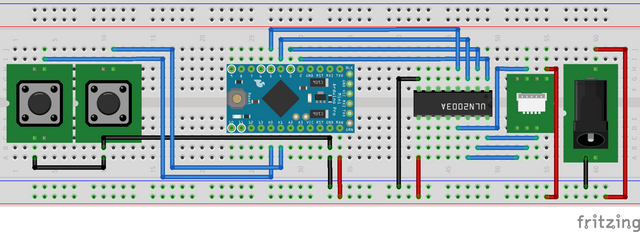
Unlike simple DC motors, stepper motors need control circuit to function. I used Arduino Pro Mini along with ULN2003 IC to drive my stepper motor, but any other 5V Arduino board (like Uno, Nano, or Mega) will do. You can use a bare ULN2003 IC or buy a premade stepper motor driver with this IC, they are widely available and dirt cheap.
I also installed buttons to control spindle rotation. The behavior of those buttons can be defined in Arduino sketch. For example, one button can be used to turn spindle a fixed angle clockwise, and the other one can be used to turn the spindle counterclockwise.
See wiring diagram:
Programming
First, install Arduino IDE if you don't have it. Then install AccelStepper and Bounce2 Arduino libraries you'll need to compile the sketch. AccelStepper library is used to control the stepper motor. Bounce2 library helps to debounce button inputs. With these two libraries installed you can now compile and upload the sketch.
The sketch itself is pretty basic, I think it is self-explanatory.
// Include the AccelStepper library found here :
// https://github.com/waspinator/AccelStepper
#include <AccelStepper.h>
// Include the Bounce2 library found here :
// https://github.com/thomasfredericks/Bounce2
#include <Bounce2.h>

#define HALFSTEP 8

// Motor pin definitions
#define motorPin1  2     // IN1 on the ULN2003
#define motorPin2  3     // IN2 on the ULN2003
#define motorPin3  4     // IN3 on the ULN2003
#define motorPin4  5     // IN4 on the ULN2003
#define BUTTON_PIN_1 A0  // Step CW
#define BUTTON_PIN_2 A1  // Step CCW

// Initialize with pin sequence IN1-IN3-IN2-IN4 for using the AccelStepper with 28BYJ-48
AccelStepper stepper1(HALFSTEP, motorPin1, motorPin3, motorPin2, motorPin4);

double stepsPerDegree = 4078.0 * 2.0 / 360.0;

Bounce debouncer1 = Bounce();
Bounce debouncer2 = Bounce();

double deltaAngle = 5.0;
double currentAngle = 0.0;

void setup() {
  stepper1.setMaxSpeed(1000.0);
  stepper1.setAcceleration(100.0);
  stepper1.setSpeed(200);

  // Setup the first button with an internal pull-up :
  pinMode(BUTTON_PIN_1,INPUT_PULLUP);
  // After setting up the button, setup the Bounce instance :
  debouncer1.attach(BUTTON_PIN_1);
  debouncer1.interval(50); // interval in ms

   // Setup the second button with an internal pull-up :
  pinMode(BUTTON_PIN_2,INPUT_PULLUP);
  // After setting up the button, setup the Bounce instance :
  debouncer2.attach(BUTTON_PIN_2);
  debouncer2.interval(50); // interval in ms
}

void loop() {
  // Update the Bounce instances :
  debouncer1.update();
  debouncer2.update();

  if ( debouncer1.fell() ) {
    currentAngle -= deltaAngle;
  }
  if ( debouncer2.fell() ) {
    currentAngle += deltaAngle;
  }
  stepper1.moveTo(currentAngle * stepsPerDegree);

  stepper1.run();
}
To do...
There are a few things I'd like to add to this project in future
- Shutter release integration
- Additional motors to control camera position and angle
- Lasers :)
How to contribute?
Do you have a question or suggestion for this project?
Feel free to contact me on Discord or Github! Or simply leave a comment.
Resources
AccelStepper Arduino library: https://github.com/waspinator/AccelStepper
Bounce2 Arduino library: https://github.com/thomasfredericks/Bounce2
28BYJ-48 stepper motor specification and description: http://www.instructables.com/id/BYJ48-Stepper-Motor/
Arduino Pro Mini specification and description: https://store.arduino.cc/usa/arduino-pro-mini
Arduino IDE: https://www.arduino.cc/en/main/software
Arduino library installation guide: https://www.arduino.cc/en/guide/libraries
Join our Discord Channel to connect with us and nominate your own or somebody else's posts in our review channel.
Help us to reward you for making it ! Join our voting trail or delegate steem power to the community account.
Your post is also presented on the community website www.steemmakers.com where you can find other selected content.
If you like our work, please consider upvoting this comment to support the growth of our community. Thank you.
marvelous work with details and well organise one. The hard disc preparation was well elaborated
Thank you, @oppongk! I'm glad that you liked my work. And thanks for the repost!
What a project! I used to work in a computer shop in highschool and all I can remember in HDD magnets being stuck to EVERYTHING! I also had never heard of thingiverse before I saw your profile... I thing I'm about to say goodbye to a lot of my spare time!
Thanks, @lifeofryan! I'm glad you liked it.
This is awesome! I bet you'd get some big offers If you put it up for sale. Impressive job.
You have a good workmanship!!
Thanks!
Congratulations @beetlevc! You have completed some achievement on Steemit and have been rewarded with new badge(s) :
Click on the badge to view your Board of Honor.
If you no longer want to receive notifications, reply to this comment with the word
STOPTo support your work, I also upvoted your post!
Do not miss the last post from @steemitboard!
Participate in the SteemitBoard World Cup Contest!
Collect World Cup badges and win free SBD
Support the Gold Sponsors of the contest: @good-karma and @lukestokes
Super
Thank you!
Thank you for the contribution. I think I might help you improve the contribution quality with some suggestions.
First, quality of blog posts mostly depends on language, volume and editorial content of the submission. Considering that, I can say that you need to increase the volume of your submissions and editorial part of your content, so the language balance between blog and tutorial approach will be better.
If you plan to prepare more DIY contributions in the blog category, you should consider changing your focus slightly, because the content we score in the category is not the result of your work, instead it's the text and its presentation in the submission.
And personally, the project made me laugh at first, especially because of the image in the beginning. Respect for your creativity and ability.
Thank you again, hoping to see better contributions from you.
Your contribution has been evaluated according to Utopian policies and guidelines, as well as a predefined set of questions pertaining to the category.
To view those questions and the relevant answers related to your post, click here.
Need help? Write a ticket on https://support.utopian.io/.
Chat with us on Discord.
[utopian-moderator]
Thank you, @roj. I will try to do better next time.
Классная игрушка, у меня 2 жестких диска валяются без дела
@rucoin, Спасибо! Ну да, я из таких же соображений - валяется хорошая вещь без дела, нужно к делу пристроить... Но вообще, HDD действительно хорошо подходит для такой задачи. Там подшипники в шпинделе совершенно недостижимого для самоделки качества - ход ровный и гладкий, никакой болтанки даже на долю миллиметра :)
Good!