Minimal Vultr(and other) 1GB VPS ~ Optimal ZEN Secure Node Guide - Custom ISO install
A foundation for optimal ZEN Secure Node & shielded transaction challenge computation.
This should also work for any other VPS provider who allows one to upload a custom ISO and install it via VNC console. It is also useful in general as a foundation for other server applications
By the end of this guide you should have an ultra-lightweight & fast Debian system consuming as little as 23MB RAM at boot time and just 3-5 processes. It is an optimal foundation to build your system up from.
Please Note ...
From this setup, I am getting steady secnodetracker challenge times on average of 3:31.
If you are exceeding 5:00 after this minimal setup, please repeat some of the steps at the bottom of this page such as reinstalling sysvinit-core and removing systemd* (some future packages may have installed systemd along with them, some packages will install it even though it is not an explicit dependancy)
Also, after installing packages and compiling software you may consider clearing the cache as follows:
- Terminate
zendandsecnodetracker(as regular user) swapoff -a(as root)sync && echo 3 > /proc/sys/vm/drop_caches(as root)swapon -a(as root)- Restart
zendandsecnodetracker(as regular user)
If you are still exceeding 5:00 challenge times after this guide, it may be congestion in your particular Vultr datacenter -- consider choosing a different VPS location and testing the difference.
Installation
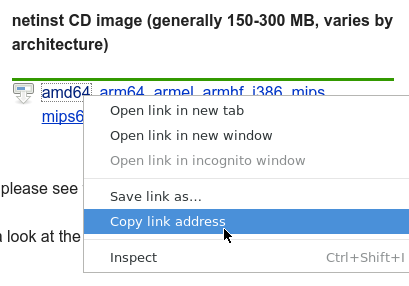
First, right click and copy the link to the Debian Net Install ISO. The ISO can be found at the bottom of the Debian netinst download page https://www.debian.org/CD/netinst/
Create a new server at Vultr (https://www.vultr.com/)
When prompted for "Server Type" choose "Upload ISO"
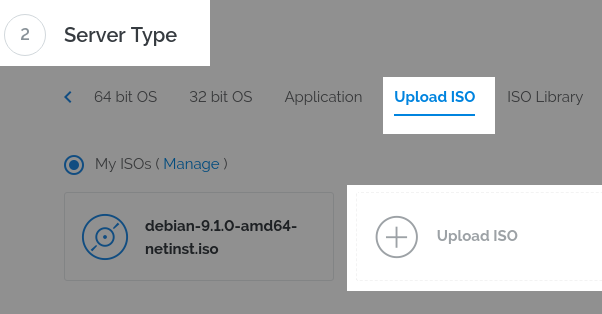
Paste the Debian Net Install ISO link
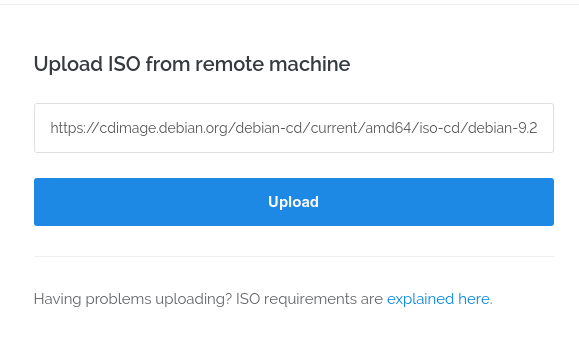
wait a moment for it to upload. You may need to refresh the page to check.
Make sure the ISO is selected when creating the server

Finish creating the server how you want it.(Choose as little as 1CPU 1024MB Server Size)
When the server is ready, open the secure VNC console by clicking the console icon at the top of the Overview page.
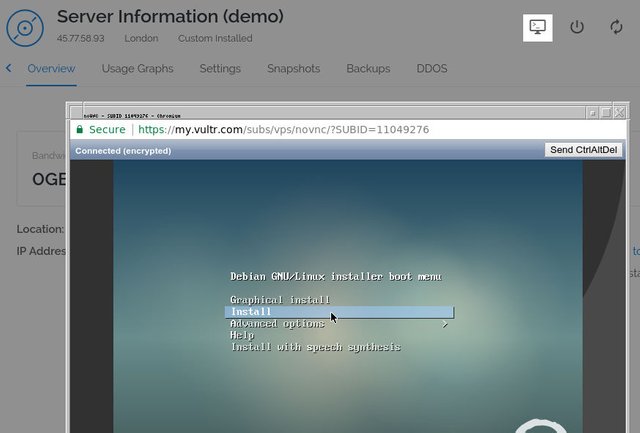
Choose the "Install" option and press enter
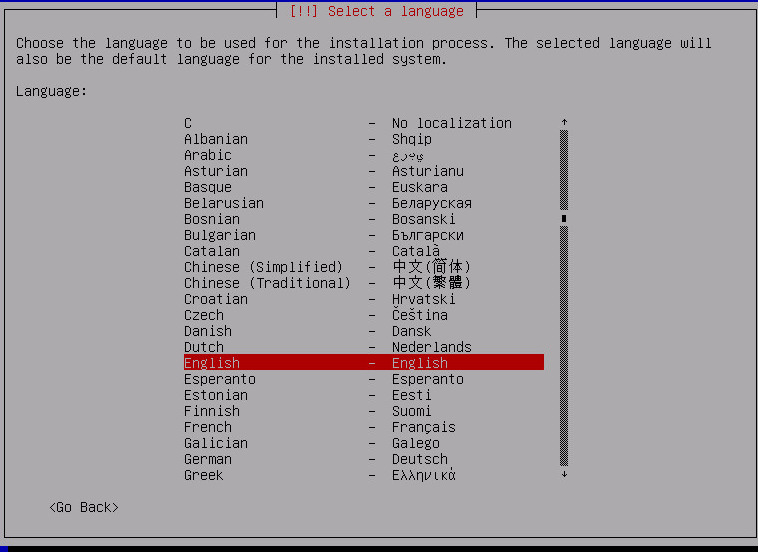
Choose your language and follow the setup steps to configure your hostname and domain (can be anything), root password, and regular user account
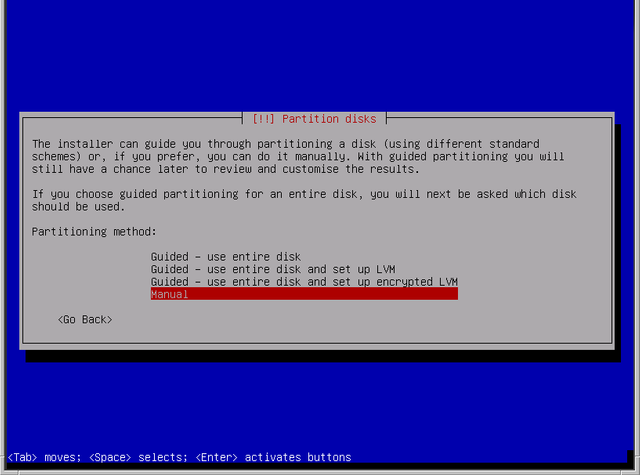
Choose Manual Partitioning
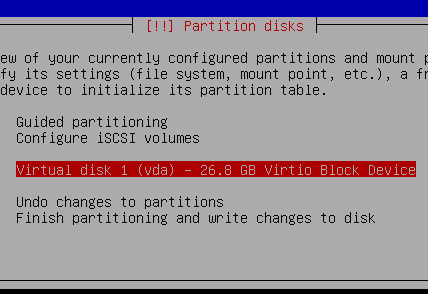
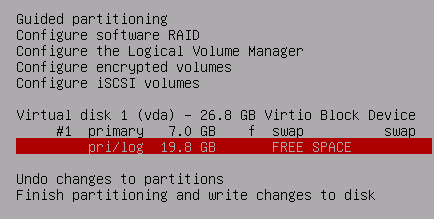
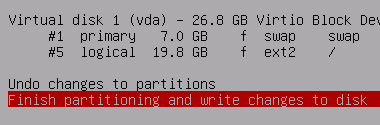
Select Virtual Disk 1 and press enter to create a new partition table
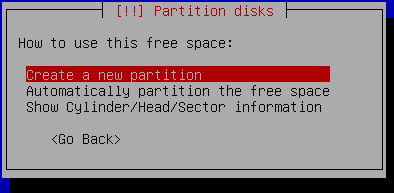
Now select the FREE SPACE and press enter
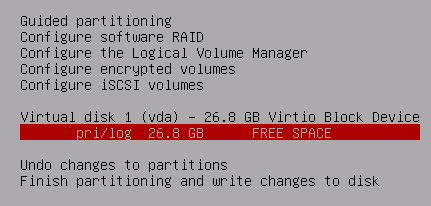
Create a new primary partition
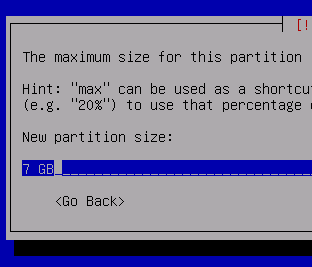
Allocate 7GB for SWAP
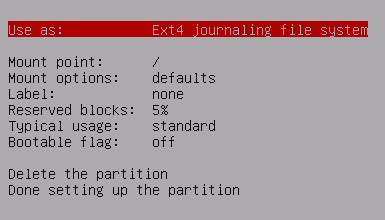
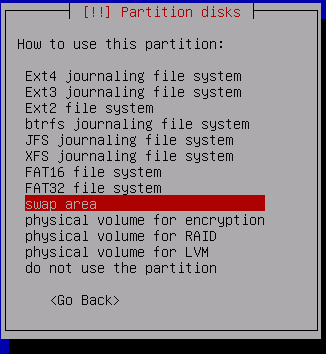
Highlight "Use as:" and press enter
Choose "swap area" and press enter
Now select the remaining FREE SPACE and press enter
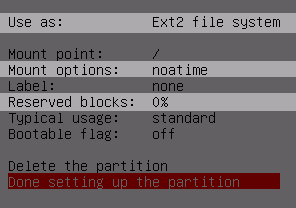
Make the filesystem EXT2, EXT3 or EXT4
as the disk is small, for faster disk performance in many cases choose EXT2 (no journal), for better recovery after crashes choose EXT3 or EXT4 (journal)
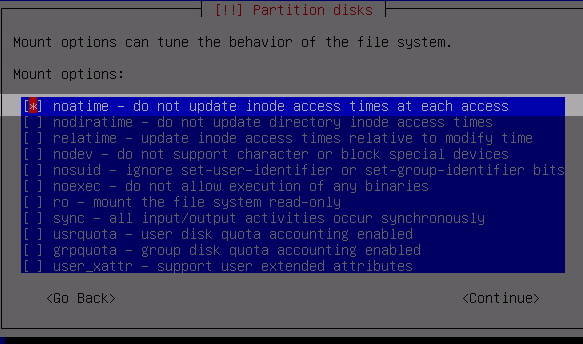
Be sure to choose Mount option noatime to improve disk performance.
(it also implies nodiratime, so we don't need to select both)
Set Reserved blocks to 0% or 1% so we can use the whole disk, as it is not a large disk.
Note: If the disk fills up, a 0% option may cause inoperability, be sure to monitor and administer the server -- some log files may grow large for example
Write the changes to disk and proceed with the installation
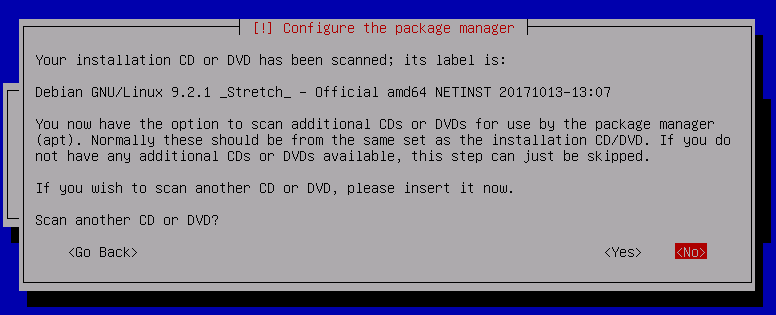
Select no here
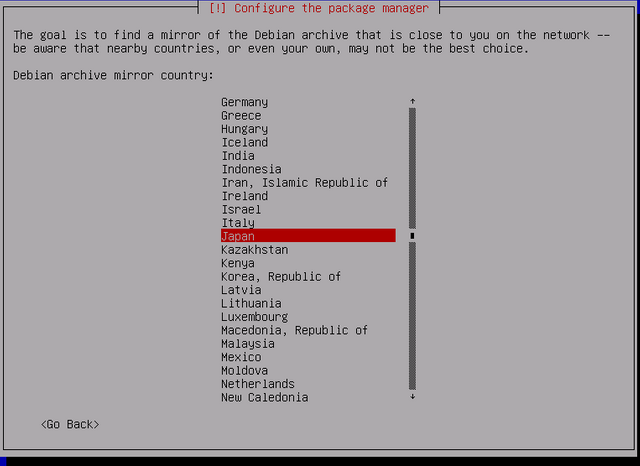
Choose the mirror according to where your Vultr VPS is located (i.e: Japan for Tokyo server)
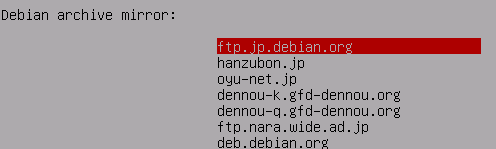
On the next screen, choose the first option (choices will differ depending on region)
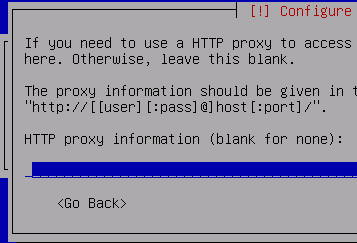
Leave this blank (unless you want to configure a proxy)
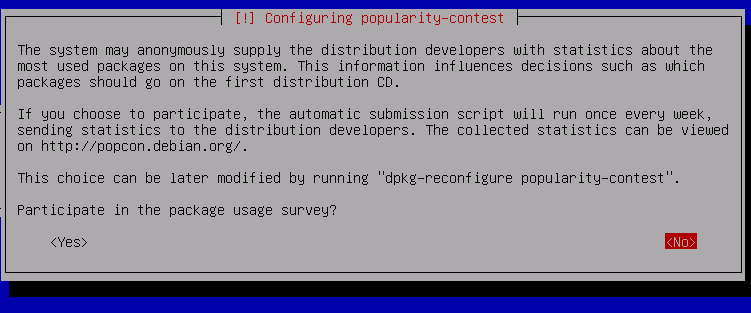
Don't participate in the package use survey
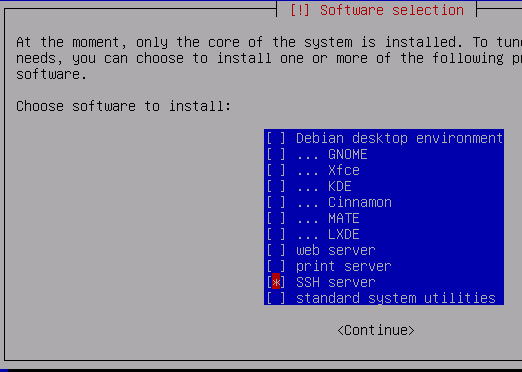
Use spacebar to uncheck ALL options except SSH server (even uncheck standard system utilities)
All we need is SSH server to login to the VPS
Yes, install GRUB to the MBR
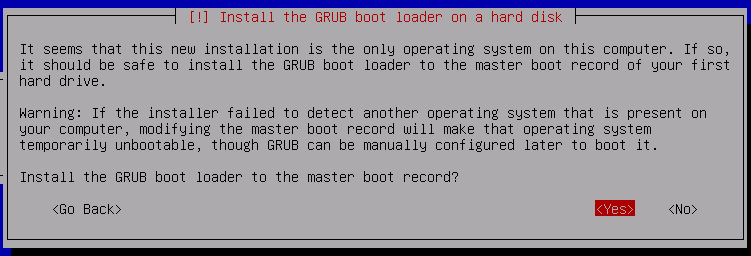
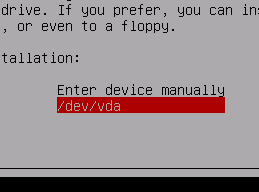
Select /dev/vda
The installation should now finish!
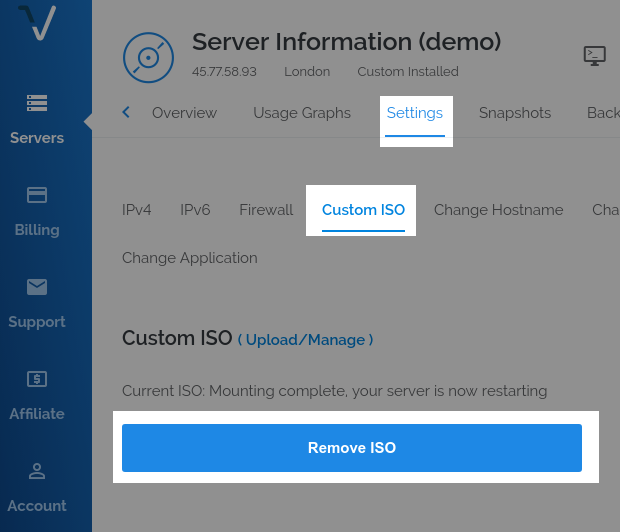
After the Installation finishes, navigate to your Vultr server Settings and Remove the ISO
Navigate to IPv4 Settings in Vultr and click networking configuration
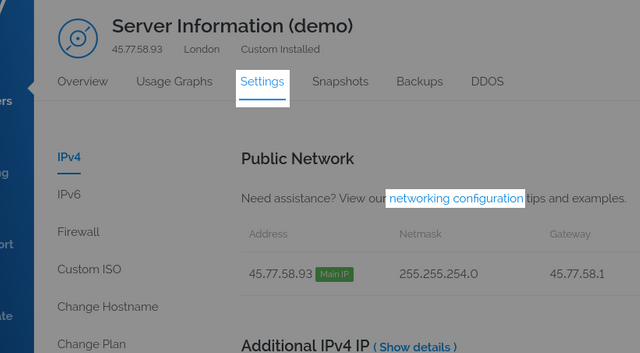
Scroll down to the Debian 9 settings
Now use SSH to login to your Vultr server from a terminal.
ssh [username]@[VultrAddress]
(if the ISO was left in after installation, it may need a reboot -- check the Vultr VNC console you was using during the installation)
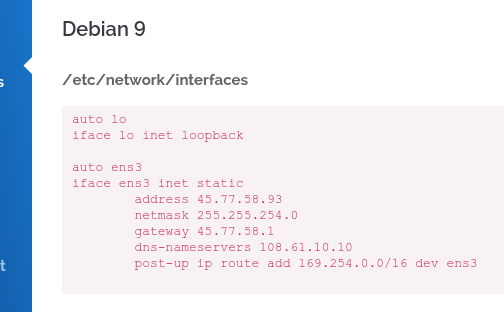
invoke the command su to become root (# symbol indicates the command should be invoked as root), then edit the network config:
# nano /etc/network/interfaces
replace the config with the Vultr static IP config. Press ctrl + o then enter to save, ctrl + x to exit.
replace bloated systemd init with traditional UNIX-style sysvinit, install htop for process monitoring and control, and reboot into sysvinit system. run:
# apt install htop sysvinit-core -y && reboot
after reboot, purge the useless remaining bits of systemd, also remove rsyslog if you do not use it, and reboot once more.
# apt purge rsyslog systemd* -y && apt autoremove --purge -y && reboot
now edit the inittab
# nano /etc/inittab
remove useless gettys we don't need, just leave the first one, delete the highlighted lines shown below:
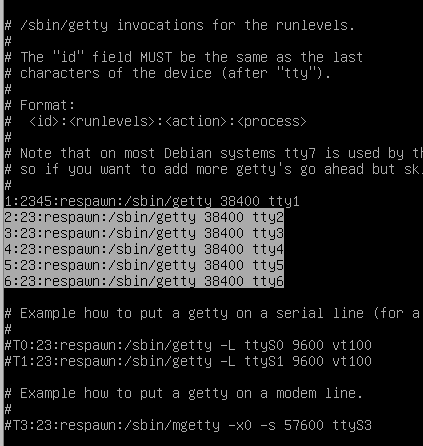
save the file and exit
now command sysvinit to reread the inittab to terminate the gettys:
# telinit q
stop udev:
# service udev stop
now sync and free the RAM:
# sync && echo 3 > /proc/sys/vm/drop_caches
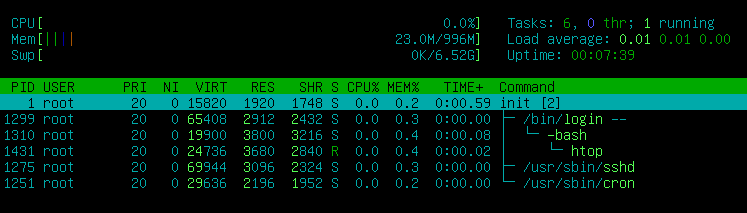
You should now have an ultra-lightweight and fast debian system. Invoke htop to see current RAM and process usage. It should look something like this:
(press F5 for a tree view and F2 for more options...)
From here you can install ZEN and SecNodeTracker and continue the rest of the Secure Node setup as usual!
https://github.com/ZencashOfficial/zen (ZEN)
https://github.com/adumaine/secnodetracker (ZEN SecNodeTracker)
If this guide has helped you, consider a donation:
ZEN: znSTMxvU3AizLV9cAm4iNPT5uLoJ2wbfHy9
Private ZEN: zcK5A39UwgaufiyUVtVqTXMFQXxxCUCvicvuMxcCE9QrgBMAGW5yCQW9a5zRqwZbYBTCMhTZgyhKH3TMMHq4xwLADQvqrM3
BTC: 1EwGXrmGdiD6Xd8uPnmRufyoWowJ7qpkJ1
All seems good, although the /etc/inittab file is not present ... any suggestion ?
Did you install
sysvinit-core? After reboot the inittab file should be there, I forgotsystemdinit does not use the inittab (i should recommend to edit the inittab after reboot).After installing
sysvinit-coreand rebooting, you should be able to edit the/etc/inittabfile. Then you can invoke:# telinit qThis will command sysvinit to reread the inittab and it should terminate the useless gettys.
I have edited the main guide to address this issue -- please let me know if it works!
Congratulations @hairetikos! You have completed some achievement on Steemit and have been rewarded with new badge(s) :
Click on any badge to view your own Board of Honor on SteemitBoard.
For more information about SteemitBoard, click here
If you no longer want to receive notifications, reply to this comment with the word
STOPCongratulations @hairetikos! You have completed some achievement on Steemit and have been rewarded with new badge(s) :
Click on any badge to view your own Board of Honor on SteemitBoard.
For more information about SteemitBoard, click here
If you no longer want to receive notifications, reply to this comment with the word
STOPThank you so much for these instructions, I'm not completely done installing the node software yet, but if it works well I may redo all my nodes like this.
I am trying a VPS host called vpsfast.net since they offer VPS in lots of different countries. A few notes about the install:
Make sure that the virtual disk and network drivers (virtio in my case) are enabled in your provider's control panel before the install, I found out too late that the default ide disk driver was set and had to reinstall after selecting vertio.
My VPS came with an Ubuntu install since that is what I chose when I ordered it, consequently there were already partitions setup that the installer would not let me delete. I used a menu option in the installer to open a shell and used fdisk to manually remove the partitions to get back to a blank disk.
I had trouble installing npm, not sure why but I found these instructions which worked:
https://linuxconfig.org/how-to-install-nodejs-on-debian-9-stretch-linux
For additional security and privacy I have also made a guide for setting up fully encrypted root filesystem and swap space:
https://steemit.com/zencash/@hairetikos/full-root-and-swap-encryption-guide-for-zen-secure-node-and-other-custom-iso-installed-vps
Please note that a fully encrypted root & swap space may require extra CPU & RAM to pass the ZenCash Secure Node challenge.