Get a Steem Witness + Seed Online Today with These Ubuntu Linux Commands!
How do we setup our Steem witness and seed nodes if we have no Ubuntu Linux experience? What are the exact commands we need to use to become a witness for Steem and get our servers online? Hopefully this guide will make it ridiculously easy to get started in the command line interface even without ever having used Linux before! To get to this tutorial, here are a few posts that will lay the foundation to go straight through this guide! Skip ahead to just view the commands!
- Launch a Steem Witness Today at https://steemit.com/witness-category/@jerrybanfield/launch-a-steem-witness-today shows the list of posts most helpful to me for starting my Steem witness with no previous experience using Ubuntu Linux combined with an introduction to what is a witness, why become one, who are witnesses, and what else do we need to do besides maintain the server?
- Steem Witness Basic Training at https://steemit.com/witness-category/@jerrybanfield/steem-witness-basic-training goes deeper into everything about being a Steem witness with answers to every single question I encountered during my first months of learning to be a witness combined with 11 steps to start the server from zero. The only thing missing from that post is the exact list of commands and troubleshooting which I share in this post!
- How to Start Getting Steem Witness Votes at https://steemit.com/witness-category/@jerrybanfield/how-to-start-getting-steem-witness-votes looks inside the most challenging part of being a witness in earning votes. I share what I did to get started and now primarily write posts like this to earn more votes along with participating in the comments, steemit.chat, and steemspeak.com.
- Steem Witness 14,542 Reporting For Duty announces the launch of my witness server and campaign at https://steemit.com/witness-category/@jerrybanfield/steem-witness-14-542-reporting-for-duty which I hope is useful in creating a post to use as the URL when broadcasting a new witness to the network!
To begin, we need hosting and access to our Ubuntu Linux server usually with a username or root plus a password. Long story short I have my hosting with @privex through witness @someguy123 with the server specs listed below. See more hosting options in Launch a Steem Witness today.
My Witness and Seed Server Specifications!
64GB DDR4 RAM
2x Intel Xeon E5-2630 V3
2x 240GB SSDs
1Gbit/s connection
These servers are capable of handling a top 20 witness load of a block every 63 seconds with minimal misses and are much higher than are needed to run the very basics at a level less than the top 20! If we want to make an effective campaign, it is easier to setup and launch our witness with servers able to serve at the very top instead of starting with something cheap and promising to upgrade. In the event of a disaster or attack, every witness ideally would have servers capable of processing a block every 63 seconds ESPECIALLY every witness in the top 30 and preferably witnesses in the top 50.
Guide Tips
- All commands will be shown in blockquotes starting with the passwd command below!
- Edits to files will also be shown in blockquotes.
- All comments will be shown next the text.
- This post shares what I did that worked for me as a beginner after spending weeks reading guides from those with much more advanced knowledge. If you are a Linux expert reading this, I invite you to make your own tutorial and/or feedback on the steps I take!
Ubuntu Linux Absolute Beginner Basics!
- Left click highlights and copies text.
- Right click pasts text.
Access the Server!
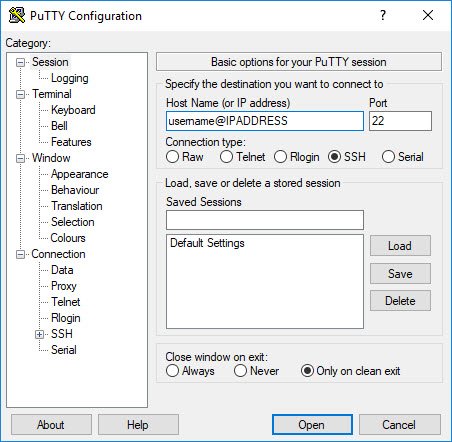
- On Windows 10, download Putty at https://www.chiark.greenend.org.uk/~sgtatham/putty/latest.html to get connected. Enter your username and IP address to get started.
- On Mac, go to Applications > Utilities, and open Terminal. Make an SSH connection to the server by using the syntax below. Substitute root for your username if needed, say yes to connect, and then enter the password:
ssh root@IPaddress
Update and Secure Ubuntu Linux
Update Server Password!
With access to our server, we start by changing the password a long secure password. Generate and store the password securely in something like https://www.lastpass.com/ or a password manager to avoid losing access to the server or having the password guessed.
passwd
Try copying and pasting the password once and then typing it again to verify it works. Test login with new password by reconnecting to the server.
logout
Download Ubuntu Linux Updates and Apps!
Switch to root directory to get to work!
cd /
Download the updates new programs and text editors!
sudo apt-get update
Install text editor nano
sudo apt-get install nano
Change directories and copy the sshd_config file into a new file in case of mistakes with command cp!
cd /etc/ssh/
sudo cp sshd_config sshd_config_0
List the files in the directory to verify the copy and get comfortable using ls to see inside the directory!
ls
Open the sshd_config file to edit the port and disable root login
sudo nano /etc/ssh/sshd_config
Change to PermitRootLogin to no because this will disable anyone logging into the server as the root. DO NOT DO THIS if you have been using root so far up until this point. Instead, stop and create a new user before continuing.
PermitRootLogin no
Change the port number to a new number between 1000 and 65535 because this will make it difficult to find the port to login on.
Port #
Use control + o to save and enter to confirm then control + x to exit!
sudo service ssh restart
Create Public and Private Keys for SSH Login!
- Get PuttyGen.exe at https://the.earth.li/~sgtatham/putty/latest/x86/puttygen.exe
- Make a strong passphrase for additional security otherwise anyone with the private key file can login
- Copy the "Public key for pasting" into a pub_key.txt file with notepad.
- Save public key calling it pub_key.
- Save private key as private.ppk
We now have three files that help us log into our server which are
- pubkey.txt
- pub_key
- private.ppk
Now we need to get this setup on our server.
Add the Public Key to the Ubuntu Linux Server!
Make .ssh directory or if it already exists and an error comes up, continue to step 2.
mkdir ~/.ssh
Modify folder access.
chmod 700 ~/.ssh
Change directory into the folder.
cd ~/.ssh
Create or read a file for the key. If blank, paste the public_key.txt in. Save/overwrite the file and close.
nano authorized_keys
Load the updates.
sudo service ssh restart
Set so only root can access.
chmod 600 authorized_keys
logout
Test login with the key to verify it works!
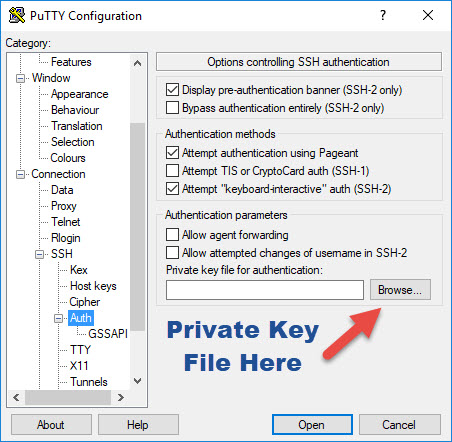
Go to SSH and auth in Putty. Put the private key file in along with the rest of the server info and save as a preset.
Verify the key works to log in so we can continue by disabling password logins.
Disable Password Logins!
Open the sshd_config to disable password access.
sudo nano /etc/ssh/sshd_config
Remove if commented out and overwrite and exit.
PasswordAuthentication no
Load new protocols.
sudo service ssh restart
Remove IPv6 Listening
Add AddressFamily inet to the end of the sshd_config file to disable IPv6 listening.
echo 'AddressFamily inet' | sudo tee -a /etc/ssh/sshd_config
sudo service ssh restart
Install and turn on UFW
Install Uncomplicated Firewall and proceed with typing y to continue the installation.
sudo apt-get install ufw
Check the status to confirm it is inactive.
sudo ufw status
sudo ufw default allow outgoing
sudo ufw default deny incoming
sudo ufw allow ssh
Set the UFW to allow a customportnumber equals to the port selected to connect with ssh earlier. For a webserver port 80 or whatever is set needs to be open along with any other program wanting access.
sudo ufw allow #
sudo ufw enable
Avoid Block Misses with NTP to Sync Time!
sudo apt-get install ntp
cd /etc
Copy the original file in case of problems.
sudo cp ntp.conf ntp0.conf
Open the conf file in text editor nano.
sudo nano /etc/ntp.conf
Add these at the end and overwrite!
minpoll 5
maxpoll 7
Enable and restart.
sudo systemctl enable ntp
sudo systemctl restart ntp
We now have the server ready to use for a seed node or a witness node! I started with the seed node because it was good practice and a lot easier. While a seed node is technically not required to be a witness, it is highly recommended if we want people to take our campaign for witness seriously and vote for us!
Seed Setup!
Install Steem Docker by @someguy123 to make installation simple!
sudo apt install git curl wget
sudo git clone https://github.com/Someguy123/steem-docker.git
cd steem-docker
./run.sh install_docker
Logout and log back in to get started.
logout
Change directory to steem-docker to run commands.
cd steem-docker
./run.sh install
After the install is complete, download the existing blocks to speed up setup!
./run.sh dlblocks
When the download finishes, adjust the shared memory. 8 GB is minimum and 12 GB at least is recommended. Do not use more than you have!
sudo ./run.sh shm_size 16G
Replay to get up to date!
./run.sh replay
Finished with at 100% and showing the newest blocks! Check with
./run.sh logs
That is it for a seed node! To get a seed node added to the list at https://status.steemnodes.com/ contact @wackou who maintains this list on steemit.chat.
Witness Setup
Setting the seed node up is great practice for bringing the witness node online because almost all of the steps to do the seed are the same along with a lot more to do the witness! If we follow the steps the way I did, we setup the seed node completely first to gain confidence and then start with the witness node from the beginning using the same process for security that we did on the seed node stopping just at the seed node steps and skipping down here instead! Ready?
Install Steem Docker and Prepare The CLI Wallet.
sudo apt update
sudo apt install git curl wget
cd steem-docker
./run.sh install_docker
logout
cd steem-docker
./run.sh install
./run.sh dlblocks
Wait for everything to finish! If permission errors here or a previous step, back up one level to home/user and chown user:user -R steem-docker to fix.
Next, we get to work making our Command Line Interface or CLI wallet because we need to manage our Steem account with the witness!
./run.sh remote_wallet
suggest_brain_key
Save the public and private key securely for later. Read all the CLI wallet commands at https://steemit.com/steemhelp/@hannixx42/cliwallet-commands-v0.
Exit the wallet with Control + D and then change the shared memory to a minimum of 8G or recommended at least 12G. I use 16 GB because I have enough memory.
sudo ./run.sh shm_size 16G
Overwrite and exit the file to finish.
Edit Config.ini to Prepare to Launch!
Make a copy in case of a mistake!
cp data/witness_node_data_dir/config.ini data/witness_node_data_dir/config0.ini
Open the config.ini file to edit.
nano data/witness_node_data_dir/config.ini
Edit in the following format with your witness name instead of mine along with the private key from the CLI wallet saved earlier and the shared file size chosen.
witness = "jerrybanfield"
private-key = 5xxxxxxxxxxxxx
shared-file-size = 16G
In the config.ini, find p2p-endpoint = 0.0.0.0:2001 and delete it because we are not running a seed! Save and close the file with press CTRL-X on nano and hitting enter to say yes to saving.
Finally, we disable port forwarding for seeds!
nano .env
With the file blank, add these lines and save
PORTS=
DOCKER_NAME=witness
Get Online!
We are now nearly ready to replay, get synced, and broadcast our witness! I was so excited to do this and hope you are too! First, we need to replay the blockchain as we did on the seed to get updated.
./run.sh replay
Wait until it is fully synced and bringing new transactions like this.
./run.sh logs
1050512ms th_a application.cpp:507 handle_block ] Got 31 transactions on block 13566376 by jerrybanfield-- latency: 141 ms
For best performance, check active seed nodes at https://status.steemnodes.com/ by pinging each and building a list in the witness_node_data_dir/config.ini file of the lowest latency nodes. Then
For example,
ping seed.jerrybanfield.com
Then edit the seed node list to those pinged successfully at the best speed.
nano data/witness_node_data_dir/config.ini
If a server restart is needed because of updating the config file, do a quick restart!
./run.sh restart
Now time to open the wallet and broadcast our witness which is the final step to getting online! This assumes you wrote a post to include in the URL which you have ready to use. If not, use a profile link and update it with the new post or get the post written first!
./run.sh wallet
Now we need to make a super secure password to keep our CLI wallet locked because anyone getting into it can use it with our active key!
set_password "mysupersecurepass"
unlock "mysupersecurepass"
Import the active key from our wallet on steemit.com under the "permissions" tab and replace with your own.
import_key 5zzzzzzzzzzzz
With the active key imported, we can now use the CLI wallet to get our witness added to the list! Here is the command I used with switching out the public key for my own and the username and the URL. Here was my exact broadcast. Switch your username, url, and PUBLIC signing key in place of mine.
update_witness "jerrybanfield" "https://steemit.com/witness-category/@jerrybanfield/steem-witness-basic-training" "STM7462wuSatDmQ6QGkuZPjohJrp2S79xgNjtsDfDgoB2c6HgaAEf" {"account_creation_fee":"0.200 STEEM","maximum_block_size":65536,"sbd_interest_rate":0} true
IF this error comes up
10 assert_exception: Assert Exception
!ec: websocket send failed: invalid state
{"msg":"invalid state"}
th_a websocket.cpp:164 send_message
Then Control + D to close the wallet and open it again. Immediately broadcast the witness message again before the wallet locks.
Price Feed Setup!
Witness are required to publish a price feed that pegs the SBD to Steem. Here is the easiest way to do it automatically. Start by changing directory to the home username such as
cd /home/jerry
Download Steemfeed from GitHub.
Create the steemfeed-js directory to install in.
cd steemfeed-js
Copy the example config file and add witness name plus active key.
cp config.example.json config.json
nano config.json
Close nano and run docker to build the feed.
docker build -t steemfeed-js
Make sure the witness is synced first before the next step!
docker run -itd --rm --name feed steemfeed-js
View results at
docker logs steemfeed
Done Setting Up!
The beginning of our witness journey is complete and our witness should now be online! Verify at https://steemd.com/@jerrybanfield except switch your username for mine and look for the witness info in the lower left. It should say witness with an ID and the data submitted. Below I will share some trouble shooting and basic errors with solutions I have encountered in the first month of being a witness that I hope are helpful!
Problems and Solutions!
Fastest Way to Get Help!
Join the witness channel at https://steemit.chat/channel/witness and start asking questions. I have received consistent help there from @someguy123 which has helped me solve most problems quickly!
CLI Wallet Issues!
If we lose or update our public key, try to dump the keys again including public and private within the CLI wallet using
list_keys
If we use multiple wallets or want to make sure our account is synced correctly, use the commend below immediately after unlocking to verify the correct account is synced in the CLI wallet.
list_my_accounts
control + D to exit the wallet
IF this error comes up
10 assert_exception: Assert Exception
!ec: websocket send failed: invalid state
{"msg":"invalid state"}
th_a websocket.cpp:164 send_message
We waited too long to send the message after unlocking the wallet. Thanks to @drakos for answering this question and providing the solution! Close the wallet and reopen and then send again immediately to update. View all wallet commands at https://steemit.com/steemhelp/@hannixx42/cliwallet-commands-v0
Miss a block?
After a month I just missed my first block fooling around updating my witness after @someguy123 successfully helped me to 19.1 without missing a block. One of the most basic things to do after missing a block is to restart steem-docker in case it crashed.
./run.sh restart
If it doesn't seem to start getting transactions after 5 minutes, then your blockchain or shared memory is corrupted and you might need to ask for help fixing that.
If a lot of blocks where missed or one was missed a long time ago, check the logs to see if the blockchain is current.
./run.sh logs
Server restart commands
If the logs are behind and not getting new transactions, a replay may be needed to catch up after a restart. Avoid running a replay if the logs are current!
./run.sh shm_size 16G
./run.sh replay
If known reboot needed, avoid replay with
mkdir /home/user/shm
cp -R /dev/shm/* /home/user/shm/
then
./run.sh shm_size 16G
cp -R /home/username/shm/* /dev/shm/
Steemfeed Troubleshooting
If the file is changed with a new active key after starting ...
docker build -t steemfeed-js
docker stop steemfeed
docker rm steemfeed
docker run -itd --name=steemfeed steemfeed-js
If price feed drops, here is a fix
crontab -e
#Add this to the end of the file to help it restart
0 */2 * * *
docker restart steemfeed
References
- Your guide to setting up a Witness Server (STEEM-in-a-box HF19) by @someguy123 at https://steemit.com/steem/@someguy123/your-guide-to-setting-up-a-witness-server-steem-in-a-box-hf19
- Complete Witness Installation Guide by @krnel at https://steemit.com/witness-category/@krnel/complete-witness-installation-guide.
- The REALLY gentle guide to becoming a witness by @personz at https://steemit.com/witness-category/@personz/the-really-gentle-guide-to-becoming-a-witness.
Resources
- Get help fast in the steemit.chat witness channel at https://steemit.chat/channel/witness.
- Conductor for automatic failover to a backup witness https://github.com/Netherdrake/conductor.
- Full command list for Steem docker https://github.com/Someguy123/steem-docker/blob/master/run.sh.
- Check open ports https://www.yougetsignal.com/tools/open-ports/.
- Track blocks https://steemdb.com/@jerrybanfield/blocks replace me with your username.
- Track missed blocks in Steemit.chat https://steemit.chat/channel/witness-blocks.
Thank you very much for reading this guide! If you found this helpful, would you please vote for me as a witness at https://steemit.com/~witnesses because it feels good to give back to witnesses that help us setup our own witness? If jerrybanfield is not in the top 50 when voting, please use the box to vote for me and just click vote once. Refresh to verify the vote went through and now appears in the list!

OR

If you have suggestions for improvements to this guide or would like to let me know what was most helpful, would you please share that in the comments here because that will help me make edits and help others reading to learn more from you?
Love,
Jerry Banfield
Edit to the steemfeed build!
Close nano and run docker to build the feed should include a period as follows because it will not run without it
Upvoted to pin this comment at the top for visibility.
Jerry with somebody who hasn't got the audience you have got and the witness every day voting for you! Is this beneficial to somebody like me with limited viewers and relatively new to the Cryptoworld? How I mean the cost of the server rental will it cover the costs of making steem? Or will I be in negative investment for the shorter term? Any help is appreciated!
@williams858 it is worth getting started with if doing it seems like fun and we have a desire to participate on steemit.chat and on the discord channels where witnesses and investors hang out! Many of the witnesses above me have earned more votes than me with fewer than 1,000 followers! The server costs can be under $100 a month which with a higher Steem price could be earned easily just getting an occasional block. When considering the price of Steem going up in a few months, being a witness becomes an outstanding opportunity even towards the bottom if we have a desire to participate on a daily basis!
Yes no problem! I am checking your profiles out now and trying to piece together on how to do it! I have looked at doing it before but got fed up and failed in that sense! It s something I would like to test my self and I will check out the discord channels!
Thanks @jerrybanfield a followup question
Do you think setting a witness using Google Cloud Platform can help? Is it too costly? which server are you using?
@jerrybanfield Would you consider writing a series of blogs or vlogs about how to start with steemit and what are the tricks and tips, basically a content valuable for complete beginners, as I am, to an average user. If you have done such thing, please link it here!
Always fresh insights regarding Steemit...
@cryptoeera thank you for commenting. I see your upvoted your comment but do not see an upvote on the post?
Yes, I upvote just myself, because I'm not a content creator and I don't earn from blogging. Anyway, it's not a problem; I comment to your posts not because am expecting you to upvote me, but because I truly believe you bring genuine value in the Steemit community and crypto in general.
I understand thank you for explaining!
i guess everyone must see this also---
What is happening to NEO (Antshares) - NEO on GitHub - Programmer explains| Buy it OR not
https://dtube.video/v/shivang/0xy00bfo
Much Needed! Thank you!
Very clear explanation.I have a question, does the computer at home need to always be on?
Buddy can you please make a post on deligation and undeligation of sp please. It would be helpfull for many steemians.
Thank you .Bdw resteemed your post.
Yes thank you very much for suggesting this because I am just about to do a post on it!
Awesome job you are doing for the community with these guides. Hope to see more in the future. Steem on 😇
Adrian thank you very much!
Great job jerry. Was eagerly waiting for this....
Excellent I am happy it is here now today finally because I have been working on this for a month!
The best breakdowns I seen on Steemit, Thanks @jerrybanfield 💪🏼🙌🏼💯
You're welcome Charles!
Thx for sharing