Learn about MQTT.fx
MQTT represents Message Queue Telemetry Transport which is a lightweight messaging and publish/ subscribe protocol. It is intended for obliged devices and low-bandwidth and unreliable networks. The aim of this protocol is to limit the network bandwidth and device resource requirements and also ensuring the reliability and the assurance of the delivery.
Now comes, MQTT.Fx tool which is a desktop tool. It is a JavaFX based client for MQTT protocol. This software is used for debugging and testing MQTT protocol.
What Will I Learn?
- Download and installation of MQTT.fx software
- Connection profiles and Broker
- Publish and Subscribe
Requirements
- Basic knowledge about MQTT protocol
- Machine-to-Machine (M2M) communication
- Knowledge of client and server
Difficulty
The difficulty of this desktop tool is intermediate.
Tutorial Contents
To start this tutorial, first of all, we need the MQTT.Fx tool installed on our desktop. So, to install this tool we have to go to the given link- http://www.mqttfx.org
Step-1:
• After entering their website, we will see their homepage. But for downloading this tool, we have to go to the download page. I have marked the download option in below screenshot.

• When we will select the “DOWNLOAD” option, we will see this download page. We have to download the marked one for our Windows operating system.

• After clicking on the marked version, we will be redirected to the directory of this file as we can see in the below image.We have to just click on the marked link and download will start automatically.

Step-2:
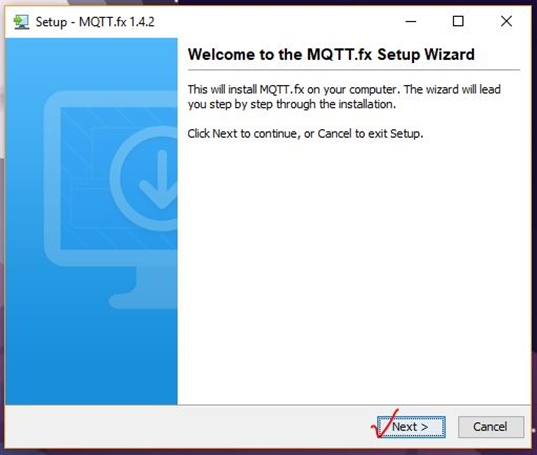
• After downloading the file, we have to just open the .exe file. Later just do the normal installation.
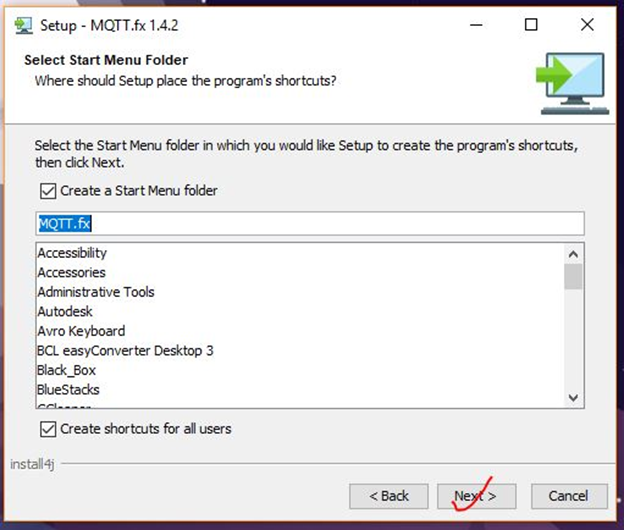
• After that, we have to browse our destination directory where our software will be installed. We can keep it default or can browse our directory clicking on the Browse button marked on the image.

• Click on the next button. You can customize your option if you want.
• We can see that the software is in the installation process. Now, wait for the processing to be completed.

• Now just hit the Finish button and go to the next step.

• We can start our software or tool from the start menu or from the installed folder.Just hit on the .exe file (marked) and the software will be open (You have to wait few seconds).

Step-3:
• At first, the following window (Fig-10) will pop up. We have to hit “No” button.

• Following window is the main interface of the tool. At the top of the window, we will be able to edit the broker (it works as a server. And if we send any data to anyone, it will be transferred through this broker) connection profile and also will be able to connect or disconnect our connection with the broker. When we will install this tool for the first time, by default if we can see there is mentioned “Local” before the broker profile name, we have to change that name (For connection via profile) Otherwise we have to change the host address for connecting via ad-hoc. We can give any name we want just like I have used test here. Afterwards, we can edit our broker connection profile by the marked icon.


• Publish, Subscribe, Scripts, Broker status and Log are five major use cases. They have their own tabs and they are detachable. We can place them anywhere we want. They can be separated. If we want these tabs to move back then just close those tabs one by one and they will be back to their actual position again. “Log” tab shows us the logging console and we can also see this thing from our application configuration folder named mqttfx.log file. Broker status shows the status of the clients, messages, traffic and loads. Scripting interface allows programmed MQTT message handling through Java8 Nashorn JavaScript Engine.

Step-4 :
• If we want to edit broker connection then we will click on the edit button as we saw earlier. When we will select that edit option, we will be able to see the following image. Here we have to give the profile name that we have used previously. Then we have to give a Broker address and this will be the public broker. I have used public broker here. Broker port will be always 1883. And to create a client ID, we have to just click on the generate button so that we can have a unique id. Now just click on “Apply”.

• Now click on the connect button when our connection will be successful, we will see that the left side light will become green.

• Now comes the publishing part. If we want to publish any message to other MQTT client (who is a subscriber of that topic). We have to give a topic name in the following place. Then just put a message and to publish this message, hit on publish button.

• Now to get the message we have to subscribe to the same topic. For that, we have to give the same topic and hit the Subscribe button and we will become the subscriber to that topic. If the publisher publishes any message we will receive that message.

• After subscribing we will see subscribed topic and messages, shown in below screenshot. Through the “Dump message option” we will be able to save our messages. We can mute and unsubscribe.

I hope this tutorial will be beneficial for the beginners to start working with the MQTT.Fx tool. This tool is trouble-free to use and very interesting also.
Posted on Utopian.io - Rewarding Open Source Contributors
Trying to learn about this. thanks for it.
Welcome........ :)
Your contribution cannot be approved as onscreen downloading and installation tutorials are known to be a trivial.
The steps you showed are not technical.
Please make tutorials for tasks which are difficult and may need tutorials.
You can contact us on Discord.
[utopian-moderator]
This post has received a 1.58 % upvote from @boomerang thanks to: @tanvirrahman