Tutorial : Creating Vintage Logos Using Inkscape Software
Good night all! Hopefully you are always in good health and can perform daily activities, and hopefully today is better than yesterday.
In some of my previous posts I have shared some kinds of tutorials about Inkscape, of course in the field of graphic design, whether it is how to create logos, writing effects, how to create effects on photos and how to create line art using inkscape software.
On this occasion I will share one more tutorial that is how to create a vintage logo using Inkscape for sure. This tutorial is long and complicated, as there are many objects we should use for a vintage logo, however I will try to formulate this tutorial as simple as possible, so that it can be easily understood and understood by friends.
As usual before I discuss the tutorial I will first introduce inkscape software in outline, because the detailed explanation I've ever discussed in the first tutorial post, or you can also learn and read more on the websites available at google.com.
Inkscape

Image Source
Inkscape is an open source software that is almost equivalent to corel draw, although not as famous as the corel draw itself. But this software already meets the standard XML, SVG and inkscape CSS can also run on windows operating system, so this graphic device is really friendly with you who have talent graphic designer.
The main goal of inkscape is presented is to be one of the current cutting-edge graphics tools. Okay friends, that's a glimpse of information about this inkscape, now we go into the tutorial season.
Tutorial
Creating Vintage Logos Using Inkscape Software
For the first step open inkscape then click the file on the menu bar then select document properties and uncheck show page border on the document properties command screen.


The second step click view on the menu bar and make sure it is in a custom position and select the zoom and select zoom 1: 1. Next click the icon align and distribute object and fill and stroke icon on the menu bar, so easy to edit objects that we will use later.


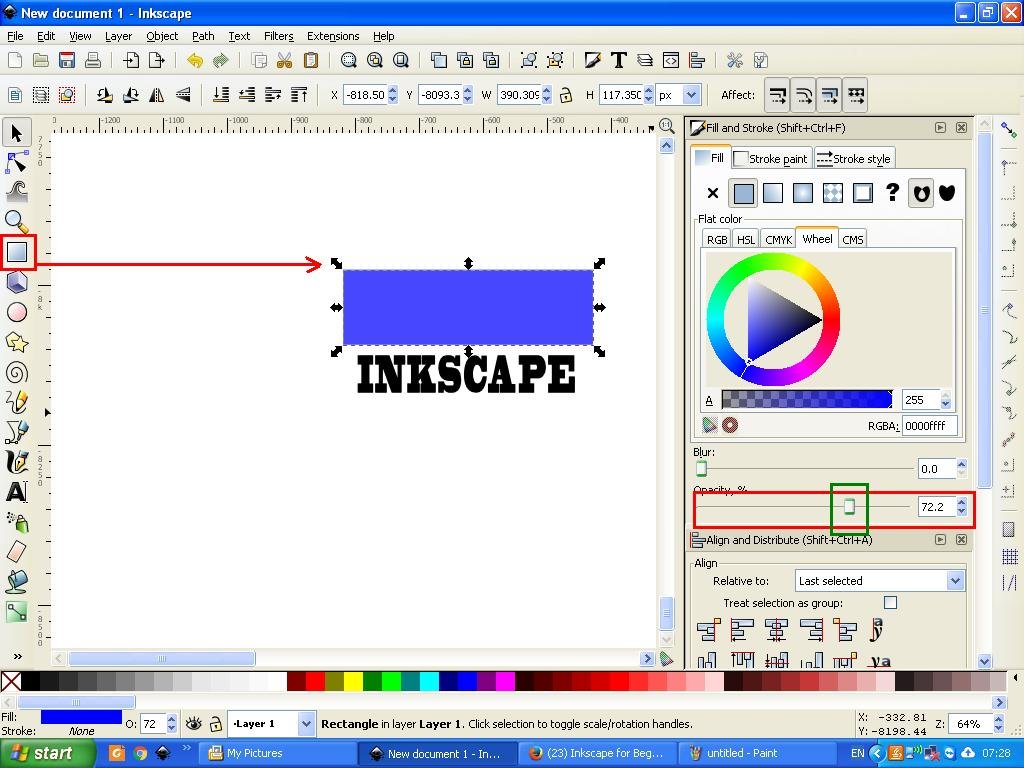
The third step click icon create and edit the text object on the side bar then make a post, here I write INKSCAPE. Then click the rectangles icon on the side bar as well and create a rectangular object with the size adjusted to your wishes or follow the size of the request, place the object above the posts and subtract the opacity of the object on the fill and stroke command screen. Then click the path on the menu bar and select the object to path, and finally click the lower selection to bottom icon on the menu bar.


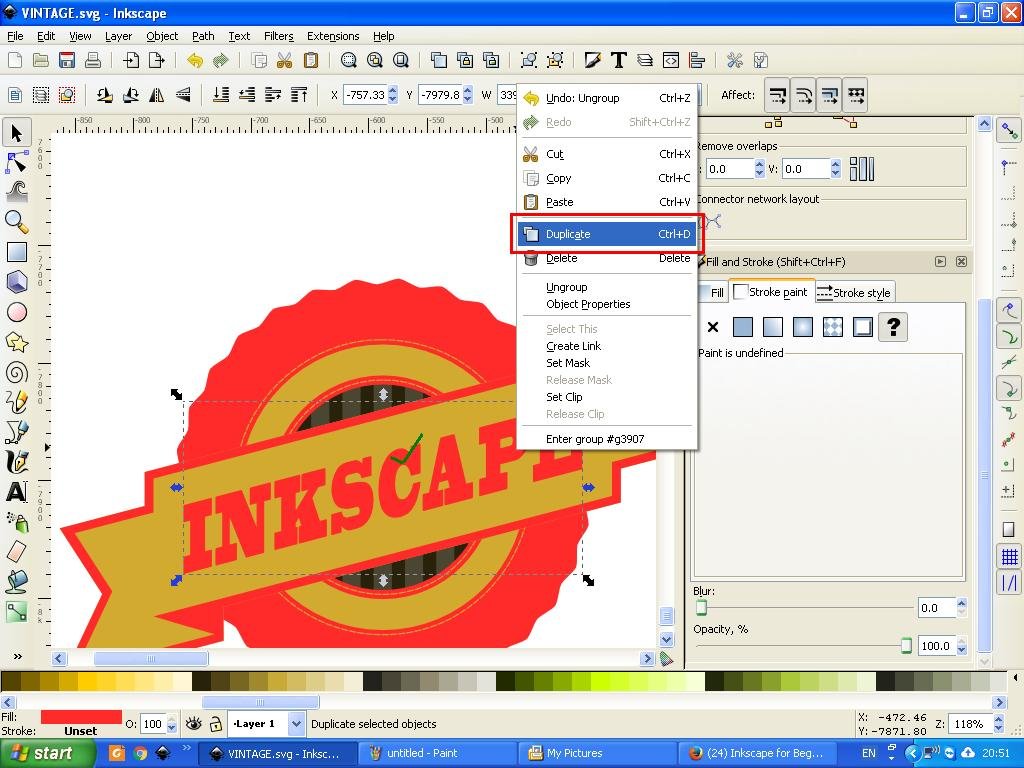
The fourth step, right on the rectangular object and select duplicate, then set the position and click the edit icon by the node on the side bar and click the insert ne nodes into selected segment above it, then akn appears some coordinate points then drag and adjust the size and position, by moving the mouse, or follow the instructions in the image below.


The fifth step, click the Bezier draw icon and make a line at the bottom to create a shadow on the object, then give one of the colors available on the task bar, here I use red. Then click both and click the group, then right click on the object that you guys group and select duplicate, then reverse its position by clicking the flip icon selected object vertically and horizontally, then place it in the top right position.


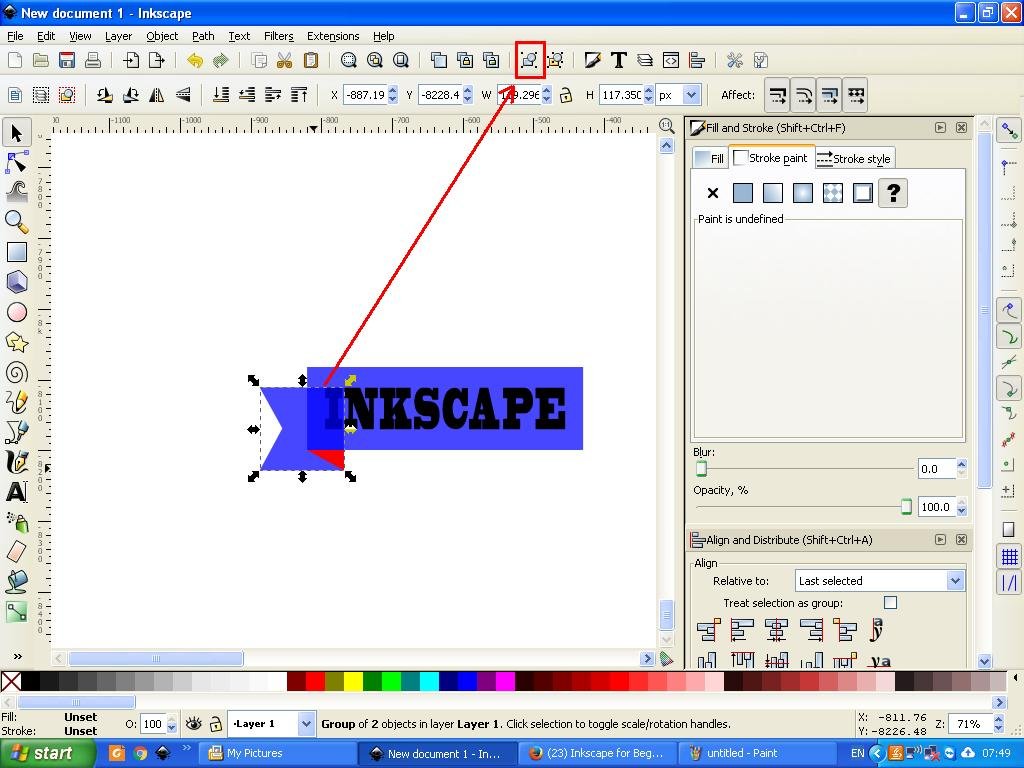


Step six, click overall and select duplicate again and change the color, then click again both and set its position by clicking center icon on vertical axis and center on horizontal axis on align and distribute object command screen, then second block and click path at menu bar and select intersection.


Step seven again the whole block and click on the path on the menu bar select union, then the blue in the corner of the object will follow the screen line, then here I change the color to red, so no need to be confused and worried, no step passed by you guys , then right click on the object and select duplicate,


The eighth step, click the duplicate object and click the path on the menu bar select the break a part, click the path again on the menu bar and select union, and set the color according to your choice, then click the lower selection to bottom icon on the menu bar and see results.


The ninth step, activate the object and click on the two-way arrow then drag up or down, then the object will change its style, and this we call as the first object.


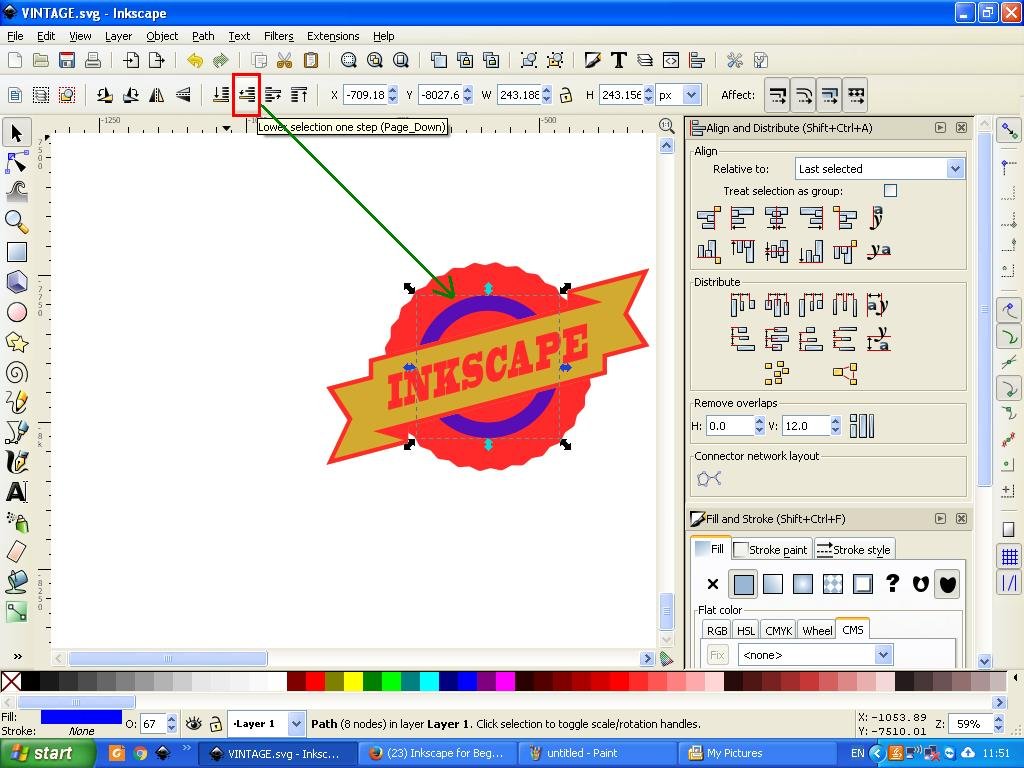
The tenth step, click the star and polygons icon on the side bar, then click the star icon on the menu bar and set the nominal next to 30 and spoke ratio 0.970 and for rounded 0.200, then create an object on your work screen. click the object and then click the path on the menu bar and select object to path, this object we call the second object, because the main object is finished in the ninth step earlier. Then click both objects and set the position by clicking center on vertical axis and center on horizontal axis on align and distribute object command screen.


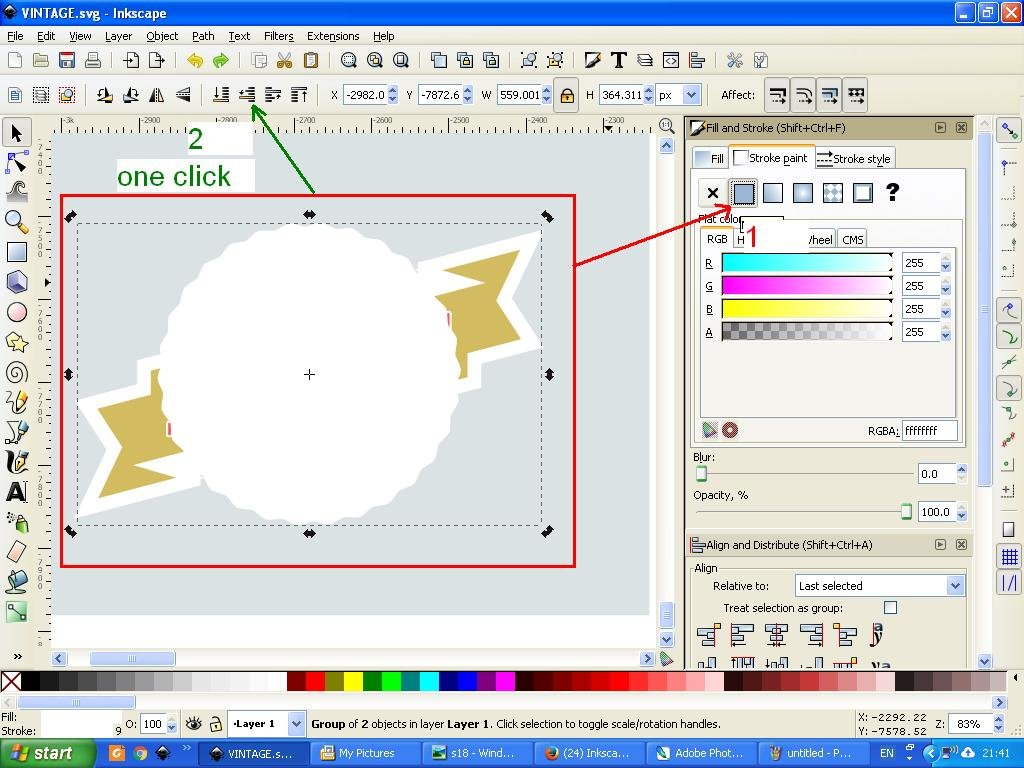
Eleventh step. Click the create circle icon, ellipses and arcs on the side bar and create a new object, or a third object and subtract the opacity, then set the position on the screen align and distribute the object earlier. Then make duplicate dang anti color, then reduce the size and adjust, then click the third object and duplicate it then click the path on the menu bar and select the difference, then click the lower one step icon on the menu bar. to equate the color of the third object with the first object, click the third object then right click on the left arrow of the screen and select dropper, then click on the first object, then the third color of the object will automatically be exactly the same.


The twelfth step make a duplicate of the third object and then set the stroke paint on the fill and stroke command screen to the right, then click stroke style and select one of the line types on the dashes arrow, then click the path on the menu bar and select out set, and see which one suits your choice. then click on the lower one step icon for its position to be behind the main object.


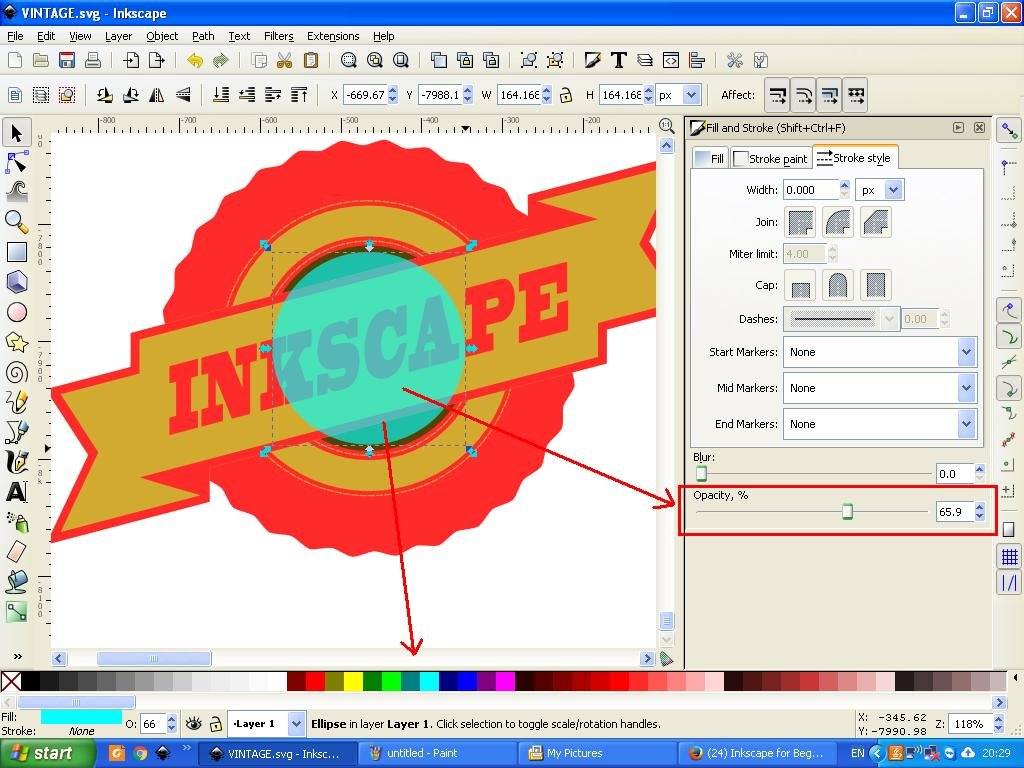
Step thirteen, re-create a new circle, and adjust the size and adjust its position in the middle and make a duplicate, substitute the color, subtract the opacity and reduce the size of the original object. If it is finished then lower it or take it laterally to setup. Here I just lower a bit down, then click rectangles on the side bar and make a rectangular object and place it on the left side of the round object, by clicking the second object and clicking the align left edges icon on the align and distribute object's command screen, then create multiple duplicates for the rectangular object and set the position on the align and distribute object's command screen. Next click on both types of objects, then click the path on the menu bar and select intersection and see the result, now set its position logo that almost finished, and if necessary change also the color and set the object's opacity.


Fourteenth step make duplicate of Inkscape and change color then click lower one step and then set stroke paint and arrange stroke style then click raise selection one step.

Next step create a rectangular object and place it behind the logo, then block the whole logo of the object and then click the path and select union. Then change the color and set its position to the back of the logo as well, then set the stroke paint and give a dark color to the square object earlier. And the logo was ready.


The last step is file storage. Click on the file select save as and select one of the desired file formats, but do not forget to save the file in SVG format, so it's easy to edit it sometime later if needed.


and if necessary you can also add some more posts to beautify the logo. and below is the result in my tutorial this time

Posted on Utopian.io - Rewarding Open Source Contributors
daily upvote please
Thank you for the contribution. It has been approved.
I appreciate your hard work in showing us the absolute full version of how to make decent graphics.
Cheers!
You can contact us on Discord.
[utopian-moderator]
Thank you very much for the appreciation @cnts #utopian-moderator
Sep hayeu ka roneuh... loen coba coba hana item jeut lom..
Nyoe teungoh loen meurueno corel draw... he he...goodluck bg @saini88
golom hayeu cit bang hai,,, mantong meuruno... saboh logo si uro baro lheuh wkwkwkwk,,,, btw thank you very much!
Hey @saini88 I am @utopian-io. I have just upvoted you!
Achievements
Suggestions
Get Noticed!
Community-Driven Witness!
I am the first and only Steem Community-Driven Witness. Participate on Discord. Lets GROW TOGETHER!
Up-vote this comment to grow my power and help Open Source contributions like this one. Want to chat? Join me on Discord https://discord.gg/Pc8HG9x