Do It Yourself : ESP8266 WiFi Module connected on Arduino UNO with the step-by-step process.
Prior with the tutorial, let us first know why am I giving you this. It is because of the account of the present rising innovation,hence it is more vital to able yourself to pick up information well and being on the trend is a bonus. With today's instructional exercise, I will give you a complete ride on the "know-abouts" of the ESP8266 WiFi Module which is one of the leading platform of the Internet of things (IoT). Without any further ado, let us bring it on!
What is ESP8266 WiFi Module?
The ESP8266 WiFi Module is an independent SOC coordinated with the TCP/IP convention stack that can give any microcontroller access to your WiFi network. The ESP8266 is prepared to do either facilitating an application or offloading all Wi-Fi organizing capacities from another application processor. Each ESP8266 module comes pre-modified with an AT command set firmware, which means, you can essentially connect this to your Arduino gadget and get about as much WiFi-capacity as a WiFi Shield offers . The ESP8266 module is to a great degree financially savvy board with an immense, and regularly developing, group. This is very essential on Arduino boards that does not have built-in capacity on connecting to the WiFi network like the Arduino UNO.
Beforehand, let us take a closer look of this chip which is the ESP-01. I will tackle the ESP-01 but it has 10 more chips available on the market.

We have two sample chips (ESP-01) presented and they have the same function yet just differ in the memory size. The most commonly used WiFi Module in experiments is the "blue" one which has only 0.5MB memory size. The 1MB WiFi Module is a new version of the latter.

Moreover, it is significant to be able to know its pin designation for an easy instructions to follow.

Important points : The ESP8266 Module isn't equipped for 5-3V logic shifting and will require an outer Logic Level Converter. Hence, you shall connect it to the 3.3V input.
Brief discussion about the Arduino UNO
Since I will be connecting the ESP8266 WiFi Module on the Arduino UNO to allow the ability of the latter on connecting to the WiFi network then I will have a brief discussion about it.
Arduino is an open-source physical registering/computing platform in view of a straightforward I/O board and an advancement domain that executes the Processing/Wiring language. In specific, the Arduino UNO can be differentiated with other Arduino boards because of its inability to adapt on the WiFi network. Below is an image which shows the needed pins for the physical connection with the ESP-01.

Observe the pins which is highlighted with the red box. Those will only be the pins to be connected with the ESP-01. The TX and RX or the transmitter and receiver, respectively which can drive the exchange of data with the two boards. The 3.3 pin which will be connected to the ESP-01, this will give an input voltage on the chip. Lastly is the reset and ground pins, the former allows the reset as the name it suggests and the latter will be connected to the ground for a complete loop of the circuit.
Important points : Of course connect the Arduino UNO on the 5V input to drive the board. I only present the pins which is physically connected on the ESP8266 - ESP01.
ESP8266 WiFi Module : The Step-By-Step process on connecting it to the Arduino UNO Board
Step 1 : the PHYSICAL CONNECTION between ESP8266 - ESP01 and Arduino UNO
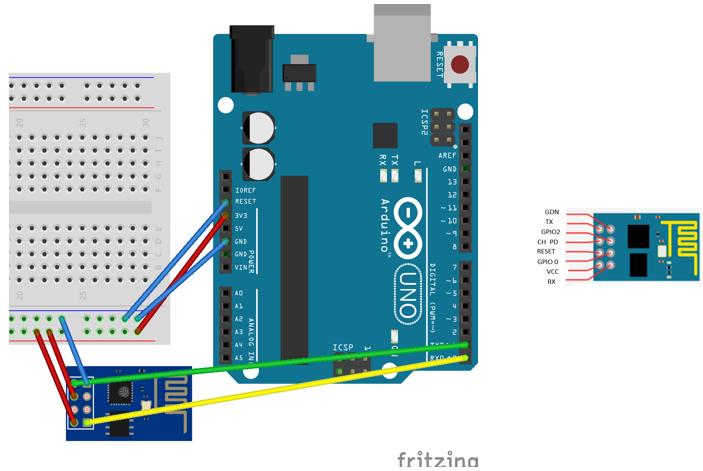
This must be the physical connection of the two boards.
- The CH_PD and the VCC can be shorted since this two pins must be fed to the 3.3V input.
- The RX and TX must be connected to its corresponding arduino board pins, respectively.
- The Reset and Ground pins of the Arduino board can be shorted as well on the breadboard (to be safe) and connect it directly to the ground pin of the ESP-01.
Other connections may include the additional of resistors on your circuit and/or neglecting the reset pin connection. But on this case, let us just assume or utilize the connection shown above.
Step 2 : the SOFTWARE CONNECTION between ESP8266 - ESP01 and Arduino UNO (sending AT Commands or Attention Commands)
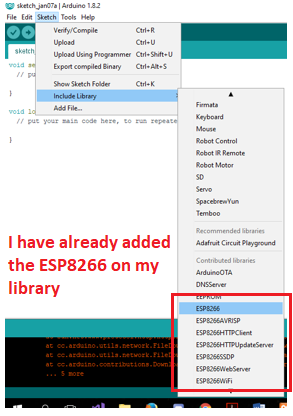
In the software connection, you need to program it by using the Arduino IDE. First, open up the Arduino IDE. Let us assume that we have not establish or added the ESP8266 on our library hence, open up the library and browse for the ESP8266 lib and add it. (In my case, i have added it already and my internet connection suddenly stuck up so I will be using my own library)

After that, also set your board to Arduino UNO. To make it just go to Tools > Board > Arduino/Genuino UNO .Add the code on your Arduino IDE.
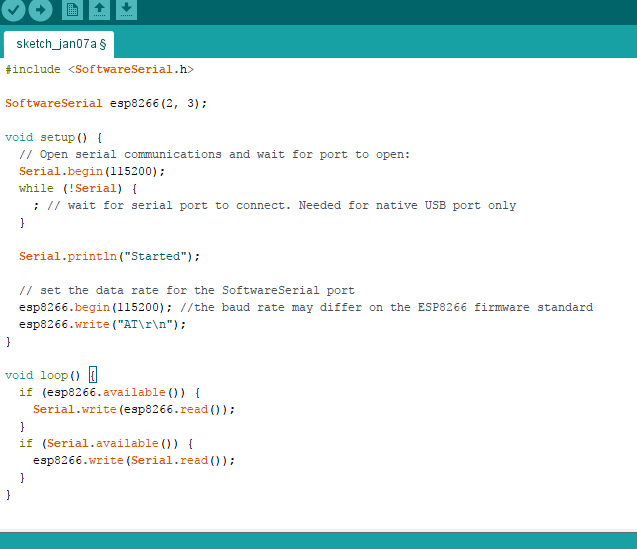


Test the code and this must give you an output on your com port which indicates that the Arduino UNO and ESP8266 is now connected.
Further Notes/Important notes :: You may also test first the Arduino UNO by any blink test to assess if it is functional. Moreover, you can also use LM7805 to connect on your Arduino UNO input if you can not attain a power source of 5V. This will convert your power source or limit it to 5V only. Which is very essential on your board not to get damaged.If the code will not function on your Wifi Module used, you may set another baud (symbols per second) to attain the desired set on the firmware. Lastly, since the Hardware Serial interface will be busy when connected to Computer, then you have to use another Serial interface to communicate with your ESP8266.
ENJOY AND HAVE A GREAT LIFE AHEAD
Bidding a goodbye, See you then :)
Posted on Utopian.io - Rewarding Open Source Contributors
This post has received a 0.39 % upvote from @drotto thanks to: @banjo.
Thank you for the contribution. It has been approved.
You can contact us on Discord.
[utopian-moderator]
Helpful Info @leryam12
Hey @leryam12 I am @utopian-io. I have just upvoted you!
Achievements
Suggestions
Get Noticed!
Community-Driven Witness!
I am the first and only Steem Community-Driven Witness. Participate on Discord. Lets GROW TOGETHER!
Up-vote this comment to grow my power and help Open Source contributions like this one. Want to chat? Join me on Discord https://discord.gg/Pc8HG9x
I am also good at esp8266 for arduino .But how I write tutorials about the theme on utopian