ESP8266 tutorials--创建wifi热点
What Will I Learn?
认识ESP8266 WIFI模块
用ESP8266 WIFI模块创建一个热点
Requirements
ESP8266 -12F
Arduino IDE (版本要大于1.6.7)


Difficulty
Basic
Tutorial Contents
一、认识ESP8266 wifi模块

ESP8266-12f型号的wifi模块由安信可科技公司研发,esp8266模块其实可以理解为一块单片机在内部电路上接上一个wifi模块供单片机使用,它的内部mcu是领先业界的Tensilica L106超低功耗的32位微型mcu,该mcu的特性如下:
- 带有16为精简模式
- 主频支持80mhz频率和160mhz频率
- 同时也是支持RTOS实时系统
- 集成了WIFI-MAC/BB/RF/PA/LNA
- 模块自带有wifi天线,因此不需要外接天线。
ESP8266模块性价比非常的不错,很适用用于无线方面的电子开发,该模块是高性能无线SOC,成本极低的同时能提供最大的使用性能,为wifi嵌入功能方面的开发提供了无限可能。
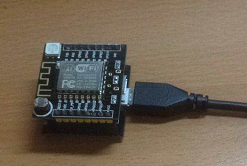
如上图,esp8266的wifi模块与Arduino UNO相比,体积小、性能高、自带wifi功能。
一般开发esp8266有以下几种形式:
- 烧写如at固件,使用arduino 等单片机通过串口发送指令控制esp8266模块。此处把esp8266当作是一个模块使用,并没有利用到esp8266模块内部的mcu
- 使用Arduino IDE对esp8266内部mcu进行固件改写
- 使用micropython语言开发esp8266模块
- 使用C+开发esp8266模块
这个课程,我们主要以使用Arduinio IDE开发esp8266内部mcu为主要的方法。
esp8266-12f wifi模块引脚介绍:

如上图:引脚有22个引脚
| esp8266-12f引脚标志 | 作用 |
|---|---|
| RST | 用于复位模块 |
| ADC | 用于A/D转换 |
| EN | 使能引脚 |
| IO16 | GPIO16引脚 |
| IO14 | GPIO14引脚 |
| IO12 | GPIO12引脚 |
| IO13 | GPIO13引脚 |
| VCC | 用于3.3V电源输入 |
| CS0 | 用于片选 |
| MISO | 主机输入,从机输出 |
| IO9 | GPIO9引脚 |
| IO10 | GPIO10引脚 |
| MOSI | 主机输出,从机输入 |
| SCLK | 模块时钟 |
| GND | 用于接电源负极 |
| IO15 | GPIO15引脚 |
| IO2 | GPIO2引脚 |
| IO0 | GPIO0引脚 |
| IO4 | GPIO4引脚 |
| IO5 | GPIO5引脚 |
| RXD | 串口UART0_RXD |
| TXD | 串口UART0_TXD |
二、用ESP8266 WIFI模块创建一个热点
1.打开Arduino IDE

2.选择对应的开发板,此步骤可以参照:**你的wifi我作主----DIY一个wifi杀手 **

3.导入所需要的库文件
#include <ESP8266WiFi.h>
#include <WiFiClient.h>
4.设置该 wifi热点的ip地址
IPAddress Local(10,0,0,10);
IPAddress Gateway(10,0,0,1);
IPAddress Subnet(255,255,255,0);
- IPAddress:将字符转为ip地址的格式
- Local:设置该热点的ip地址
- Gateway: 设置该热点的网关
- Subnet: 设置该热点的子网
5.将设置好的ip地址写入模块
WiFi.softAPConfig(Local, Gateway, Subnet);
6.设置该WIFI热点的名称
String Name = ("steemit_cha0s0000");
const char *APName = Name.c_str();
- c_str():将字符串转为c字符串指针
7.设置wifi热点的密码
String Pass = ("cha0s0000");
const char *APPass = Pass.c_str();
8.将设置好的wifi账号密码写入模块并生成热点
WiFi.softAP(APName, APPass);
IPAddress myIP = WiFi.softAPIP();
Serial.print("AP IP address: ");
Serial.println(myIP);
- softAP:写入esp8266模块的函数
- softAPIP:获取wifi热点的IP地址
9.打印到串口调试
Serial.print("name is : ");
Serial.println(Name);
Serial.print("pass is : ");
Serial.println(Pass);
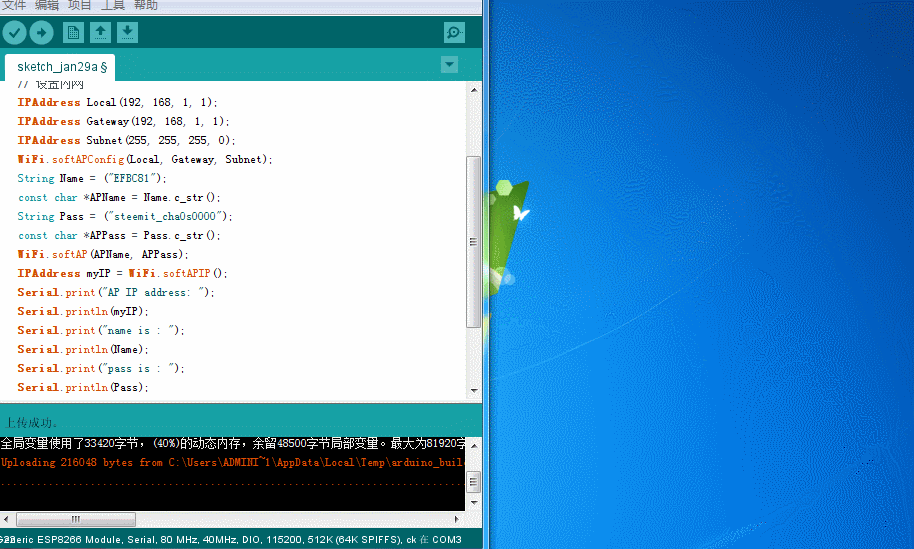
10.整合程序
#include <ESP8266WiFi.h>
#include <WiFiClient.h>
void setup() {
  Serial.begin ( 115200 );
  Serial.println("");
  // 设置内网
  IPAddress Local(192, 168, 1, 1);
  IPAddress Gateway(192, 168, 1, 1);
  IPAddress Subnet(255, 255, 255, 0);
  WiFi.softAPConfig(Local, Gateway, Subnet);
  String Name = ("EFBC81");
  const char *APName = Name.c_str();
  String Pass = ("steemit_cha0s0000");
  const char *APPass = Pass.c_str();
  WiFi.softAP(APName, APPass);
  IPAddress myIP = WiFi.softAPIP();
  Serial.print("AP IP address: ");
  Serial.println(myIP);
  Serial.print("name is : ");
  Serial.println(Name);
  Serial.print("pass is : ");
  Serial.println(Pass);
}

void loop() {

}
11.上传程序
注意:上传程序的时候,需要按一下esp8266-12f模块的RST键


12.测试效果:


Posted on Utopian.io - Rewarding Open Source Contributors
Thank you for the contribution. It has been approved.
You can contact us on Discord.
[utopian-moderator]
Thanks @shreyasgune ,One more thing my post which you rejected last time can be rereviewed again??
Hey @cha0s0000 I am @utopian-io. I have just upvoted you!
Achievements
Suggestions
Get Noticed!
Community-Driven Witness!
I am the first and only Steem Community-Driven Witness. Participate on Discord. Lets GROW TOGETHER!
Up-vote this comment to grow my power and help Open Source contributions like this one. Want to chat? Join me on Discord https://discord.gg/Pc8HG9x