[Tutorial] Ionic Alert Controller and Action Sheets

Repository: Ionic Github Repository
Software Requirements:
Visual Studio Code(Or any preferred code editor)
What you will learn:
In this tutorial you would learn about two components in ionic which are almost always essential in ionic development, we would be covering these main concepts:
- Learn what action sheets are and how to use them
- Learn what alert controllers are and how to use them
- Learn the difference between using the native and ionic's action sheets and alerts
Difficulty: Intermediate
Tutorial
In this tutorial i would be covering the Alert and Action Sheet components which are components of ionic which you would almost certainly use during your development. In this tutorial i would try to make understanding the use of this as easy as possible so you would be using this in you applications in no time.
These like all other elements we use in ionic are component which have been developed as part of the core framework. Lets get to how to use them.
Alerts
Alert are pop-up that are present in almost all applications and for ionic we have about 6 alert types. They have a few modifications you can make to which ever you would like to use and it would display on the template whenever triggered by an event. You should note however that ionic alerts are not native,meaning that they are like modified components not the inbuilt alerts that come with ionic. However if you would choose to use the native, you would download the cordova plugin for this.
Lets get to how to use these in the logic file of a page
First off generate a new page using
ionic start newProject blank
We would be creating an alert that prompts the user for data and passes that data for us to use. This would seem to be a challenge to junior developers as this not clearly stated in the documentation.
When all dependencies and packages have been installed head to the template file for the home page and use the code explained below.
import { Component } from '@angular/core';
import { NavController, AlertController } from 'ionic-angular';

@Component({
  selector: 'page-home',
  templateUrl: 'home.html'
})
export class HomePage {
  name: string;

  constructor(public alertCtrl: AlertController, public navCtrl: NavController) {

  }
  ionViewDidLoad(){
      const prompt = this.alertCtrl.create({//We create the prompt alert here
        title: 'Hello',
        message: "What is your name?",
        //the inputs is the array where you can collect all the data from you alert to your file since there is no template file for this component
        inputs: [
          {
            name: 'name',
            placeholder: 'Your name'
          },
        ],
        buttons: [
          {
            text: 'Cancel',
            handler: data => {
              console.log('Cancel clicked');
            }
          },
          {
            text: 'Save',
            handler: data => {//this is how you read the data from the template file
              this.name = data.name;
            }
          }
        ]
      });
      prompt.present();
  }

}
And in our template file we should simply have
<ion-header>
  <ion-navbar>
    <ion-title>Home</ion-title>
  </ion-navbar>
</ion-header>

<ion-content padding>
 <h1>Hello {{ name }}</h1>(html comment removed: Use interpolation to read the data into our template file)
</ion-content>
We should see this in effect in our template
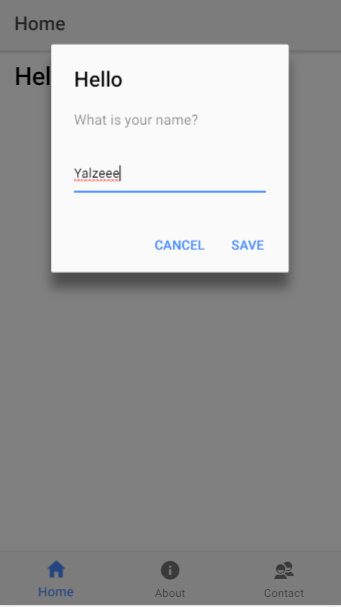.png)
And
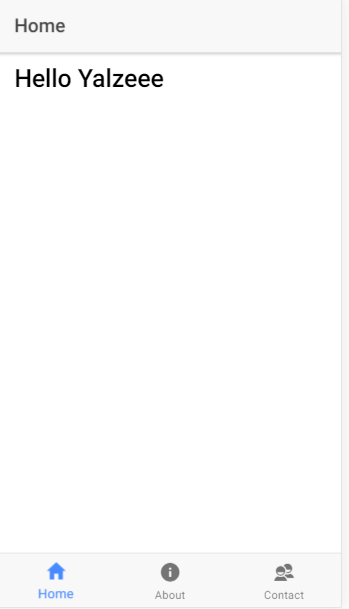.png)
I chose to do a data transfer because nowhere in the documentation did it state it clearly and when i was starting up this was quite a hassle.
Next lets move on to the Action Sheets
Action Sheets
Ionic default action sheets act just like the alerts with the alert controller handles. Action sheets are simple components that pop up to enable us create quick on actions such as deleting a file or playing a file and even modifying it. Rather than using the native action sheets that come with android and ios ionic developed something quick and easy to use. Lets get on to how to use this.
We'll also be using our home page for this example and seeing the different types of actions.
Look at the code below
//We create this function which will call our action sheet when triggered
showIt(){
    const actionSheet = this.actionSheetCtrl.create({//We create action sheets like every other component
      title: 'My first Action sheet',
      buttons: [
        {
          text: 'Delete this item',
          role: 'destructive',//Note that action sheets are given roles
          handler: () => {
            this.name = '';//This would clear our name whever the delete option is chosen
          }
        },{
          text: 'Archive',
          handler: () => {
            console.log('Archive clicked');
          }
        },{
          text: 'Cancel',
          role: 'cancel',
          handler: () => {
            console.log('Cancel clicked');
          }
        }
      ]
    });
    actionSheet.present();//This is necessary to render this view to our template
  }
If you looked through the code you would have noticed that some of the buttons had roles. This are peculiar to action sheets and help identify and modify the button based on use. For instance the button with the role of destructive is for deleting an item. In the template this button is displayed in red text and is displayed at the beginning of the template regardless of where in the array it is placed. Also the cancel button is always at the end of the template. Lets trigger this event from our template and see the effect.
In our home.html we would have
<ion-header>
  <ion-navbar>
    <ion-title>Home</ion-title>
  </ion-navbar>
</ion-header>

<ion-content padding>
 <h1>Hello {{ name }}</h1>
 <button ion-button full block (click)="showIt()">Show Options</button>
</ion-content>
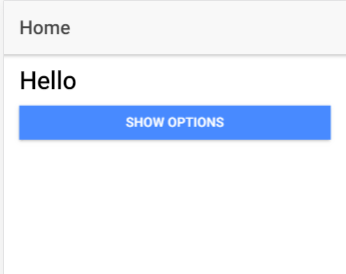
We can now see that the event is triggered by a button click. So testing it out
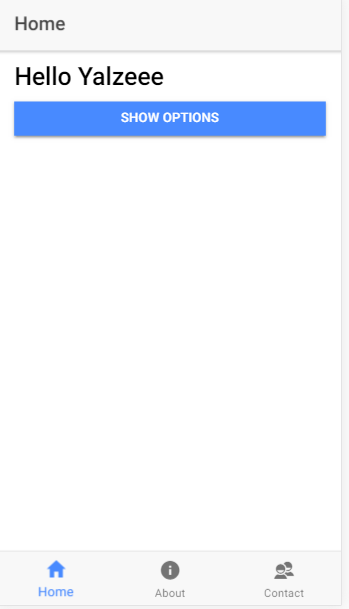.png)
And when we click our button
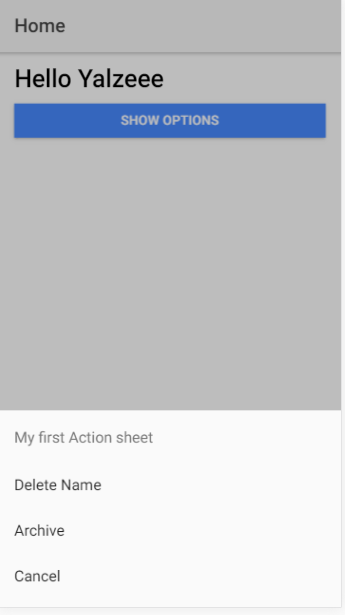.png)
Also when i click the button we can see that it clears the name i previously input.
.png)
The difference between native alerts and action sheets and ionics defaults
In the examples above i used ionic defaults action sheets and alert. You could also use the native alerts which are inbuilt into android and ios frameworks with ionic. These would require plugins and are a whole different process which i would explain in a different tutorial.
Now speaking about the pros and cons or simply the difference between using these. In my opinion, using ionics default would be better because these components are not complex and would not require any extra processing speed. So it would in no way affect the lag of your application. Using native components on the other hand requires the use of plugins which work perfectly fine also when setup for the platform they are to be used on but as always native components are a bit more complex.
Hope you found this helpful.
See you in the next
You can find the code for this tutorial in Github
Thank you for your contribution @yalzeee.
After reviewing your tutorial we suggest the following points listed below:
Try to improve the structure of your tutorial. For example, in the tutorial and alerts section could be a title so as to create a greater separation over the text of the explanation. Use as title for example
<h2>title</h2>tags. It will give a better presentation of the text to the reader.See the template for tutorial here.
We hope to see an improvement in structure in your next tutorial. Thank you for your work.
Your contribution has been evaluated according to Utopian policies and guidelines, as well as a predefined set of questions pertaining to the category.
To view those questions and the relevant answers related to your post, click here.
Need help? Write a ticket on https://support.utopian.io/.
Chat with us on Discord.
[utopian-moderator]
Thank you for your review, @portugalcoin! Keep up the good work!
Hello! I find your post valuable for the wafrica community! Thanks for the great post! We encourage and support quality contents and projects from the West African region.
Do you have a suggestion, concern or want to appear as a guest author on WAfrica, join our discord server and discuss with a member of our curation team.
Don't forget to join us every Sunday by 20:30GMT for our Sunday WAFRO party on our discord channel. Thank you.
Hi @yalzeee!
Your post was upvoted by @steem-ua, new Steem dApp, using UserAuthority for algorithmic post curation!
Your post is eligible for our upvote, thanks to our collaboration with @utopian-io!
Feel free to join our @steem-ua Discord server
Hey, @yalzeee!
Thanks for contributing on Utopian.
We’re already looking forward to your next contribution!
Get higher incentives and support Utopian.io!
Simply set @utopian.pay as a 5% (or higher) payout beneficiary on your contribution post (via SteemPlus or Steeditor).
Want to chat? Join us on Discord https://discord.gg/h52nFrV.
Vote for Utopian Witness!