Using Flare to Build Vector Graphics and Animations in Flutter
Repository
https://github.com/flutter/flutter
What Will I Learn?
- You will learn how to make Vector Graphics in Flare
- You will learn how to use Bones in Flare to Animate graphics
- You will learn how to use Flare Actors to Manipulate the Flare assets in Flutter
- You will learn about the Flare Hierarchy Tree Design
- You will learn how to coordinate different animations together to make a design
- You will learn some of the basics for using the Flare UI with the Flare tool.
Requirements
System Requirements:
- IDEA intellij, Visual Studio Code with the Dart/Flutter Plugins, Android Studio or Xcode
- The Flutter SDK on the latest Master Build
- An Android or iOS Emulator or device for testing
OS Support for Flutter:
- Windows 7 SP1 or later (64-bit)
- macOS (64-bit)
- Linux (64-bit)
Required Knowledge
- A basic knowledge Programming
- A fair understanding of Mobile development and Imperative or Object Oriented Programming
- Basic knowledge of dependencies
Resources for Flutter and this Project:
- Flutter Website: https://flutter.io/
- Flutter Official Documentation: https://flutter.io/docs/
- Flutter Installation Information: https://flutter.io/get-started/install/
- Flutter GitHub repository: https://github.com/flutter/flutter
- Flutter Dart 2 Information: https://github.com/flutter/flutter/wiki/Trying-the-preview-of-Dart-2-in-Flutter
- Flutter Technical Overview: https://flutter.io/technical-overview/
- Dart Website: https://www.dartlang.org/
- Flutter Awesome GitHub Repository: https://github.com/Solido/awesome-flutter
- The Flutter Provider Library: https://github.com/rrousselGit/provider
- Pub website: https://pub.dartlang.org
Flare Resources:
- Flare Home Page: https://www.2dimensions.com/
- Flare Made-with Page: https://www.2dimensions.com/made-with-2d
- Flare-Flutter Github: https://github.com/2d-inc/Flare-Flutter
Sources:
Flutter Logo (Google): https://flutter.io/
Difficulty
- Intermediate
Description
In this Flutter Video tutorial, we take a look at the Flare Flutter runtime library and the Flare UI toolkit. These two tools were released when Google officially released Flutter to the world during their 2018 I/O conference. Flare is a runtime and toolkit that allows for developers to build assets and then import them directly into Flutter (and other platforms). These assets can be manipulated much like any other widget in the Flutter Framework which makes them feel like native widgets.
The Flare UI Toolkit and its Tree Based Hierarchy
Flare is a fairly comprehensive SaaS (software as a service) that can be accessed from a browser. The Toolkit gives you a robust set of tools which can be used to design and develop graphics and user interfaces features. You can build the assets using the tools and you can import existing SVG files directly into the toolkit. Flare makes use of a tree based hierarchy that works in a way that is similar to Flutter's own widget tree. Parent objects have control over their children which makes it easy to determine how the objects will interact with one another during an animation.
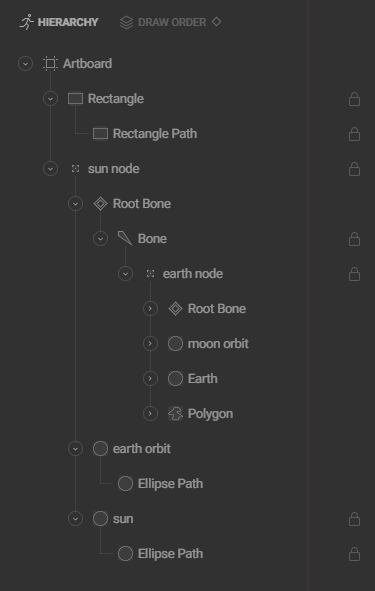
The above image shows off the general hierarchy of the asset that was created during this Tutorial. Everything is a child to the artboard which is the main field that you draw these components on-top of. Underneath of that we have a rectangle which is used to define a background color for our Solar System. Next to it is the Sun node which is a static node that sits in the very center of our animation. The sun node is what pins together all of the different shapes that represent our Sun in the graphic. The Sun then connects to the Earth node with a Bone and like the Sun node, the Earth node pins together the various components for our Earth.
Creating Predefined Animations in Flare and Importing them into Flutter
Once you've defined a tree hierarchy for your graphic, you can then create a bunch of different animations. The animations are able to run at a smooth 60 frames per second and they can be defined directly on the asset itself and then executed with the Flare runtime in your Flutter application. You may also interface with these animations using Flutter AnimationControllers and the controls given you you by the Flare_Flutter library. This allows you to not only define premade static animations but also define the behavior of an asset based on user interaction. When you export a file from Flare, you are given a .flr file which you can then import into your flutter application like any other asset file. This .flr file can then be used to execute the predefined animations and also create dynamic behavior in combination with objects from the Flare_Flutter library.
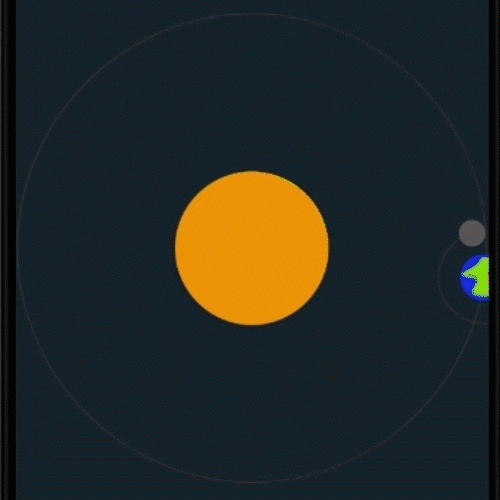
Above is a Gif of the graphic and animation that was created for this Tutorial. This animation is running in the Android emulator inside of our Flutter application and it runs at a smooth 60 frames per second. The animation of the moon, earth and sun rotating was a predefined animation created in the Flare Toolkit. It was then imported into Flutter via a .flr file and then rendered into our application using a FlareActor object.
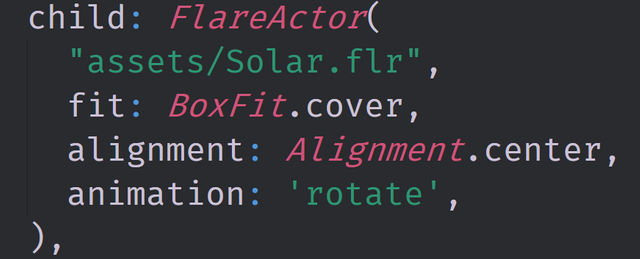
Above is the code used to define the FlareActor object. Notice that we need to input the .flr file's path using a string. We then are able to stretch, pan and align the asset using the fit and alignment properties built into the FlareActor Object. There are also many other properties that we can use to modify how the graphic is rendered by Flutter including coloring, decorations, rotations and transformations. At the very bottom of the FlareActor code is a string defining the animation that we want to execute when this widget is rendered by our application. We can also control how this animation executes using this property in concert with a few other properties given to use by the Flare_Flutter library.
The Source Code for this video may be found here: https://github.com/tensor-programming/flutter_flare_example
The Flare Asset made in this video can be found here: https://www.2dimensions.com/a/tensordeveloper/files/flare/solar
Video Tutorial
Curriculum
Projects and Series
Stand Alone Projects:
- Building a Flutter Speech to Text/Speech Recognizer Application
- Dart Flutter Cross Platform Chat Application Tutorial
- Building a Temperature Conversion Application using Dart's Flutter Framework
- Managing State with Flutter Flux and Building a Crypto Tracker Application with Dart's Flutter Framework
Utopian Rocks Example
- Advanced Flutter Project - Setting Up the Basic Structure - Part One
- Advanced Flutter Project - Adding a Second BloC - Part Two
- Advanced Flutter Project - Best Practices - Generic BLoC Providers - Part Three
- Advanced Flutter Project - Adding Fonts and Fuzzy Timestamps - Part Four
- Advanced Flutter Project - Filtering Contributions and Building Aesthetics - Part Five
Building a Calculator
- Building a Calculator Layout using Dart's Flutter Framework
- Finishing our Calculator Application with Dart's Flutter Framework
Movie Searcher Application
- Building a Movie Searcher with RxDart and SQLite in Dart's Flutter Framework (Part 1)
- Building a Movie Searcher with RxDart and SQLite in Dart's Flutter Framework (Part 2)
- Building a Movie Searcher with RxDart and SQLite in Dart's Flutter Framework (Part 3, Final)
Minesweeper Game
- Building a Mine Sweeper Game using Dart's Flutter Framework (Part 1)
- Building a Mine Sweeper Game using Dart's Flutter Framework (Part 2)
- Building a Mine Sweeper Game using Dart's Flutter Framework (Part 3)
- Building a Mine Sweeper Game using Dart's Flutter Framework (Part 4, Final)
Redux Todo App
- Building a Todo/CRUD Application In Flutter With Redux - Part 3
- Building a Todo/CRUD Application In Flutter With Redux - Part 2
- Building a Todo/CRUD Application In Flutter With Redux - Part 1
RxCommand Weather App
- Building a Weather Application with Dart's Flutter Framework (Part 1, Handling Complex JSON with Built Code Generation)
- Building a Weather Application with Dart's Flutter Framework (Part 2, Creating a Repository and Model)
- Building a Weather Application with Dart's Flutter Framework (Part 3, RxCommand (RxDart) and Adding an Inherited Widget)
- Building a Weather Application with Dart's Flutter Framework (Part 4, Using RxWidget to Build a Reactive User Interface)
- Localize and Internationalize Applications with Intl and the Flutter SDK in Dart's Flutter Framework
Curriculum
- Building a Multi-Page Application with Dart's Flutter Mobile Framework
- Making Http requests and Using Json in Dart's Flutter Framework
- Building Dynamic Lists with Streams in Dart's Flutter Framework
- Using GridView, Tabs, and Steppers in Dart's Flutter Framework
- Using Global Keys to get State and Validate Input in Dart's Flutter Framework
- The Basics of Animation with Dart's Flutter Framework
- Advanced Physics Based Animations in Dart's Flutter Framework
- Building a Drag and Drop Application with Dart's Flutter Framework
- Building a Hero Animation and an Application Drawer in Dart's Flutter Framework
- Using Inherited Widgets and Gesture Detectors in Dart's Flutter Framework
- Using Gradients, Fractional Offsets, Page Views and Other Widgets in Dart's Flutter Framework
- Making use of Shared Preferences, Flex Widgets and Dismissibles with Dart's Flutter framework
- Using the Different Style Widgets and Properties in Dart's Flutter Framework
- Composing Animations and Chaining Animations in Dart's Flutter Framework
- Building a Countdown Timer with a Custom Painter and Animations in Dart's Flutter Framework
- Reading and Writing Data and Files with Path Provider using Dart's Flutter Framework
- Exploring Webviews and the Url Launcher Plugin in Dart's Flutter Framework
- Adding a Real-time Database to a Flutter application with Firebase
- Building a List in Redux with Dart's Flutter Framework
- Managing State with the Scoped Model Pattern in Dart's Flutter Framework
- Authenticating Guest Users for Firebase using Dart's Flutter Framework
- How to Monetize Your Flutter Applications Using Admob
- Using Geolocator to Communicate with the GPS and Build a Map in Dart's Flutter Framework
- Managing the App Life Cycle and the Screen Orientation in Dart's Flutter Framework
- Making use of General Utility Libraries for Dart's Flutter Framework
- Interfacing with Websockets and Streams in Dart's Flutter Framework
- Playing Local, Network and YouTube Videos with the Video Player Plugin in Dart's Flutter Framework
- Building Custom Scroll Physics and Simulations with Dart's Flutter Framework
- Making Dynamic Layouts with Slivers in Dart's Flutter Framework
- Building a Sketch Application by using Custom Painters in Dart's Flutter Framework
- Using Dart Isolates, Dependency Injection and Future Builders in Dart's Flutter Framework
- Looking at the Main Features of the Beta Three Release of Dart's Flutter Framework
- Working With gRPC in Flutter on Top of a Go Service
Hi @tensor,
Doing Graphics and animation is a lot of fun. And this time, I get to see how you do it using the Flutter controller. It's the details that people need to learn. Your tutorial provides the detail instruction that is needed.
Thank you again for your video contribution adding more fun tutorials onto the Flutter series.
Your contribution has been evaluated according to Utopian policies and guidelines, as well as a predefined set of questions pertaining to the category.
To view those questions and the relevant answers related to your post, click here.
Need help? Chat with us on Discord.
[utopian-moderator]
Thank you for your review, @rosatravels! Keep up the good work!
This post has been voted on by the SteemSTEM curation team and voting trail in collaboration with @curie.
If you appreciate the work we are doing then consider voting both projects for witness by selecting stem.witness and curie!
For additional information please join us on the SteemSTEM discord and to get to know the rest of the community!
Hi, @tensor!
You just got a 6.5% upvote from SteemPlus!
To get higher upvotes, earn more SteemPlus Points (SPP). On your Steemit wallet, check your SPP balance and click on "How to earn SPP?" to find out all the ways to earn.
If you're not using SteemPlus yet, please check our last posts in here to see the many ways in which SteemPlus can improve your Steem experience on Steemit and Busy.
Hi @tensor!
Your post was upvoted by @steem-ua, new Steem dApp, using UserAuthority for algorithmic post curation!
Your post is eligible for our upvote, thanks to our collaboration with @utopian-io!
Feel free to join our @steem-ua Discord server
Hey, @tensor!
Thanks for contributing on Utopian.
We’re already looking forward to your next contribution!
Get higher incentives and support Utopian.io!
Simply set @utopian.pay as a 5% (or higher) payout beneficiary on your contribution post (via SteemPlus or Steeditor).
Want to chat? Join us on Discord https://discord.gg/h52nFrV.
Vote for Utopian Witness!
Great post! I invite you to watch the last video on channel54
I don't appreciate you using a bot to post the same thing on multiple posts.