How to set up and use multisignature accounts on Steem Blockchain.

Image by @good-karma
What is multisignature and why is it important ?
An account set to use multisignature (or multisig) will require one or more signatures to perform a certain task, as opposed to traditional accountes that only require one signature.
There are two main reasons to use multisig :
- Enhancing the security of an account by requiring more than one signature and storing the keys on different devices to mitigate the risks.
- Performing action based on a consensus. Project owners can set an account to use multisig in order to allow transactions only if 80% of the cofounders agree to sign it, for example.
Multisig on Steem
Types of permissions
There are four types of permissions on Steem and each has its pair of private/public keys:
- Owner Key: This is the admin key, that gives right to perform any kind of transaction.
- Active Key: The active key is needed to perform monetary transactions. It can also be used to change the other permissions (except for Owner).
- Posting Key:The posting key is used to post, vote and perform some broadcasts.
- Memo Key:Use to encode/decode private memos.
Multi-authority account
In the case of a multi-authority account, more than one pair of keys can be set for one or more of these permissions (except for Memo).
For example, I can keep the full ownership of my account @stoodkev but decide to require an additional signature from @steem-plus for the Active permission.
There are two important parameters when setting the authorities for an account :
- the weight : how much the signature of the account A is worth compared to the signatures by the other accounts?
- the threshold : when do we reach consensus ?
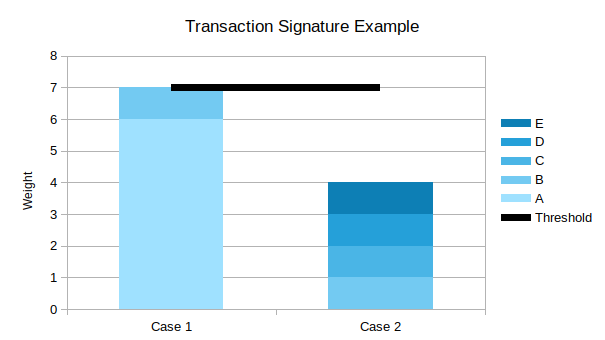
Consider the following example:
The Active authority of an account is weighted as follow:
Account A (6), Account B (1), Account C (1), Account D (1), Account E (1).
The threshold is set at 7.
Case 1
A and B sign a transaction requiring active authority.
Their total weight is 6+1=7, the threshold is reached and the transaction is validated.
Case 2
Everyone but A sign the transaction.
Their total weight is 1+1+1+1=4, the transaction won't be validated as long as A do not sign it.
Multisig example using DSteem
In this part, I will use dsteem library to exemplify how to update an account to use multisig, check the signature requirements and finally use this all and sign a transaction using active permission.
Updating the account
Let's first take a look at the object we need to send to update the account on the official documentation.
Roles: active owner
To update the account, you will need the active or owner permission. Note that if you use the active permission, you won't be able to change the owner permission.
Parameters: account owner active posting memo_key json_metadata
Only account, owner, active and posting are relevant to this tutorial.
The object in this example looks liks this :
{
    "account": "steemit",
    "posting": {
      "weight_threshold": 1,
      "account_auths": [],
      "key_auths": [
        [
          "STM6FATHLohxTN8RWWkU9ZZwVywXo6MEDjHHui1jEBYkG2tTdvMYo",
          1
        ],
        [
          "STM76EQNV2RTA6yF9TnBvGSV71mW7eW36MM7XQp24JxdoArTfKA76",
          1
        ]
      ]
    },
    "memo_key": "STM6FATHLohxTN8RWWkU9ZZwVywXo6MEDjHHui1jEBYkG2tTdvMYo",
    "json_metadata": ""
  }
We can observe that for posting (and similarly for other permissions), the threshold is defined as weight_threshold and the different public keys are listed in the key_auths. Each authority is an array comprising the public key followed by the weight. Alternatively, account names can be listed with the corresponding weight in "account_auths".
It is thus easy to adapt the object above to set up multisig for one several permissions.
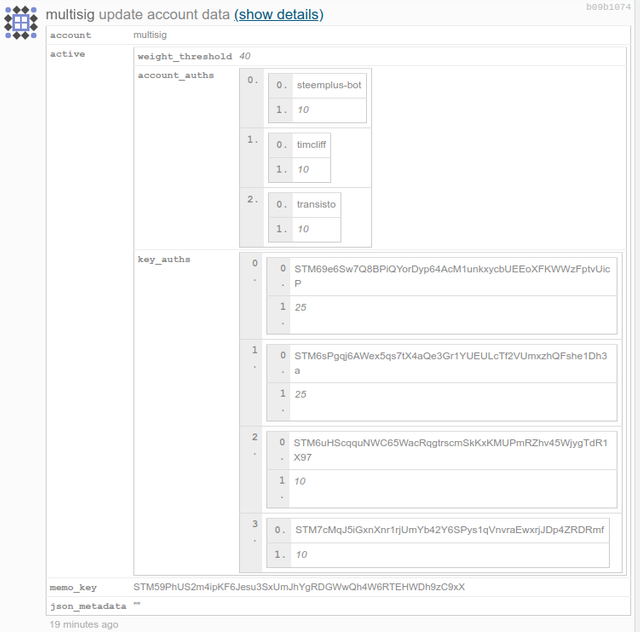
The 7 keys example
The task requests requires the example of a 7 keys active authority (weights: 25% 25% 10% 10% 10% 10% 10%) with a 40% threshold.
Set the authorities either by account or public active key, and do not forget to add the json_metadata and memo_key, they are not optional.
Here is what it looks like using dsteem. I created a @multisig account for the occasion.
const dsteem = require('dsteem');
const client = new dsteem.Client('https://api.steemit.com');

const update_account = {
    "account": "multisig",
    "active": {
        "weight_threshold": 40,
        "account_auths": [
            ["steemplus-bot", 10],
            ["timcliff", 10],
            ["transisto", 10]
        ],
        "key_auths": [
            [
                "STM69e6Sw7Q8BPiQYorDyp64AcM1unkxycbUEEoXFKWWzFptvUicP", //@multisig
                25
            ],
            [
                "STM6sPgqj6AWex5qs7tX4aQe3Gr1YUEULcTf2VUmxzhQFshe1Dh3a", //@stoodkev
                25
            ],
            [
                "STM6uHScqquNWC65WacRqgtrscmSkKxKMUPmRZhv45WjygTdR1X97", //@steem-plus
                10
            ],
            [
                "STM7cMqJ5iGxnXnr1rjUmYb42Y6SPys1qVnvraEwxrjJDp4ZRDRmf", //@steemplus-pay
                10
            ]
        ]
    },
    "json_metadata": "",
    "memo_key": "STM59PhUS2m4ipKF6Jesu3SxUmJhYgRDGWwQh4W6RTEHWDh9zC9xX"
};

client.broadcast.updateAccount(update_account, dsteem.PrivateKey.from("Your Private Active Key")).then(function(result) {
    console.log('Result: ' + result);
}, function(error) {
    console.error(error);
})
Of course, do not hardcode your private WIF whatever you do, this is for demonstration purpose only.
As expected, we get the following result on the blockchain explorer steemd.com :
Signing transactions
Preparing the transaction
Before you start signing, you need to prepare the transaction :
const expireTime=1000*3590;
const props = await client.database.getDynamicGlobalProperties();
const ref_block_num = props.head_block_number & 0xFFFF;
const ref_block_prefix = Buffer.from(props.head_block_id, 'hex').readUInt32LE(4);
const expiration = new Date(Date.now() + expireTime).toISOString().slice(0, -5);
const extensions = [];
const operations= [['transfer',
                 {'amount': '5.000 STEEM',
                  'from': 'multisig',
                  'memo': '',
                  'to': 'stoodkev'}]];
const tx = {
            expiration,
            extensions,
            operations,
            ref_block_num,
            ref_block_prefix,
        }
Let's see about the parameters that matter here:
expiration
You can set the expiration time of the transaction (time after which even with sufficient signatures, the transaction will be refused). The maximum expiration time is one hour (3600*1000 ms) but I have noticed that if the maximum time is set, it will sometimes throw errors, so I ve used a slightly smaller period of 3590 seconds.
Setting to one hour lets sufficient time to gather the signatures needed.
ref_block_*
No need to reinvent the wheel when @xeroc already explained the purpose of the two ref_block parameters :
The ref_block_num indicates a particular block in the past by referring to the block number which has this number as the last two bytes. The ref_block_prefix on the other hand is obtain from the block id of that particular reference block. It is one unsigned integer (4 bytes) of the block id, but not starting at the first position but with an offset of 4 bytes. [...]
The purpose of these two parameters is to prevent replay attacks in the case of a fork. Once two chains have forked, the two parameters identify two different blocks. Applying a signed transaction of one chain at another chain will invalidate the signature.
operations
Here the operation for the transaction is hardcoded to send 5 STEEM to @stoodkev for demonstration purpose. Of course, it can be replaced by any kind of operation associated with the given authority.
Signing the transaction
Let's go back to our 7 keys example.
@multisig (weight : 25) wants to send 5 STEEM to @stoodkev (weight : 25). Both signatures would be enough to reach the threshold (40), but for fairness @stoodkev decides not to sign it himself. All others being equal (weight : 10), 2 more signatures are needed (total weight : 45).
@steem-plus and @steemplus-pay will sign as well.
Let's see how it goes :
const signMultisig = client.broadcast.sign(tx, dsteem.PrivateKey.from(process.env.ACTIVE_MULTISIG));
//const sendMultisig= await client.broadcast.send(signMultisig);
//console.log(sendMultisig);
// Failing due to "Missing Active Authority" (weight inferior to the threshold)
const signSteemPlus = client.broadcast.sign(signMultisig, dsteem.PrivateKey.from(process.env.ACTIVE_SP));
const signSteemPlusPay = client.broadcast.sign(signSteemPlus, dsteem.PrivateKey.from(process.env.ACTIVE_SPP));
console.log(signSteemPlusPay);
// Send the broadcast
const send= await client.broadcast.send(signSteemPlusPay);
console.log(send); // Success
As you can see, for each account or key having an active authority that we wish to use to sign, we need to use client.broadcast.sign with tx and the private active key as parameters.
If we try to send the broadcast with unsifficient signatures, a Missing Active Authority error is thrown.
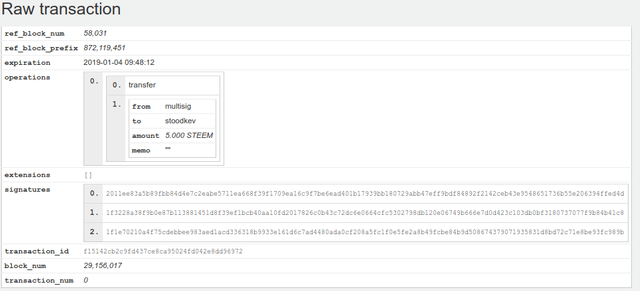
The sign function returns tx with the corresponding signature added to its signatures array.
{ expiration: '2019-01-04T09:48:12',
  extensions: [],
  operations: [ [ 'transfer', [Object] ] ],
  ref_block_num: 58031,
  ref_block_prefix: 872119451,
  signatures:
   [ '2011ee83a5b89fbb84d4e7c2eabe5711ea668f39f1709ea16c9f7be6ead401b17939bb180729abb47eff9bdf84892f2142ceb43e9548651736b55e206394ffed4d',
     '1f3228a38f9b0e87b113881451d8f39ef1bcb40aa10fd2017826c0b43c72dc6e0664cfc5302798db120e06749b666e7d0d423c103db0bf3180737077f9b84b41c8',
     '1f1e70210a4f75cdebbee983aed1acd336318b9933e161d6c7ad4480ada0cf208a5fc1f0e5fe2a8b49fcbe84b9d508674379071935831d8bd72c71e8be93fc989b' ] }
Last step is sending the transaction with client.broadcast.send() and voila! The transfer was succesful, check it on steemd.
Checking additional potential signatures for a partially signed transaction
Two features that need additional attention :
- get_potential_signatures can be used to find out which keys need are sufficient to reach the threshold.
- get_required_signatures can be used to get the smallest subset of signatures required given an array of keys in your possession.
Remember the expiration time, be efficient!
Of course, in the example above, all the keys are available, although in reality different persons with hold the keys.
How you implement this is up to you. If just a few signatures are needed,one could simply sign the transaction, export is as .json file and pass it to the next person to sign. The last one to sign can send broadcast the transaction.
For complex organisations with numerous signers, an interface showing automatically transactions that can be signed would be better. It would then be possible to sign it in a click and refresh the object to sign for the other signers. After a sufficient weight of signature has been gathered, the transaction would be broadcasted.
DISCLAIMER :
This post is an attempt at comprehending how multisignature works on the Steem blockchain and answering this task request. If this is chosen as the accepted answer, the bounty will be used to fund projects on Fundition, reward my colleague @cedricguillas for his amazing work on SteemPlus, @steemchiller for SteemWorld, etc.
Repository:
https://github.com/steemit/steem
Sources :
- @xeroc Piston Multisig guide
- @xeroc's Transaction signing in a nutshell
- DSteem's Github
- Steem Developer Portal
Hope you found this tutorial useful. If you did, please consider voting for me as a witness.
Steem on!
EDIT : I have created this repository for reference : https://github.com/stoodkev/multisig
Thank you for your contribution @stoodkev.
This tutorial is very interesting and of great use to all users in Steemit and even multi-users project accounts to make transfer decisions.
The tutorial is very well explained and with images with the results it facilitates the user to understand what you are explaining.
We are waiting for more tutorials. Thank you!
Your contribution has been evaluated according to Utopian policies and guidelines, as well as a predefined set of questions pertaining to the category.
To view those questions and the relevant answers related to your post, click here.
Need help? Write a ticket on https://support.utopian.io/.
Chat with us on Discord.
[utopian-moderator]
Thank you for your review, @portugalcoin! Keep up the good work!
Nice guide. Would be cool to design a html page to make things easier for the users, since you're using a JS library.
Thank you!
Yes I m thinking about creating a small repo next week to make it easier to understand and let users update their accounts and sign/broadcast transactions
@buildteam and @steemvoter are proud to award you a Steemvoter Guild vote for your efforts in contributing to the multisig bounty.
Hi @stoodkev!
Your post was upvoted by @steem-ua, new Steem dApp, using UserAuthority for algorithmic post curation!
Your post is eligible for our upvote, thanks to our collaboration with @utopian-io!
Feel free to join our @steem-ua Discord server
Hey, @stoodkev!
Thanks for contributing on Utopian.
We’re already looking forward to your next contribution!
Get higher incentives and support Utopian.io!
Simply set @utopian.pay as a 5% (or higher) payout beneficiary on your contribution post (via SteemPlus or Steeditor).
Want to chat? Join us on Discord https://discord.gg/h52nFrV.
Vote for Utopian Witness!
This post has been included in today's SOS Daily News - a digest of all you need to know about the State of Steem.
Editor of the The State of Steem SoS Daily News.
Promoter of The State of Steem SoS Weekly Forums.
Editor of the weekly listing of steem radio shows, podcasts & social broadcasts.
Founder of the A Dollar A Day charitable giving project.
Congrats @stoodkev, you are one of the finalists for the Multisig bounty, BuildTeam will be sponsoring a Steemvoter Guild vote in addition to any other bounty you may receive. Incoming shortly.
Thanks a lot!
Hope that this tutorial helps