Learn to build a fullstack website with Java and JavaScript
What Will I Learn?
- We will build a simple login system
- Take a look at SQLite, Java Spark and W3 frontend
Requirements
- A Java IDE (I'm using Eclipse, but you can grab anything, even a text editor)
- Some kind of text / code editor (I'm using VS Code)
- A browser
- Internet connection
- Basic OOP understanding (Java, C++, C#, whatever)
- Basic SQL skills
Difficulty
- Intermediate, but don't be discouraged, it's not hard at all
Hello, welcome to a very simple tutorial to get you started with full stack development. Whether you are new to web stuff, or just want to try something new, this should get you up and running. This is in no way a complete tutorial, and I encourage you to discover other options and see what's fit for you.
That being said, we will use some open source libraries and frameworks here, the first one being Java Spark. This is a small, lightweight microframework that lets you create Java web APIs. Here is how it works. Your Javascript (or anything else for that matter) code opens your myapi.com/hello, reads whatever is on the site and then displays that to the user. Simple.
Set up our server first. You will need to create a new Maven project, in Eclipse this can be done with File -> New -> Project -> Maven -> Maven project. Maven will take care of importing our libraries for us. Name your project whatever and skip the archetype selection. In your newly generated project you should see a pom.xml file. That is where Maven will check what should it import. You can check Spark's website (I recommend you do), but for now, let's just add this to the pom:
<dependencies>
    <dependency>
        <groupId>com.sparkjava</groupId>
        <artifactId>spark-core</artifactId>
        <version>2.7.1</version>
    </dependency>
</dependencies>
This will import Spark for us. We will also need some kind of database to store the users. You can use about 3 trillion databases for this, but to keep it simple, we are using SQLite. SQLite is a self-contained database, meaning we will not need to set up any separate applications to run it, simply use the driver in our application. To import it add this to your pom after Spark:
<dependency>
        <groupId>org.xerial</groupId>
        <artifactId>sqlite-jdbc</artifactId>
        <version>3.21.0</version>
</dependency>
Note: sometimes Maven doesn't download the SQLite driver properly, in that case you can add the .jar file manually, download here and add like this.
That out of the way we can start building our application. I will not paste the whole code here, you can read it on GitHub, but I will be putting the important lines here. We will be using an MVC approach. MVC stands for Model-View-Controller. Now of course you don't need to follow this again, but this is the main layout for the repo's structure. Create these 3 packages and an additional Main package in your project. Package is just a fancy name for a folder, can be created by right clicking on your src folder.
Model
We will need to write some boilerplate first to speed up the later parts. Create a java file in the Model package called User. User will represent our users and will store a name and a password. You can find the full code here. It is really self-explanatory and shouldn't be given much thought honestly.
Something more interesting is the database part. You can create a DB.java either here or in the Controller package, I made one here because my hand slipped. This is where we will store our database stuff. Full code.
First we will need to set up an SQLite database. This can easily be done by
try {
    Class.forName("org.sqlite.JDBC");
    c = DriverManager.getConnection("jdbc:sqlite:test.db");
} catch (Exception e) {
    //manage exception
}
Now we can use SQLite in our class. Let's create the actual database, which will be stored in our project's root folder if you ever want to check that out. SQLite uses similar commands to MySQL. A simple id - name - pass database can be created by
Statement statement;
try {
    statement = c.createStatement();
    String sql = "CREATE TABLE IF NOT EXISTS USERS " +
                     "(ID             INTEGER PRIMARY KEY," +
                     " NAME           TEXT    NOT NULL, " +
                     " PASS           TEXT    NOT NULL)";
    statement.executeUpdate(sql);
    statement.close();
} catch (SQLException e) {
    e.printStackTrace();
}
If you are experienced in SQL you are already typing "hey where is AUTOINCREMENT?!?!?!?". Well it's there, if you don't provide a value to the primary key in SQLite, it will autoincrement that value.
Now that we have out database, let's insert and read users. In the example code I provided both a PreparedStatement version (insertUser) and a plain text concatenation version (checkLogin). Generally speaking, you should use PreparedStatements. Why? Let's assume the user inputs "; DROP TABLE users;--. This will delete our entire database. We don't want that. We really don't want that, and PreparedStatements help us not to lose our entire database.
After you read the code and implemented your own, let's move on to
Controller
What do we control? The API. We will provide some URLs to the website to use. This is where Spark comes to play.
Usually you can press ctrl - shift - o in Eclipse to import your dependencies, but with Spark we will use static imports. This can be done with
import static spark.Spark.get;
import static spark.Spark.port;
import static spark.Spark.before;
Of course you can import spark.Spark.* but don't do that. Only import what you need.
If you read the code, you can see that we have an instance of a DB object. This will let us have multiple API classes with the same database if we ever decide we need that, but we don't need that yet.
port(number);
will open our server on localhost:number, so let's create some endpoints to check it out.
get("/hello", (req, res) -> {
    return "Hello";
});
This is the simplest endpoint, if you run your program and go to ˙localhost:8081/hello`, you should see your server saying hello to you once we have our Main set up. If you can't wait, just scroll there and start your sever.
If you can wait a bit though, let's set up our login and register endpoints. Remember our DB class? We can easily create our endpoints because we have everything set up there.
get("/user/add/:name/:pass", (req, res) -> {
    db.insertUser(new User(req.params(":name"), req.params(":pass")));
    return "true";
});
You can see, that now we can register if we just go to localhost:8081/user/add/username/password
DISCLAIMER
In this tutorial we use simple GET requests to send data. DO NOT DO THAT OTHERWISE. You can read about HTTP requests here.
After you got scared from the disclaimer and wrote the login code, head over to
Main
There is really not much else to do here, just set up your database and API and you are done, the server is working.
DB db = new DB();
API api = new API(db);
Frontend
We are using w3css to make our site responsive. Responsive sites look different on mobile, and is a good idea to implement in any site. I am going to assume you can write basic HTML, if not, head over to W3 to learn more about it. To use w3css, just include
<link rel="stylesheet" href="https://www.w3schools.com/w3css/4/w3.css">
in your < head > tag.
To make your site responsive, this library uses a similar approach as Bootstrap. You can simply
<div class="w3-row">
    <div class="w3-third w3-container">
        something
    </div>
    <div class="w3-third w3-container">
        something else
    </div>
    <div class="w3-third w3-container">
        something else again
    </div>
</div>
This will divide your screen to 3 separate columns, that will get resized if you view it on mobile. If you want to do more, you can read up on W3CSS to create cool looking web interfaces.
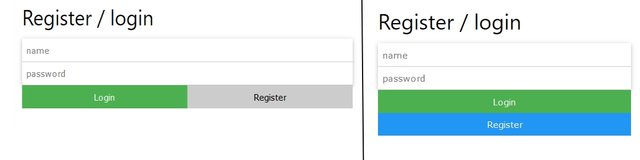
Now we need to create a login / register form with these same buttons, make sure to add onclick=function() to both of the buttons.
Let's get to javascript. JS will be the language that communicates with our server. To simplify that, we will include W3JS. This is not a framework, just a collection of functions you would end up rewriting anyway. Put
<script src="https://www.w3schools.com/lib/w3.js"></script>
in your < head > tag.
I put the JS code in the same file, but if you decide to use a separate file, you can <script src="myfoder/myfilejs"></script> the same way. To get the input value of the textboxes, you can use var name = document.getElementById(ID).value, where ID is the id="something" tag in the html code.
After we got our values, we can use W3JS' w3.getHttpObject(URL, Callback) function. Callback is an other funcion what will consume the data fetched from the server. In the code I simply logged the results to a < div >.
And we are done
Now, if your server is running, you can open your html file and interact with it. Go wild, create new endpoints, who knows, maybe this very website will be the next Steemit some day.
Posted on Utopian.io - Rewarding Open Source Contributors
Thank you for the contribution. It has been approved.
You can contact us on Discord.
[utopian-moderator]
@razorsh4rk, Upvote is the only thing I can support you.
Hey @razorsh4rk I am @utopian-io. I have just upvoted you!
Achievements
Suggestions
Get Noticed!
Community-Driven Witness!
I am the first and only Steem Community-Driven Witness. Participate on Discord. Lets GROW TOGETHER!
Up-vote this comment to grow my power and help Open Source contributions like this one. Want to chat? Join me on Discord https://discord.gg/Pc8HG9x
Nice post. Good to see a Java dev who is not using Eclipse :)