Build Application Using Firebase With Electronjs(Part 3)
Repository
Electron Github Address
https://github.com/electron/electron
AngularJs Github Address
https://github.com/angular/angular.js/
My Github Adress
This Project Github Address
https://github.com/pckurdu/Build-Application-Using-Firebase-With-Electronjs-Part-3
What Will I Learn?
- You will learn firestore data insertion and data display
- You will learn the firestore
add()function - You will learn the firestore
onSnapshot()andget()functions - You will learn the firestore
docspropery anddata()function - You will learn how to create your collection in firestore
- You will learn
innerHTMLandgetElementByIdfunctions in javascript
Requirements
- text editor (I used atom editor)
- Basic javascript information
- Basic electron information
- Basic angularjs information
Difficulty
- Basic
Tutorial Contents
Hello to everyone,
We are at the end of the articles I described the process of creating a desktop application using firebase.
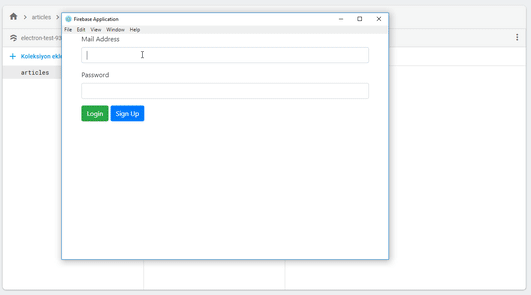
We have performed electronjs installation in previous tutorials and we have done angular routing settings and also we have performed login and signup using firebase authentication.
Once we've logged in, we can access and modify certain data in application. We must store this data in a database. Firebase provides database and database services to store our data. This database is called cloud firestore and we will use this database for our desktop application.
We'll create a dashboard page and we'll only give it access when it's authentice. When the user accesses the dashboard page, he/she will be able to add articles and view these articles. We will enter the title and content of the article on the application and create a collection of articles and add the data to the documentation.
This tutorial consists of 3 parts:
In the first part, we will create the dashboard page and create the form elements to enter the title and content of the articles, and we will also edit them using bootstrap.
In the second part, we enter these values on the cloud firestore.
In the third part, we list the documents on the cloud firestore.
Let's start!
Designing the Dashboard Page
The dashboard page is a page that the user can see by loging in. This page will be the data entry into the database.
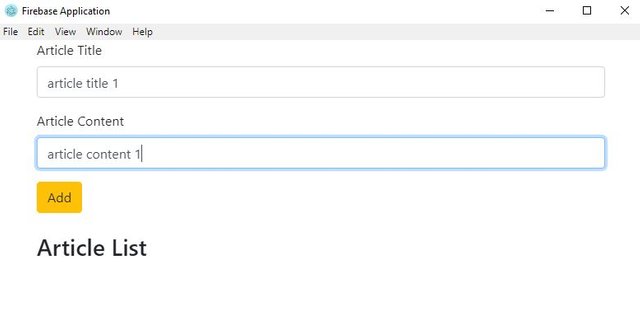
The user will enter the title and content of the articles in the form field and this information will be saved in the cloud firestore so we have to create two input for the user to enter the article title and article content.
These values must also be displayed on the screen because I want to explain post the data in firestore and get the data list in firestore. So I would like to open a field where I will show you the article lists.
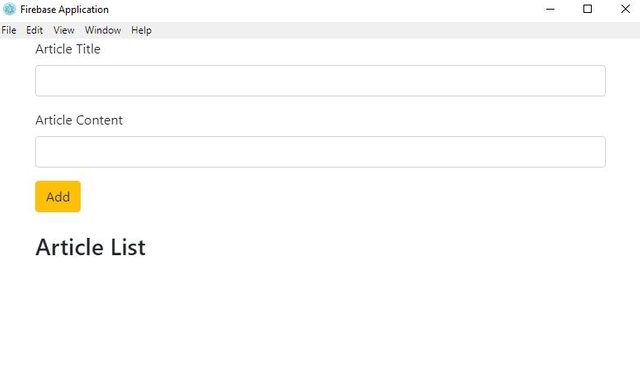
In dashboard.html
<div class="container">
    <form>
        <div class="form-group">
          <label for="title">Article Title</label>
          <input type="text" class="form-control" id="title" ng-model="title" />
        </div>
        <div class="form-group">
          <label for="content">Article Content</label>
          <input type="text" class="form-control" id="content" ng-model="content" />
        </div>
        <button type="submit" class="btn btn-warning" ng-click="add()">Add</button>
    </form><br/>
    <h3>Article List</h3>
    <div>
        <ul class="list-group" id="ul">

        </ul>
    </div>
</div>
We've added two div that use the form-group classes, and we've defined the inputs between these divs.
The important thing here is the values of the ng-model attributes, because with the help of these values, we will capture the data entered in the inputs. In addition, the button added to the button will inform us that the button clicked.
We divided the board page into two and added the data to the user in the first part, in the second part, we have defined the ul label to show this added data. We do not define the li tags inside the ul tag because will create the li tags on the controller page and upload them to the ul tag.
Create a DashboardCtrl
To access the elements on the dashboard page we need to create a controller for this page. So we can access the add() function and add the data to firestore.
In script.js
app.controller('dashboardCtrl',function($rootScope,$scope,$location){
if($rootScope.auth==true){//checking user login.
}
}
Since I'll use $scope, $rootScope and $location objects in the dashboardCtrl, I've defined these objects in the cotroller function.
When the user loged in to loginCtrl, we set the $rootScope.auth object to true. So that we can determine that the user is logged in. In dashboardCtrl, we have to check this auth object before activating the dashboard page.
Adding Data to Firestore
As we have done the necessary checks, we can now write our code to add our data. We need to write all the codes in the if block, which we check the auth object.
In script.js
  $scope.add=function(){

      db.collection('articles').add({//A collection of articles is being created and a document is added.
          title:$scope.title,
          content:$scope.content
      }).then(()=>{//success
          console.log("Article successfully added");
      }).catch(err=>{//unsuccessful
          console.log(err.message);

      })

  }
The $scope.add function is the function that will be triggered when the button is clicked.
We have previously defined the db variable. This represents the variable firestore. We can add collection to firestore with collection included in db object. With the add() function in the collection, we can add a document to the firestore.
The add() function takes the object into it and resends the result to us. If the data insertion is successful with the then() function, we can capture the result. If an error occurs during data insertion, we can find this error with the catch() function.
After clicking the Add button, this data is added to the firebase.

Initially did not have a collection of articles and was created when we click the add button. If we run the application again and add the another article again, it will add the document in the existing articles collection.
Show Firestore Data
In this section we will show the firestore data on the application.
  var ul=document.getElementById('ul');//ul element to be added to the article list is captured.

  db.collection('articles').onSnapshot(snap=>{//Instant data is captured with onsnapshot
      console.log(snap.docs);

})
We created the ul tag on dashboard.html.With the getElementById() function, we can access this entire tag.
The onSnapshot() function allows us to access the documents in the collection instantly. Opens a channel between firestore and the application and provides continuous control of a change. Another method of access to data is the get() function. With the get() function, access to the data is provided, but the application cannot see this change when there is a change in firestore after access.
When we print the snap.docs information to the console, we get the following result.

then we can capture articles from this data.
var articles=snap.docs;//all documents in articles collection
      if(articles.length){
          let html='';//I will add all li tags into html
          articles.forEach(art=>{
              //console.log(belge);
              var a=art.data();//title and content fields of the document
              console.log(a);
              //each article is written to the variable li.
              var li=`<li class="list-group-item">${a.title}---${a.content}</li>`;
              html +=li;
          });
          ul.innerHTML=html;//Add li elements into ul
      }
We return to all documents with forEach and access the documents with the data() function. after this process a variable has the title and content information of the document.We can define this information in a li tag, I define the class property for using Bootstrap. After the forEach process is finished, the data in the database is made up of a html variables.
Finally, we can define this data to the ul tag using the innerHTML property.
Result:
Curriculum
- https://steemit.com/utopian-io/@pckurdu/build-application-using-firebase-with-electronjs-part-1
- https://steemit.com/utopian-io/@pckurdu/build-application-using-firebase-with-electronjs-part-2
Thank you for your contribution @pckurdu.
After analyzing your tutorial we suggest the following points:
Nice work on the explanations of your code, although adding a bit more comments to the code can be helpful as well.
Thank you for following our suggestions in your previous tutorial.
Looking forward to your upcoming tutorials.
Your contribution has been evaluated according to Utopian policies and guidelines, as well as a predefined set of questions pertaining to the category.
To view those questions and the relevant answers related to your post, click here.
Need help? Chat with us on Discord.
[utopian-moderator]
Thank you for your review, @portugalcoin! Keep up the good work!
Hi @pckurdu!
Your post was upvoted by @steem-ua, new Steem dApp, using UserAuthority for algorithmic post curation!
Your post is eligible for our upvote, thanks to our collaboration with @utopian-io!
Feel free to join our @steem-ua Discord server
Hey, @pckurdu!
Thanks for contributing on Utopian.
We’re already looking forward to your next contribution!
Get higher incentives and support Utopian.io!
Simply set @utopian.pay as a 5% (or higher) payout beneficiary on your contribution post (via SteemPlus or Steeditor).
Want to chat? Join us on Discord https://discord.gg/h52nFrV.
Vote for Utopian Witness!