How To Use MYSQL & NodeJS + SteemJS Example

Repository
https://github.com/steemit/steem-js
What Will I Learn?
- How to use MySQL & PhpMyAdmin
- How To Save/Delete/Get/Update Data With MySQL
- Send Comment With SteemJS and save the data with MySQL
Requirements
- Text Editor - I recommending using Atom
- NodeJS
- XAMPP (Install Here: https://www.apachefriends.org/index.html)
Difficulty
- Basic
Tutorial Content
first create your database,
run XAMPP and open localhost/phpmyadmin click "New"
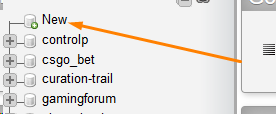
and create a database called mysql_database

now create a table called steem
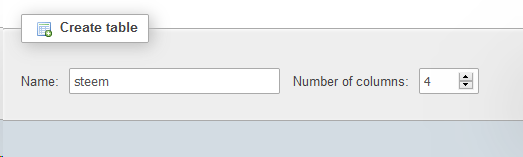
now create 3 columns, first will be id with A_I(AutoIncrement) It will auto-fill the identifier of the row (1,2,3,4,5 etc.)

and you will need 2 VARCHARS (strings), first it's author it will store the author of our comment,
second will be permlink, it will store the permlink of our comment.

great, now click save, we're done with the database!
now add the packages,
we will use HTTP for the server,
steem for the API of steem,
mysql to access the database.
var http = require('http').createServer(), //creating the server
  steem = require('steem'),
  mysql = require('mysql'); // getting the mysql package
we already create the server, we just need to listen for the port (we will use 8080 for now)
// create listener for port 8080 - opening the server
http.listen(8080, function(){
  console.log('listening on *:8080');
});
now to access the database we will need to connect the database,
first, create config json object with -
host, user, password, and base
//the config object of the database
var config = {
  "db":{
  host: "localhost",
  user: "root",
  password: "",
  base: "mysql_database"
  }
};
host - the host of the database (the IP)
user - the username of the database, for xampp it will be root, in web host it will change
password - if you didn't open it to the public it should be blank, on a web host, it will be what you choose
base - the name of the database you've created before
when you're using xampp the settings will be the same just the database will change (this is the database you made above, if you called it mysql_database leave it the same)
now create the connection to the database
//creating the mysql connection
var db = mysql.createConnection({
  host: config.db.host,
  user: config.db.user,
  password: config.db.password,
  database: config.db.base
});
so we're creating a connection and giving it to the variable db,
after we create the connection we can successfully make a connection to the database -
// connecting to the database
db.connect(function (error) {
  if (error)
  throw error;

  console.log('mysql connected');
});
if there is an error we will get the error to the console,
if the connection made successfully it will say mysql connected.
great now we can use mysql!
basic queries:
We will use a lot of question marks ? it means that the data will inject later, it preventing SQL injections from outside
- Insert
db.query("INSERT INTO `table`(`variable1`, `variable2`, `variable3`) VALUES(?, ?, ?)", [var1, var2, var3], function(err, res){
console.log(res);
});
- Select
db.query("SELECT * FROM `table`", function(err, res){
console.log(res);
});
db.query("SELECT * FROM `table` WHERE `variable1`=? AND `variable2`=?", [var1, var2], function(err, res){
console.log(res);
});
- Delete
db.query("DELETE FROM `table` WHERE `id`=?", [iD], function(err, res){
console.log(res);
});
- Update
db.query("UPDATE `table` SET `variable1`=? WHERE `id`=?", [varnew1, iD], function(err, res){
console.log(res);
});
that's all of the queries you will use most of the times,
there are some advanced ones but it's not used so often so we will go for it later in the tutorials!
now for the end of the tutorial let's make a steem comment and store the data on our database
so first, create a function that creates new permlink (a random text)
function permlinkCreate(number) {
  var text = "";
  var possible = "abcdefghijklmnopqrstuvwxyz";

  for (var i = 0; i < number; i++)
  text += possible.charAt(Math.floor(Math.random() * possible.length));

  return text;
}
so first, we're taking a number (the length of the text),
we're taking a "possible" letters (the ABC) and then making a loop of the length (number) and adding the letter to the text variable
we made at the start then sending back the permlink.
now we have a function that creates new permlink,
we need a function that sends a comment
so first create a function called sendComment with the variables account, wif, author, permlink, permalink, body
permalink is our new permlink
permlink is the permlink of the post
function sendComment(account, wif, author, permlink, permalink, body){

}
now make the comment function from the steem API
steem.broadcast.comment(wif, author, permlink, account,
permalink, '', body,
JSON.stringify({
tags: "steemit",
app: 'steemit/0.1',
  users: [account],
  format: "markdown"
}),
function(err, result) {

}
so we're at the comment function we need the posting wif, the author of the post, the permlink of the post,
the commentor(the one who send the comment - account), the permalink (the comment permlink), the body which is the content of the comment, json object with the tagsteemitjust cause comment need a basic tag, the app which is the application that the comment sent from (leavesteemit/0.1), users which is the commentor, the format which is the normal content format ofmarkdown`
now at the function insert the data to the database -
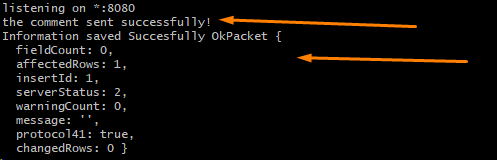
  console.log("the comment sent successfully!");
  // inserting data to the `steem` table
  db.query("INSERT INTO `steem`(`author`, `permlink`) VALUES(?, ?)", [account, permalink], function(err, res){
  if(err)
  throw err;

  console.log("Information saved Succesfully", res);
  });
first, we're telling the console that the comment sent,
then we're inserting the author and permlink to the steem table.
then when the insert made we're telling the console that the information is saved and sending the result
now the function is done, let's create variables for the account author, post permlink, comment permlink and the account&wif.
var pr = permlinkCreate(13),
  author = "upmeboost",
  permlink = "steemjs-full-tutorial-all-the-functions-all-the-abilities";
var acc = "guest123",
  wif = "5JRaypasxMx1L97ZUX7YuC5Psb5EAbF821kkAGtBj7xCJFQcbLg";
so easy enough, pr is the comment permlink,
the author is the post author,
permlink is the post permlink.
acc is the commentor,
wif is the posting key of the commentor.
now just send the function.
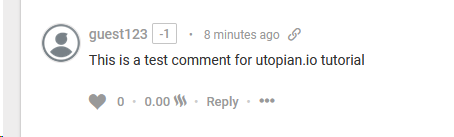
sendComment(acc, wif, author, permlink, pr, 'This is a test comment for utopian.io tutorial');
and you're done!
results -
if you have any suggestions for the next tutorial just leave a comment here!
Proof of Work Done
https://github.com/upmeboost-utopian
Note: this tutorial is taken from my alt account @upmeboost,
this tutorial didn't submit to utopian and I submitted it from my main account @lonelywolf.
Thank you for your contribution @lonelywolf.
Your tutorial is very interesting, but we suggest you further detail the concepts you are explaining.
Nice work on the explanations of your code, although adding a bit more comments to the code can be helpful as well.
In the next tutorial try to improve the structure of your tutorial and improve your language.
Your contribution has been evaluated according to Utopian policies and guidelines, as well as a predefined set of questions pertaining to the category.
To view those questions and the relevant answers related to your post, click here.
Need help? Chat with us on Discord.
[utopian-moderator]
Thank you for your review, @portugalcoin! Keep up the good work!
ǝɹǝɥ sɐʍ ɹoʇɐɹnƆ pɐW ǝɥ┴
Hi, @lonelywolf!
You just got a 0.28% upvote from SteemPlus!
To get higher upvotes, earn more SteemPlus Points (SPP). On your Steemit wallet, check your SPP balance and click on "How to earn SPP?" to find out all the ways to earn.
If you're not using SteemPlus yet, please check our last posts in here to see the many ways in which SteemPlus can improve your Steem experience on Steemit and Busy.
Hi @lonelywolf!
Your post was upvoted by @steem-ua, new Steem dApp, using UserAuthority for algorithmic post curation!
Your post is eligible for our upvote, thanks to our collaboration with @utopian-io!
Feel free to join our @steem-ua Discord server
Hey, @lonelywolf!
Thanks for contributing on Utopian.
We’re already looking forward to your next contribution!
Get higher incentives and support Utopian.io!
Simply set @utopian.pay as a 5% (or higher) payout beneficiary on your contribution post (via SteemPlus or Steeditor).
Want to chat? Join us on Discord https://discord.gg/h52nFrV.
Vote for Utopian Witness!
nice tutorial, I really like seeing this type of content on steem. I so wish I had the time to sit down a lean this. Tweeting for extra visibility
Hello @lonelywolf! This is a friendly reminder that you have 3000 Partiko Points unclaimed in your Partiko account!
Partiko is a fast and beautiful mobile app for Steem, and it’s the most popular Steem mobile app out there! Download Partiko using the link below and login using SteemConnect to claim your 3000 Partiko points! You can easily convert them into Steem token!
https://partiko.app/referral/partiko
make a blog related to mysql with asp.net application realetion or with orcale.thanks in advanced
make a blog related to mysql with asp.net application realetion or with orcale.thanks in advanced