Setting up complete node.js project for efficient development process
What Will I Learn?
In this tutorial I will describe the way I normally organize my nodejs projects for most efficient development process. List of topics we will touch include:
- installing node.js/npm through nvm
- initial git configuration
- starting npm project and organizing its directory structure
- setting up test runner and test coverage report
Requirements
- Experience working in command line
- Very basic programming experience
Difficulty
- Basic
Tech Stack
We will use quite a few different open source apps in our setup:
- nvm, node.js, npm
- git for code version management
- nodemon: npm package for application hot-reload
- mocha, chai and nyc for testing
Tutorial Contents
This tutorial was originally to be included as a part of tutorial for creating a particular node.js app. After some though, I came to the conclusion that steps developer takes when starting a new project are always almost exactly the same, so it makes sense to decouple the setup/devops part into the separate post. This structure makes it possible to refer to it from multiple future tutorials that that use the same initial tech stack.
Keep in mind that this tutorial explains the bare minimum of required setting. Always refer to the official documentation to learn full list of features of described tools.
Your questionss and suggestions are welcomed in comment section, as always. Examples are tested on MacOS, but should work without changes in Linux as well. Windows users are advised to use virtual machine to emulate linux environment.
Completed project is available in my github repository.
Step 1: nvm, npm and nodejs
Node Version Manager (nvm) allows you to keep multiple nodejs version in your system and switch between them at will. This is most useful when developing open source libraries and applications, where developer has no control over which nodejs version will be used to run his code, so developer needs to run tests in multiple nodejs versions.
Installing nvm is very easy thanks to it's installation script:
$ curl -o- https://raw.githubusercontent.com/creationix/nvm/v0.33.8/install.sh | bash
Alternatively, you can install it from git repository according to information in the README.md.
Now we just need to install latest stable nodejs version (8.10.0 at time of writing):
$ nvm install v8.10.0
Downloading and installing node v8.10.0...
Downloading https://nodejs.org/dist/v8.10.0/node-v8.10.0-darwin-x64.tar.xz...
######################################################################## 100.0%
Computing checksum with shasum -a 256
Checksums matched!
You can switch between installed nodejs version with nvm use <version>. Use nvm --help to see the full list of available options. To verify that correct node.js version is available on your system run following command:
$ node -v
v8.2.1
Second step: creating a project
Create a directory for your our project and navigate into it (I will use node_rest as a name for the project from here on).
$ mkdir node_rest && cd node_rest
In node.js world, package is a very simple entity: it's a directory that contains package.json file with project description and the source code for your app. To perform initial package configuration run npm init. This is an interactive command that will ask you multiple questions about the project setup:
- package name: probably the most important configuration parameter. If you are writing a library and make it available on npm libaray, this will be the name people use to install it and refer to it from code. Make sure to check that package name you choose is not present already in npm library if you ever plan to publish it. By default package name is the same as parent directory name.
- version: package version is not as simple as many novice developers believe. There is the whole system of rules to proper organize your project into versions, which is called Semantic Versioning. Projects that do not follow Semantic Versioning rules usually to be avoided, since they might cause lots of effort vasted for compatability support. By default, npm propeses you to choose version
1.0.0. I don't usually agree with this choice. Version1.0.0should be the first version that gets published to npm, but, obviously, there is nothing to publish at the very beginning of your project. For this reason I normally choose version0.0.1as my starting point. - description: short, human readable description of your project. Empty by default.
- entry point: for libraries this is the file that get's imported when library is imported. For applications, this is the file that starts your app. Default option of
index.jsis normally a good choice. - test command: depending on which test framework you use for your code, you will need to use differnet commands to start tests. This filed is just there for convinience: if you tell npm how to run your test you can later use
npm testcommand instead of explicitly specifying test runner. I prefer to leave this field empty initially and update it inpackage.jsononce first tests are written. - git repositry: is the url where user can find git reposity for this library. npm requires all public packages, to use git and host publicly available git repository. Again, I usually leave this field empty until the first commit is created and pushed to remote repository.
- keywords: array of tags that describe your project. Used for search in npm library. Empty by default.
- author: your name or nickname
- licence: default licence is ISC and is very much a placeholder for a real licence. If you write an open souce project it's advised to choose MIT or BSD licence.
- On the last step npm will show you the configuration and ask you to confirm the chages. Once you enter yes and press enter
package.jsonfor your project will be created.
Resulting package.json will look like this:
{
  "name": "node_rest",
  "version": "0.0.1",
  "description": "",
  "main": "index.js",
  "scripts": {
    "test": "echo \"Error: no test specified\" && exit 1"
  },
  "author": "laxam",
  "license": "MIT"
}
Installing Nodemon
This part of a tutorial is only needed for people who write application that will benefit from hot-realod (restarting your application when source code has been changed), such as Rest API. If you are writing a library you can ignore the instructions, but it is still recommended to read them to understand how npm actually works.
Nodemon continuously watches your project folder for changes in *.js files and reloads your app automatically when needed. Installing nodemon through npm:
$ npm install nodemon --save

<... some messages omitted for brewity ...>

npm notice created a lockfile as package-lock.json. You should commit this file.
npm WARN [email protected] No description
npm WARN [email protected] No repository field.

+ [email protected]
added 370 packages in 12.884s
Not the --save key there. What it does is saves the latest version of a package as a dependency in package.json, so that project setup in future can be done automatically. If you open package.json now you will see the following:
"dependencies": {
    "nodemon": "^1.17.1"
  }
If you look at the list of files in your project, you can see that there are some more changes. New node_modules directory was created to hold your dependencies. require statements in your javascript files will use this directory to look up an actual source code for installed dependencies. If you look into that directory you might be surprised to see that it not only holds nodemon source code, but also hundreds of other packages. Those are the dependencies of nodemon, dependecies of it's dependencies and so on. Nodejs resolves complete dependency tree according to Sematic Versioning rules and tries to reuse as many packages as possible. Unless there is a version conflict between two identical packages (required by other packages), it puts all dependencies on the top layer. Nodejs stores resulting dependency structure in the file package-lock.json, so whenever you initialize package dependencies in a new environment exactly the same package versions are used.
Git setup
As mentioned above, npm expects you to use git. It's always a good idea to keep the history of your project in version management system, and it's the only efficient way to work in a team consisting of more than one developer. If you don't have git installed on your system, follow instructions in git download page.
In project directory run git init to initialize empty git repository:
$ git init
Initialized empty Git repository in /Users/user/Projects/node_rest/.git/
By default git will keep history of all the files in this directory, but that's not exactly what we want. We are only interested in changes made to our own codebase, changes in dependencies, debug logs, lock-files, code coverage reports and similar files should be ignored, as they are not useful. We need to "blacklist" node_modules folder in git to achieve that. To do that, create file called .gitignore (dot in the beginning is important!) in root directory of your project and add following lines to it:
node_modules/
npm-debug.log*
.nyc_output
*.log
This should be good enough for most projects. More comprehensive list of common gitignore entries for nodejs projects can be found in this github repository.
One more thing we need before making our inital commit is to perform inital git configuration. There are only 2 things that are explicitly required by git itself: your name and your email address. You can quickly update them with following commands:
$ git config --global user.name "Firstname Lastname"
$ git config --global user.email [email protected]
There are many more paramiters that you can optionally provide to git to make your life easier, but they are unfortunately out of the scope of this tutorial. You can take a look into git book to learn more on the topic.
Now we can make our first commit:
$ git add . # add all files to stage (i.e. prepare all files to be commited)
$ git commit -m "Initial commit" # commit staged files with message "Initial commit"
Project directory structure and test setup
Unlike some other programming languages (Java is one example), nodejs does not enforce any project structure for your code. Yet there are some standard practices that most open source projects support. It's a good idea to keep your main code of your application/library inside the ./lib subderictory of your project. index.js should ideally not contain any business logic (unless package is so small that all business logic can be placed in a single file). Tests are usually placed in ./test subdirectory of the project.
Let's create our first very minimal "library". It will not be very functional, but it will be perfect as a template for future applications. Create a lib directory and create a file adder.js in it with a following content:
'use strict';

module.exports = {
    adder: (a, b) => a + b,
};
Now update index.js in the root level of your project to export adder function:
'use strict';

const { adder } = require('./lib/adder');

module.exports = { adder };
Of course, this is somewhat contrived example, becuse normally you would not put such a small function in seperate module. But remember, we are doing this for learning purposes, not for the code itself.
Next step would be to create a test for this function. We will use mocha as a testing framework and chai as an assertion library. Install thos libraries with following command:
$ npm install mocha chai --save-dev
--save-dev key puts dependencies into seperate category (compared to --save we used previously). If dependency will only be used for development and should not be installed in production (as is the case for mocha and chai), you should use --save-dev instead of --save.
Create a directory ./test, and file adder.js inside it. Normally, filenames in test directory match corresponding filenames in lib directory. It's very convinient when searching for tests that check specific functionality in an app. For this reason our single test file will be called adder.js. Content looks like this:
'use strict'

const { adder } = require('..');
const { expect } = require('chai');

describe('Adder', () => {
    it('adds two numbers', () => {
        expect(adder(1,2)).to.equal(3);
    });
});
Now you can execute the test with mocha:
$ ./node_modules/.bin/mocha test
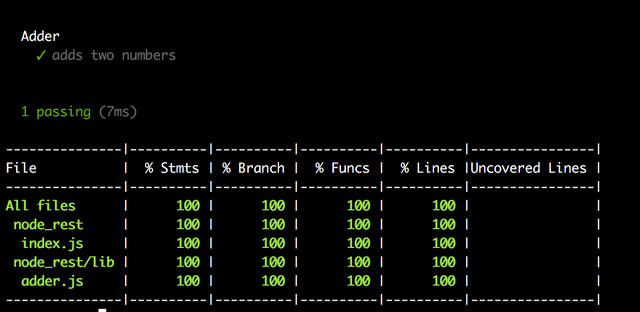
Adder
✓ adds two numbers
1 passing (9ms)
At this point it is worth to update scripts.test section in package.json to tech npm how to run our tests:
<... rest of the file is omitted for brewity ...>
"scripts": {
    "test": "mocha test"
}
<... rest of the file is omitted for brewity ...>
Note that npm knows how to find binaries for installed packages, so instead of specifying full path ./node_modules/.bin/mocha test it's enough to just mention binary name mocha.
Las testing package we will install is called nyc. It creates reports on what percentage of your codebase is tested. It is also very useful in bigger projects to find out which modules/functions are not yet covered by tests. Installation and setup is fortunately very simple: install the package through npm the same way we installed mocha and chai (don't forget --save-dev!) and change script.test in package.json from mocha test to nyc mocha test. Now, run npm test and you will see that our library's code coverage is 100% (not such a big achievement considering its size).
Epilogue
I hope this tutorial was useful for everyone who starts his node.js journey. It's a great software and it's well worth investing your time and effort into. This tutorial will serve as a basis for my future tutorials on node.js development, so stay tuned if you want to know more.
Have fun writing JavaScript.
Posted on Utopian.io - Rewarding Open Source Contributors
Thank you for the contribution. It has been approved.
You can contact us on Discord.
[utopian-moderator]
As a follower of @followforupvotes this post has been randomly selected and upvoted! Enjoy your upvote and have a great day!
Hey @laxam I am @utopian-io. I have just upvoted you!
Achievements
Community-Driven Witness!
I am the first and only Steem Community-Driven Witness. Participate on Discord. Lets GROW TOGETHER!
Up-vote this comment to grow my power and help Open Source contributions like this one. Want to chat? Join me on Discord https://discord.gg/Pc8HG9x
you can also use
ninstead ofnvmwhich I find easier to use.