Dockerizing NodeJS project
Dockerizing nodejs project
What Will I Learn?
- creating Dockerfile for NodeJS application
- building and running docker image
Requirements
- This tutorials continues my previous tutorial: Setting up complete NodeJS project for efficient development process. You need to either follow that tutorial to create a sample project, or have another existing NodeJS project ready to be dockerized.
- You need to have access to Linux or MacOS system, or, if you are using Windows, create virtual Linux environment in a virtual machine
- Basic command line proficiency
- Experience working with NodeJS and/or docker is a plus, but is not strictly required
Difficulty
- Intermediate
Tutorial Contents
In this tutorial I will describe the way I usually configure docker and docker-compose for my NodeJS projects.
Docker and docker compose are great tools for:
- bundling your node application together with its external dependencies
- service discovery configuration
As an example, you might want to write set of end to end tests that will test complete workflow of user's interaction with your API. In this case it's not desirable to mock database connection, ideally database queries should work exactly the way they do in production. It can be quite time consuming to set up necessary configurations on the host machine:
- you need to download correct version of database
- configure it as similarly as possible to production configuration
- create database user
- synchronize schema
- inject test data
This process needs to be repeated by every developer on each of his computers. Docker helps by providing convenient way to simplify and automate setup process.
Curriculum
Dockerfile
First we will need to create a Dockerfile. Dockerfile specifies environment configuration for our application only (no external services at this point). You can think about dockerfile as a list of instructions to perform step-by-step when creating an application container. First line of our Dockerfile looks like this:
FROM node:8-alpine
FROM directive declares base image to use for our container. Dockerhub image registry contains many pre-built containers for most of the popular technologies. Some of them are supported by community, but many, including nodejs we used here, have official support from maintainers of corresponding project.
The part of from directive after the double column is called a tag. Tag usually corresponds to the certain version of the software. Tag latest, for example, normally point on to an image containing latest stable version of software. You can also define version explicitly:
FROM nodejs:9.9.0
Next line is trivial, it simply executes mkdir -p /usr/src/app command to create a directory for our project in the container. WORKDIR changes current working directory during image build and is similar to cd shell command.
Next few lines need to be explained together, because they perform popular pattern of working with package managers in docker. But before we start, we need a bit of an explanation on how docker actually works.
Container layers
When image is being built, docker reads the Dockerfile line by line and performs corresponding actions. After each line it stores resulting state it as a container "layer". So the complete container can be viewed as a sequence of layers stacked on top of each other, each one of them corresponds to the state of an image after certain instruction.
Main benefit of such architecture is that when change occurs in Dockerfile, docker does not need to start rebuilding an image from scratch. It reuses the last layer which is known not to be altered by the changes in dockerfile.
Some instructions, however, might have different resulting state without any changes in Dockerfile whatsoever, because they deal with an external environment. One good example of such instruction is COPY. It takes files from the host machine's filesystem and copies it into the container. Even if COPY command was not changed in Dockerfile, contents of a target file might be altered. Docker is smart enough to recognize such situations and rebuild the image starting from the layer before the copy command.
If we were to add npm's package.json together with the rest of the code, and put RUN npm install afterwards, change of any source file would invalidate copy command layer and trigger image rebuild from that point. As a result, npm install would run even when dependencies have not changed. Obviously that would be very inconvenient. This is why we copy package.json separately into a parent directory, then run npm install (this will create node_modules folder in parent directory) and only afterwards copy the main program's source code into container (we are actually attaching the volume instead of copying at that step, but more on that later). NodeJS will search for imported modules in parent directies until it finds ./node_modules directory, so no imports will fail. Changes to source code will only invalidate layers after RUN npm install, so we will not run it every time anymore. We will only execute that command when package.json was charged, which is desired behavior.
COPY package.json /usr/src
COPY package-lock.json /usr/src
RUN npm install && npm cache clean --force
CMD
CMD instruction is optional, but if it's present it can only be the last command in a dockerfile. It can also be overridden at the execution time. The purpose of this command is to specify default action to take once the container is started. In our case we tell docker to start the application, but we can override cmd to run tests, for example.
Full Dockerfile
Just to wrap up, here is how our completed Dockerfile looks:
RUN mkdir -p /usr/src/app
WORKDIR /usr/src

COPY package.json /usr/src
COPY package-lock.json /usr/src
RUN npm install && npm cache clean --force

WORKDIR /usr/src/app
CMD npm test
Note that we didn't tell docker to copy the main part of our code into the container. We will deliver it via bind mounts instead.
Bind mounts
We've met COPY command before: we used it to deliver package.json and package-lock.json into container. We could use it to copy our souce code into container as well, but such approach has one big drawback for active development process: it copies the files in a container on the build time, and it does not propagate changes in the files to the container in the execution time. So developer needs to manually rebuild the container for each source code update. That might be alright for some projects, but it is unconvienient in most cases, especially if hot-reload tools like nodemon are involved.
To fix this problem we will use bind mounts. Bind mounts allow mounting folders from the host machine into containers, so every change in the source files will be immediately visible inside of a container as well. Normally you would use copy for container running in production and bind mount for local development.
Bind mount command is configured at execution time: we will need to specify source directory on the host machine and target directory inside of the container.
Building and running the container
Once dockerfile is ready, we can use following command to build an image out of it:
docker build .
Mind the dot in the end, it's important! It specifies the docker's working directory on host machine.
Sending build context to Docker daemon  32.25MB
Step 1/9 : FROM node:8-alpine
 ---> a47a5669ac57
Step 2/9 : RUN apk add --update make
 ---> Using cache
 ---> a9cfe9871f17
Step 3/9 : RUN mkdir -p /usr/src/app
 ---> Using cache
 ---> 66f8908ef8e2
Step 4/9 : WORKDIR /usr/src
 ---> Using cache
 ---> 7810103e29b5
Step 5/9 : COPY package.json /usr/src
 ---> Using cache
 ---> 8d180685d7fb
Step 6/9 : COPY package-lock.json /usr/src
 ---> Using cache
 ---> 1da0d447b6e9
Step 7/9 : RUN npm install && npm cache clean --force
 ---> Using cache
 ---> 6618eba64332
Step 8/9 : WORKDIR /usr/src/app
 ---> Using cache
 ---> 55eba64393fa
Step 9/9 : CMD npm test
 ---> Using cache
 ---> e70adf83efbc
Successfully built e70adf83efbc
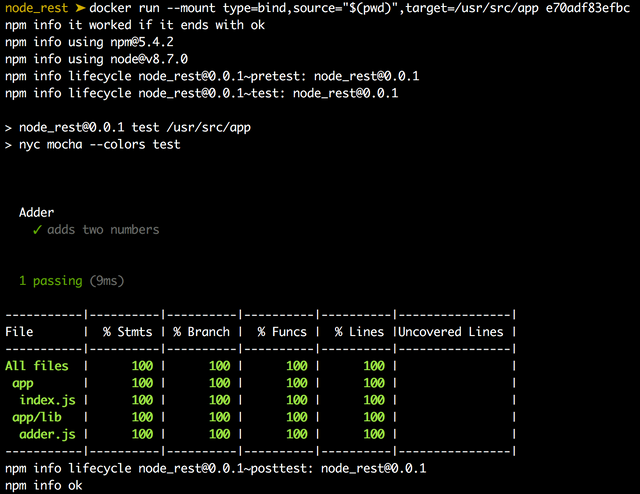
Docker output describes each layer it creates (or re-uses) for you. We can use the image ID in the end to run the image. In addition we need to specify bind mounts. In the end, we can run our docker container with following command (don't forget to change image ID before running this command):
docker run --mount type=bind,source="$(pwd)",target=/usr/src/app e70adf83efbc
I hope you have enjoyed this tutorial. All questions are welcomed in comments.
Posted on Utopian.io - Rewarding Open Source Contributors
Thank you for the contribution. It has been approved.
You can contact us on Discord.
[utopian-moderator]
Hey @laxam I am @utopian-io. I have just upvoted you!
Achievements
Community-Driven Witness!
I am the first and only Steem Community-Driven Witness. Participate on Discord. Lets GROW TOGETHER!
Up-vote this comment to grow my power and help Open Source contributions like this one. Want to chat? Join me on Discord https://discord.gg/Pc8HG9x