Building a Hotel Management System With ASP.NET Core(#7) - Working With Images
Repository
https://github.com/dotnet/core
What Will I Learn?
- You will learn how to create the ImageController in our Hotel Management system.
- You will learn about the importance of an Image Model in our application.
- You will learn how to store uploaded files on our server's file system.
- You will learn about Html Form
enctypeattribute types and their implications. - You will learn about ContentRootPath and WebRoothPath in the ASP.NET Core's IHostingEnvironment.
- You will learn about Streams and their use.
- You will learn to work with bootstrap Modals and how to send in dynamic data to a Modal.
Requirements
- Basic knowledge of C# programming language
- Visual Studio 2017/ VS code/ Any suitable code editor
- Previous Tutorial
Difficulty
- Advanced
Tutorial Contents

In this tutorial, we are going to handle working with images in our ASP.NET core application. There are two ways to save images in our application. We can choose either to save it in our database as a byte array or save the file in our hosting server's file system. Both methods have their advantages and disadvantages, however, it is generally easier and more preferable to store it in the file system. In this tutorial, we will store our image on the server.
Why We need an Image Model
Why do we need a model in the first place? I mean, since we are going to be storing our image in the file system, then we wouldn't need to interact with the database to fetch the images, right?
Naturally, fetching images from the file system would require a direct interaction with the these folders. After deployment, it would require us to meddle with this folder in order to track and monitor images in our application. Since our system is not designed to be operated by the developer alone, we would need to abstract every control to a user friendly interface with which non-coding oriented minds will be able to work with perfectly. For this reason, we want to keep track of every image on our server in our database via an ID. With this ID, we make fetch and make changes to the linked file.
Also, we want to keep track of other image properties such as image size. For this reasons, we create an image model for our images. Note that we are not storing the image file on the database but a path to the location on the server.
Update the Image Model
To reflect properties such as size and file path, we update the model to the following:
public class Image
    {
        public string ID { get; set; }
        public string Name { get; set; }
        public string Size { get; set; }
        public string ImageUrl { get; set; }
        public string FilePath { get; set; }
    }
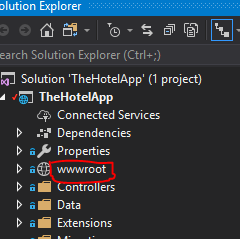
Create the ImageController
Next we scaffold a new Controller class --> ImageController as we have done severally in previous tutorials.
(Note that the reason we scaffold generally is to have EntityFramework create the class and associated view files, and populate them with default required code, instead of doing it ourselves).
Index Action
As usual, the index action should fetch all available rows of the model entity's table in the database and display it as a list.
First we update the constructor of our controller to depend on our service class.
 private readonly IGenericHotelService<Image> _hotelService;

        public ImagesController(IGenericHotelService<Image> genericHotelService)
        {
            _hotelService = genericHotelService;
        }
Then we call the GetAllItemsAsync() method in our index action
  public async Task<IActionResult> Index()
        {
            return View(await _hotelService.GetAllItemsAsync());
        }
Create View
The GET create action in this case performs no logic nor sends any information to the view. It simply serves the appropriate view file
  public IActionResult Create()
        {
            return View();
        }
- In the view
create.cshtml, we put a form which allows the user select multiple images to be added to our system.
<div class="row">
    <div class="col-md-4">
        <form asp-action="Create" enctype="multipart/form-data" method="post">
            <div asp-validation-summary="ModelOnly" class="text-danger"></div>


            <div class="form-group">
                <label>Upload Image(s):</label>
                <input type="file" multiple class="form-control" name="Files" />
            </div>

            <div class="form-group">
                <input type="submit" value="Create" class="btn btn-default" />
            </div>
        </form>
    </div>
</div>
Note the use of the multipart attribute
enctype="multipart/form-data". When posting files through a form, failure to use this attribute will default to encrypting it as aapplication/x-www-form-urlencodedortext/plain. These will send the files as strings rather than the actual files we intended.Also note the use of
multipleattribute in the input element.<input type="file" multiple class="form-control" name="Files" />. This allows us to select multiple images to our input.

Create Action [POST]
When the user selects a couple of images, it posts this as a request to the create action that processes the form content.
ASP.NET Core offers an interface IFormFIle by which posted files can be accessed through model binding. When specified, it accesses the files in the request and collates them into a list of IFormFiles.
In our controller, we get these files and pass them to a method in our GenericHotelService class, which we would define shortly.
[HttpPost]
        [ValidateAntiForgeryToken]
        public async Task<IActionResult> Create(List<IFormFile> files)
        {
            var result = await _hotelService.AddImagesAsync(files);
         }
Defining The AddImagesAsync() Method
As we have done severally before, to implement and use a method in the GenericHotelService.cs class, we first define in it the IGenericHotelService.cs interface.
IGenericHotelService.cs
Task<AddImagesViewModel> AddImagesAsync(List<IFormFile> files);
- Notice that the return type of this method is
AddImagesViewModelwhich we haven't defined yet.
"AddImagesViewModel" Definition
    public class AddImagesViewModel
    {
        public List<string> UploadErrors { get; set; }
        public List<Image> AddedImages { get; set; }
    }
This ViewModel simply returns a list of images that were successfully added to the system as well a list of errors that resulted in the process.
AddImagesAsync() Implementation in GenericHotelService
The Complete implementation is as follows (The explanation of this code is below).
 public async Task<AddImagesViewModel> AddImagesAsync(List<IFormFile> files)
        {
            var UploadErrors = new List<string>();
            var AddedImages = new List<Image>();
            var imagesFolder = Path.Combine(_hostingEnvironment.WebRootPath, "images");

            foreach (var formFile in files)
            {

                var _ext = Path.GetExtension(formFile.FileName).ToLower(); //file Extension

                if (formFile.Length > 0 && formFile.Length < 1000000)
                {
                    if (!(_ext == ".jpg" || _ext == ".png" || _ext == ".gif" || _ext == ".jpeg"))
                    {
                        UploadErrors.Add("The File \"" + formFile.FileName + "\" could Not be Uploaded because it has a bad extension --> \"" + _ext + "\"");
                        continue;
                    }

                    string NewFileName;
                    var ExistingFilePath = Path.Combine(imagesFolder, formFile.FileName);
                    var FileNameWithoutExtension = Path.GetFileNameWithoutExtension(formFile.FileName);

                    for (var count = 1; File.Exists(ExistingFilePath) == true; count++)
                    {
                        FileNameWithoutExtension = FileNameWithoutExtension + " (" + count.ToString() + ")";

                        var UpdatedFileName = FileNameWithoutExtension + _ext;
                        var UpdatedFilePath = Path.Combine(imagesFolder, UpdatedFileName);
                        ExistingFilePath = UpdatedFilePath;

                    }

                    NewFileName = FileNameWithoutExtension + _ext;
                    var filePath = Path.Combine(imagesFolder, NewFileName);

                    using (var stream = new FileStream(filePath, FileMode.Create))
                    {
                        await formFile.CopyToAsync(stream);
                    }
                    var image = new Image
                    {
                        ID = Guid.NewGuid().ToString(),
                        Name = NewFileName,
                        Size = ByteSize.FromBytes(formFile.Length).ToString(),
                        ImageUrl = "~/images/" + NewFileName,
                        FilePath = filePath
                    };
                    AddedImages.Add(image);

                }
                else
                {
                    UploadErrors.Add(formFile.FileName + " Size is not Valid. -->(" + ByteSize.FromBytes(formFile.Length).ToString() + ")... Upload a file less than 1MB");
                }
            }
            _context.Images.AddRange(AddedImages);
            _context.SaveChanges();


            var result = new AddImagesViewModel
            {
                AddedImages = AddedImages,
                UploadErrors = UploadErrors
            };
            return result;
        }
Explanation
- 1). Our AddImagesAsync() takes in a list of
IFormFilewhich we are going to add to the system.
public async Task<AddImagesViewModel> AddImagesAsync(List<IFormFile> files)
- 2). We then define new instances of
List<string>andList<Image>which will be the properties of our returned viewModel.
var UploadErrors = new List<string>();
var AddedImages = new List<Image>();
- 3). Next, we specify the folder to which we are going to be storing our images. Previously, in ASP.NET MVC5, we would make use of the
Server.MapPath()method to find physical file paths, but in ASP.NET Core, the MapPath method doesn't exist any longer.
To get the web root or content root paths, we need to make use of the IHostingEnvironment inteface.
The webroot path is the root directory from which static content is served (eg css, js and images), while the content root is the application base path.
We are going to make use of the webroot path since we generally do not want to provide any access to our content root folder which contains files that should not be served to the client.
To get this path info, we inject the HostingEnvironment details into the GenericHotelService class
 private readonly IHostingEnvironment _hostingEnvironment;
 public GenericHotelService(ApplicationDbContext context, IHostingEnvironment hostingEnvironment)
        {
            _context = context;
            _hostingEnvironment = hostingEnvironment;  //new Addition
            DbSet = context.Set<TEntity>();
        }
So in our AddImages() method, we use this _hostingEnvironment property to fetch our web root path. We call Path.Combine() to create a concatenation of two path strings.
var imagesFolder = Path.Combine(_hostingEnvironment.WebRootPath, "images");
This returns [application_path]/webroot/images
- 4). We loop through each file in the request, then
a. Get the file extension
b. Check the file size
c. Check the file extension if it is an image type extension (jpg, png, gif, jpeg)
d. If it isn't one of the above stated extensions, we add a message to ourUploadErrorslist indicating
this error
e. If the file exceeds the specified size (1mb in my case), we also add the appropriate message to the
UploadErrorslist.
  foreach (var formFile in files)
            {

                var _ext = Path.GetExtension(formFile.FileName); //file Extension

                if (formFile.Length > 0 && formFile.Length < 1000000)
                {
                    if (!(_ext == ".jpg" || _ext == ".png" || _ext == ".gif" || _ext == ".jpeg"))
                    {
                        UploadErrors.Add("The File \"" + formFile.FileName + "\" could Not be Uploaded because it has a bad extension --> \"" + _ext + "\"");
                        continue;
                    }
                   .
                   .
                   .
                }

               else
                {
                    UploadErrors.Add(formFile.FileName + " Size is not Valid. -->(" +
 ByteSize.FromBytes(formFile.Length).ToString() + ")... Upload a file less than 1MB");
                }
            }
Note the use of the static method ByteSize.FromBytes() in our else block.
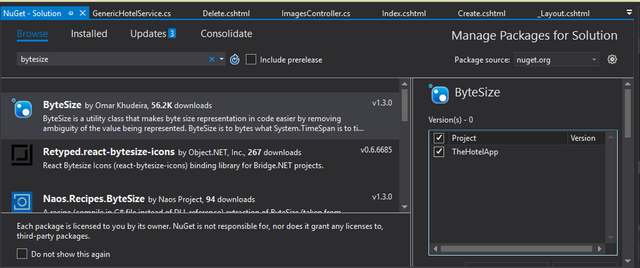
ByteSize() Class
This formFile.Length() method returns the size of the file in bytes as a data type of long. However, this is unreadable by normal users. We generally want to present this detail in a readable form to the user. This class is a excellent open source project by Omar that contains several methods to achieve this task and many more. You can add this as a nuget package from the Packages console window. The github repo for this is https://github.com/omar/ByteSize
5). Checking if a FileName already exists in our Folder
Often times, we upload an image with a file name that already exists in the folder. This action will either override the existing file, or throw an exception. Generally, what we would want to do in these situations is to suffix a number after the name of the new file like ... (1).
I implemented this as follows:
 string NewFileName;
  var ExistingFilePath = Path.Combine(imagesFolder, formFile.FileName);
  var FileNameWithoutExtension = Path.GetFileNameWithoutExtension(formFile.FileName);

   for (var count = 1; File.Exists(ExistingFilePath) == true; count++)
       {
              FileNameWithoutExtension = FileNameWithoutExtension + " (" + count.ToString() + ")";
               var UpdatedFileName = FileNameWithoutExtension + _ext;
               var UpdatedFilePath = Path.Combine(imagesFolder, UpdatedFileName);
               ExistingFilePath = UpdatedFilePath;
               count++;
         }
This block of code runs the method File.Exists(ExistingFilePath) to check if a file path exists, and on every iteration, it adds a number and checks again, until it gets to a point where this method returns false. At this point, FileNameWithoutExtension has been updated to carry the appropriate number suffix.
- After this loop, we set the new file name and create a file path for it
 NewFileName = FileNameWithoutExtension + _ext;
var filePath = Path.Combine(imagesFolder, NewFileName);
Streams
Streams are used to transfer bytes to a source. They are used to read or write bytes to the caller variable. Here, we make use of a stream to transfer the file bytes to our defined filePath
  using (var stream = new FileStream(filePath, FileMode.Create))
                    {
                        await formFile.CopyToAsync(stream);
                    }
- Next, we create an
Imageentity and add it to ourList<Image>with the appropriate properties. Note that we have theImageUrlproperty which is an accessible string that can be used direc
 var image = new Image
                    {
                        ID = Guid.NewGuid().ToString(),
                        Name = NewFileName,
                        Size = ByteSize.FromBytes(formFile.Length).ToString(),
                        ImageUrl = "~/images/" + NewFileName,
                        FilePath = filePath
                    };
                    AddedImages.Add(image);
- Lastly, we add the AddedImages to the
Imagestable, save db context changes, then return a newAddImagesViewModelcreated from added images and upload errors.
   _context.Images.AddRange(AddedImages);
            _context.SaveChanges();


            var result = new AddImagesViewModel
            {
                AddedImages = AddedImages,
                UploadErrors = UploadErrors
            };
            return result;
The complete method implementation can be found here https://github.com/Johnesan/TheHotelApplication/blob/master/TheHotelApp/Services/GenericHotelService.cs
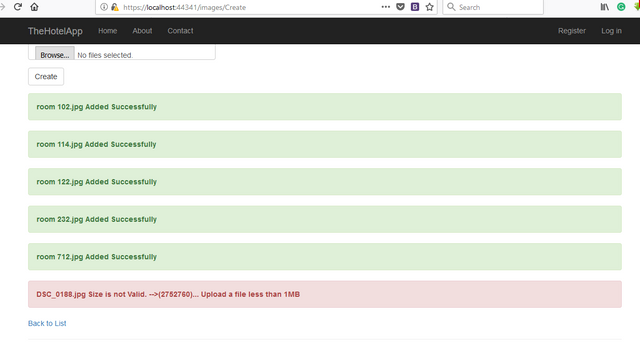
Sending Upload Feedback to Users
Now that have received the AddImagesViewModel result from the method above, we send the appropriate feedback to our users in ViewBags. We put in the upload error messages into ViewData["UploadErrors"] and Successfully added images into ViewData["AddedImages"]
The Complete Post Action Method for the Create View:
 [HttpPost]
        [ValidateAntiForgeryToken]
        public async Task<IActionResult> Create(List<IFormFile> files)
        {
            var result = await _hotelService.AddImagesAsync(files);
            var AddedImages = new List<string>();
            foreach(var image in result.AddedImages)
            {
                AddedImages.Add(image.Name + " Added Successfully");
            }
            ViewData["AddedImages"] = AddedImages;
            ViewData["UploadErrors"] = result.UploadErrors;
            return View();
        }
Displaying Feedback Messages in View
Now that we have sent these feedback messages from the controller method, we need to receive them at the view and display them appropriately.
In your Create.cshtml view, add the following:
 @if (ViewBag.AddedImages != null)
    {
        @foreach (var item in ViewBag.AddedImages as List<string>)
        {
            <div class="alert alert-success">
                <strong>@item</strong>
            </div>
        }

    }

    @if (ViewBag.UploadErrors != null)
    {
        foreach (var item in ViewBag.UploadErrors as List<string>)
        {
            <div class="alert alert-danger">
                <strong>@item</strong>
            </div>
        }

    }
- This code checks if the respective ViewBags contain any message. If it does, it iterates through them and displays them appropriately. I have styled the AddedImage messages with bootstrap's
alert alert-successand the errors withalert alert-danger
The Index View
I styled the index view a bit, with some nice bootstrap classes.
<div class="row">
    @foreach (var item in Model)
    {
        <div class="col-md-4 panel">
            <div style="background-color:lightgrey; margin:2px;">
                <iimg class="img-responsive" src="@item.ImageUrl" asp-append-version="true" alt="@item.Name" width="400" />
                <div class="panel-group" style="padding:5px;">
                    <p>@item.Name</p>
                    <p class="small">@item.Size</p>
                </div>
                <div class="panel-footer" style="width:100%;">
                    <a href="#">View</a> |
                    <a asp-action="Delete" data-image-id="@item.ID" data-image-name="@item.Name" data-toggle="modal" data-target="#DeleteModal">Delete</a>
                </div>
            </div>
        </div>
    }
</div>
Index ScreenShots
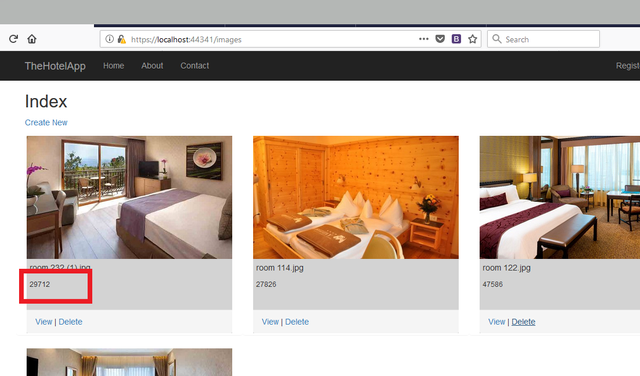
Image before file size was formatted with ByteSize

Image after formatting with ByteSize
Also note the two files with the same name uploaded twice and distinguished with (1) suffix
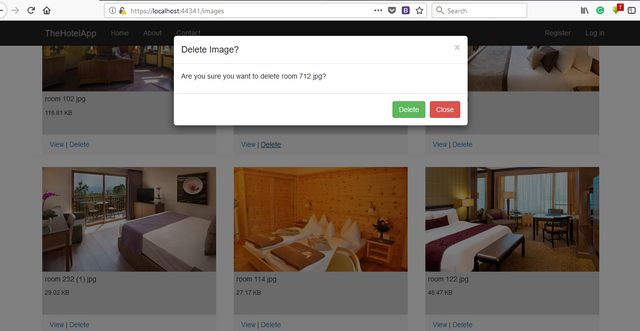
Deleting Images
To delete an image, we will make use of a modal popup that displays a confirmation and thereafter calls the Delete action to delete the image with the ID specified, from the database and from the file system
Thus, we add a bootstrap modal to the Index view. This modal is called by the delete button on each image.
<div class="modal fade" id="DeleteModal" role="dialog">
<div class="modal-dialog">
<div class="modal-content">
<div class="modal-header">
<button type="button" class="close" data-dismiss="modal">×</button>
<h4 class="modal-title">Delete Image?</h4>
</div>
<div class="modal-body">
<p id="DeleteConfirmation"></p>
</div>
<div class="modal-footer">
<form asp-action="Delete" method="post">
<input type="hidden" name="id" value="" />
<input type="submit" value="Delete" class="btn btn-success" />
<button type="button" class="btn btn-danger" data-dismiss="modal">Close</button>
</form>
</div>
</div>
</div>
</div>
- The id input value as well as the "DeleteConfirmation" paragraph are set by jquery:
@section Scripts {
    <script>
        $(document).ready(function () {
            $('#DeleteModal').on('show.bs.modal', function (e) {

                //get data-id attribute of the clicked element
                var imageID = $(e.relatedTarget).data('image-id');
                var imageName = $(e.relatedTarget).data('image-name');
                var deleteMessage = "Are you sure you want to delete " + imageName + "?";
                $('#DeleteConfirmation').html(deleteMessage);
                $(e.currentTarget).find('input[name="id"]').val(imageID);
            });
        });
    </script>
}
This jquery code obtains the caller image's id and name, then populates the modal input and paragraph with these details.
Delete Action [POST]
When you click delete, the form is posted to the delete action with the image's id.
        [ValidateAntiForgeryToken]
        public async Task<IActionResult> Delete(string id)
        {
            var image = await _hotelService.GetItemByIdAsync(id);
            await _hotelService.RemoveImageAsync(image);
            return RedirectToAction(nameof(Index));
        }
This method simply calls the RemoveImageAsync() method and passes in the image to be deleted.
We implement this method in IGenericHotelService and GenericHotelService as follows:
IGenericHotelService.cs
Task RemoveImageAsync(Image image);
GenericHotelService.cs
  public async Task RemoveImageAsync(Image image)
        {
            File.Delete(image.FilePath);
            _context.Images.Remove(image);
            await _context.SaveChangesAsync();
        }
This method simply finds the file with the specified filePath and deletes it from our system. Thereafter, it removes the row with that image from our context and then saves changes to our database.
Curriculum
- Building a Hotel Management System With ASP.NET Core(#1) - Introduction
- Building a Hotel Management System With ASP.NET Core(#2) - Building the Service Layer
- Building a Hotel Management System With ASP.NET Core(#3) - Building the RoomType Controller Logic
- Building a Hotel Management System With ASP.NET Core(#4) - Building the Room Controller Logic
- Building a Hotel Management System With ASP.NET Core(#5) - Complex Data Relationships(ManyToMany Relationship Linking)
- Building a Hotel Management System With ASP.NET Core(#6) - Displaying and Updating Related Data
Proof of Work Done
Github Repo for the tutorial solution:
https://github.com/Johnesan/TheHotelApplication
Nice tutorials. Do you use lazy load image on the project?
Also, I suggest that you store the image in the temporary file first then upload it to file server so the main server doesn't get bloated.
That's true, lazy loading is always good, but instead of lazy loading only the images I would say lazy load entire list of view, like load 10 room pictures at once and then when scrolling do others. What is the advantage of using temporary file, because storing it in both the places will not make the overhead of memory consumption, though if you upload it asynchronoulsy I do not think there is any problem.
Hey @codingdefined
Here's a tip for your valuable feedback! @Utopian-io loves and incentivises informative comments.
Contributing on Utopian
Learn how to contribute on our website.
Want to chat? Join us on Discord https://discord.gg/h52nFrV.
Vote for Utopian Witness!
Thanks for your comment @drsensor.
Well, I haven't gotten to the part of the tutorial where images are fetched as navigation properties of other entities(that will be the next tutorial).
However, when images are to be loaded, eager loading or lazy loading will work just fine. Remember, I am not storing the image file in the database, only a string representing the file path.
Eventually though, eager loading would be a better approach as it would load every required related data in one query.
tempFiles is 65533(or thereabout). This becomes a problem when you have a large user base all performing their own actions against this same folder.
Wow, there is concurrent usage limit, thats new to me :o . It's been a while since I fiddle with ASP.NET (and now Core). Thanks for the info, I learn a lot. Looking forward for your next tutorials :)
Hey @drsensor
Here's a tip for your valuable feedback! @Utopian-io loves and incentivises informative comments.
Contributing on Utopian
Learn how to contribute on our website.
Want to chat? Join us on Discord https://discord.gg/h52nFrV.
Vote for Utopian Witness!
Thank you for your contribution.
While I liked the content of your contribution, I would still like to extend few advices for your upcoming contributions:
Looking forward to your upcoming tutorials.
Your contribution has been evaluated according to Utopian policies and guidelines, as well as a predefined set of questions pertaining to the category.
To view those questions and the relevant answers related to your post, click here.
Need help? Write a ticket on https://support.utopian.io/.
Chat with us on Discord.
[utopian-moderator]
Hey @johnesan
Thanks for contributing on Utopian.
We’re already looking forward to your next contribution!
Contributing on Utopian
Learn how to contribute on our website or by watching this tutorial on Youtube.
Want to chat? Join us on Discord https://discord.gg/h52nFrV.
Vote for Utopian Witness!