Building A Content Management System Using The MEAN Stack - 5 (Front-End Development)
Repository
https://github.com/nodejs/node
What Will I Learn
The codebase for this tutorial is based on MEANie an open source content management system by Jason Watmore.
This is the fifth tutorial in the series of tutorials on building a content management system using the MEAN technology.
In the earlier tutorials we worked on all the components needed for the backend and the API to run including the server, controllers and services.
In this tutorial we are going to start building the front-end for our cms.
By the end of this tutorial we will have completed work on some of the features for the admin section of the application.
Mainly we will create a user interface to display the posts from the admin dashboard in the application.
We will also create forms to be used in creating and editing new posts, pages, redirects and user account details.
We will add directives and functions to make the layout functional and communicate with the API.
N.B;- LINK TO THE EARLIER TUTORIALS IN THIS SERIES CAN BE FOUND AT THE END OF THIS POST
Requirements
- NodeJS and NPM,
- Angular
- MongoDB
- Text Editor
Difficulty
- Intermediate
Tutorial Contents
In the first tutorial for this series we created a directory inside the project directory server.
Our current project structure would look like the one below with Project serving as the parent/ directory
Project -
        - server
The server directory contains all the backend files for this application.
To accommodate all the files for our client side we need to create a new directory in the project directory client.
Our new project structure would look like so
 Project -
        - client
        - server
Inside the new directory we will add all client side code.
Aside AngularJS we will also be making use of some additional frameworks and modules to boost the process.
In the client directory add a new sub-directory and name it admin.
This new directory will contain all client side code for the admin area of the CMS.
Before diving into the main work let's add the CSS styles that will beautify our admin area.
Create a new directory css inside the admin directory.
Inside the css directory add a new file style.css and paste the following code
body {

    font-family: 'Open Sans', sans-serif;

}


.admin-sidebar {

    padding-top: 50px  !important;

    /*padding-left: 50px !important;*/

}


.card {

    width: 90%  !important;

}


.most-recent-area {

    padding-left: 5%  !important;

    margin-top: 50px;

}


.main-content-area {

    margin-top: 50px  !important;

}


.brand-logo {

    margin-left: 50px;

}


.tabs {

    padding-left: 120px  !important;

}


.checkmark {

    font-size: 24px;

}


.posts-area-header {

    padding-top: 50px;

}


.new-post-button {

    margin-top: 10px;

    padding-right: 100px  !important;

}


.add {

    text-decoration-style: solid;

}


.card-title {

    font-size: 18px  !important;

}


.edit-btn {

    margin-left: 200px;

}


.add-post-area {

    border: 3px  solid  #000;

    margin-top: 50px;

    margin-bottom: 50px;

    padding: 50px;

    border-radius: 5%;

}


.add-edit-form-area {

    border: 3px  solid  #000;

    margin-top: 50px;

    margin-bottom: 50px;

    padding: 50px;

    border-radius: 4%;

}
This file will be imported alongside other required files in the index.html file.
The Index File
The first thing we'll create for the admin section is the index.html file which will serve as the admin dashboard.
In the index.html file we'll have the following code
<!DOCTYPE html>

<html>
    <head>
        <meta  charset="utf-8" />
        <title>MEAN-CMS - The MEAN Stack Blog</title>
        <link  rel="shortcut icon"  href="/admin/_content/images/logo.png"  type="image/png" />
        <link  rel="icon"  href="/admin/_content/images/logo.png"  type="image/png" />
        <link  rel="stylesheet"  href="https://cdnjs.cloudflare.com/ajax/libs/materialize/1.0.0/css/materialize.min.css">
        <link  href="https://unpkg.com/[email protected]/dist/css/ionicons.min.css"  rel="stylesheet">
        <link  href="https://fonts.googleapis.com/css?family=Open+Sans"  rel="stylesheet">
        <link  rel="stylesheet"  href="css/style.css">
    </head>
    <body>
        <div  class="nav-area">
            <nav  class="white">
                <div  class="nav-wrapper">
                    <a  href="#"  class="brand-logo black-text">MEAN CMS</a>
                    <ul  id="nav-mobile"  class="right hide-on-med-and-down black-text">
                        <li><a  href="/login"  target="_self"  class="waves-effect waves-light btn indigo lighten-2">LOGOUT</a></li>
                    </ul>
                </div>
            </nav>
        </div>
        <div  class="row">
            <div  class="admin-sidebar col l2 m2">
                <ul  class="collection">
                    <li  class="collection-item"  ng-class="{active: activeTab === 'posts'}"><a  href="#/posts">POSTS</a></li>
                    <li  class="collection-item"  ng-class="{active: activeTab === 'pages'}"><a  href="#/pages">PAGES</a></li>
                    <li  class="collection-item"  ng-class="{active: activeTab === 'redirects'}"><a  href="#/redirects">REDIRECTS</a></li>
                    <li  class="collection-item"  ng-class="{active: activeTab === 'account'}"><a  href="#/account">USERS</a></li>
                </ul>
            </div>
            <div  class="col l10 m10"  ui-view></div>
        </div>
        <div  class="flash-message center"  ng-if="flash">
            <div  class="{{'alert alert-' + flash.type}}"  ng-bind="flash.message"></div>
        </div>
        (html comment removed:  footer )
        <footer></footer>

        (html comment removed:  Minified JQuery )
        <script  src="https://code.jquery.com/jquery-3.3.1.min.js"  integrity="sha256-FgpCb/KJQlLNfOu91ta32o/NMZxltwRo8QtmkMRdAu8="  crossorigin="anonymous"></script>

        (html comment removed:  Compiled and minified JavaScript )
        <script  src="https://cdnjs.cloudflare.com/ajax/libs/materialize/1.0.0/js/materialize.min.js"></script>

        <script  src="js/admin.js"></script>

        (html comment removed:  underscore )
        <script  src="//cdnjs.cloudflare.com/ajax/libs/underscore.js/1.8.3/underscore-min.js"></script>

        (html comment removed:  moment )
        <script  src="//cdnjs.cloudflare.com/ajax/libs/moment.js/2.10.6/moment.min.js"></script>

        (html comment removed:  angular )
        <script  src="//ajax.googleapis.com/ajax/libs/angularjs/1.4.7/angular.min.js"></script>
        <script  src="//cdnjs.cloudflare.com/ajax/libs/angular-ui-router/0.2.15/angular-ui-router.min.js"></script>

        (html comment removed:  ckeditor )
        <script  src="//cdn.ckeditor.com/4.5.7/full/ckeditor.js"></script>
        <script  src="//cdn.ckeditor.com/4.5.7/full/adapters/jquery.js"></script>

        (html comment removed:  meanie )
        <script  src="_dist/app.min.js"></script>
    </body>
</html>
In the above file we import the following frameworks to assist during the development process.
MaterializeCSS which provides pre-made HTML/CSS components and UI design elements.
Ionicons and Google Fonts which provides material icons and text fonts for the UI respectively.
JQuery which provides some JavaScript functions for the front end.
UnderscoreJS which provides some needed utility functions.
MomentJS which handles date/time validation and parsing in our application.
CKEditor a text editor that we will use in adding page and post contents.
On the interface we have a navigation area which is handled by the following block of code
<div  class="nav-area">
    <nav  class="white">
        <div  class="nav-wrapper">
            <a  href="#"  class="brand-logo black-text">MEAN CMS</a>
            <ul  id="nav-mobile"  class="right hide-on-med-and-down black-text">
                <li><a  href="/login"  target="_self"  class="waves-effect waves-light btn indigo lighten-2">LOGOUT</a></li>
            </ul>
        </div>
    </nav>
</div>
The block above includes the code for the page logo and a button on the far right which will allow the administrator logout of the admin area.
Since the CMS will be a single page application we will be using the AngularJS UI-Router to handle all of the routing.
We have imported AngularJS and the Angular-UI router through the cdn using these lines of code respectively
<script  src="//ajax.googleapis.com/ajax/libs/angularjs/1.4.7/angular.min.js"></script>


<script  src="//cdnjs.cloudflare.com/ajax/libs/angular-ui-router/0.2.15/angular-ui-router.min.js"></script>
After the navigation we create a row with two columns including a sidebar and a main area.
The line <div class="col l10 m10" ui-view></div> indicates that all the pages rendered through the UI-Router should be rendered inside this element, which is the second column(main area).
In the sidebar we have a collection list which contains links to all components relating to the admin area to be rendered through the UI-Router.
The components to be rendered in the main view include Posts, Pages, Redirects and Users components.
We will only cover the Posts view for this tutorial.
The code for the sidebar
<div  class="admin-sidebar col l2 m2">
    <ul  class="collection">
        <li  class="collection-item"  ng-class="{active: activeTab === 'posts'}"><a  href="#/posts">POSTS</a></li>
        <li  class="collection-item"  ng-class="{active: activeTab === 'pages'}"><a  href="#/pages">PAGES</a></li>
        <li  class="collection-item"  ng-class="{active: activeTab === 'redirects'}"><a  href="#/redirects">REDIRECTS</a></li>
        <li  class="collection-item"  ng-class="{active: activeTab === 'account'}"><a  href="#/account">USERS</a></li>
    </ul>
</div>
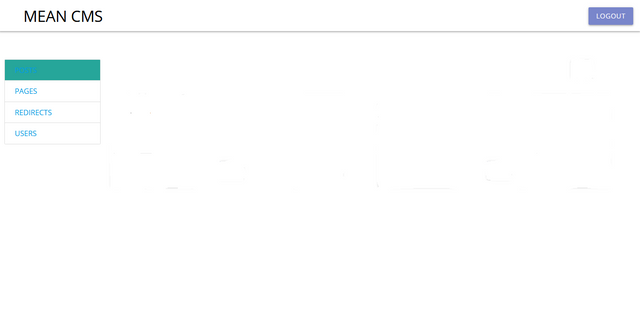
Whenever a page is displayed in the main view the corresponding link pointing to the page will be highlighted in the sidebar, this made possible by the line ng-class="{active: activeTab === ''}".
This is a screenshot of the index.html file without any of the other components rendered
Setting the UI-Router
Before we can create the templates for the remaining components of the admin area we need to set the routes for each one of them using the UI-Router.
Create a file in the admin directory, name it app.js. It will consist the code for routing all other front end components for the admin area.
The code for the app.js file
(function () {
    'use strict';
    angular
        .module('app', ['ui.router'])
        .config(config)
        .run(run);

    function  config($locationProvider, $stateProvider, $urlRouterProvider) {
        // default route
        $urlRouterProvider.otherwise("/posts");

        $stateProvider
            .state('posts', {
                url:  '/posts',
                templateUrl:  'posts/index.view.html',
                controller:  'Posts.IndexController',
                controllerAs:  'vm',
                data: { activeTab:  'posts' }
            })

            .state('posts/add', {
                url:  '/posts/add',
                templateUrl:  'posts/add-edit.view.html',
                controller:  'Posts.AddEditController',
                controllerAs:  'vm',
                data: { activeTab:  'posts' }
            })

            .state('posts/edit', {
                url:  '/posts/edit/:_id',
                templateUrl:  'posts/add-edit.view.html',
                controller:  'Posts.AddEditController',
                controllerAs:  'vm',
                data: { activeTab:  'posts' }
            })

            .state('pages', {
                url:  '/pages',
                templateUrl:  'pages/index.view.html',
                controller:  'Pages.IndexController',
                controllerAs:  'vm',
                data: { activeTab:  'pages' }
            })

            .state('pages/add', {
                url:  '/pages/add',
                templateUrl:  'pages/add-edit.view.html',
                controller:  'Pages.AddEditController',
                controllerAs:  'vm',
                data: { activeTab:  'pages' }
            })

            .state('pages/edit', {
                url:  '/pages/edit/:_id',
                templateUrl:  'pages/add-edit.view.html',
                controller:  'Pages.AddEditController',
                controllerAs:  'vm',
                data: { activeTab:  'pages' }
            })

            .state('redirects', {
                url:  '/redirects',
                templateUrl:  'redirects/index.view.html',
                controller:  'Redirects.IndexController',
                controllerAs:  'vm',
                data: { activeTab:  'redirects' }
            })

            .state('redirects/add', {
                url:  '/redirects/add',
                templateUrl:  'redirects/add-edit.view.html',
                controller:  'Redirects.AddEditController',
                controllerAs:  'vm',
                data: { activeTab:  'redirects' }
            })

            .state('redirects/edit', {
                url:  '/redirects/edit/:_id',
                templateUrl:  'redirects/add-edit.view.html',
                controller:  'Redirects.AddEditController',
                controllerAs:  'vm',
                data: { activeTab:  'redirects' }
            })

            .state('account', {
                url:  '/account',
                templateUrl:  'account/index.view.html',
                controller:  'Account.IndexController',
                controllerAs:  'vm',
                data: { activeTab:  'account' }
            });
    }

    function  run($http, $rootScope, $window) {
        // add JWT token as default auth header
        $http.defaults.headers.common['Authorization'] =  'Bearer '  +  $window.jwtToken;

        // update active tab on state change
        $rootScope.$on('$stateChangeSuccess', function (event, toState, toParams, fromState, fromParams) {
            $rootScope.activeTab  =  toState.data.activeTab;
        });
    }

    // manually bootstrap angular after the JWT token is retrieved from the server
    $(function () {
        // get JWT token from server
        $.get('/token', function (token) {
            window.jwtToken  =  token;

            angular.bootstrap(document, ['app']);
        });
    });
})();
In order to instantiate the admin area and get it ready for its routes, methods and states we use
angular
    .module('app', ['ui.router'])
    .config(config)
    .run(run);
The two parameters from the config() function, that is $stateProvider and $urlRouterProvider are provided from the ui-router module imported in the index.html file.
$urlRouterProvider.otherwise("/posts"); will redirect the user to the posts section of the admin dashboard by default once a path is not specified.
We register the state for each admin component using the state() method alongside $stateProvider.
Each state() method holds two parameters, the first parameter is the name of the state while the second parameter is an object containing the needed components for each state to function.
For each state we have four components,
urlwhich is the URL to the directory containing all files for that state.templateUrlwhich is the URL to the html file responsible for the view inside the directory for that state.controllerwhich holds the URL to the controller for that state in the directory.
States are created for the following features of the admin area.
posts/addwhich handles the code for creating blog posts.posts/editwhich handles the code for editing existing blog posts.postswhich handles the code for viewing blog posts in the admin area.pages/addwhich handles the code for creating pages.pages/editwhich handles the code for editing existing pages.pageswhich handles the code for viewing pages in the admin area.redirects/addwhich handles the code for creating redirects.redirects/editwhich handles the code for editing existing redirects.redirectswhich handles the code for viewing redirects in the admin area.accountswhich handles the code for editing existing account details for the user.
Adding Components/Views
After setting the ui-router module in the app.js file we need to add the views for the following features of the admin area
- Posts
- Pages
- Redirects
- Accounts
We'll start with the Posts
Posts
To create the posts area we need to add a new directory in the admin directory.
The directory will be named posts. Inside the directory we will add the html template file for displaying the posts in the admin area.
To do that create a new file in the posts directory index.view.html
In the file we have the code
<div  class="posts-area">
    <div  class="posts-area-header row">
        <div  class="col l6 m6">
            <h5>Posts</h5>
        </div>
        <div  class="col l6 m6 new-post-button">
            <a  href="#/posts/add"  class="waves-effect waves-light btn right indigo lighten-2 add">
                <i  class="icon ion-ios-add"></i>
            </a>
        </div>
    </div>

    <div  class="row">
        <div  class="col l6 m6"  ng-repeat="post in vm.posts">
            <div  class="card">
                <div  class="card-content">
                    <span  class="card-title activator">Post Title: <br>  <span  class="center">{{post.title}}<i  class="icon ion-md-more right"></i></span></i></span>
                </div>
                <div  class="card-reveal">
                    <span  class="card-title"><i  class="icon ion-md-close right"></i></span>
                    <ul  class="collection">
                        <li  class="collection-item">Tags: <span  class="right">{{post.tags | csv}}</span></li>
                        <li  class="collection-item">Publish Date: <span  class="right">{{post.publishDate | date:'dd/MM/yyyy'}}</span></li>
                        <li  class="collection-item">Published <i  ng-if="post.publish"  class="icon ion-md-checkmark checkmark right" /></li>
                    </ul>
                </div>
                <div  class="card-action">
                    <a  href="#/posts/edit/{{post._id}}"  class="btn indigo lighten-2 edit-btn"><i  class="icon ion-md-create"></i></a>
                </div>
            </div>
        </div>
    </div>
</div>
In the code above we have a button which is located around the header serction for the posts view, clicking this button will take the user to a page where they can add a new post.
Upon adding a new post to the database, selected details relating to that particular post will be displayed in a card on the posts view in the admin area.
In the index.view.html file for posts the directive ng-repeat="post in vm.posts" simply implies that for every post in the posts table in the database repeat the following process.
For each post in posts the card displays the following
- post title,
{{post.title}} - post tags
{{post.tags | csv}} - post publish date,
{{post.publishDate | date:'dd/MM/yyyy'}}
We also have a button in the card action area of the card which can be used to edit the current post.
We need a state controller for this view file so to create that we need to add the controller file.
We will name the controller file index.controller.js and in the file we have the code
(function () {
    'use strict';

    angular
        .module('app')
        .controller('Posts.IndexController', Controller);

    function  Controller(PostService) {
        var  vm  =  this;
        vm.posts  = [];
        initController();
        function  initController() {
            vm.loading  =  true;
            PostService.GetAll()
                .then(function (posts) {
                    vm.loading  =  false;
                    vm.posts  =  posts;
                });
        }
    }

})();
This file indicates that the controller name for the posts view is Posts.IndexController.
The function Controller() grabs data gotten from the PostService module which we will create in a bit and stores it in the array vm.posts.
The values stored in vm.posts are then used to populate the posts view in the admin area.
We can now add the service module for our posts view.
Outside the posts directory, that is one level directly into the admin directory create a new directory services.
Inside this new directory add a new file post.service.js which will contain the following code
(function () {
    'use strict';

    angular
        .module('app')
        .factory('PostService', Service);

    function  Service(DataService) {
        var  service  =  DataService('/api/posts');
        return  service;
    }

})();
The function Service() above grabs data from the posts controller modules located in the server directory and serves them to the posts controller in the client to be rendered in the view.
We can view the posts view finally and it should look like the screenshot below
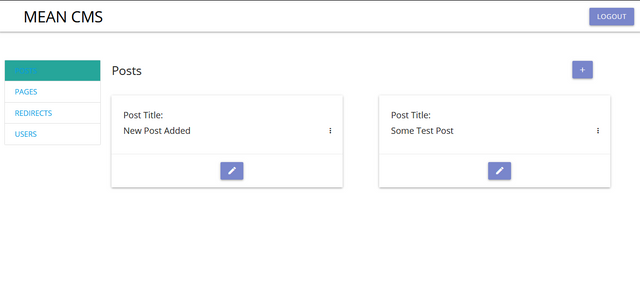
Clicking on the icon on the far right of each card would reveal extra details for each post as shown in the snapshot below.

Posts Add/Edit View
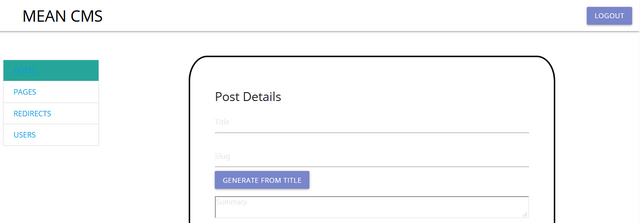
In order to add new posts or edit existing posts we need to add a view containing a form which will accept all the text and parameters for our blog post.
We are going to add a template html file and a controller for the template.
In the posts directory add a new file add-edit.view.html . In the file add the following code
<div  class="add-post-area container">

    <h5>Post Details</h5>
    <form  ng-if="!vm.loading">
        <div  class="input-field">
            <input  placeholder="Title"  id="title"  type="text"  ng-model="vm.post.title" />
        </div>
        <div  class="input-field">
            <input  placeholder="Slug"  type="text"  id="slug"  ng-model="vm.post.slug" />
            <a  class="generate-slug btn waves waves-effect indigo lighten-2"  ng-click="vm.post.slug = (vm.post.title | slugify)">Generate from title</a>
        </div>
        <div  class="input-field">
            <textarea  placeholder="Summary"  id="summary"  ng-model="vm.post.summary"  rows="4"></textarea>
        </div>
        <div  class="input-field">
            <textarea  ng-model="vm.post.body"  wysiwyg></textarea>
        </div>
        <div  class="input-field">
            <input  type="text"  id="tags"  placeholder="Tags"  ng-model="vm.post.tags"  tags />
        </div>
        <div  class="post-date">
            <i  class="icon ion-md-calendar"></i>
            <input  type="text"  placeholder="Publish Date"  id="publish-date"  ng-model="vm.post.publishDate"  class="datepicker" />
        </div>
        <p>
            <label>
                <input  type="checkbox"  ng-model="vm.post.publish" />
                <span>Publish</span>
            </label>
        </p>
        <div  class="center">
            <a  class="btn waves waves-effect indigo lighten-2"  ng-click="vm.savePost()">SAVE</a>
            <a  class="btn waves waves-effect indigo lighten-2"  href="#/posts">CANCEL</a>
            <a  class="btn waves waves-effect indigo lighten-2"  ng-click="vm.deletePost()"  ng-show="vm.post._id">DELETE</a>
        </div>
    </form>
</div>

<script>
    $(document).ready(function(){
        $('.datepicker').datepicker();
    });
</script>
In the file we have a form containing text inputs that accepts the following values through the ng-model directive
- Post Title:
ng-model="vm.post.title" - Slug:
ng-model="vm.post.slug" - Post Summary:
ng-model="vm.post.summary" - Post Body:
ng-model="vm.post.body" - Post Tags:
ng-model="vm.post.tags" - Publish Date:
ng-model="vm.post.publishDate"
The post body textarea also contains an extra directive wysiwyg which imports the ckeditor module into that textarea.
Ckeditor is a text editor solution that can be used with web applications. It provides a wysiwyg interface which allows for easy customization of the post content.
We also have three buttons which performs the following functions specified by their various ng-click directive
- Save Post:
ng-click="vm.savePost()" - Cancel Editing:
href="#/posts" - Delete Post:
ng-click="vm.deletePost()"
The delete post operation also has another directive which prevent the button from being displayed if the post is just being added for the first time ng-show="vm.post._id".
Now we will add the controller for the add-edit view file. In the posts directory add a new file add-edit.controller.js.
The code for the add-edit contoller
(function () {
    use strict';

    angular
        .module('app')
        .controller('Posts.AddEditController', Controller);

    function  Controller($stateParams, $location, $filter,  PostService, AlertService) {
        var  vm  =  this;

        vm.post  = {};
        vm.savePost  =  savePost;
        vm.deletePost  =  deletePost;

        initController();

        function  initController() {
            vm.loading  =  0;
              if ($stateParams._id) {
                  vm.loading  +=  1;
                  PostService.GetById($stateParams._id)
                      .then(function ($stateParams._id) {
                            vm.loading  -=  1;
                            vm.post  = post;
                        });
              } else {
                    // initialise with defaults
                    vm.post  = {
                        publishDate:  moment().format('YYYY-MM-DD'),
                        publish:  true
                    };
                }
        }

        function  savePost() {
            PostService.Save(vm.post)
                .then(function () {
                    AlertService.Success('Post saved', true);
                    $location.path('/posts');
                })
                .catch(function (error) {
                    AlertService.Error(error);
                });
        }

        function  deletePost() {
            PostService.Delete(vm.post._id)
                .then(function () {
                    AlertService.Success('Post deleted', true);
                    $location.path('/posts');
                })
                .catch(function (error) {
                    AlertService.Error(error);
                });
        }
    }

})();
In this file, the functionController() gets data from the database through the PostService module.
Each post and its various properties is stored in vm.postarray.
Whenever a user clicks the SAVE button in the view, the savePost() function runs and it saves the post in the database through the PostService module.
If the user clicks the DELETE button, the deletePost() function runs and it removes the post from the database through the PostService module.
Here is a screenshot of the add-edit form for new posts just about to be created
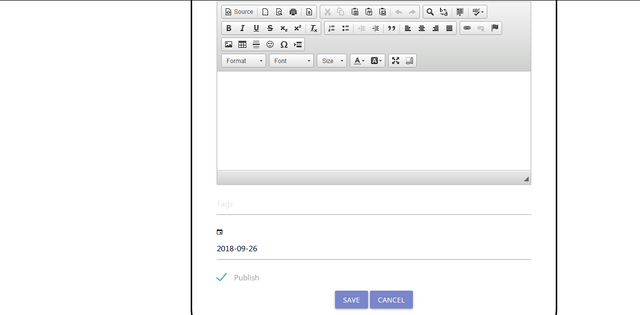
For existing posts that are being edited the buttons at the end of the form would include a delete button that can be used to delete post from the database.
That brings us to the end of the posts view and this tutorial.
In our next tutorial we will work on the pages view.
Curriculum
Building A Content Management System Using The MEAN Stack - 2(Create Controller Modules 1)
Building A Content Management System Using The MEAN Stack - 3 (Create Controller Modules 2)
Building A Content Management System Using The MEAN Stack - 4 (Create Services Modules)
Proof Of Work Done
https://github.com/olatundeee/mean-cms
Thank you for your contribution @gotgame.
Following our review of your tutorial, we suggest the following points below:
In addition to your good explanation of your code, we suggest you put comments in the code. Comments are very important to help the reader better understand your code.
In placing your code there are lots of spaces between rows. Be careful when entering your code and see this tutorial link to use the markup better.
It would be interesting a short gif or video to show what was developed and its features.
We really enjoyed your tutorial and look forward to more tutorials from you. Thank you and good work!
Your contribution has been evaluated according to Utopian policies and guidelines, as well as a predefined set of questions pertaining to the category.
To view those questions and the relevant answers related to your post, click here.
Need help? Write a ticket on https://support.utopian.io/.
Chat with us on Discord.
[utopian-moderator]
Thank you for your review, @portugalcoin!
So far this week you've reviewed 1 contributions. Keep up the good work!
Hello! Your post has been resteemed and upvoted by @ilovecoding because we love coding! Keep up good work! Consider upvoting this comment to support the @ilovecoding and increase your future rewards! ^_^ Steem On!

Reply !stop to disable the comment. Thanks!
Hello! Your post has been resteemed and upvoted by @ilovecoding because we love coding! Keep up good work! Consider upvoting this comment to support the @ilovecoding and increase your future rewards! ^_^ Steem On!

Reply !stop to disable the comment. Thanks!
Hello! Your post has been resteemed and upvoted by @ilovecoding because we love coding! Keep up good work! Consider upvoting this comment to support the @ilovecoding and increase your future rewards! ^_^ Steem On!

Reply !stop to disable the comment. Thanks!
Hello! Your post has been resteemed and upvoted by @ilovecoding because we love coding! Keep up good work! Consider upvoting this comment to support the @ilovecoding and increase your future rewards! ^_^ Steem On!

Reply !stop to disable the comment. Thanks!
Hello! Your post has been resteemed and upvoted by @ilovecoding because we love coding! Keep up good work! Consider upvoting this comment to support the @ilovecoding and increase your future rewards! ^_^ Steem On!

Reply !stop to disable the comment. Thanks!
Hello! Your post has been resteemed and upvoted by @ilovecoding because we love coding! Keep up good work! Consider upvoting this comment to support the @ilovecoding and increase your future rewards! ^_^ Steem On!

Reply !stop to disable the comment. Thanks!
Hello! Your post has been resteemed and upvoted by @ilovecoding because we love coding! Keep up good work! Consider upvoting this comment to support the @ilovecoding and increase your future rewards! ^_^ Steem On!

Reply !stop to disable the comment. Thanks!
Hello! Your post has been resteemed and upvoted by @ilovecoding because we love coding! Keep up good work! Consider upvoting this comment to support the @ilovecoding and increase your future rewards! ^_^ Steem On!

Reply !stop to disable the comment. Thanks!
Hi @gotgame!
Your post was upvoted by @steem-ua, new Steem dApp, using UserAuthority for algorithmic post curation!
Your post is eligible for our upvote, thanks to our collaboration with @utopian-io!
Feel free to join our @steem-ua Discord server
Hey, @gotgame!
Thanks for contributing on Utopian.
We’re already looking forward to your next contribution!
Get higher incentives and support Utopian.io!
Simply set @utopian.pay as a 5% (or higher) payout beneficiary on your contribution post (via SteemPlus or Steeditor).
Want to chat? Join us on Discord https://discord.gg/h52nFrV.
Vote for Utopian Witness!