Building an iOS Audio Editor with Swift(#4)-Creating an Extension for Playback Functions
Repository
https://github.com/apple/swift
What Will I Learn?
- You will learn about Stack Views in iOS
- You will learn how to connect multiple views to a single @IBAction
- You will learn about enums in swift
- You will learn how to use enums to distinguish between clicks on multiple views
- You will learn about Extensions in swift
- You will learn how to setup for playback using an extension for the
SoundsPlaybackControllerclass - You will learn about the
AVAudioFileclass
Requirements
- Basic knowledge of the Swift Programming Language
- MAC OSx High Sierra version 10.13 and above
- Xcode version 9.3 Editor
- Previous Tutorial
Difficulty
- Intermediate
Tutorial Contents
Image Source
In the previous Tutorial, we used the AVAudioRecorderDelegate to determine when recording of audio was complete and we sent the path to the recorded file across a segue to the SoundsPlaybackController where it would be used for playback of the recorded audio at different pitches.
Lets build on this knowledge and set up the views for the SoundsPlaybackViewController which would represent different audio functionalities within the application. To design our layout we will use Stack views
Stack Views
Stack views in iOS are used to create layouts that can resize and adapt to various screen sizes and orientation. They are of two types : Horizontal Stack View and Vertical Stack View. Views are arranged in a linear order either horizontally or vertically and automatically resize as required. Also, stack views can be nested with each other, for example many horizontal stack views can be placed or stacked in a root vertical stack view. We will be building our layout with this in mind. Click here to read more on how to use stack views.
Designing the Views
On the Main.storyboard file, drag a vertical stack view from the object library pane onto the Sounds Playing Controller Scene. Click drag its edges so as to make it fill the entire device screen, setting its constraints to the edges of the view area. Also in the attributes inspector, set its Distribution property to fill equally. This ensures that its child views are spaced equally between each other. Drag three horizontal stack views consecutively onto the view area. These views will be automatically stacked ontop each other in a vertical manner.
Proceed by dragging two buttons into each horizontal stackview making a total of six buttons. These buttons will represent six states of playback sound pitch: High pitch, Low pitch, Fast rate, Slow rate, Echo state, Reverberation state. Therefore, clicking on any of these buttons, the recorded sound will be played at any of the selected states. You can set appropriate images as you wish on your buttons to indicate the type of playback or use labels.
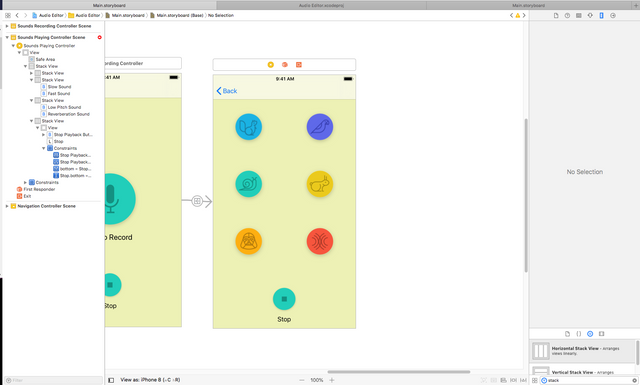
Final UI design
The views are then connected to the SoundsPlaybackViewController via @IBOutlets so as to have a reference to them from code,
    @IBOutlet weak var highPitchButton: UIButton!
    @IBOutlet weak var echoButton: UIButton!
    @IBOutlet weak var slowButton: UIButton!
    @IBOutlet weak var fastButton: UIButton!
    @IBOutlet weak var lowPitchButton: UIButton!
    @IBOutlet weak var reverbButton: UIButton!
    @IBOutlet weak var stopPlaybackButton: UIButton!
Attaching Views to Actions
We have created @IBActions before, these annotations represent methods that are called when a view is clicked by the user. In our layout we have six buttons, each representing a similar action (playing back audio), while we might choose to call a method for each view when it is clicked, this is an unwise decision and leads to boilerplate code and other issues. The best way to attach our views to actions would be to make each view call the same method and then differentiate which view was clicked within the method. To do this we use an important concept in swift known as enumerations.
Enumerations
These are data types in swift that represent a set of values known as members. They can be of any type and can be initially declared with a particular data type or initialized later on elsewhere in code. It is declared with the enum keyword. Each member of the enum is unique and represents a special and distinctive case of the data type. An example of an enumeration is,
enum Planet {
case mercury
case venus
case earth
case mars
case jupiter
case saturn
case neptune
case pluto
}
The members of an enum can then be referenced by calling the enum type and using the dot operator to call the member. For example Planet.pluto. To learn more about Enumerations visit the link here
Distinguishing Views
With this knowledge of enumerations, lets create an enum of buttons called PlaybackButton,
enum PlayBackButton : Int{
        case highPitch = 0
        case lowPitch
        case slow
        case fast
        case reverb
        case echo
    }
We have declared our enum to be of type Int and initialized the first member to be equal to 0, this ensures that subsequent members follow the pattern and increase accordingly with PlaybackButton.fast equal to 3 and PlaybackButton.echo equal to 5.
An @IBAction function called playbackRecording() is then created by dragging from any of the buttons unto the SoundsPlaybackController. Then click drag from the each of the buttons to the Sounds Playing Controllerin the main.storyboard, this pops up a menu showing the available @IBActions present in the controller class. Click on the playbackRecording() function for all the playback buttons. This single method will be called for all playback buttons when they are clicked. Then finally connect the stop button to a function called stopPlayback().
Next thing we have to do to differentiate our buttons is to assign tags to the from the story board. Views are automatically assigned tags of 0 by xcode and we can change this into a value that would correspond to that in our PlaybackButton enum. Click on the button and click on the attributes inspector, select the tag attribute and set it to the value corresponding to the state declared in the PlaybackButton enum. Then in the playbackRecording() function, type in the following lines of code,
@IBAction func playbackRecording(_ sender: UIButton) {
        switch(PlayBackButton(rawValue: sender.tag)!){
        case .highPitch: //play high pitch
            return
        case .lowPitch: //play low pitch
            return
        case .slow: //play slow sound
            return
        case .fast: //play fast sound
            return
        case .reverb: //reverberate sound
            return
        case .echo: //make sound echo
            return
        default: break
        }
A switch statement is defined that takes in the raw value of sending button's tag. This tag is then compared with cases of the enum members to then ascertain what will be done when any of the tags matched. Therefore, our six playback buttons have been wired up to call just a single method. The next thing we have to do is to define different behaviour for playback of the recorded file.
Extension
An Extension(keyword - extension) in swift serves as a means to add existing functionalities to a class, struct or protocol. It helps to ensure code can be added from another file into an existing class or struct. This helps in code maintenance and decoupling. Extensions only help in adding new functionality or behaviors, they do not override existing ones.
An example is shown below of an extension of the UIButton,
extension UIButton{

func clickToRed(color : Float)->{
//write code to change button colour to red
}
}
This defines an extension of the UIButton class and defines a function called clickToRed() passing in a float parameter. This function can then be called by any instance of type UIButton within the iOS project. Lets apply this knowledge to our application and set up for audio playback. To learn more about extensions, visit the link here
Setting Up for Playback using Extension
To get started we create an extension of the SoundsPlayingController class simply by creating a new file called SoundsPlaybackControllerExtension. Within this extension, we create a struct to hold in certain string constants that will be displayed during error, well knowing that this is an audio playing interface and therefore errors might be encountered at any point. Type in the following lines of code,
extension SoundsPlayingController {

    struct Errors{
        static let DismissAlert = "Dismiss"
        static let RecordingDisabledTitle = "Recording Disabled"
        static let RecordingDisabledMessage = "You've disabled this app from recording your microphone. Check Settings."
        static let RecordingFailedTitle = "Recording Failed"
        static let RecordingFailedMessage = "Something went wrong with your recording."
        static let AudioRecorderError = "Audio Recorder Error"
        static let AudioSessionError = "Audio Session Error"
        static let AudioRecordingError = "Audio Recording Error"
        static let AudioFileError = "Audio File Error"
        static let AudioEngineError = "Audio Engine Error"
    }
}
The extension to the SoundsPlayingController has been created and whatever is added to this file will be available to the other file where the SoundsPlayingController was declared as a class. The struct of constants will be easy to use to refer to a particular type of error and output it on the console.
Moving on, we want our UI to be adaptive during certain situations during playback or when playback is stopped. For example, when the segue to the SoundsPlayingController is done executing, the stopPlayBackButton should be disabled and it should be enabled when playback of a particular sound is ongoing. Lets take care of this with the following lines of code in the SoundsPlaybackControllerExtension file,
enum PlayingState { case playing, notPlaying }


func configureUI(_ playState: PlayingState) {
        switch(playState) {
        case .playing:
            setPlayButtonsEnabled(false)
            stopPlaybackButton.isEnabled = true
        case .notPlaying:
            setPlayButtonsEnabled(true)
            stopPlaybackButton.isEnabled = false
        }
    }

func setPlayButtonsEnabled(_ enabled: Bool) {
        slowButton.isEnabled = enabled
        highPitchButton.isEnabled = enabled
        fastButton.isEnabled = enabled
        lowPitchButton.isEnabled = enabled
        echoButton.isEnabled = enabled
        reverbButton.isEnabled = enabled
    }
First of all, we create an enum called PlayingState. This enum represents two unique states of our app: playing(When playback is currently ongoing) and notPlaying(when playback has stopped). Then in the configureUI() function, we pass in the enum type as a parameter and use a switch statement to determine which of the enum cases is being satisfied. When this is known, a method called setPlayButtonsEnabled() is called, also the stopPlaybackButton.isEnabled property is set to true while playing and false when audio playback is stopped.
The setPlayButtonsEnabled() method simply sets the isEnabled property of the 6 playback buttons to true or false depending on the current state of the enum.
Moving further, lets define a function to be called in case of error at any point during audio playback. I have called this function showError() and its implementation is shown in the following lines of code,
 func showError(_ title: String, message: String) {
        let alert = UIAlertController(title: title, message: message, preferredStyle: UIAlertControllerStyle.alert)
        alert.addAction(UIAlertAction(title: Alerts.DismissAlert, style: .default, handler: nil))
        self.present(alert, animated: true, completion: nil)
    }
The UIAlertController is a class in the UIKit module that helps to configure alert messages and actions for display to the user at any point in the app. A constant called alert is initialized as a UIAlertController and the title and message parameters are passed in as originally obtained from the parameter of the function, the third parameter is a type of UIAlertControllerStyle and here it has been set to UIAlertControllerStyle.alert
An alternative alert controller style is UIAlertControllerStyle.actionSheet
The alert instance is then used to call a method called addAction() passing in a type of UIAlertAction which is a class that handles actions to be taken when a user clicks on any interactive view such as a button in the alert. The title of the alert is set in the UIAlertAction initializer and also the style of the alert.
Finally, the present() method of the SoundsPlaybackController is called. This method is used to present a view controller to the user for interaction. The alert instance earlier created is passed in and the animation parameter is set to true to make sure the presentation is animated.
Creating the Audio File from the Url Path
With the above functionalities defined, lets create an audio file using the url path that we earlier passed between
segues. To create this file we make use of a class in swift known as AVAudioFile.
An instance of the AVAudioFileclass represents an audio file that can be altered or changed, in other words it can be written to or read from regardless of the format of the file. A common file format is used by the device to perform this alteration and conversion is made between the file's actual format and the common file format. To learn more about the AVAudioFile class you can visit this link.
To use this class, lets create an instance of it in our SoundsPlaybackController class using theAVFoundation module we learnt about in earlier tutorials,
import AVFoundation

class SoundsPlayingController: UIViewController {
var audioFile : AVAudioFile!

}
We have done this in our SoundsPlayingController class but note that it could also be created in the extension and it would still work. Next in our SoundsPlayingControllerExtension we create a function called setUpAudio to handle the creation of the audio file. Type in the following lines of code,
func setupAudio() {

        do {
            audioFile = try AVAudioFile(forReading: recordedAudioURL as URL)
        } catch {
            showError(Errors.AudioFileError, message: String(describing: error))
        }
    }
This code snippet shows the setUpAudio() function. A do-catch block is used to perform the creation of the audio file. This creation is done with a try keyword indicating that an error could be thrown if the audio file cannot be generated from the url. If indeed there is an error, it is caught in the catch block and the showError() function we earlier created is then called, passing in the appropriate error message.
We have just taken the first steps towards setting up our SoundsPlaybackController for audio playback by adding the above functionalities to its extension. Next up in this tutorial, we will be adding functionalities such as audio rate and audio pitch to control the audio playback.
Curriculum
- Building an iOS Audio Editor with Swift (#1)-Introduction
- Building an iOS Audio Editor with Swift(#2)-Adding the Audio Recording Functionality
- Building an iOS Audio Editor with Swift(#3)-Referencing the Audio File for Playback
Proof of Work Done
Github repo for the full application
https://github.com/demistry/Audio-Editor
Thank you for your contribution.
While I liked the content of your contribution, I would still like to extend few advices for your upcoming contributions:
Looking forward to your upcoming tutorials.
Your contribution has been evaluated according to Utopian policies and guidelines, as well as a predefined set of questions pertaining to the category.
To view those questions and the relevant answers related to your post, click here.
Need help? Write a ticket on https://support.utopian.io/.
Chat with us on Discord.
[utopian-moderator]
Hey @davidemi
Thanks for contributing on Utopian.
We’re already looking forward to your next contribution!
Contributing on Utopian
Learn how to contribute on our website or by watching this tutorial on Youtube.
Want to chat? Join us on Discord https://discord.gg/h52nFrV.
Vote for Utopian Witness!
Congratulations @davidemi! You received a personal award!
Click here to view your Board
Congratulations @davidemi! You received a personal award!
You can view your badges on your Steem Board and compare to others on the Steem Ranking
Vote for @Steemitboard as a witness to get one more award and increased upvotes!