Part 5: Build a CSS-in-JS React App with Styled Components and Priceline Design System
Currently, we live in the era of dwindling patience. We expect our meals available quickly, so we visit the local fast food drive through for takeouts. We schedule automated order purchases with tools like Alexa and Google Home and sometimes, even skip the bus to visit our destinations with on-demand services like Uber and Lyft.
As a result, we've adopted a set of behavioral patterns that shape our expectations when using applications. Studies have shown that users are willing to abandon a site or app within 6 seconds of perceived non-responsiveness.
What does this mean for us as application developers? It means we either get our sites or apps faster or we lose users. It's really important to note that users tend to be more interested in apps that seem fast even if they may not be orders of magnitude faster than the next guy's app.
Today, we'll explore a few techniques for improving perceived responsiveness for apps. We'll be looking at a few such techniques today (even though there are much more sophisticated and code intensive techniques out there). We'll use a technique that is employed by some of the most popular apps available today. Stay with us to find out more.
Disclaimer:
This tutorial may be pretty challenging for a first time reader of this series. I sincerely recommend that visitors get at least a cursory gaze at the previous articles in this series for easier comprehension. Links to the previous articles are available at the end of this tutorial.
Repository
Tutorial Repository
Difficulty
- Advanced
What Will I Learn?
By the time we get to the end of this tutorial, you should be able to apply these techniques to your React apps:
- Implementing route based content filtering using React Router.
- Use JSON data as an in-app data store. We'll be working extensively with JSON.
- Improving content loading times by delegating to Infinite Scroll.
- Hooking Infinite Scroll to our Redux store using sagas.
Requirements
- Node.js 8.0 or greater.
- NPM 3.0 or greater.
- Yarn package manager
- Git
- FireLiners Github Repository Code
- An intermediate level of ReactJS knowledge.
- Resource Assets for This Tutorial
- Keen interest and patience.
Brief Introduction.
In the overview above, we briefly described our problem space and we also clearly outlined the techniques we hope to use to address said problems. Let's address the first technique.
Infinite Scroll:
Infinite scroll is a very popular performance technique for when you have a really long list of items to display to the user. It's nearly ubiquitous these days. It's currently employed in the most popular web and mobile apps available today.
How does infinite scroll work? Well, its principle is really simple. You simply detect when you're scrolling closer to the bottom of the screen and then you issue a request for additional information. It's main drawback usually, is the loss of awareness upon destruction of the app instance.
You can determine the position of the scroll by running calculations in the window.onScroll handler. You may also use the shiny new IntersectionObserver API that makes handling this way easier than the way it was done in the past.
To save on time, we'll be using the wonderful react-infinite-scroll-component package. You can get it installed by running
npm install --save react-infinite-scroll-component
With this React component now available, we should give ourselves a brief refreshing of the current app structure we're employing.
fire-liners/
- config/...
- node_modules/...
- public/...
- scripts/...
- src/
- assets/
- data/
- authors.json
- liners.json
- img/...
- data/
- components/
- Header/
- index.js
- logo.svg
- Header/
- containers/
- App/
- App.test.js
- index.js
- constants.js
- reducer.js
- App/
- redux/
- reducerInjector.js
- reducers.js
- sagas.js
- store.js
- screens/
- AddLine /
- index.js
- actions.js
- Home /
- index.js
- constants.js
- actions.js
- Loading /
- index.js
- AddLine /
- services/
- DataService/
- index.js
- DataService/
- index.js
- registerServiceWorker.js
- assets/
- package.json
Important: Before we proceed, please remember to download the fireliners-resources.zip file (listed under requirements) above that contains some resources we'll be using for our tutorial. If you've done that, extract the contents of the assets folder within the fire-liners.zip to the src/assets directory.
We'll be refactoring our Data Service to get it ready for infinite scrolling.
Refactoring the Data Service.
Currently, our data service methods retrieve either all the data within our liners.json or just a particular item within the liners.json file. Our infinite scrolling should only load five items at any particular point in time.
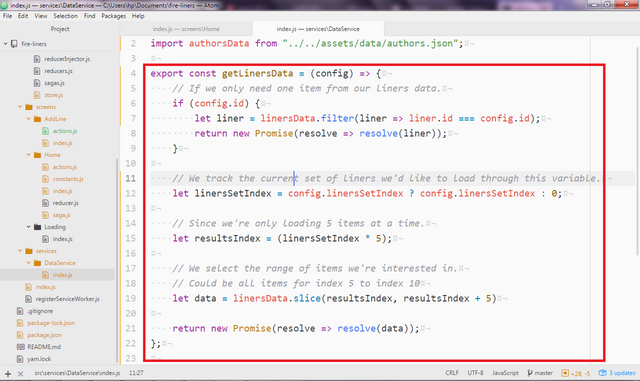
Our new getLinersData method accepts a config object. If we specify an id property within the config object, we return only one item. We need to keep track of the data we'll be selecting. For instance, we might need to request the first set of items within the range (1-5), then from ranges (5-10), you know stuff like that. We keep track using the linersSetIndex variable. The values within this variable would usually be 1, 2, 3...
Finally, we use the linersData.slice method to 'select' out the items we're interested in.
export const getLinersData = (config) => {
    // If we only need one item from our liners data.
    if (config.id) {
        let liner = linersData.filter(liner => liner.id === config.id);
        return new Promise(resolve => resolve(liner));
    }

    // We track the current set of liners we'd like to load through this variable.
    let linersSetIndex = config.linersSetIndex ? config.linersSetIndex : 0;

    // Since we're only loading 5 items at a time.
    let resultsIndex = (linersSetIndex * 5);

    // We select the range of items we're interested in.
    // Could be all items for index 5 to index 10
    let data = linersData.slice(resultsIndex, resultsIndex + 5)

    return new Promise(resolve => resolve(data));
};
Also, we should create a method that returns the total number of items in our liners.json file.
export const getLinersTotal = () => linersData.length;
Adding Infinite Scroll Functionality.
We'll need to modify our HomeScreen component to support infinite scrolling. We'll add two dependencies to the top of the src/screens/Home class. We're simply importing the InfiniteScroll component and the getLinersTotal method from the data service.
import InfiniteScroll from 'react-infinite-scroll-component';
import { getLinersTotal } from '../../services/DataService';
Next, we set up our constructor method. We define some local state for this component. We set the previously mentioned linersSetIndex property to default to 0. We also need a means of checking to see if we've still got more items that we're yet to load. We can track that by using the boolean hasMore property that we'll set to true by default.
class Home extends Component {
    constructor(props) {
            // ...Previous code here.
            this.state = {
                linersSetIndex: 0,
                hasMoreItems: true,
                linersTotal: 0
        }
    }
    //... More code here
}
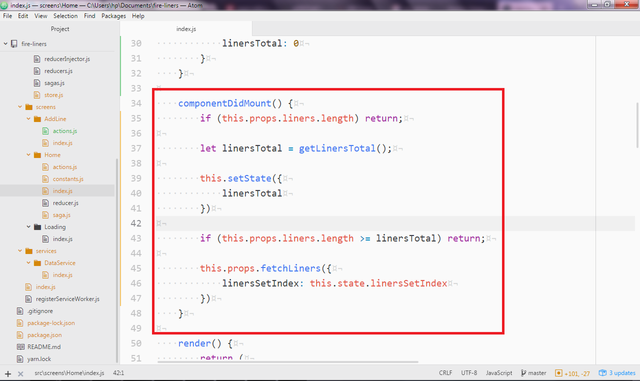
We also need to run some tasks when the component mounts. We first check to see if we've got any liners in the Redux store. If we do, then we don't need to run any other tasks. If that's not the case, we get the total number of liners available to us (in this case, 30 liners). We then keep the value returned by the getLinersTotal method in the local state.
Next, we need to check if we already have the maximum number of liners available so we can skip making an unnecessary request. If that's not the case we proceed to call the this.props.fetchLiners method to get a fresh set of liners.
    componentDidMount() {
        if (this.props.liners.length) return;

        let linersTotal = getLinersTotal();

        this.setState({
            linersTotal
        })

        if (this.props.liners.length >= linersTotal) return;

        this.props.fetchLiners({
            linersSetIndex: this.state.linersSetIndex
        })
    }
In our render method, we'll use the InfiniteScroll component. We'll supply some attributes to this component. Let's go through them.
dataLength: We'll use this prop to tell our Infinite Scroll component the number of items we have available. In this case we set its value equal tothis.props.liners.lengthnext: We can use this prop to specify the method we'd like the component to call when it needs to load our next set of items. In this case, we'd like it to callthis.fetchMoreDatamethod that we'll define shortly.hasMore: We use this prop to tell the component we have more items available. If this value is set to false. The component displays theendMessage(more on this below). We set this value equal tothis.state.hasMoreItems(defined above).loader: This is set to some markup that displays before new content is loaded.endMessage: This is set to some markup that displays whenever there are no more items to load. In our case, we simply show a bold centered paragraph. You could display a loading animation if you wish.
    render() {
        return (
            <Flex justify="center" alignItems="center">

              <Box width={[ 0.9, 0.8, 0.6 ]} p={3}>
                  <Text fontSize={3} mb={3} bold>Recent Quotes</Text>

                  <InfiniteScroll
                    dataLength={this.props.liners.length}
                    next={this.fetchMoreData}
                    hasMore={this.state.hasMoreItems}
                    loader={<h4 style={{textAlign: 'center'}}>Loading...</h4>}
                    endMessage={
                      <p style={{textAlign: 'center'}}>
                        <b>Homie, you done seen all the liners we got.</b>
                      </p>
                    }>
                    {/* Our Liners will show here */}
                    </InfiniteScroll>
             </Box>
          </Flex>
        )
}
The rest of the render method is unchanged. All we simply need to do is wrap the previously existing markup in the <InfiniteScroll></InfiniteScroll> component.
                  {
                      this.props.liners.length > 0 &&
                      this.props.liners.sort((a, b) => a.id < b.id).map((liner, index) => (
                      <Box key={index}>
                          <Flex
                            bg={index === (this.state.linersSetIndex * 5) ? 'lightBlue' : "lightGray"}
                            style={{borderRadius: '4px'}}
                            p={3}
                            mb={3}>
                              <Flex width={[0.5, 0.7, 0.2]}>
                                  <Circle bg={"lightGray"} mr={5} flexDirection="column" justify="center" align="center">
                                    {this.getLinerAvatar(liner) &&
                                    <Image src={require(`../../assets/img/${this.getLinerAvatar(liner)}`)} style={{ borderRadius: '50%', width: '60px' }}/>
                                    }
                                  </Circle>
                              </Flex>
                              <Flex flexDirection="column" width={[0.5, 0.7, 0.7]}>
                                  <Text mb={3} width={1} italic fontSize={[1, 2, 3]}>
                                      {liner.body}
                                  </Text>
                                  <Link href={'/authors/' + liner.author}>
                                      <Text fontSize={1} mb={3} color="gray" align="right" bold>{liner.author}</Text>
                                  </Link>
                              </Flex>

                          </Flex>
                      </Box>
                  ))}
We now need to define the fetchMoreData method. We'll simulate production app conditions. Usually, a roundtrip to the server could take as much as 1500 milliseconds (I'm being hopeful here). We'll set a timeout of 1500 milliseconds then we'll carry out some tasks.
Firstly, we'll increment the state property linersSetIndex by 1. We'll also check if the total number of liners loaded is less than the total number of all liners available and we update the hasMoreItems property to true if our condition is true and false otherwise.
Last of all, we run check to see if they're more items available to load. If that's the case, we call this.props.fetchLiners to get more items from the data service.
    fetchMoreData = () => {
      // a fake async api call like which sends
      // 20 more records in 1.5 secs
      setTimeout(() => {

          this.setState({
            linersSetIndex: this.state.linersSetIndex + 1,
            hasMoreItems: this.props.liners.length < this.state.linersTotal
          });

          if (this.state.hasMoreItems) {
              this.props.fetchLiners({
                  linersSetIndex: this.state.linersSetIndex
              })
          }
      }, 1500);
    };
Setting up Our Reducers
We'll need to modify our reducer to accommodate infinite scrolling. Previously, we simply set the liners properties to the array returned by the data whenever the SET_LINERS action was detected. We have to change its reducer to one that adds a new set of items instead of just replacing it.
Let's do just that. Let's open up src/containers/app/reducer.js and take a look at it.
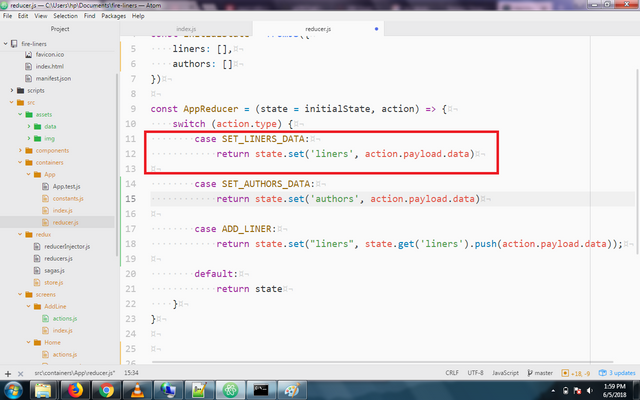
We'll need to modify it to look like this. We're simply setting the liners property to an array that comprises of the previous liners and the new set of liners. We use the fromJS method to make this an ImmutableJS record.
    case SET_LINERS_DATA:
        return state.set('liners', fromJS([...state.get('liners'), ...action.payload.data]))
Congrats! We've completed our Infinite Scroll feature. We can test it out by running npm start and visit http://localhost: 3000.
Implementing route based content filtering using React Router.
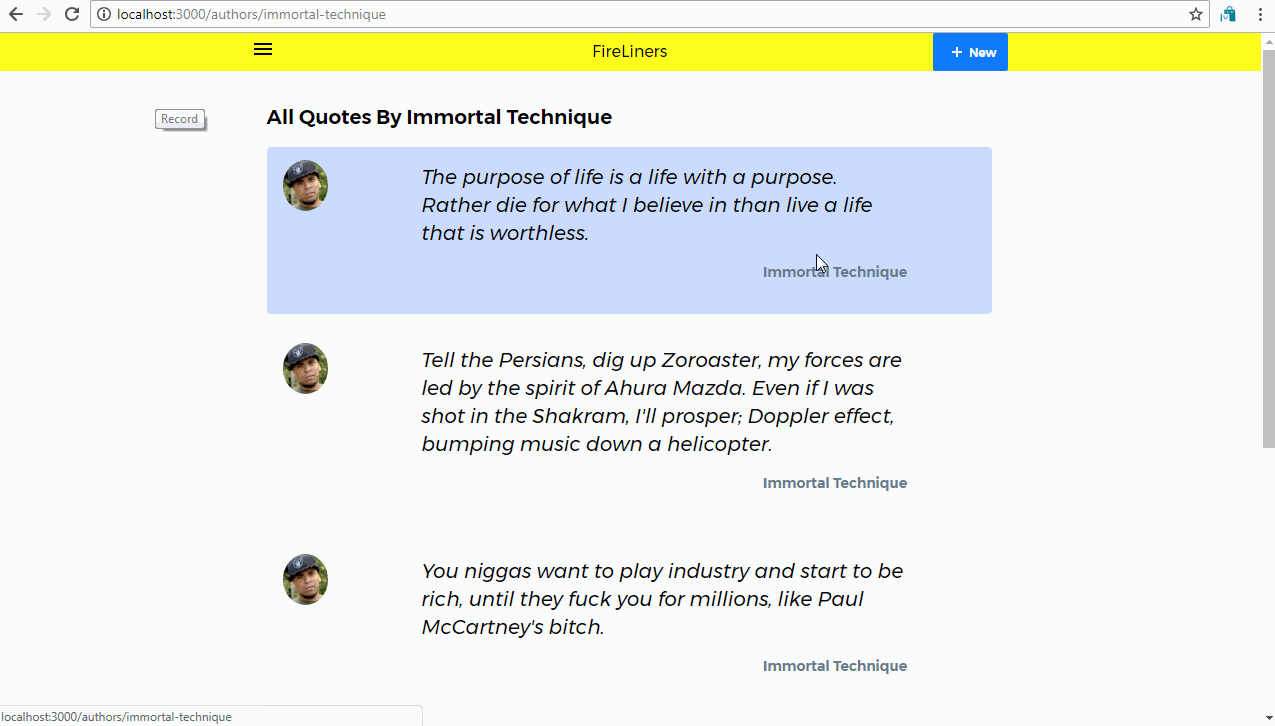
Usually, in most applications, we have multiple routes to serve different content types. These routes are usually passed parameters that influence how its going to work. We'd love to be able to filter liners by authors. For instance, if we hit /authors/Eminem we should see only liners by Eminem. We'll need a new screen component, the Author screen to help us display liners for an author.
We'll also need to refactor our code so we can reuse the infinite scroll feature in our Author screen.
Refactoring our Code for Maximum Reuse
We'll need to extract our code into a new component so we can share it between different component. We'll be extracting our code that displays our liners into the Feed component we'll be creating soon. Create src/components/Feed/index.js and we'll get to work. We'll import our dependencies similar to what exists at the code for the Home screen. We'll also be defining the Circle component here.
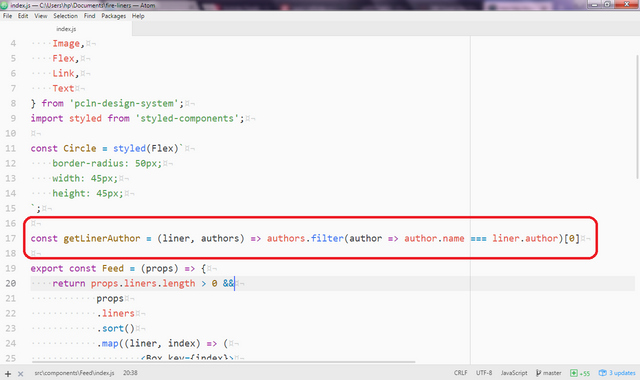
We need a way to be able to get information about the creator of a liner. We'll use the utility function getLinerAuthor to get the author information for a liner. It's a really simple method, we just go through every author and we only return an author if that author is the author of the liner.
import React from 'react';
import {
    Box,
    Image,
    Flex,
    Link,
    Text
} from 'pcln-design-system';
import styled from 'styled-components';

const Circle = styled(Flex)`
    border-radius: 50px;
    width: 45px;
    height: 45px;
`;

const getLinerAuthor = (liner, authors) => authors.filter(author => author.name === liner.author)[0]
We then define the stateless Feed component that is in reality, nothing but a wrapper around our previous code at the Home screen for displaying our liners. Our Feed component is in reality a "pure" function that accepts props and returns some JSX markup. Our JSX markup simply displays the name & photo of the liner's author alongside the liner.
export const Feed = (props) => {
    return props.liners.length > 0 &&
            props
            .liners
            .sort()
            .map((liner, index) => (
                    <Box key={index}>
                        <Flex
                          bg={index === (props.linersSetIndex * 5) ? 'lightBlue' : "lightGray"}
                          style={{borderRadius: '4px'}}
                          p={3}
                          mb={3}>
                            <Flex width={[0.5, 0.7, 0.2]}>
                                <Circle bg={"lightGray"} mr={5} flexDirection="column" justify="center" align="center">
                                  {getLinerAuthor(liner, props.authors).photo &&
                                  <Image src={require(`../../assets/img/${getLinerAuthor(liner, props.authors).photo}`)} style={{ borderRadius: '50%', width: '60px' }}/>
                                  }
                                </Circle>
                            </Flex>
                            <Flex flexDirection="column" width={[0.5, 0.7, 0.7]}>
                                <Text mb={3} width={1} italic fontSize={[1, 2, 3]}>
                                    {liner.body}
                                </Text>
                                <Link href={'/authors/' + getLinerAuthor(liner, props.authors).slug}>
                                    <Text fontSize={1} mb={3} color="gray" align="right" bold>{liner.author}</Text>
                                </Link>
                            </Flex>

                        </Flex>

                    </Box>
                )
            )
}

export default Feed;
Building the Author Screen.
Let's create src/screens/author/index.js and add some code. We'll reuse some of our code for the Home screen. We'll import the InfiniteScrollcomponent and also the newly created Feed component. We also import the fetchAuthorLinersRequest action and the getAuthorLiners data service.
import React, {Component} from 'react';
import { connect } from 'react-redux';
import InfiniteScroll from 'react-infinite-scroll-component';
import Feed from '../../components/Feed';
import {
    Box,
    Flex,
    Text
} from 'pcln-design-system';
import { fetchAuthorLinersRequest, fetchAuthorsRequest } from './actions';
import { getAppState } from '../../containers/App/reducer';
import { getAuthorLiners } from '../../services/DataService';
Next, we setup our constructor. We don't need to be too innovative here as we can simply replicate the constructor of the Home class as they are really similar classes.
class Author extends Component {
    constructor(props) {
        super(props)
        this.state = {
            linersSetIndex: 0,
            hasMoreItems: true,
            linersTotal: 0
        }
    }
When we visit the author screen, we'd like to know how many liners our author has. We'll use the getAuthorLiners method to get all the liners and we'll count them by using the length property. We'll create the getAuthor method to get the current author we're viewing. We also call a yet to be created dispatch method called fetchAuthorLiners. We'll pass it an object containing the linersSetIndex and the author properties.
    componentDidMount() {

        this.setState({
            linersTotal: getAuthorLiners(this.getAuthor()).length
        })

        this.props.fetchAuthorLiners({
            linersSetIndex: this.state.linersSetIndex,
            author: this.getAuthor()
        })
    }
We'll also define the render method along with our markup. We'll use the infinite scroll component along with similar attributes to the one at the Home component. However, we'll simply pass the Feed component to the <InfiniteScroll></InfiniteScroll> component as its child. The props for our Feed component are as follows.
liners: The array of liners you'll need to pass to the Feed.linersSetIndex: The current set of liners to be loaded. Could be the second set if2is provided as the value.authors: The authors array we have access to through themapStateToPropsmethod.
We also show a little message whenever we have no liners for a particular author.
    render() {
        return (
            <Flex justify="center" alignItems="center">

              <Box width={[ 0.9, 0.8, 0.6 ]} p={3}>
                  <Text fontSize={3} mb={3} bold>All Quotes By {this.getAuthor().name}</Text>

                  <InfiniteScroll
                    dataLength={this.props.liners.length}
                    next={this.fetchMoreData}
                    hasMore={this.state.hasMoreItems}
                    loader={<h4 style={{textAlign: 'center'}}>Loading...</h4>}
                    endMessage={
                      <p style={{textAlign: 'center'}}>
                        <b>Homie, you done seen all the liners we got.</b>
                      </p>
                    }
                  >

                  <Feed
                      liners={this.getAuthorLiners()}
                      linersSetIndex={this.state.linersSetIndex}
                      authors={this.props.authors}
                  />
                  </InfiniteScroll>

                  {!this.props.liners.length && <div>Sorry, No Liners are available</div>}

               </Box>
            </Flex>
        )
    }
We also get to define the fetchMoreData method similar to the one at our Home screen.
    fetchMoreData = () => {
      // a fake async api call like which sends
      // 20 more records in 1.5 secs
      setTimeout(() => {

          this.setState({
            linersSetIndex: this.state.linersSetIndex + 1,
            hasMoreItems: this.props.liners.length < this.state.linersTotal
          });

          if (this.state.hasMoreItems) {
              this.props.fetchAuthorLiners({
                  linersSetIndex: this.state.linersSetIndex,
                  author: this.getAuthor()
              })
          }
      }, 1500);
    };
We also need to define the getAuthorLiners and getAuthor methods. These methods will simply return the current author and then returns all the liners created by the author. We use the filter method to return only the data that matches our criteria.
    getAuthorLiners() {
        let author = this.getAuthor()
        return this.props.liners.filter(liner => liner.author === author.name)
    }

    getAuthor() {
        return this.props.authors.filter(author => author.slug === this.props.match.params.slug)[0]
    }
Finally...
We need to define our mapStateToProps and mapDispatchToProps methods. We'll use them to connect our component to the Redux store. We'd like to be able to access the liners and authors from the store so we return them from the mapStateToProps method. We also need to be able to trigger fetchAuthorLiners and fetchAuthors actions so we return them from the mapDispatchToProps methods.
const mapStateToProps = (state) => {
    return {
        liners: getAppState(state).get('liners').toJS(),
        authors: getAppState(state).get('authors')
    }
}

const mapDispatchToProps = (dispatch) => {
    return {
        fetchAuthorLiners: data => dispatch(fetchAuthorLinersRequest(data)),
        fetchAuthors: data => dispatch(fetchAuthorsRequest(data))
    }
}

export default connect(mapStateToProps, mapDispatchToProps)(Author);
Setting Up Our Data Service Methods.
We referenced the getAuthorLiners and getAuthorLinersData methods from our data service module that we're yet to create. We can create them now. Edit src/Services/DataService/index.js and add the getAuthorLiners method. This method will go through all the liners fetched from the liners.json file and return only the ones created by our author of interest.
export const getAuthorLiners = (author) => linersData.filter(liner => author.name === liner.author);
We also define the getAuthorLinersData method that is basically a rehash of the getLinersData method with an adaptation towards loading a specific authors liners.
export const getAuthorLinersData = (config) => {
    let authorLiners = getAuthorLiners(config.author)

    // We track the current set of liners we'd like to load through this variable.
    let linersSetIndex = config.linersSetIndex ? config.linersSetIndex : 0;

    // Since we're only loading 5 items at a time.
    let resultsIndex = (linersSetIndex * 5);

    // We select the range of items we're interested in.
    // Could be all items for index 5 to index 10
    let data = authorLiners.slice(resultsIndex, resultsIndex + 5)

    return new Promise(resolve => resolve(data));
};
Setting Up Our Actions
We also referenced the fetchAuthorLinersRequest and the fetchAuthorsRequest but we are yet to define them. We'll edit the src/screens/Author/actions.js and define them now.
First of all, we'll import a few constants from the constants.js file. We'll then define the fetchAuthorLinersRequest action object that we'll be dispatching.
import {
ADD_LINER_REQUEST,
ADD_AUTHOR_LINERS_REQUEST,
ADD_LINERS_REQUEST,
ADD_AUTHORS_REQUEST
} from './constants';

export const fetchAuthorLinersRequest = data => {
    return {
        type: ADD_AUTHOR_LINERS_REQUEST,
        data
    }
}
We also need to define the fetchAuthorsRequest. Pretty routine stuff. It will return an object with a type value set to the ADD_AUTHORS_REQUEST constant.
export const fetchAuthorsRequest = () => {
    return {
        type: ADD_AUTHORS_REQUEST
    }
}
Setting Up Our Sagas
We'll now setup our saga to help us process our dispatched actions. Let's create src/screens/Author/saga.js. We'll start off with our dependencies. It's a really similar set of dependencies to our previous sagas.
import { all, call, put, takeLatest } from 'redux-saga/effects';
import { getAuthorLinersData, getAuthorsData } from '../../services/DataService';
import { ADD_AUTHOR_LINERS_REQUEST, ADD_AUTHORS_REQUEST } from './constants';
import { SET_LINERS_DATA, SET_AUTHORS_DATA } from '../../containers/App/constants';
We'll also be defining two saga handlers, fetchAuthorLiners and fetchAuthors methods.
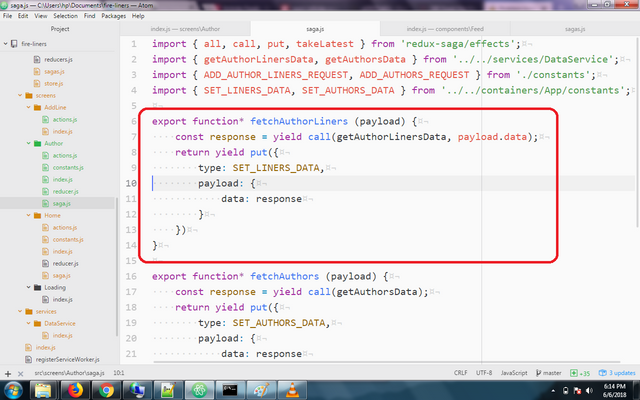
In the fetchAuthorLiners method, we'll resolve the promise returned by getAuthorLinersData passing it the payload's data. We'll then dispatch the SET_LINERS_DATA action to the reducer along with the response.
export function* fetchAuthorLiners (payload) {
    const response = yield call(getAuthorLinersData, payload.data);
    return yield put({
        type: SET_LINERS_DATA,
        payload: {
            data: response
        }
    })
}
In the fetchAuthors method, we'll resolve the promise returned by getAuthorsData. We'll be passing the payload.data object as an argument. We'll then dispatch the SET_AUTHORS_DATA action to the reducer along with the response returned.
export function* fetchAuthors (payload) {
    const response = yield call(getAuthorsData);
    return yield put({
        type: SET_AUTHORS_DATA,
        payload: {
            data: response
        }
    })
}
We'll also need to define the actions we're listening for. In the root method, we'll use the takeLatest method to listen to the ADD_AUTHOR_LINERS_REQUEST action. We'll then run the fetchAuthorLiners method if this action was dispatched.
We also do the same for the ADD_AUTHORS_REQUEST action but in this case, running the fetchAuthors method.
/**
 * We process only the latest action
 */
export default function* root() {
  yield all([
    takeLatest(ADD_AUTHOR_LINERS_REQUEST, fetchAuthorLiners),
    takeLatest(ADD_AUTHORS_REQUEST, fetchAuthors),
  ]);
}
Concluding with the Root Saga
We've been awesome today. To complete our route based filtering, we'll simply need to add our AuthorScreen saga to the root saga. We can do this by editing the src/redux/sagas.js and adding the Author screen saga to the root saga giant default export object. We import the AuthorScreenSaga and we add it to the array argument in the all method.
Our src/redux/sagas.js file should look like the one below now.
import { all, fork } from 'redux-saga/effects';

import HomeScreenSaga from '../screens/Home/saga';
import AuthorScreenSaga from '../screens/Author/saga';

/**
 * rootSaga
 */
export default function* root() {
  yield all([
    fork(HomeScreenSaga),
    fork(AuthorScreenSaga),
  ]);
}
Finito! Here's our route based filtering in all its glory. We are freely switching between different authors. This could be the start of something greater.
Conclusion
In this tutorial, we covered multiple concepts. We learned more about the importance of perceived fast loading in the success of our applications. We also added infinite scrolling capabilities to the FireLiners application. We then added route based data filtering without connecting to an external API.
In our next tutorial, we'll explore more responsiveness aiding techniques. We'll look at action notifications and skeletal loading as viable means of increasing perceived application responsiveness.
Proof of Work
- Infinite Scrolling at the Home Screen
- Route Based Filtering alongside Infinite Scrolling.
Curriculum
Part One: Build a CSS-in-JS App With Styled Components and Priceline Design System
Part Two: Build a CSS-in-JS App With Styled Components and Priceline Design System
Part Three: Build a CSS-in-JS App With Styled Components and Priceline Design System
Part Four: Build a CSS-in-JS App With Styled Components and Priceline Design System
I will be featuring it in my weekly #technology and #science curation post for the @minnowsupport project and the Creators' Guild! The @creatorsguild is a new group of Steem bloggers and content creators looking to improve the overall quality of their niche.
Wish not to be featured in the curation post this Friday? Please let me know. In the meantime, keep up the hard work, and I hope to see you at the Creators' Guild!
If you have a free witness vote and like what I am doing for the Steem blockchain it would be an honor to have your vote for my witness server. Either click this SteemConnect link or head over to steemit.com/~witnesses and enter my username it the box at the bottom.
Thanks dude. Added my vote to your witness.
Thanks for your vote!
Please edit your link tutorial repository. It isn´t work.
Need help? Write a ticket on https://support.utopian.io/.
Chat with us on Discord.
[utopian-moderator]
Sorry about that. Fixed it mate. Cheers!
Thank you for your contribution.
While I liked the content of your contribution, I would still like to extend one advice for your upcoming contributions:
Looking forward to your upcoming tutorials.
Your contribution has been evaluated according to Utopian policies and guidelines, as well as a predefined set of questions pertaining to the category.
To view those questions and the relevant answers related to your post, click here.
Need help? Write a ticket on https://support.utopian.io/.
Chat with us on Discord.
[utopian-moderator]
Hey @creatrixity
Thanks for contributing on Utopian.
We’re already looking forward to your next contribution!
Contributing on Utopian
Learn how to contribute on our website or by watching this tutorial on Youtube.
Want to chat? Join us on Discord https://discord.gg/h52nFrV.
Vote for Utopian Witness!
Congratulations @creatrixity! You have completed some achievement on Steemit and have been rewarded with new badge(s) :
Click on the badge to view your Board of Honor.
If you no longer want to receive notifications, reply to this comment with the word
STOP