Post Processing with three.js
What Will I Learn?
- You will learn what post processing is
- You will learn how to use post processing effects in three.js
- You will learn how to stack post processing effects for a more complicated look
- You will learn how to extend three.js with your own post processing shader
Requirements
- Basic familiarity with structure of three.js applications
- Basic programming knowledge
- Any machine with a webgl compatible web browser
- Knowledge on how to run javascript code (either locally or using something like a jsfiddle)
Difficulty
- Intermediate
Post Processing
There are many interesting things that you can do with three.js that don't find their way into the official builds. Instead of implementing every interesting new feature into the official build the maintainers of three.js choose to tuck them away in the example directory. Post Processing is such a feature. It has been implemented and worked on by the maintainers but isn't found in the main build. We access these extra features by downloading the corresponding files from the examples directory and including them in our projects source.
So what is post processing exactly? It is a way of adding special effects that apply to the entire screen. It is very commonly used for modifying the colors of a final image. Essentially instead of just rendering the scene to the screen, you render the scene to a texture and then you read from that texture and draw whatever you want over top of it.
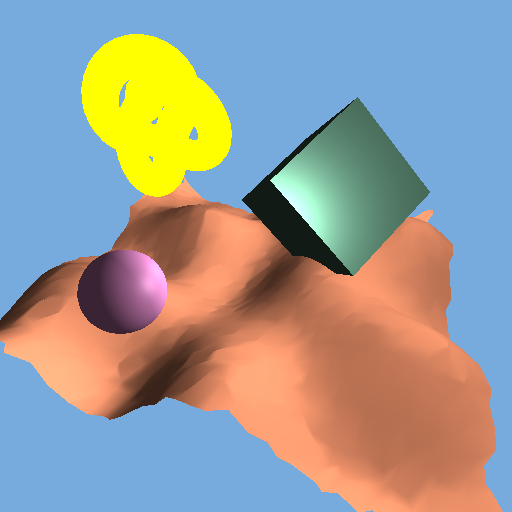
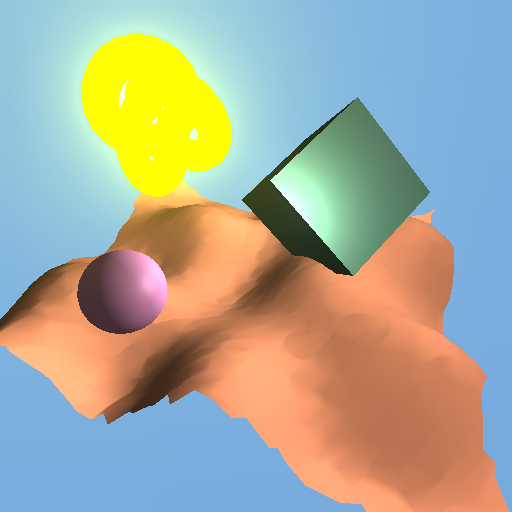
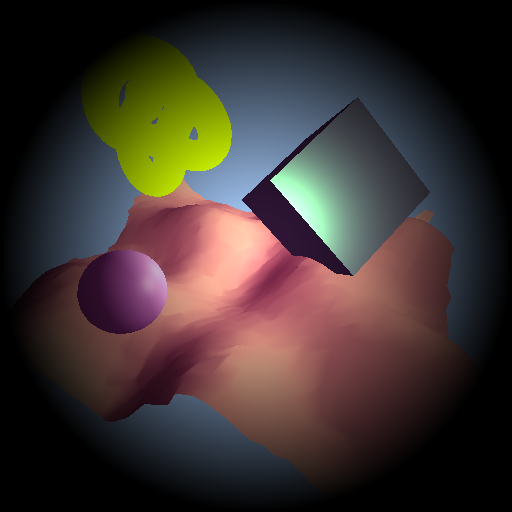
To begin, we will render a scene like the one below.
Then we will walk through how to use a few of the effects that a provided right out of the box in three.js. And finally we will take a look at writing our own custom post processing effects.
Effect Composer
In order to begin using post processing effects in three.js we will use the EffectComposer. This keeps track of each of the render passes and calls them at the appropriate time. Think of it as a mixture between the Scene object and the Renderer object. It can be found here. Download it and add it to your project.
<script src="EffectComposer.js"></script>
We initialize the EffectComposer the same way as other objects in three.js, but we pass the renderer into it when we do so.
var composer = new THREE.EffectComposer(renderer);
composer.setSize(512, 512);
From here we will add passes by calling addPass on the EffectComposer. We will do so for each of the post processing passes we want to make.
composer.addPass(pass_name);
Then, inside the render loop, we call render on the composer instead of on the renderer.
//renderer.render(scene, camera);
composer.render();
Now we are ready to start experimenting with different post processing effects!
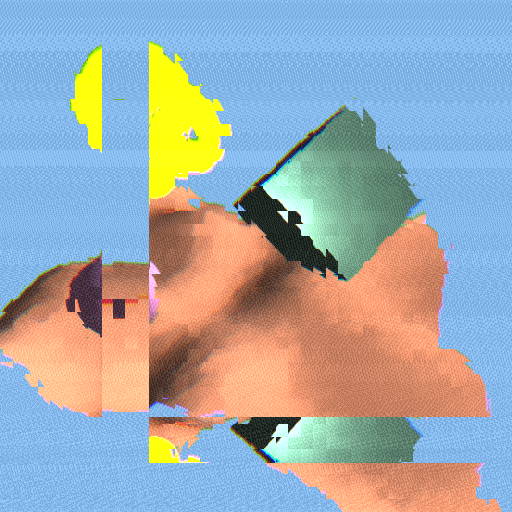
Glitch
First let's look at how to use the GlitchPass. This is a cool glitchy effect that makes your scene look like it is being displayed on a broken tv. You can find the code here. Most post processing effects will require that you also include a corresponding shader. The GlitchPass relies on a shader called DigitalGlitch so we will include that too. It can be found here. Include both files in your program.
<script src="DigitalGlitch.js"></script>
<script src="GlitchPass.js"></script>
Next we initialize the GlitchPass and add it to the composer.
var glitch_pass = new THREE.GlitchPass();
composer.addPass(glitch_pass);
One final line of code to add, because the GlitchPass will be our final pass we instruct three.js to render it directly to the screen by setting renderToScreen to true.
glitch_pass.renderToScreen = true;
Running that code should get you the following image.

Clearly something is wrong here. The scene isn't rendered at all. We end up with some fuzzy lines over a black screen. This is happening because we haven't instructed the EffectComposer to render the scene at all. three.js has an easy way to correct for this, the RenderPass.
Render Pass
The RenderPass acts just like a typical pass only it renders the scene into a texture within the post processing stack. It can be downloaded from here. And make sure to include it.
<script src="RenderPass.js"></script>
There is no corresponding shader because it is simply rendering the scene to a texture. Now before we add the GlitchPass to the composer we will add the RenderPass. The RenderPass takes a reference to the scene and camera just as the call to render would have before.
composer.addPass(new THREE.RenderPass(scene, camera));
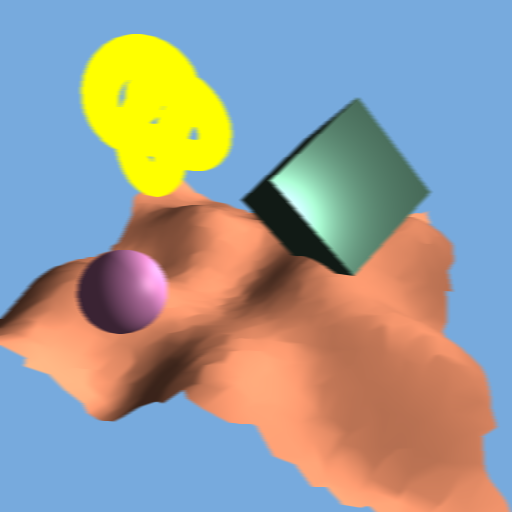
With this added line in we get.
Perfect, we get the scene rendered correctly and then we get the effect we desired overlayed on top.
Simple Effects
For each of these effects you can download the shader from here and the corresponding pass object from here.
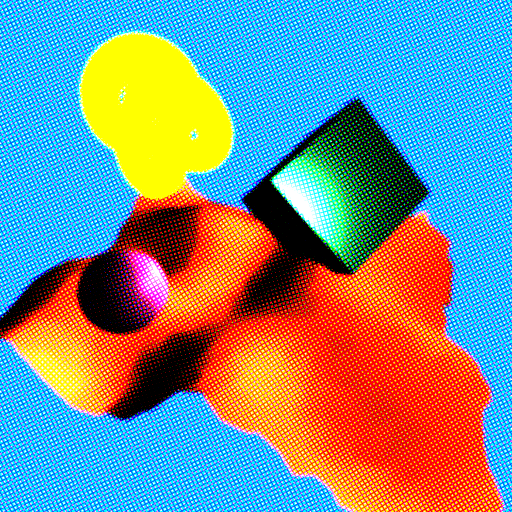
DotScreen is a neat little effect that draws the screen as a bunch of large dots instead of its normal pixels. It is created like so.
var dot_screen_pass = new THREE.DotScreenPass(center, angle, scale);
dot_screen_pass.renderToScreen = true;
composer.addPass(dot_screen_pass);
It takes three values in its constructor. Or none if you are okay with the default settings. center is a Vector2 which shifts the dots around the screen so you can control where they are. angle controls the direction of the pattern in case you want it to look a little less grid like. And finally scale controls the size of the dots. With the default settings you get something like this.
Its a fairly basic effect, one interesting thing to note though is how the torus in the upper left corner disappears with this effect. When the brightness is being calculated to give the final value of the color the torus and the background end up being very similar. This is an important consideration to keep in mind if you are making scenes with black and white effects like this. You may end up making it difficult to see some of your objects.
Here are a few more common effects that are initialized the same way as GlitchPass and DotScreenPass

You can see the built in effects in three.js provide a wide assortment of visual effects. These are just a small sample of what three.js offers.
ShaderPass
A more generic solution to post processing is the ShaderPass object. It simply takes a shader that can be run on the full screen and adds it as a render pass. It can be found here. You can use any of the shaders included in the previous section with it, but there are also shaders from the example folder which don't correspond to any pass that you can use.
First, here is the DotScreenShader again. Before we used it inside the DotScreenPass. But now we can use the same shader from within the ShaderPass. We do that like so.
var dot_screen_pass = new THREE.ShaderPass(THREE.DotScreenShader);
dot_screen_pass.uniforms.center.value = center;
dot_screen_pass.uniforms.angle.value = angle;
dot_screen_pass.uniforms.scale.value = scale;
dot_screen_pass.renderToScreen = true;
composer.addPass(dot_screen_pass);
Notice how we have to set the uniforms manually if we want to change the values. When using the DotScreenPass we could set these values when we initialized the pass.
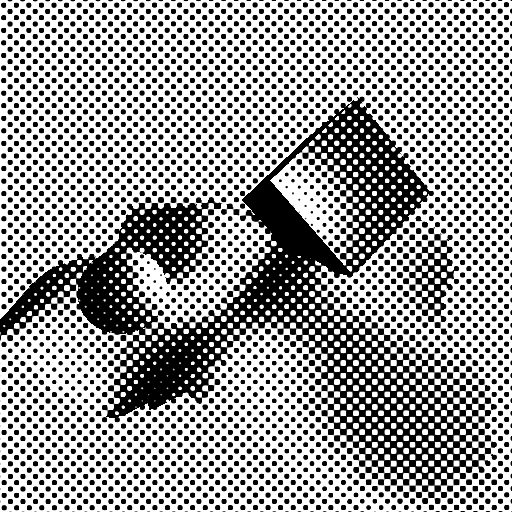
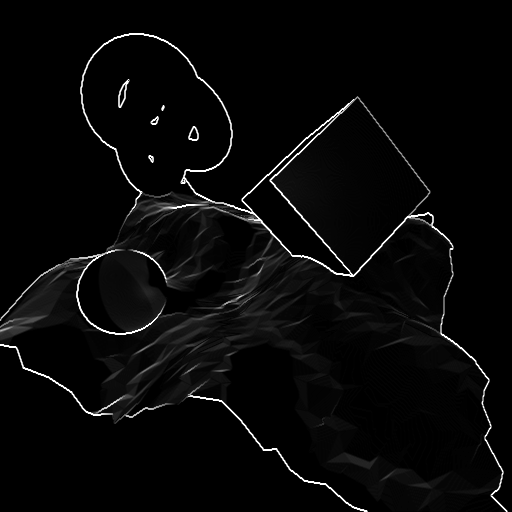
Now lets look at a shader that doesn't correspond to a pass. For this we will use the SobelOperatorShader. The sobel operator is a great way to detect edges in a full screen pass. Download the SobelOperatorShader found here. Make sure to include it. And then you can call it inside the ShaderPass.
var sobel_pass = new THREE.ShaderPass(THREE.SobelOperatorShader);
sobel_pass.uniforms.resolution.value = new THREE.Vector2(512, 512); //or whatever resolution your screen is
sobel_pass.renderToScreen = true;
composer.addPass(sobel_pass);
Notice that it requires the resolution to be passed in. This is another common feature of post processing shaders. Many require the desired screen resolution in order to work properly. Running the code should get you a nice image like the one below, with all the edges highlighted.
Multi Pass Rendering
Where post processing starts to get really interesting is when you combine multiple passes. Thus far we have gone one pass at a time to show off different effects that essentially just add an overlay to the screen. But the real beauty in post processing is the fact that you can chain different effects as much as you want. Just make sure that you set renderToScreen to true only on the last of the effects. All others should be rendered to a texture and then read by the next effect.
To illustrate the usefulness of multi pass post processing effects we will be using a two pass blur effect. It is easy to do a blur in a single pass but if we do it in two passes we can take a fraction of the number of samples and compute the blur much faster. You will need the HorizontalBlurShader found here and the VerticalBlurShader found here. Make sure to include both in your project. Then we will add them to the composer the same way we added the other effects.
var blur_x_pass = new THREE.ShaderPass(THREE.HorizontalBlurShader);
blur_x_pass.uniforms.h.value = 1.0 / 512.0;
composer.addPass(blur_x_pass);

var blur_y_pass = new THREE.ShaderPass(THREE.VerticalBlurShader);
blur_y_pass.uniforms.v.value = 1.0 / 512.0;
blur_y_pass.renderToScreen = true;
composer.addPass(blur_y_pass);
The shaders each take one uniform value, which is the inverse of the width or height of the screen. This is so the shader knows how large each of the pixels will be when scaled to the range 0-1.
Running this code gives us the same scene as before, only slightly blurrier!
Custom Post Processing Effects
Once you have gotten used to using the effects that three.js provides you can go beyond that and start to write your own custom post processing shaders. This is where the real power comes from, with just a simple shader you can do some very interesting effects. For now we are going to keep things simple. We will walk through how to make a post processing effect similar to a filter you might find on a photo app like Instagram.
We start by defining the Shader object. Shaders in three.js follow a very straightforward format that makes writing them very simple. We define an object that wraps up three properties, uniforms, vertexShader, and fragmentShader.
THREE.InstagramFilter = {
    uniforms: {},
    vertexShader: [],
    fragmentShader: []
};
Let's walk through each of these in turn. First let's look at uniforms. We have worked with them before, they are variables that get passed to the shader from the main program. In three.js they are very simple to define.
uniforms: {
  "tDiffuse": { value: null },
  "vignette": { value: 0.4 },
  "exposure": { value: 1.4 },
  "color": { value: new THREE.Color(0.66, 1.2, 0.66) }
},
tDiffuse is a necessary uniform for writing post processing shaders, it is a reference to the screen texture that we will be reading from. If you do not define this uniform then you can't read from the screen. The others are all uniforms that I have added that control various properties of the filter we will be writing. vignette creates a darkening effect around the edges of the screen. exposure washes out the colors in the scene. And color will be used to change the color balance in the final image. Next let's look at the vertexShader.
vertexShader: [
    "varying vec2 vUv;",
    "void main() {",
        "vUv = uv;",
        "gl_Position = projectionMatrix * modelViewMatrix * vec4( position, 1.0 );",
    "}"
].join( "\n" ),
This is a very basic vertex shader. It takes input vertex positions and places them in their corresponding positions on the screen. It also takes the uv passed in by the geometry and passes it to the fragment shader. If you are familiar with shaders this will look very simple and normal. If not, do not worry about it, all post processing vertex shaders should look exactly like this. Finally let's look at the fragment shader, for post processing this is where the magic happens.
Fragment shaders run for every pixel on the geometry. For post processing shaders this means that they run for every pixel on the screen. Additionally what we will do is read from the tDiffuse texture and manipulate the color from the corresponding pixel. A basic fragment shader would look like this.
fragmentShader: [
  "uniform sampler2D tDiffuse;",
  "uniform float vignette;",
  "uniform float exposure;",
  "uniform vec3 color;",
    "varying vec2 vUv;",

    "void main() {",
        "vec4 texel = texture2D( tDiffuse, vUv );",
        "gl_FragColor = texel;",
    "}"
].join( "\n" )
Notice how we define each of the uniforms at the top? This is so we can access them within the fragment shader. Next we define a main function. The main function is called on every pixel. The first line we call texture2D, this is how we read from the previous texture. Then we set the final color of image by setting gl_FragColor to the color of our previous image. Now, let's add in the effects one by one. First color modulation. We modulate the color of the image by raising the current color, gl_FragColor to the power of another color. In this case it will be the color uniform we passed in.
"gl_FragColor.xyz = pow(gl_FragColor.xyz, color);",
Next, we acheive the washed out effect by multiplying the color by the exposure uniform the above line then becomes.
"gl_FragColor.xyz = pow(gl_FragColor.xyz*exposure, color);",
Finally we apply the vignetting. We do so by calculating the distance of a pixel from the center of the screen and then multiplying the brightness by 1.0 - distance:
"vec2 p = vUv * 2.0 - 1.0;", //move the origin to the center of the screen
"gl_FragColor.xyz *= clamp(1.0 - length(p) *vignette, 0.0, 1.0 );",
And that is everything you need. Back into our main program we can add this shader the same way we did the others.
var instagram_pass = new THREE.ShaderPass(THREE.InstagramFilter);
instagram_pass.renderToScreen = true;
composer.addPass(instagram_Pass)
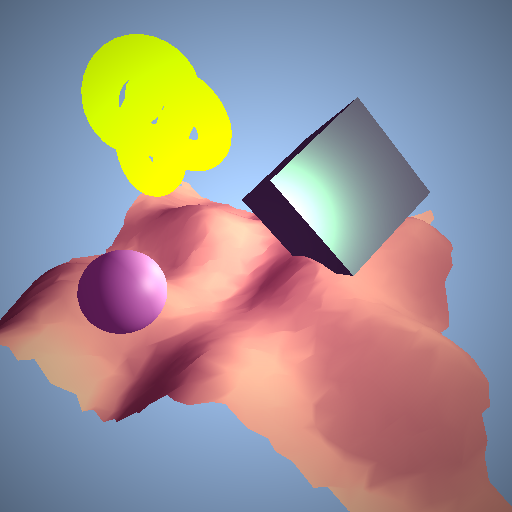
This gives us.
Try altering the strength of the vignette effect.
instagram_pass.uniforms.vignette.value = 0.7;
Changing all the uniforms can give you very different looking filters that allow for a substantial amount of variation in the final image.
instagram_pass.uniforms.exposure.value = 1.9;
instagram_pass.uniforms.color.value = new THREE.Color(0.5, 0.7, 1.2);

For ease of reference here is the full code for the Instagram filter.
THREE.InstagramFilter = {

    uniforms: {
    "tDiffuse": { value: null },
    "vignette": { value: 0.4 },
    "exposure": { value: 1.4 },
    "color": { value: new THREE.Color(0.66, 1.2, 0.66) }
    },

    vertexShader: [

        "varying vec2 vUv;",

        "void main() {",

            "vUv = uv;",
            "gl_Position = projectionMatrix * modelViewMatrix * vec4( position, 1.0 );",

        "}"

    ].join( "\n" ),

    fragmentShader: [

    "uniform sampler2D tDiffuse;",
    "uniform float vignette;",
    "uniform float exposure;",
    "uniform vec3 color;",
        "varying vec2 vUv;",

        "void main() {",

            "vec4 texel = texture2D( tDiffuse, vUv );",
      "vec2 p = vUv * 2.0 - 1.0;",
            "gl_FragColor = texel;",
            "gl_FragColor.xyz = pow(gl_FragColor.xyz*exposure, color);",
      "gl_FragColor.xyz *= clamp(1.0 - length(p) *vignette, 0.0, 1.0 );",

        "}"

    ].join( "\n" )

};
Summary
That was a lot of content to swallow at once, I know. But it should be enough to help you get your feet wet. If the prospect of writing your own shader is too daunting then just play around with some of three.js's built in post process effects, there is plenty there to keep you occupied. Hopefully you have learnt.
- The value of post processing effects
- How to use various post processing effects in three.js
- How to extend three.js with your own custom effects
Curriculum
Tutorials you should read before going through this one:
Other tutorials in the learn three.js series:
- Procedural Geometry in three.js
- Dynamic Geometry in three.js
- Manual Matrices in three.js
- Raycasting in three.js
- Faking Gravity in three.js
Posted on Utopian.io - Rewarding Open Source Contributors
Thanks for the contribution.
Need help? Write a ticket on https://support.utopian.io.
Chat with us on Discord.
[utopian-moderator]
gotta keep learning!
Hey @clayjohn! Thank you for the great work you've done!
We're already looking forward to your next contribution!
Fully Decentralized Rewards
We hope you will take the time to share your expertise and knowledge by rating contributions made by others on Utopian.io to help us reward the best contributions together.
Utopian Witness!
Vote for Utopian Witness! We are made of developers, system administrators, entrepreneurs, artists, content creators, thinkers. We embrace every nationality, mindset and belief.
Want to chat? Join us on Discord https://discord.me/utopian-io